Introduction
Welcome to the world of iPhones, where everything from precious photos to essential contacts and important data is stored in a tiny handheld device. With our increasing reliance on iPhones, it becomes crucial to have a backup plan in case of unexpected mishaps like device failure or data loss. Thankfully, Apple provides a reliable solution for backing up your iPhone – iTunes.
Creating regular backups of your iPhone is essential to ensure that your data remains safe and accessible. However, many iPhone users often wonder where these backups are stored on their PCs. In this article, we will explore the intricacies of iPhone backups and guide you on where to find them on your Windows or Mac computer.
To comprehend the storage location of iPhone backups, it is crucial to understand how these backups are created in the first place.
When you connect your iPhone to your PC and launch iTunes, the software automatically detects the device and prompts you to create a backup. This backup includes various components like app data, device settings, photos, contacts, and messages.
Now that we have a basic understanding of iPhone backups, let’s delve into the different storage locations where you can find them on your PC.
How are iPhone backups created?
Before we explore where iPhone backups are stored on your PC, it is important to understand the process behind creating these backups. When you connect your iPhone to your computer and launch iTunes, the software takes an exact snapshot of your device, capturing all your important data and settings. Here’s how the backup process works:
1. Connected Device: After connecting your iPhone to your PC using a USB cable, launch iTunes. Ensure you have the latest version of iTunes installed to avoid compatibility issues.
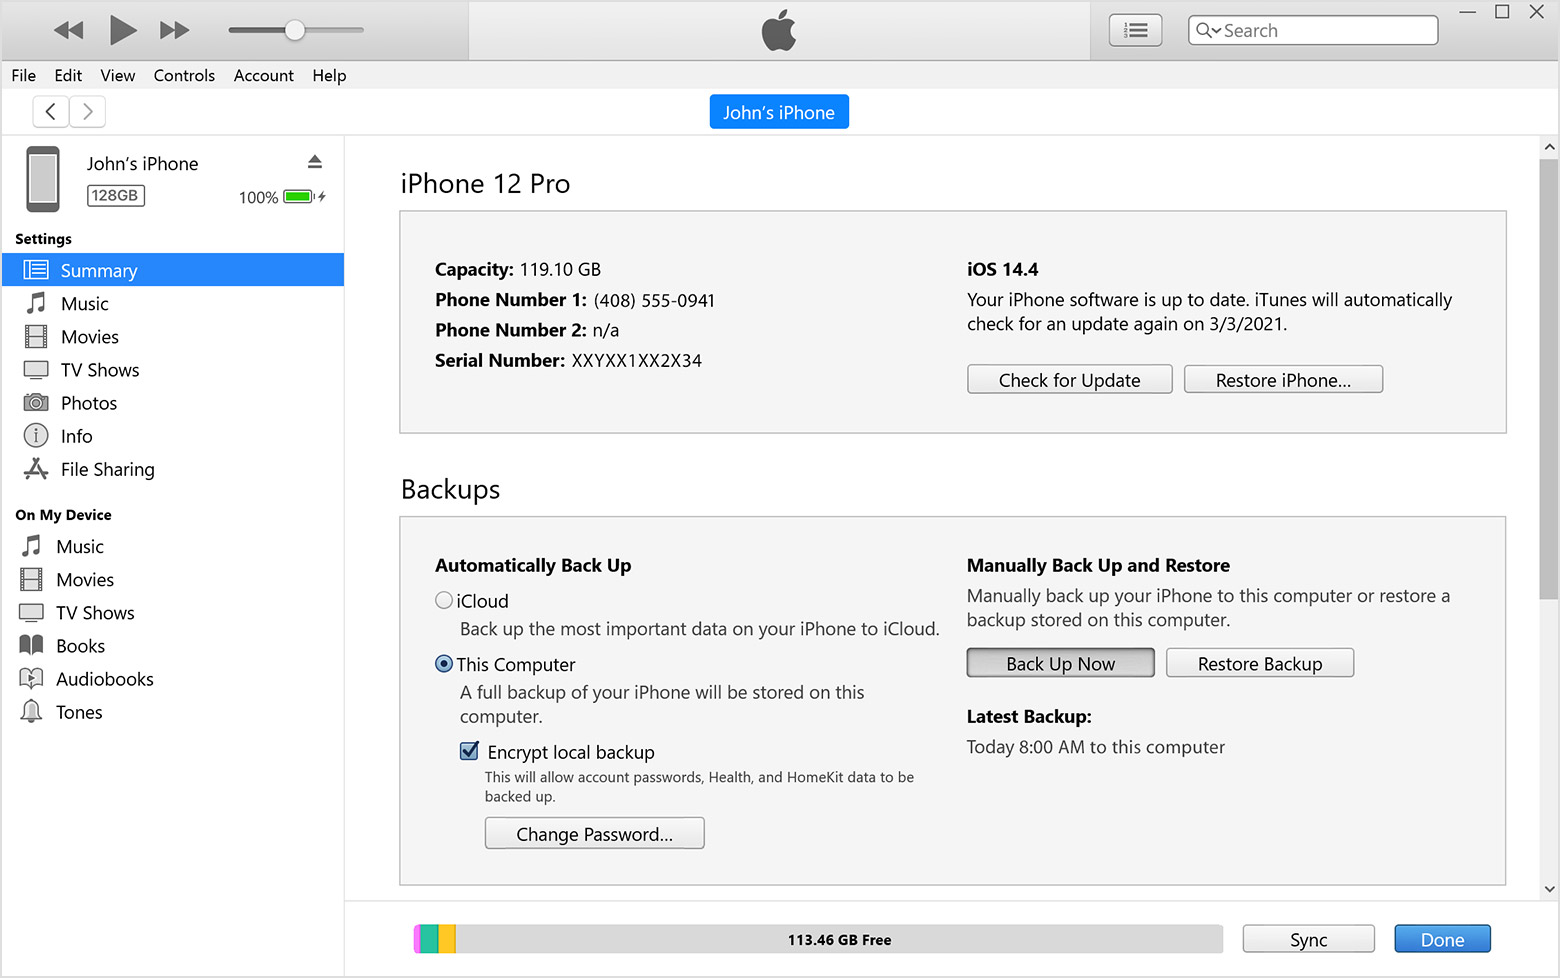
2. Device Detection: iTunes automatically detects your connected iPhone and displays it in the device list. Click on your device to access its summary page.
3. Backup Options: On the summary page, you will find a section called “Backups.” Here, you have two options for creating backups: iCloud and iTunes. For the purpose of this article, we will focus on iTunes backups.
4. Backup Settings: Under the iTunes backup options, you can choose to create backups manually or automatically whenever your iPhone is connected to your PC. You can also encrypt your backups to protect sensitive information.
5. Backup Process: When you initiate a backup, iTunes starts copying your iPhone’s data and settings to your PC. This includes app data, photos, videos, contacts, messages, and more. The backup process duration may vary based on the amount of data stored on your device.
6. Completion and Verification: Once the backup process is complete, iTunes displays a message confirming the successful creation of the backup. It is advisable to verify the backup to ensure its integrity before proceeding with any further steps.
By understanding the process of creating iPhone backups, you can now explore the different storage locations where these backups are saved on your PC. Let’s delve into the next section to uncover the default backup locations for iTunes.
Where are iPhone backups stored on a PC?
When it comes to storing iPhone backups on your PC, iTunes has default locations depending on the operating system. These default locations ensure that your backups are organized and easily accessible. Let’s take a closer look at the default backup locations for iTunes:
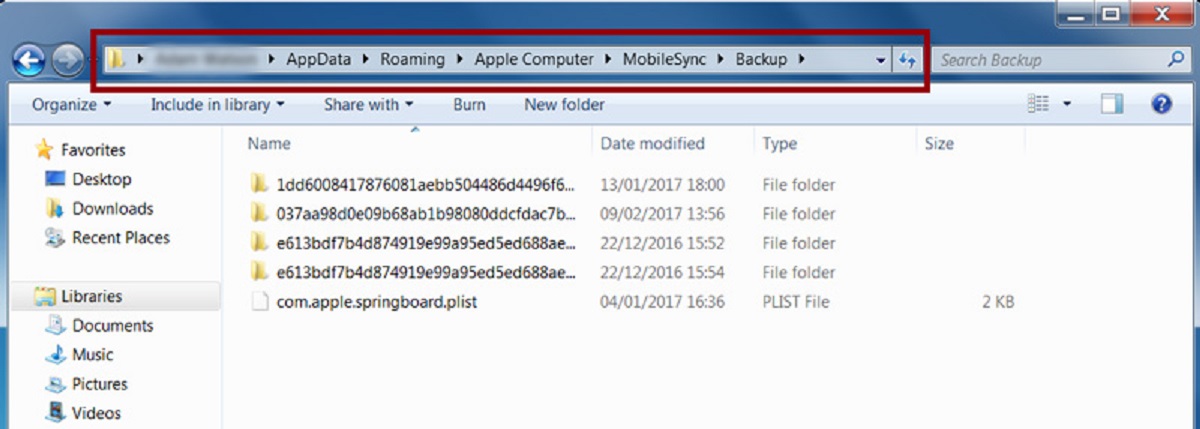
Windows: On a Windows PC, iTunes stores iPhone backups in the following location:
C:\Users\USERNAME\AppData\Roaming\Apple Computer\MobileSync\Backup
Note: Replace “USERNAME” with your Windows username.
Here, you will find a series of folders, each representing a specific backup. The folder names might not be easily identifiable, so it’s helpful to sort them by date modified to locate the most recent backup.
Mac: If you are using a Mac, iTunes stores iPhone backups in the following default location:
~/Library/Application Support/MobileSync/Backup/
On a Mac, the tilde (~) represents your Home folder. So, you can access the default backup location by selecting Go in the Finder menu, choosing Go to Folder, and then entering the above path.
Similar to Windows, the backups are stored in separate folders, each named with a unique identifier. Sorting the folders by date modified will help you find the latest backup.
It is worth mentioning that these default backup locations can sometimes change due to system updates or changes in iTunes. So, if you can’t find your backups in the default locations, don’t panic. There are alternate methods to locate your iPhone backups on both Windows and Mac systems.
Now that you know the default locations for iPhone backups let’s explore how to manually change the backup storage location in iTunes, in case you prefer to store your backups in a different folder or drive on your PC.
Default backup locations for iTunes
When you create an iPhone backup using iTunes on your PC, the software automatically saves the backup files in specific default locations. These default locations may vary depending on your operating system. Let’s take a closer look at the default backup locations for iTunes:
Windows: On a Windows PC, iTunes stores iPhone backups in the following location:
C:\Users\USERNAME\AppData\Roaming\Apple Computer\MobileSync\Backup
Note: Replace “USERNAME” with your Windows username.
Mac: If you are using a Mac, iTunes stores iPhone backups in the following default location:
~/Library/Application Support/MobileSync/Backup/
Note: The tilde (~) represents your Home folder on a Mac.
Within these default backup locations, iTunes creates separate folders for each backup. These folders are usually labeled with a unique alphanumeric identifier. Sorting the folders by date modified can help you identify the most recent backups.
It’s important to remember that these default locations are set by iTunes, and any changes made to the software or system updates may affect the storage location of your backups. If you’re unable to find your backups in the default locations, there are alternative methods to locate them on your PC.
Now that we’ve covered the default backup locations, let’s explore how you can manually change the backup storage location in iTunes to suit your preferences.
Manually changing the backup storage location in iTunes
If you prefer to store your iPhone backups in a different folder or drive on your PC, you have the option to manually change the backup storage location in iTunes. Here’s how you can do it:
Windows:
- Close iTunes, if it is running on your PC.
- Press the Windows key + R to open the Run dialog box.
- Type “%APPDATA%\Apple Computer” and click OK.
- A new window will open, and you will see the “MobileSync” folder.
- Right-click on the “MobileSync” folder and select “Cut”.
- Navigate to the location where you want to move your backups.
- Right-click in the destination folder and select “Paste” to move the “MobileSync” folder.
- Next, create a symbolic link (symlink) for the “MobileSync” folder. Open the Command Prompt as an administrator.
- Type “mklink /J” followed by the destination path of the “MobileSync” folder and the original path of the “MobileSync” folder. For example, if you moved the “MobileSync” folder to the D drive, the command would look like this:
- Press Enter to create the symlink.
mklink /J "C:\Users\USERNAME\AppData\Roaming\Apple Computer\MobileSync" "D:\MobileSync"
Mac:
- Quit iTunes, if it is open on your Mac.
- Open a Finder window and go to the location where you want to move your backups.
- Open another Finder window and navigate to “~/Library/Application Support/MobileSync/”.
- Drag the “Backup” folder from the original location to the desired location.
- Hold down the Option key and drag the “Backup” folder back to its original location in “~/Library/Application Support/MobileSync/”. This will create an alias of the folder in the new location.
By following these steps, you can manually change the backup storage location in iTunes to a folder or drive of your choice. This allows you to have more control over the organization and accessibility of your iPhone backups.
Now that you know how to change the backup storage location, let’s discover how to locate iPhone backups on both Windows and Mac systems.
Finding iPhone backups on Windows PC
After creating iPhone backups using iTunes on your Windows PC, you may need to locate these backups for various reasons, such as restoring your device or transferring the backups to a different computer. Here’s how you can find iPhone backups on a Windows PC:
- Open File Explorer on your PC, which is usually accessible by clicking on the folder icon in the taskbar or by pressing the Windows key + E.
- In the address bar at the top of the File Explorer window, enter the following path:
- Press Enter, and you will be directed to the default backup location for iTunes.
- Here, you will find a list of folders. Each folder represents a specific backup, but their names might not be easily identifiable.
- To locate the most recent backup, sort the folders by date modified in descending order. The backup with the latest modification date will be at the top of the list.
- You can now copy or move the desired backup folder to a different location if needed.
C:\Users\USERNAME\AppData\Roaming\Apple Computer\MobileSync\Backup
Note: Replace “USERNAME” with your Windows username.
Remember, if you have changed the default backup storage location in iTunes, you will need to navigate to the new location to find your iPhone backups on your Windows PC.
Now that you know where to find iPhone backups on a Windows PC, let’s explore how to locate them on a Mac.
Finding iPhone backups on Mac
If you use iTunes on your Mac to create iPhone backups, you may need to locate these backups for various reasons, such as restoring your device or transferring the backups to another computer. Here’s how you can find iPhone backups on a Mac:
- Open a Finder window on your Mac by clicking on the Finder icon in the dock or by pressing Command + N.
- In the menu bar at the top of the screen, click on “Go” and select “Go to Folder…” or use the shortcut Command + Shift + G.
- A small window will appear. In the text field, enter the following path:
- Click “Go” or press Enter, and you will be taken directly to the default backup location for iTunes.
- Here, you will find a list of folders, with each folder representing a specific backup. These folders are usually named with a unique identifier.
- To find the most recent backup, sort the folders by date modified in descending order. The backup with the latest modification date will be at the top of the list.
- If you need to, you can copy or move the desired backup folder to another location on your Mac.
~/Library/Application Support/MobileSync/Backup/
Note: The tilde (~) represents your Home folder on a Mac.
It’s important to note that if you have changed the default backup storage location in iTunes, you will need to navigate to the new location to find your iPhone backups on your Mac.
Now that you know how to find iPhone backups on a Mac, let’s explore some additional tips for managing iPhone backups on a PC.
Additional tips for managing iPhone backups on a PC
Managing your iPhone backups on your PC is essential to ensure the security and accessibility of your data. Here are some additional tips to effectively manage your iPhone backups:
- Regularly delete unnecessary backups: Over time, the backup folder can accumulate multiple backups, taking up valuable storage space on your PC. It’s a good practice to review and delete older backups that you no longer need.
- Encrypt your backups: When creating iPhone backups, consider encrypting them with a password. This adds an extra layer of security and ensures that your sensitive information remains protected.
- Keep multiple backups: It’s recommended to keep multiple backups of your iPhone on your PC. This provides an additional safeguard in case a backup becomes corrupted or is accidentally deleted.
- Backup different iOS devices separately: If you have multiple iOS devices, such as iPhones or iPads, create separate backups for each device. This helps to prevent confusion and ensures that you can easily restore the correct backup when needed.
- Consider using third-party backup software: While iTunes is the default option for creating iPhone backups on a PC, there are also third-party backup software available that offer additional features and flexibility. Explore different options and select the one that best suits your needs.
- Regularly update iTunes: Keeping your iTunes software up to date ensures that you have access to the latest features and improvements, as well as any security patches that may be necessary.
By following these tips, you can effectively manage your iPhone backups on your PC and ensure the safety and availability of your vital data.
Now that we’ve covered these additional tips, let’s wrap up this article.
Conclusion
Creating regular backups of your iPhone is crucial to safeguard your valuable data and ensure its accessibility in case of unexpected events. In this article, we explored the process of iPhone backups and learned where these backups are stored on a PC.
We discovered that iTunes, the default software for creating iPhone backups, has specific default storage locations depending on the operating system. On Windows, the backups are stored in the “C:\Users\USERNAME\AppData\Roaming\Apple Computer\MobileSync\Backup” directory, while on Mac, they are saved in the “~/Library/Application Support/MobileSync/Backup/” location.
We also discussed how to manually change the backup storage location in iTunes, allowing you to customize where your iPhone backups are stored on your PC.
Additionally, we provided step-by-step instructions on how to find iPhone backups on both Windows and Mac systems. By following these instructions, you can easily access and manage your iPhone backups.
Lastly, we shared some additional tips for effectively managing your iPhone backups, including regularly deleting unnecessary backups, encrypting your backups for added security, and keeping multiple backups of your devices.
With this knowledge and these tips, you can confidently handle your iPhone backups, ensuring the safety, accessibility, and organization of your valuable data.
Remember, regular backups are an essential part of maintaining the security and integrity of your iPhone data. Take the time to create backups regularly and keep them in a safe place to protect yourself from data loss and unexpected issues with your device. Start taking control of your iPhone backups today!