Introduction
Welcome to the guide on how to download music in Windows Media Player. Windows Media Player is a popular media player and library application that allows you to play various types of media files, including music. While there are numerous online platforms and music streaming services available, sometimes you may want to download music directly to your computer for offline listening or to create a personal music library.
In this article, we will walk you through the step-by-step process of downloading music in Windows Media Player. Whether you are a beginner or an experienced user, this guide will provide you with the necessary instructions and tips to seamlessly and efficiently download music using this versatile media player.
Windows Media Player offers an intuitive interface and a range of features to enhance your music listening experience. By following these steps, you will be able to download your favorite songs and albums to your computer, allowing you to enjoy them anytime, anywhere, without the need for an internet connection.
Before we dive into the steps, it’s important to note that the ability to download music in Windows Media Player may vary depending on the version of the application and your operating system. However, the basic process remains the same, and we will provide alternative methods or options where applicable.
So, without further ado, let’s get started with the first step: launching Windows Media Player.
Step 1: Launch Windows Media Player
The first step to downloading music in Windows Media Player is to launch the application. If you are using a Windows desktop or laptop computer, chances are that Windows Media Player is already installed on your system. Here’s how you can find and open it:
- Click on the ‘Start’ button located at the bottom left corner of your desktop.
- In the search bar, type ‘Windows Media Player’ and press Enter.
- You can also access Windows Media Player by navigating to the ‘Windows Accessories’ folder in the ‘All Apps’ section of the Start menu.
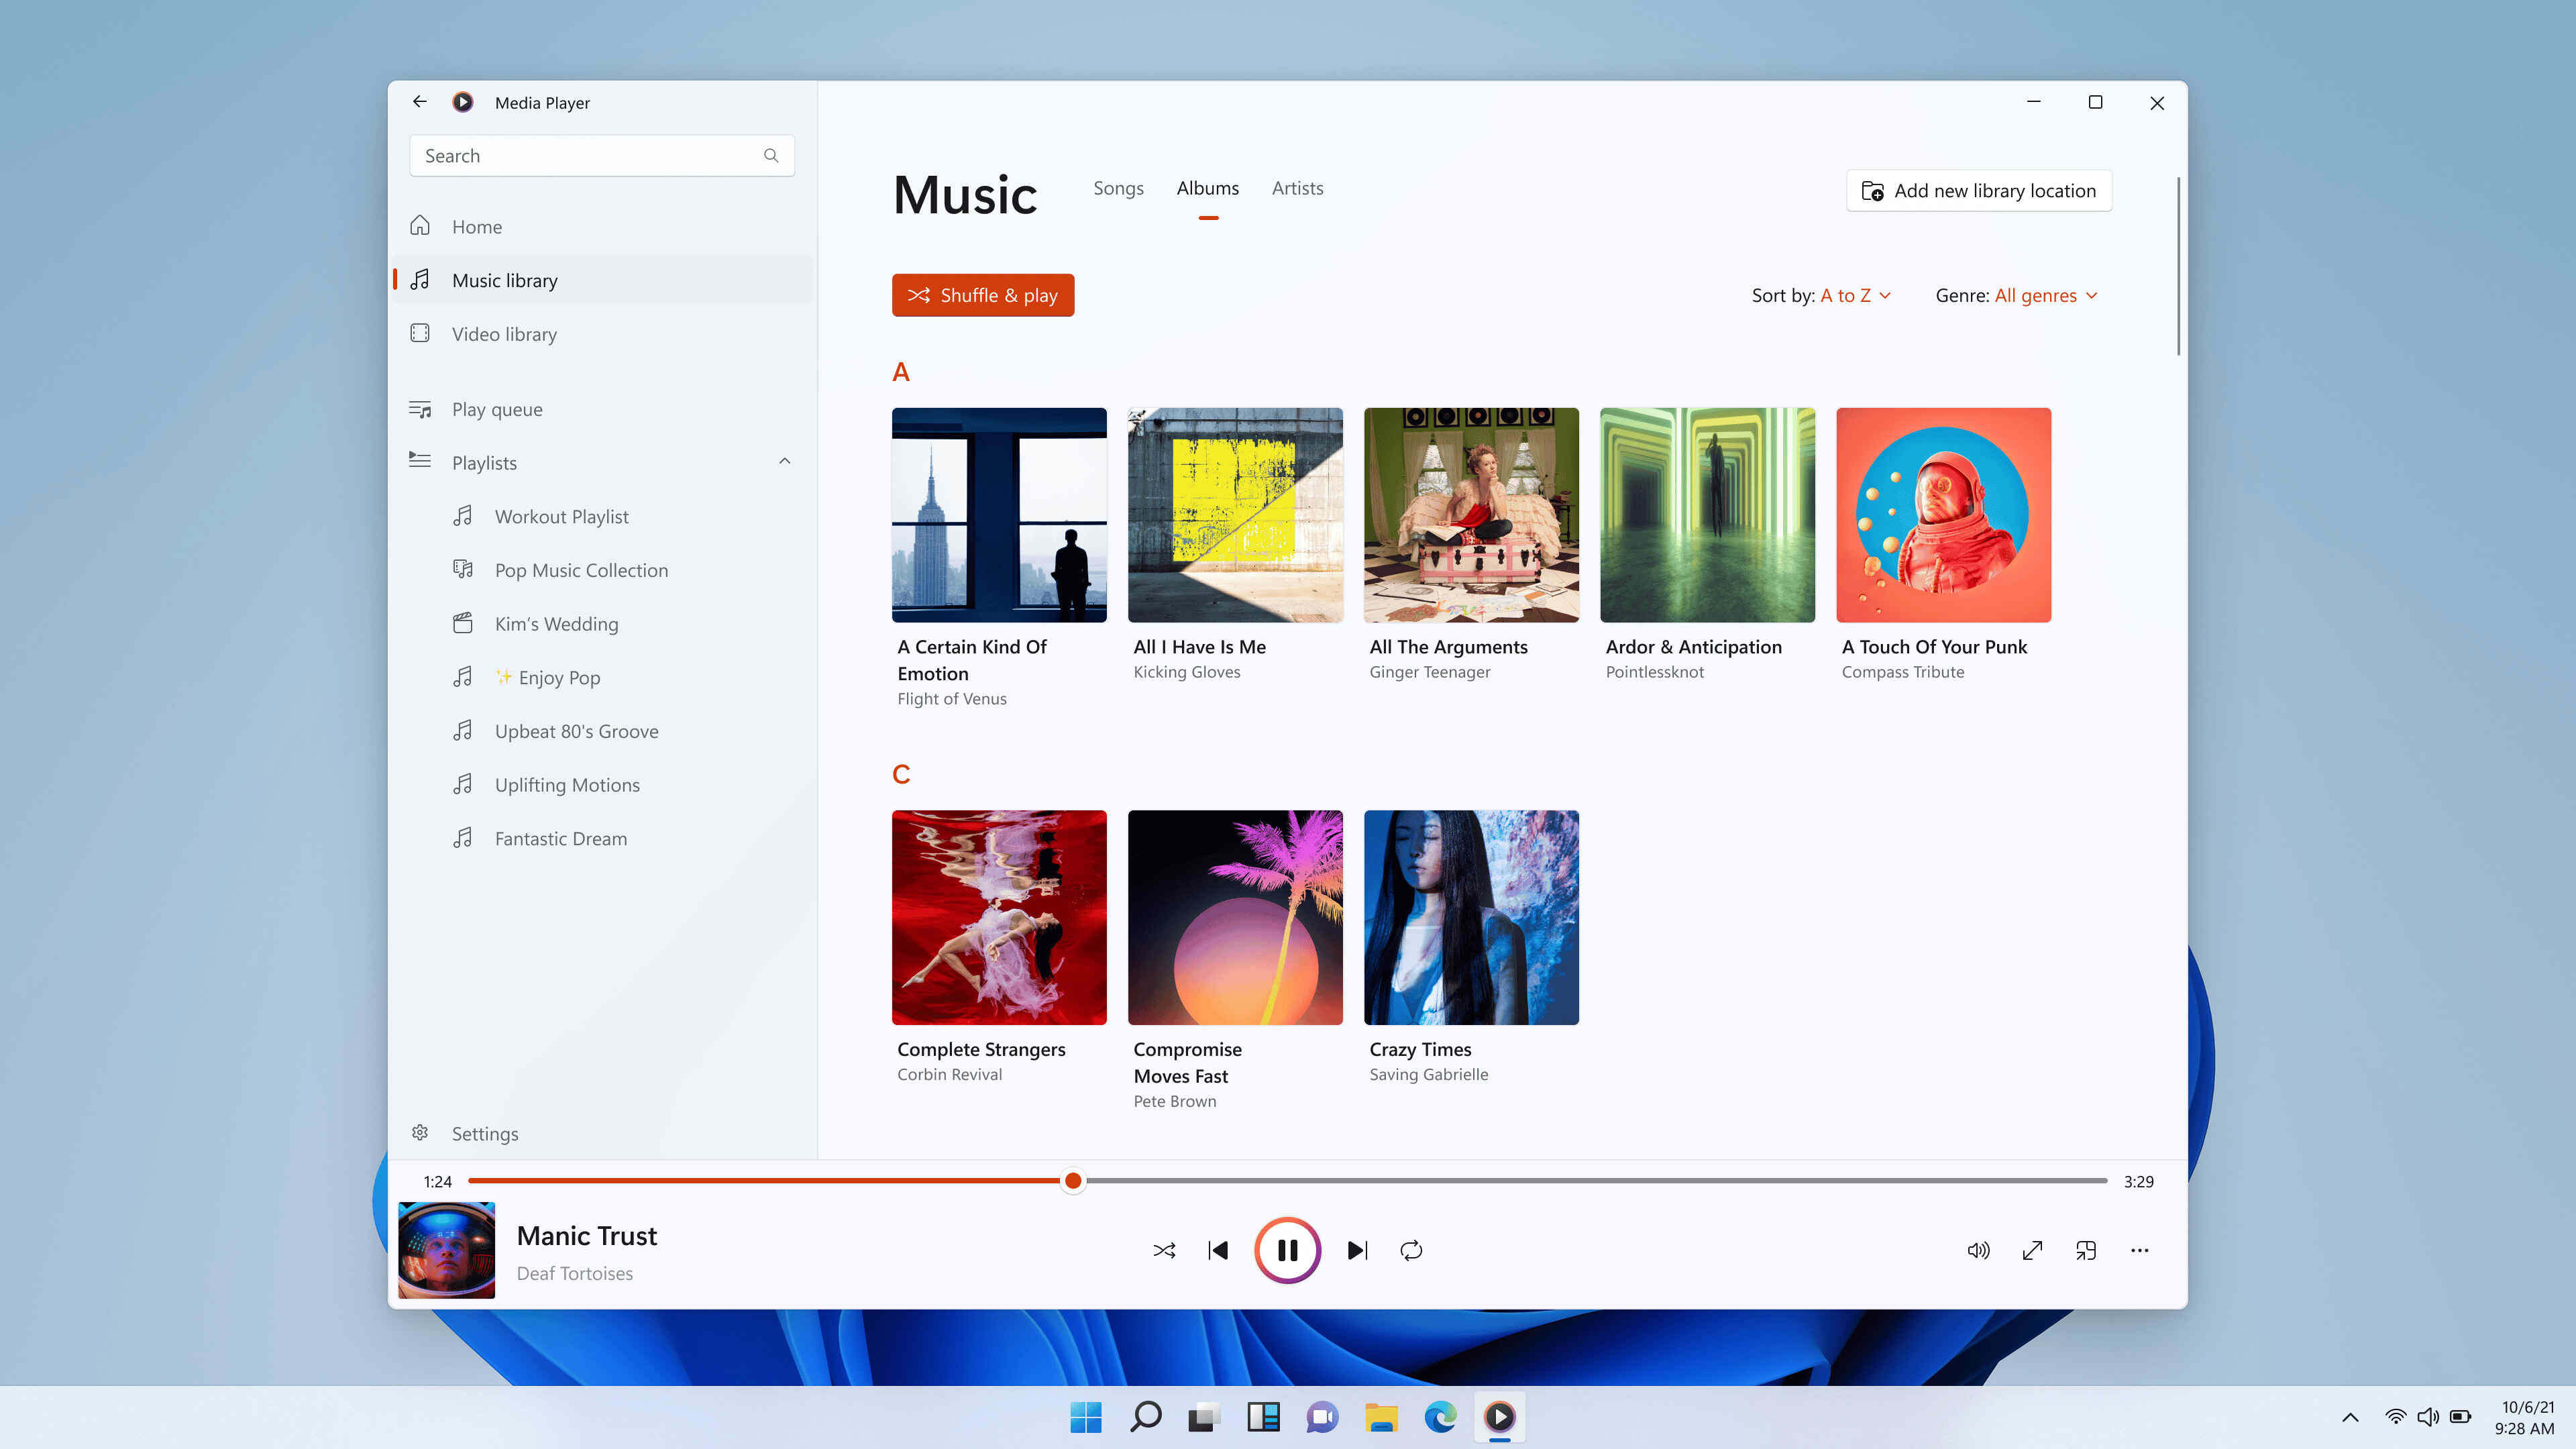
Once you have located and opened Windows Media Player, you will be greeted with the main interface, which displays your media library and available media playback options. Now that you have successfully launched Windows Media Player, you can proceed to the next step to access the online music store where you can find and download the music of your choice.
Step 2: Access the Online Music Store
Once you have launched Windows Media Player, the next step is to access the online music store. Windows Media Player provides an integrated online store where you can browse and purchase a wide range of music tracks from various artists. To access the online music store, follow these steps:
- In the top menu of Windows Media Player, click on the ‘Online Stores’ tab.
- A drop-down menu will appear with a list of available online stores. Select the store of your choice, such as the Microsoft Store or any other supported music store.
After selecting the online store, Windows Media Player will connect to the store’s servers and display the available music options. From here, you can explore different genres, search for specific artists or albums, and even listen to previews of the songs. The online music store provides a user-friendly interface, making it easy to navigate and discover new music that suits your taste.
It’s worth noting that accessing the online music store may require an active internet connection. Ensure that your computer is connected to the internet before proceeding to this step.
Now that you have successfully accessed the online music store, you can proceed to the next step to search for and select your desired music for download.
Step 3: Search for the Desired Music
After accessing the online music store within Windows Media Player, the next step is to search for the desired music that you want to download. The online store provides a search feature that allows you to easily find specific songs, artists, albums, or genres. Follow these steps to search for the music you want:
- Look for the search bar within the online music store interface. It is usually located at the top or in a prominent position.
- Click on the search bar and enter the name of the song, artist, or album you are looking for.
- Press Enter or click on the search icon to initiate the search.
The online music store will then display the search results based on your query. You can browse through the results and look for the specific track or album that you want to download. If you are unsure of the exact search term, you can try using broader keywords or filters like genre, release year, or popularity to narrow down the results.
Additionally, many online music stores offer recommendations or personalized suggestions based on your listening history or preferences. Take advantage of these features to discover new music that you may enjoy.
Once you have found the desired music, you can proceed to the next step to choose the preferred format and quality for your download.
Step 4: Choose the Preferred Format and Quality
After searching for the desired music in the online music store, the next step is to choose the preferred format and quality for your download. Windows Media Player typically offers multiple options for downloading music files, allowing you to select the format and quality that best suits your needs. Here’s how you can choose the preferred format and quality:
- Select the specific track or album that you want to download from the search results or the music store interface.
- On the music details page, you will usually find information about the available formats and quality options for the selected item.
- Choose the format that is compatible with Windows Media Player. Common formats include MP3, AAC, and WMA.
- Select the desired quality level for the download. Higher quality levels usually result in larger file sizes but offer better audio fidelity.
It’s important to ensure that the chosen format and quality are supported by Windows Media Player to ensure smooth playback. Refer to the application’s documentation or consult the online store’s guidelines if you are unsure about the compatibility of a particular format or quality level.
Keep in mind that some online music stores may offer additional features such as DRM (Digital Rights Management) protection or the option to download an entire album instead of individual tracks. Consider these factors when making your selection.
Once you have chosen the preferred format and quality for your download, you can proceed to the next step to add the selected music to your Windows Media Player library.
Step 5: Add the Selected Music to the Windows Media Player Library
After choosing the format and quality for your downloaded music, the next step is to add the selected music to your Windows Media Player library. This step ensures that the downloaded files are properly organized and easily accessible within the application. Here’s how you can add the selected music to your library:
- In the online music store interface or the music details page, look for the option to add the track or album to your library.
- Click on the “Add to Library” or similar button associated with the selected item.
- Windows Media Player will prompt you to choose the location in your library where you want to store the downloaded music. You can create playlists, albums, or organize the files based on your preferred categorization system.
- Select the desired location within your library and click on the “Add” or “Import” button to start the process.
Windows Media Player will then proceed to add the selected music to your library. Depending on the size of the download and the speed of your internet connection, this process may take a few moments. Once the files have been successfully added, they will be available for playback and further organization within Windows Media Player.
Adding the downloaded music to your library ensures that you can easily locate and play the tracks or albums in the future. It also allows you to create playlists, synchronize the music with other devices, and organize your library according to your preferences.
With the selected music successfully added to your Windows Media Player library, you can proceed to the next step to start the download process.
Step 6: Start the Download Process
Now that you have added the selected music to your Windows Media Player library, it’s time to start the download process. This step will initiate the downloading of your chosen music files from the online store to your computer. Follow these steps to begin the download:
- In your Windows Media Player library, locate the recently added music files that you want to download.
- Right-click on the selected music files to open a context menu.
- From the context menu, choose the option that initiates the download process. It may be labeled as “Start Download,” “Download,” or a similar term.
- Windows Media Player will begin fetching the selected music files from the online store and saving them to the designated location on your computer.
The duration of the download process depends on various factors, including the size of the files, the speed of your internet connection, and the load on the online store’s servers. You can monitor the progress of the downloads by keeping an eye on the progress bar or other indicators provided by Windows Media Player.
During the download process, it is important to maintain a stable internet connection to ensure uninterrupted and successful downloads. Avoid closing Windows Media Player or interrupting the download process until it has been completed for all the selected music files.
Once the download process has finished, you can move on to the next step to access the downloaded music within Windows Media Player.
Step 7: Monitor the Download Progress
As you initiate the download process of your selected music files in Windows Media Player, it is important to monitor the progress to ensure that the downloads are proceeding smoothly. By keeping an eye on the download progress, you can stay informed about the status and estimated time remaining for the completion of each file. Follow these steps to monitor the download progress:
- Once the downloads have started, navigate to the ‘Downloads’ or ‘Downloads and Updates’ section within Windows Media Player. This section typically provides information about the ongoing downloads and their respective progress.
- Within the ‘Downloads’ section, you will see a list of the music files being downloaded, along with their progress bars or percentage indicators.
- Monitor the progress bars or percentages to get an idea of how much of each file has been downloaded and how much is remaining.
- Windows Media Player may also provide an estimated time remaining for the completion of each download. This can be helpful in planning your activities while the files are being downloaded.
It is important to note that the download progress may vary depending on factors such as the file size, your internet connection speed, and any network congestion. In some cases, downloads may pause or experience temporary interruptions. Windows Media Player will usually resume the downloads automatically once the connection is restored.
If you encounter any issues or errors during the download process, consult the Windows Media Player’s documentation or seek assistance from the online music store’s support team for further troubleshooting options.
With the ability to monitor the download progress, you can stay informed and patient while Windows Media Player fetches your chosen music files. Once the downloads are completed, you can proceed to the next step to access the downloaded music within the application.
Step 8: Access the Downloaded Music in Windows Media Player
After the completion of the download process, you can now access and enjoy your downloaded music within Windows Media Player. This step allows you to locate the downloaded files in your library and start playing them. Follow these steps to access the downloaded music:
- Navigate to your Windows Media Player library, either by clicking on the ‘Library’ tab or opening the library view within the application.
- Look for the category or playlist where you have saved the downloaded music files. This may include the “Downloads” folder or a specific playlist that you created.
- Click on the category or playlist to expand it and reveal the downloaded music files.
- Browse through the list of downloaded music files and click on the desired track or album to start playing it.
Windows Media Player provides various playback options to enhance your listening experience. You can use the controls to pause, play, skip, or shuffle the songs. Additionally, you can create and manage playlists, adjust the volume, and customize the audio settings according to your preferences.
If you have downloaded multiple albums or tracks, you can organize them further by creating additional playlists, sorting them by artist or genre, or assigning them specific tags within Windows Media Player.
Remember that the downloaded music files are stored on your computer’s hard drive, allowing you to access them even when you are offline. This feature is particularly useful for those who prefer listening to music without an active internet connection or for creating personal music libraries.
Now that you have successfully accessed the downloaded music files within Windows Media Player, you can enjoy your favorite songs and albums at your convenience.
Conclusion
Congratulations! You have successfully learned how to download music in Windows Media Player. By following the step-by-step process outlined in this guide, you can now enjoy your favorite songs and albums offline, create personalized music libraries, and have complete control over your music collection.
Windows Media Player provides a user-friendly interface and a range of features that make the downloading process efficient and convenient. From accessing the online music store to choosing the preferred format and quality, and from adding the music to your library to monitoring the download progress, each step has been carefully explained to ensure a smooth experience.
By accessing the online music store within Windows Media Player, you have the opportunity to explore a vast selection of music, search for specific tracks or albums, and discover new artists and genres. The ability to download music gives you the flexibility to listen to your favorite songs whenever and wherever you want, without relying on an internet connection.
Remember to always ensure the compatibility of the chosen format and quality with Windows Media Player for optimal performance. Monitor the download progress to stay informed about the status of the downloads, and access the downloaded music in your library for easy playback and organization.
Whether you’re building a music library, creating playlists for different moods, or simply enjoying your favorite tunes, Windows Media Player provides the tools and functionality to enhance your music listening experience.
So, go ahead and start downloading your favorite music in Windows Media Player and enjoy a personalized and immersive audio journey!