Introduction
Welcome to this comprehensive guide on how to zoom in on a computer! Whether you’re dealing with small text, intricate details, or just in need of a closer look, learning how to zoom in can greatly enhance your computer experience. In this article, we’ll explore various methods and tools to help you zoom in on both Windows and Mac computers.
Zooming in on a computer allows you to magnify the content displayed on your screen, making it easier to read, view, and interact with. This can be particularly beneficial for individuals with visual impairments, those who prefer larger text and images, or anyone working on detailed tasks that require a closer examination.
Understanding the different methods and features available for zooming can help boost your productivity, ease eye strain, and improve accessibility while using your computer. From zooming in on web browsers to specific applications, and utilizing system accessibility options, we’ll cover everything you need to know to make the most out of your computer’s zoom capabilities.
In the following sections, we’ll dive into the common methods available for zooming in on Windows and Mac computers, as well as exploring built-in features in web browsers and specific applications. We’ll also discuss accessibility options and provide troubleshooting tips to address any zoom-related issues you may encounter.
So, whether you’re a seasoned computer user or just starting to navigate the digital world, let’s embark on this journey to discover how to zoom in on your computer and make your computing experience more enjoyable and convenient!
Understanding Zooming on a Computer
Before we delve into the various methods of zooming in on a computer, let’s take a moment to understand what zooming actually means in the context of computing. Zooming refers to the ability to enlarge or magnify the content displayed on your computer screen, whether it’s text, images, or other visual elements. This feature proves to be incredibly useful in multiple scenarios, from reading small text to examining intricate details of an image.
When you zoom in on a computer, the content on your screen is enlarged without affecting the resolution. This means that even when you zoom in, your display retains its clarity and sharpness, allowing you to see more details without compromising the quality of what you’re viewing. It’s important to note that zooming in doesn’t physically change the size or resolution of your screen, but rather adjusts the scale at which the content is displayed.
Zooming in on a computer can be especially beneficial for individuals with visual impairments, as it provides an inclusive way to make content more readable and accessible. By increasing the size of text, icons, and images, zooming enables those with visual challenges to comfortably interact with their computer. Additionally, for tasks that require precision and attention to detail, zooming in allows for a closer examination, ensuring accuracy and reducing errors.
Zooming can be applied to various elements on your computer, including web browsers, documents, images, and even specific applications. It’s important to understand the different methods available for zooming, as each platform and application may offer its own set of features and shortcuts to facilitate the zooming process.
In the next sections, we’ll explore the common methods and tools available for zooming in on both Windows and Mac computers. We’ll also discuss how to utilize zoom features within web browsers and specific applications, ensuring that you have all the knowledge you need to make the most out of your computer’s zooming capabilities. So let’s dive in and uncover the secrets of zooming on your computer!
Common Methods to Zoom In on a Windows Computer
Windows computers provide several convenient methods to zoom in on your screen, making it easy to adjust the display according to your needs. Here are some common methods you can use to zoom in on a Windows computer:
- Using Keyboard Shortcuts: Windows offers built-in keyboard shortcuts that allow you to quickly zoom in and out. Press the “Windows” key and the “+” key together to zoom in and make the content larger. Conversely, press the “Windows” key and the “-” key together to zoom out and make the content smaller. You can also press the “Windows” key and the “Esc” key simultaneously to exit the zoom mode.
- Using the Magnifier Tool: The Magnifier tool is a built-in accessibility feature in Windows that enables you to magnify the entire screen or a portion of it. To access the Magnifier tool, open the Start menu, search for “Magnifier,” and click on the application to launch it. Once open, you can choose between different magnification levels and control options to tailor the zoom settings to your preferences.
- Using the Settings App: Windows 10 and later versions provide a convenient way to adjust the zoom settings within the Settings app. Open the Start menu, click on the gear icon to open the Settings app, and then select “Ease of Access.” In the left sidebar, choose “Display,” and you’ll find the “Make everything bigger” section. Here, you can drag the slider to adjust the zoom level, making the content larger or smaller.
- Using Web Browsers: Most web browsers, such as Google Chrome, Mozilla Firefox, and Microsoft Edge, allow you to zoom in on webpages using keyboard shortcuts. Pressing “Ctrl” and the “+” key simultaneously will zoom in, while pressing “Ctrl” and the “-” key will zoom out. Alternatively, you can click on the “Menu” button in the top-right corner of the browser window, go to the “Zoom” or “Page Zoom” option, and select the desired zoom level.
These are just a few of the common methods you can use to zoom in on a Windows computer. Depending on your specific needs and preferences, you can choose the method that works best for you. With these zooming options at your disposal, you can easily customize your screen and make the content more readable and accessible. Now, let’s explore the methods for zooming in on a Mac computer in the next section.
Common Methods to Zoom In on a Mac Computer
Mac computers offer a variety of methods to zoom in on your screen, allowing you to enlarge the content and improve readability. Here are some common methods you can use to zoom in on a Mac computer:
- Using Keyboard Shortcuts: Macs provide built-in keyboard shortcuts that make it easy to zoom in and out. Press the “Option” key and the “=” key together to zoom in and make the text and images larger. To zoom out and make the content smaller, press the “Option” key and the “-” key simultaneously. Additionally, you can press “Option” + “Command” + “8” to toggle the zoom on or off.
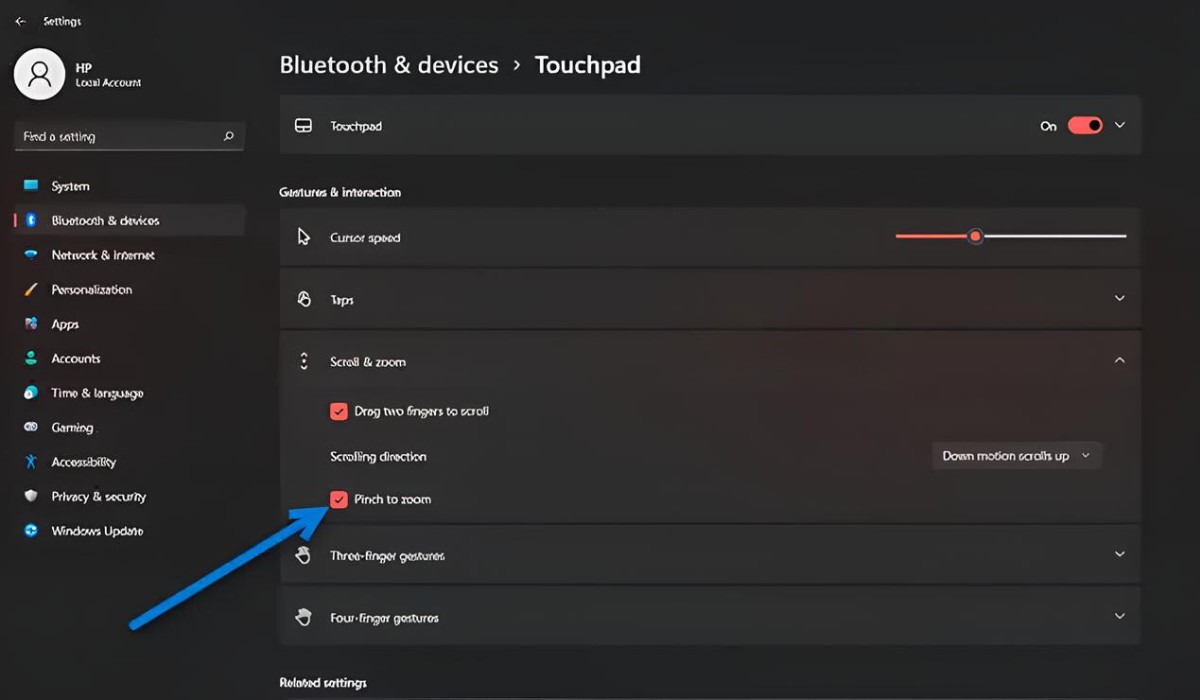
- Using Trackpad Gestures: If you have a Mac laptop or a Magic Trackpad, you can use trackpad gestures to zoom in on specific areas of the screen. Using the “pinch-to-zoom” gesture by placing two fingers on the trackpad and spreading them apart allows you to zoom in on the content under your fingers. To zoom out, pinch your fingers together.
- Using Accessibility Features: Mac computers include various built-in accessibility features to assist users with zooming needs. One such feature is the Zoom feature, which provides additional zooming options and customization. To access it, go to the Apple menu, click on “System Preferences,” select “Accessibility,” and then choose “Zoom” from the sidebar. Here, you can enable Zoom and configure the settings according to your preferences.
- Using Web Browsers: Most web browsers on Mac, such as Safari, Google Chrome, and Mozilla Firefox, offer simple ways to zoom in on webpages. Pressing “Command” and the “+” key together will zoom in, while pressing “Command” and the “-” key will zoom out. Alternatively, you can go to the “View” menu, select the “Zoom In” or “Zoom Out” option, or use the zoom icons available in the browser’s toolbar.
These are just a few of the common methods you can use to zoom in on a Mac computer. Depending on your Mac model and personal preference, you can choose the method that works best for you. With these zooming options, you can easily adjust the display and make the content more visible and accessible. Now, let’s move on to the next section and learn how to utilize zoom features in web browsers on both Windows and Mac computers.
Using Zoom Features in Web Browsers
Web browsers offer useful built-in zoom features that allow you to adjust the zoom level of webpages, making the content larger or smaller to suit your needs. Whether you’re using a Windows computer or a Mac, here’s how you can utilize zoom features in popular web browsers:
- Google Chrome: To zoom in or out on webpages in Google Chrome, you can use keyboard shortcuts. Pressing “Ctrl” and the “+” key simultaneously will zoom in, while pressing “Ctrl” and the “-” key will zoom out. Alternatively, you can click on the three-dot menu icon in the top-right corner of the browser window, go to the “Zoom” option, and select the desired zoom level. You can also reset the zoom level by clicking on the magnifying glass icon in the address bar and selecting “Reset” from the dropdown menu.
- Mozilla Firefox: In Mozilla Firefox, zooming in or out on webpages can be done via keyboard shortcuts. Pressing “Ctrl” and the “+” key together will zoom in, and pressing “Ctrl” and the “-” key will zoom out. Similar to Chrome, you can also use the three-line menu icon in the top-right corner of the browser window to access the zoom controls. Click on “Zoom” and choose the desired zoom level. To reset the zoom, simply click on the magnifying glass icon in the address bar and select “Reset” from the dropdown menu.
- Microsoft Edge: Microsoft Edge has similar zoom functionalities to other web browsers. You can use the “Ctrl” and “+” keys to zoom in, and the “Ctrl” and “-” keys to zoom out. The three-dot menu icon in the top-right corner of the window also provides access to the zoom controls. Click on “Zoom” and adjust the zoom level as desired. To reset the zoom, click on the magnifying glass icon in the address bar and select “Reset” from the dropdown menu.
These are the general methods to zoom in and out on webpages in commonly used web browsers. It’s worth noting that different browsers may have slight variations in their user interfaces, but the underlying zoom functionalities remain similar.
Utilizing the zoom features in web browsers can greatly enhance your browsing experience. Whether you need to enlarge text, images, or other webpage elements, adjusting the zoom level allows for better readability and usability. Experiment with different zoom levels to find the one that works best for your preferences and needs.
Now that we’ve explored zooming in web browsers, let’s move on to the next section and discuss methods for zooming in on specific applications.
Zooming In on Specific Applications
While zooming in on web browsers can enhance your overall browsing experience, there are also specific applications where zooming can be useful for getting a closer look at the content. Let’s explore how you can zoom in on specific applications:
- Microsoft Office Applications: Microsoft Office applications such as Word, Excel, and PowerPoint provide built-in zoom features. In these applications, you can find the zoom controls in the lower-right corner of the window. Click on the zoom percentage to open a dropdown menu, where you can select a specific zoom level or use the “+” and “-” icons to adjust it incrementally. Zooming in on these applications allows you to view and edit documents, spreadsheets, and presentations with greater clarity and ease.
- Adobe Photoshop: In Adobe Photoshop, you can zoom in on your images using various methods. You can use keyboard shortcuts like pressing “Ctrl” and the “+” key together to zoom in, and “Ctrl” and the “-” key together to zoom out. You can also use the zoom tool located in the toolbar on the left-hand side of the application window. Simply click on the zoom tool icon and then click on your image to zoom in. Similarly, you can use the zoom dropdown menu in the options bar to select a specific zoom level.
- Video Conferencing Applications: Zooming in during video conferencing sessions can be helpful if you want to focus on specific participants or to enlarge shared content. Most video conferencing applications like Zoom, Microsoft Teams, and Google Meet offer zoom options during a call. Look for the zoom controls usually located in the toolbar or settings menu. You can adjust the view to focus on the active speaker or enlarge the shared screen for better visibility.
These are just a few examples of specific applications where zooming can be beneficial. Remember that different applications may have their own unique zoom features and methods. Exploring the menus, toolbars, or settings of the specific application you’re using can provide further insights into the available zoom options.
By zooming in on specific applications, you can closely examine the details and make precise edits, adjustments, or observations as needed. Now, let’s move on to the next section and discuss accessibility options for zooming on a computer.
Accessibility Options for Zooming on a Computer
Computers offer a range of accessibility options to assist individuals with specific needs, including those who require additional zooming capabilities. These accessibility options provide enhanced zoom features and customization to ensure a more inclusive and comfortable user experience. Let’s explore the accessibility options for zooming on a computer:
- Windows Accessibility Options: Windows computers provide a dedicated Accessibility section where you can find various settings to customize zoom features. To access these options, go to the Start menu, click on the gear icon to open the Settings app, and select “Ease of Access.” From there, you can navigate through the different accessibility features, including options for the Magnifier tool, high contrast settings, and more. These options allow you to enable and configure zooming settings according to your preferences and specific accessibility needs.
- Mac Accessibility Options: Mac computers offer comprehensive accessibility options that include zoom features. To access these options, go to the Apple menu, click on “System Preferences,” select “Accessibility,” and choose “Zoom” from the sidebar. Here, you can enable Zoom and customize its behavior. You can adjust the zoom style, choose between zooming the entire screen or just a portion, set the maximum zoom level, and configure additional keyboard shortcuts for zoom controls. These options enable you to fine-tune the zoom settings and access them easily whenever necessary.
- Third-party Accessibility Tools: In addition to the built-in accessibility features, there are also third-party software and tools available that provide advanced zooming options. These tools often offer greater flexibility in zooming, allowing for more precise adjustments and customization. Some popular third-party accessibility tools include ZoomText, SuperNova, and Magic Zoom Plus. These tools can provide additional zooming functionalities and features tailored to specific accessibility needs.
By utilizing the accessibility options for zooming on a computer, you can ensure that your zoom settings are personalized to accommodate your individual needs. Whether it’s adjusting the zoom style, maximum zoom level, or enabling specific keyboard shortcuts, these options provide a more inclusive computing experience.
It’s worth noting that the exact accessibility options and settings may vary depending on the operating system version and the specific software installed on your computer. Exploring the accessibility settings and documentation for your particular system can provide more detailed information and guidance on how to optimize zooming for accessibility.
Now that we’ve covered the accessibility options for zooming, let’s move on to the next section and tackle some common troubleshooting tips to resolve zoom-related issues.
Troubleshooting Zoom Issues
While zooming on a computer can be a useful feature, there may be instances where you encounter issues or glitches. Fortunately, there are several troubleshooting steps you can take to resolve common zoom-related problems. Let’s explore some of the common troubleshooting tips:
- Restart or Refresh: If you’re experiencing issues with the zoom feature, a simple restart or refresh of your computer or application can often resolve the problem. Close the application or browser window, reopen it, and try zooming in again. This can help clear any temporary glitches or conflicts that may be causing the issue.
- Check Zoom Settings: Ensure that the zoom settings in your computer or application are properly configured. Verify that the zoom feature is enabled and set to the desired level. Additionally, check for any specific zoom settings within the application or browser you’re using to ensure they are correctly set.
- Update Software: Make sure that your operating system, web browser, and specific applications are up to date with the latest software updates. Outdated software can sometimes lead to compatibility issues or bugs that affect the functioning of the zoom feature. Check for updates and install them if available.
- Disable Zoom Extensions: If you’re using browser extensions or add-ons related to zooming, try disabling them temporarily. Sometimes, these extensions can conflict with the built-in zoom features of the browser, causing issues. Disabling them can help determine if they are the cause of the problem.
- Check Hardware Limitations: Some older computer models or hardware configurations may have limitations on the level of zooming they can support. If you’re experiencing issues on such systems, it’s possible that the hardware is not capable of handling higher zoom levels. In such cases, try reducing the zoom level to see if it improves the functionality.
- Reset Accessibility Options: If you’ve made customizations to the accessibility options for zooming, but it’s causing issues, you can try resetting them to default settings. This can be done by navigating to the accessibility settings on your computer and selecting the option to reset or revert to default settings.
If none of the troubleshooting steps mentioned above resolve your zoom-related issues, it may be helpful to consult official support documentation or reach out to technical support for further assistance. They can provide specific guidance based on your computer model, operating system, and the software you’re using.
Remember, troubleshooting steps can vary depending on the specific issue and the software you’re using. It’s always a good idea to refer to official documentation or seek professional support for more complex problems.
Now that we’ve covered troubleshooting tips for zoom issues, let’s conclude this guide with a brief summary of what we’ve covered so far.
Conclusion
In this comprehensive guide, we have explored various methods and tools to help you zoom in on your computer. Whether you’re using a Windows or Mac computer, we discussed the common methods available for zooming in, including keyboard shortcuts, built-in tools like the Magnifier tool, and adjusting settings within applications and web browsers.
We also explored how to utilize zoom features in specific applications like Microsoft Office and Adobe Photoshop, as well as the accessibility options available for zooming on both Windows and Mac computers. By leveraging these accessibility options, you can ensure a more inclusive and personalized zooming experience.
Additionally, we provided troubleshooting tips to address common zoom-related issues, such as refreshing the computer or application, checking the settings, updating software, and temporarily disabling conflicting extensions or add-ons. If you encounter persistent issues, it’s always advisable to consult official documentation or seek technical support for further assistance.
Remember, zooming in on your computer can greatly enhance your browsing, reading, and editing experience. Whether you need to enlarge text, images, or specific application content, knowing how to zoom in can improve readability, increase accessibility, and help prevent eye strain.
Now armed with the knowledge of various zooming methods and tools, you can tailor your computer’s display according to your needs and preferences. Take advantage of the features and options provided by your operating system, applications, and web browsers to create a more comfortable and efficient computing environment.
With these zooming techniques at your disposal, you can now navigate the digital world with ease, whether you’re reading an article, examining intricate details, or collaborating on important tasks. So go ahead, zoom in, and enjoy an enhanced computing experience!