Introduction
Resetting your Roku TV may sometimes be necessary to resolve certain issues or refresh your device to its default settings. Whether you’re facing a performance problem, experiencing connectivity issues, or simply want to start afresh, resetting your Roku TV can help you overcome these challenges.
Roku TVs have become increasingly popular due to their user-friendly interface, extensive streaming options, and affordable prices. However, like any electronic device, they may encounter occasional glitches or need troubleshooting. By understanding how to reset your Roku TV, you can quickly resolve common issues and enjoy uninterrupted entertainment.
In this article, we will guide you through the different methods of resetting your Roku TV. We will cover various options, such as a soft reset, factory reset, and hard reset. Each method has its purpose and level of intensity, so it’s important to choose the one that best suits your needs.
Before we delve into the details, it’s essential to note that resetting your Roku TV will erase all the personalized settings, including your installed apps, login information, and preferences. Therefore, it is advisable to make note of any important settings or channels before proceeding with the reset.
Now, let’s explore the different options available for resetting your Roku TV, so you can get your device back on track and enjoy seamless streaming once again.
Why would you want to reset your Roku TV?
There are several reasons why you might need to reset your Roku TV. Let’s explore some of the common scenarios where a reset can be beneficial:
1. Performance Issues: Over time, your Roku TV may start experiencing sluggishness, freezing, or buffering problems. Resetting your device can help clear out temporary files and refresh the system, potentially resolving these performance issues.
2. Network Connectivity Problems: If you’re facing difficulties connecting your Roku TV to your Wi-Fi network or experiencing frequent network dropouts, a reset can help re-establish a stable connection.
3. Software Glitches: Sometimes, your Roku TV may encounter software glitches, resulting in apps crashing, error messages, or random reboots. Resetting the device can help resolve these glitches by restoring the software to its original state.
4. Forgotten Settings: If you’ve made changes to your Roku TV’s settings and can’t remember the exact configurations, performing a reset will revert all the settings back to the default values.
5. Selling or Giving Away: Before selling or giving your Roku TV to someone else, it’s essential to remove all your personal information and settings. A factory reset ensures that your data is wiped clean and the recipient can set up the device as per their preferences.
6. Starting Fresh: If you simply want to start afresh or customize your Roku TV from scratch, a reset is an excellent option. This allows you to clear all the installed channels, remove unnecessary clutter, and set up your device according to your current preferences.
Remember, performing a reset should be considered as a last resort when troubleshooting other solutions has failed. It’s important to understand that it will erase all your personalized settings, so be sure to back up any important information or settings before proceeding with the reset.
Now that you have a better understanding of the reasons why you might want to reset your Roku TV, let’s move on to the different methods available for performing a reset.
How to reset your Roku TV
Resetting your Roku TV is a relatively straightforward process. Below, we’ll outline three different methods: a soft reset, a factory reset, and a hard reset. Each method offers varying levels of reset intensity, depending on your specific needs.
Option 1: Soft Reset
A soft reset is the simplest and least invasive way to reset your Roku TV. This method is often effective in resolving minor issues without erasing your installed apps or personalized settings. Here’s how to perform a soft reset:
- Press the Home button on your Roku TV remote to navigate to the home screen.
- Scroll up or down to highlight the Settings option and press the OK button.
- In the settings menu, select System and then choose Power.
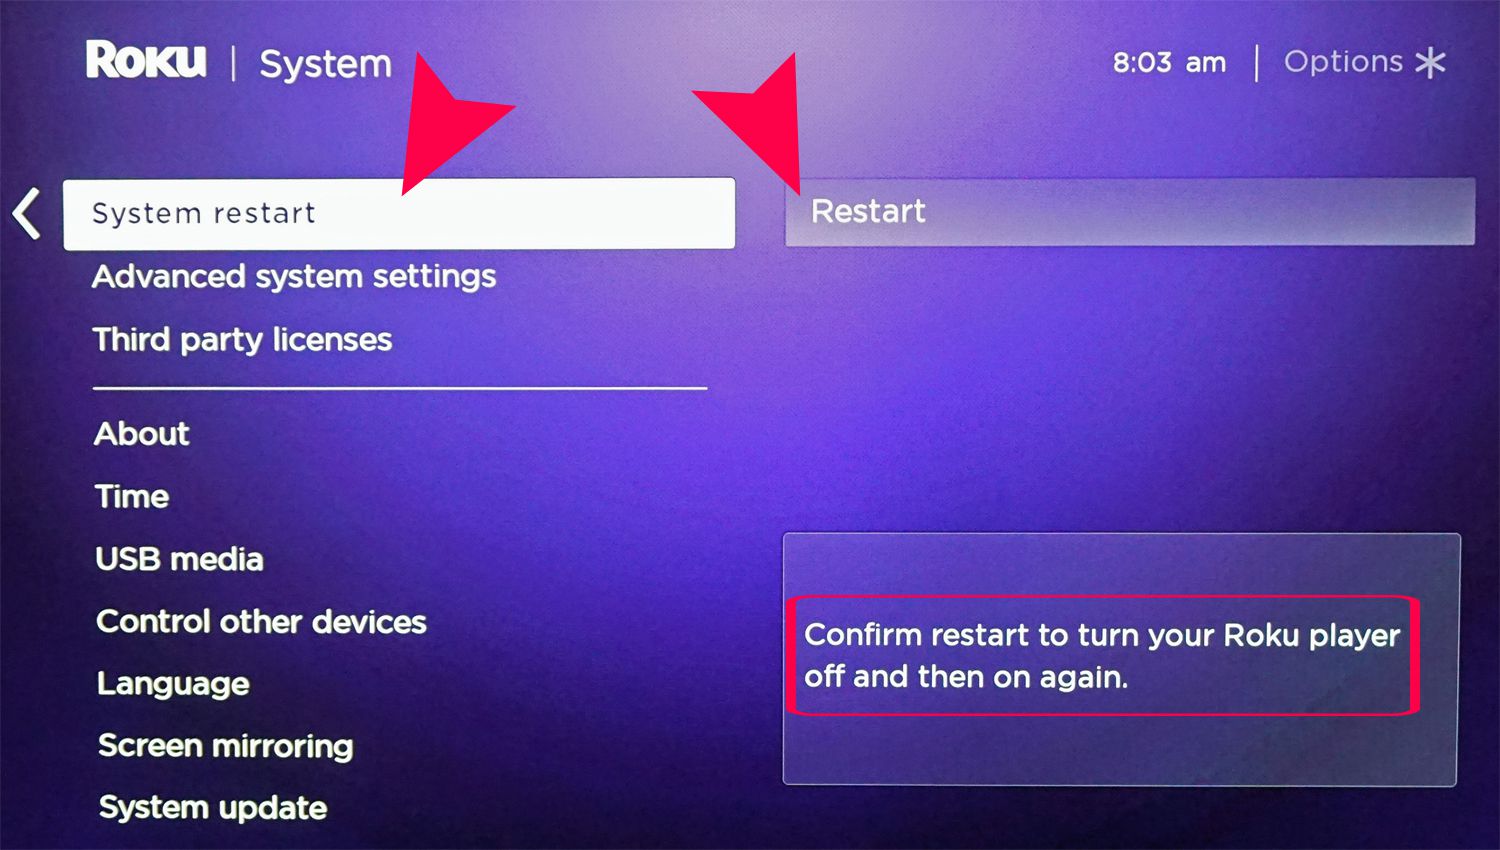
- Select System restart and press the OK button to confirm.
After performing a soft reset, your Roku TV will reboot, resolving most minor issues while retaining your apps and personal preferences.
Option 2: Factory Reset
A factory reset is more comprehensive than a soft reset and will erase all your installed channels, settings, and user data. This method is recommended when you’re encountering persistent issues and need to start fresh. Here’s how to perform a factory reset:
- Access the settings menu by pressing the Home button on your remote and navigating to Settings.
- Select System and then choose Advanced system settings.
- Scroll down and select Factory reset.
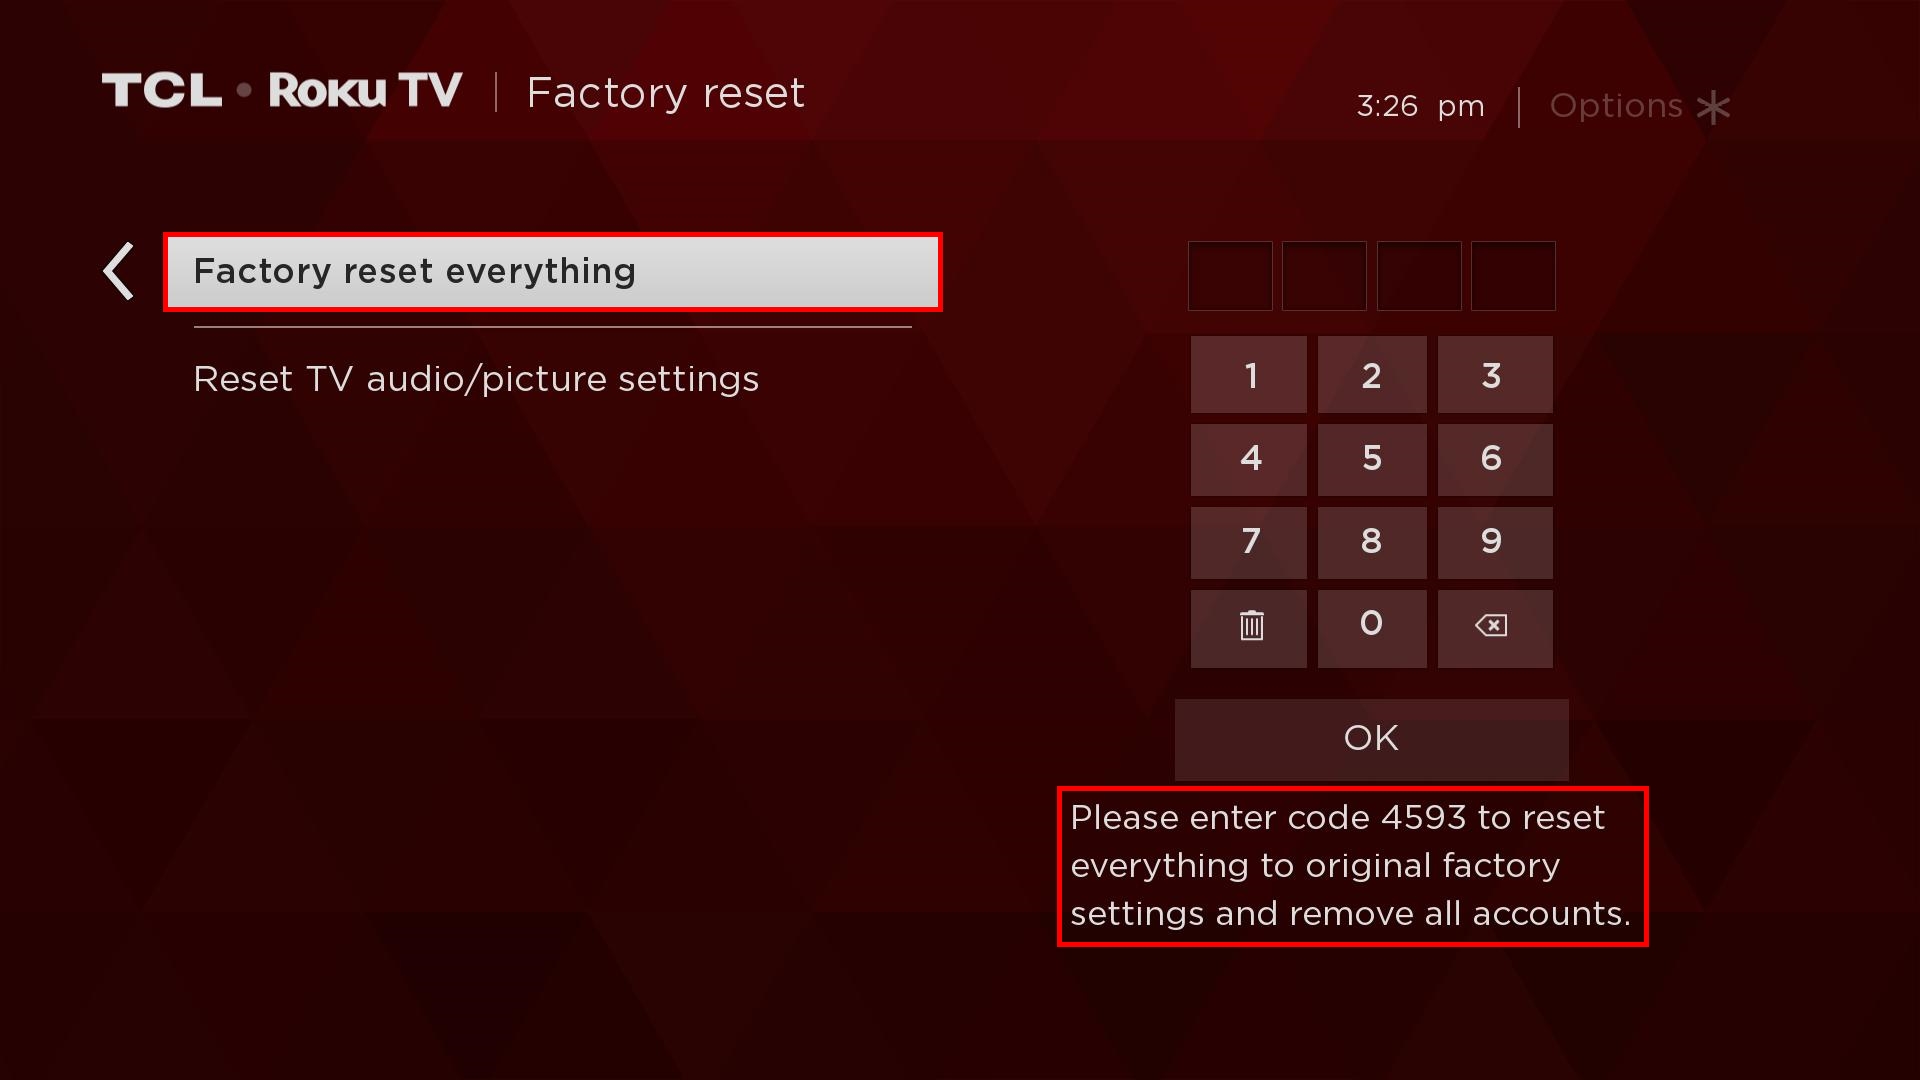
- Follow the on-screen instructions to proceed with the factory reset. This may involve entering a unique code provided by Roku for confirmation.
Once the factory reset is complete, your Roku TV will be restored to its original settings, as if it were fresh out of the box. You will need to go through the initial setup process again, including signing in to your Roku account and reinstalling your preferred channels.
Option 3: Hard Reset
A hard reset is the most drastic method and should only be used as a last resort. It involves physically disconnecting the power supply to your Roku TV and can help resolve stubborn issues. Here’s how to perform a hard reset:
- Unplug the power cord from the back of your Roku TV.
- Wait for 10-15 seconds to ensure the TV’s internal memory is fully cleared.
- Plug the power cord back into the Roku TV.
- Turn on your Roku TV by pressing the power button or using the remote control.
This hard reset method can help resolve more persistent issues that a soft or factory reset may not fix. However, keep in mind that it will also remove all your settings and installed apps.
Now that you’re familiar with the three different methods of resetting your Roku TV, you can choose the one that best fits your needs. Remember to consider the level of reset intensity required and make sure to back up any necessary data before performing a reset.
Option 1: Soft Reset
A soft reset is a quick and effective method to resolve minor issues with your Roku TV without losing your installed apps or personalized settings. This method can help improve the overall performance and stability of your device. Here’s how to perform a soft reset:
- Press the Home button on your Roku TV remote to navigate to the home screen.
- Scroll up or down to highlight the Settings option and press the OK button.
- In the settings menu, select System and then choose Power.
- Select System restart and press the OK button to confirm.
Once the soft reset is initiated, your Roku TV will shut down and reboot. This process clears the temporary files and refreshes the system, which can often resolve minor issues like freezing, slow performance, or connection problems.
It’s important to note that a soft reset does not remove any of your installed apps, logins, or settings. After the restart, your Roku TV will retain all your personalized preferences, making it a convenient option for troubleshooting without the need to start from scratch.
However, if you’re still facing persistent issues after performing a soft reset, you may need to consider a factory reset or a hard reset, which provide more extensive solutions but will erase your installed apps and settings. Make sure to back up any essential data or settings before proceeding with those methods.
Performing a soft reset regularly, especially if you notice any performance issues or network connectivity problems, can help keep your Roku TV running smoothly. It’s a quick and hassle-free way to refresh your device without losing any important data or needing to reinstall your apps.
Now that you’re familiar with the soft reset option, let’s explore the next method: the factory reset.
Option 2: Factory Reset
If you’re experiencing persistent issues with your Roku TV or want to start afresh, performing a factory reset is the way to go. A factory reset will erase all your installed channels, settings, and user data, returning your Roku TV to its original state. Here’s how to perform a factory reset:
- Access the settings menu by pressing the Home button on your remote and navigating to Settings.
- Select System and then choose Advanced system settings.
- Scroll down and select Factory reset.
- Follow the on-screen instructions to proceed with the factory reset. You may be required to enter a unique code provided by Roku for confirmation.
Once the factory reset process is initiated, your Roku TV will begin erasing all the installed channels, settings, and user data. This includes any personalized preferences, login information, and app configurations.
After the reset is complete, your Roku TV will reboot and present you with the initial setup screen. You will need to go through the process of connecting to your Wi-Fi network, signing in to your Roku account, and reinstalling your preferred channels.
Performing a factory reset is recommended when you’re facing persistent issues or want to start fresh with your Roku TV. It can help resolve software glitches, improve performance, and provide a clean slate for customization.
However, it’s important to note that a factory reset is irreversible. Once you proceed with the reset, all your data will be permanently erased, and you won’t be able to recover it. Therefore, it’s crucial to back up any important data or settings before performing a factory reset.
By using the factory reset option selectively and when absolutely necessary, you can ensure that your Roku TV remains in optimal working condition and enjoy a seamless streaming experience.
Now that you’re familiar with the factory reset option, let’s move on to the next method: the hard reset.
Step 1: Accessing the Settings menu
In order to perform a factory reset on your Roku TV, you’ll need to access the Settings menu. This is where you can find the option to initiate the reset process. Follow these steps to access the Settings menu:
- Grab your Roku TV remote and ensure it’s within reach.
- Press the Home button on your remote to navigate to the home screen.
- Using the directional buttons, scroll up or down to highlight the Settings option.
- Once the settings option is highlighted, press the OK button to enter the Settings menu.
By pressing the Home button on your remote, you’ll be taken to the main screen of your Roku TV. From there, you can navigate to the Settings option. The Settings menu is where you can access various options to customize and configure your Roku TV’s settings.
Ensure that you take note of the highlighted option to avoid confusion. The directional buttons on your remote will help you navigate through the menus. Once you’ve highlighted the Settings option, press the OK button to enter the Settings menu.
It’s important to note that the exact appearance and layout of the Settings menu might vary slightly, depending on the model and firmware version of your Roku TV. However, the general steps and options should remain consistent across most devices.
Accessing the Settings menu is the first step towards performing a factory reset on your Roku TV. Once you’ve successfully entered the Settings menu, you can proceed to the next step and select the system option, which will guide you through the rest of the reset process.
Now that you know how to access the Settings menu, let’s move on to the next step: selecting the System option.
Step 2: Selecting the System option
After accessing the Settings menu on your Roku TV, the next step in performing a factory reset is to select the System option. This is where you can find advanced system settings, including the option to initiate the reset process. Follow these steps to select the System option:
- With the Settings menu open on your screen, use the directional buttons on your remote to scroll up or down.
- Continue scrolling until you highlight the System option.
- Once the System option is highlighted, press the OK button to enter the System settings.
By navigating through the Settings menu using the directional buttons, you’ll be able to find the System option. The System settings contain various options for configuring and customizing your Roku TV’s system-level settings.
Scrolling up or down with the directional buttons will allow you to navigate through the available options. It’s important to pay attention to the highlighted option as you scroll to ensure you’re selecting the correct one.
Once you’ve highlighted the System option, press the OK button to enter the System settings. This will open up a new menu with additional options related to the overall system functionality of your Roku TV.
It’s worth noting that the appearance and arrangement of options within the System settings may vary slightly depending on your specific Roku TV model and firmware version. However, the general steps and behaviors for navigating and selecting options should remain consistent.
Now that you’ve successfully selected the System option, you’re one step closer to performing a factory reset. In the next step, we’ll guide you through choosing the Advanced system settings, which will bring you even closer to initiating the reset process.
Step 3: Choosing the Advanced system settings
Once you have accessed the System settings menu on your Roku TV, the next step in performing a factory reset is to choose the Advanced system settings option. Here’s how you can proceed:
- Using the directional buttons on your remote, scroll through the options in the System settings menu.
- Keep scrolling until you find and highlight the Advanced system settings option.
- Press the OK button on your remote to enter the Advanced system settings menu.
By navigating through the System settings menu using the directional buttons on your remote, you’ll be able to find the Advanced system settings option. This option provides access to more advanced configuration and customization options for your Roku TV.
Scroll up or down using the directional buttons to navigate through the available options. Make sure to pay attention to the highlighted option as you scroll to ensure you select the correct one.
Once you have highlighted the Advanced system settings option, press the OK button on your remote to enter the Advanced system settings menu. This will bring you to a new menu where you can find additional options related to the advanced system-level configurations of your Roku TV.
It’s important to note that the appearance and organization of options within the Advanced system settings menu may vary slightly depending on your specific Roku TV model and firmware version. However, the general steps for navigating and selecting options should remain consistent.
Now that you have successfully chosen the Advanced system settings option, you are one step closer to performing a factory reset. In the next step, we will guide you through the process of initiating the factory reset on your Roku TV.
Step 4: Performing a Factory Reset
After accessing the Advanced system settings menu on your Roku TV, you are now ready to perform a factory reset. Follow these steps to initiate the factory reset:
- Using the directional buttons on your remote, scroll through the options in the Advanced system settings menu.
- Continue scrolling until you find and highlight the Factory reset option.
- Once the Factory reset option is highlighted, press the OK button on your remote to select it.
- Follow the on-screen instructions and confirm your decision to proceed with the factory reset.
By scrolling through the options in the Advanced system settings menu using the directional buttons, you’ll be able to find the Factory reset option. This is the option that will initiate the factory reset process on your Roku TV.
While scrolling, ensure that you pay attention to the highlighted option as you navigate through the menu to select the correct one.
Once you have highlighted the Factory reset option, press the OK button on your remote to select it. This will bring up a confirmation screen or dialog box, asking you to confirm your decision to proceed with the factory reset.
Take a moment to review the confirmation message and ensure that you understand the consequences of initiating a factory reset. It’s important to note that a factory reset will erase all your installed channels, settings, and user data.
If you are certain that you want to proceed with the factory reset, confirm your decision by following the on-screen instructions. This may involve entering a unique code or password provided by Roku to prevent accidental resets.
Once you have confirmed the factory reset, your Roku TV will begin the process of erasing all your installed channels, settings, and user data. This may take a few moments, so be patient and avoid interrupting the process.
After the factory reset is complete, your Roku TV will automatically reboot and present you with the initial setup screen. From there, you can follow the on-screen instructions to customize your settings, sign in to your Roku account, and reinstall your preferred channels.
Performing a factory reset is a drastic step that should be taken with caution, as it permanently erases your data. Make sure to back up any essential data or settings before proceeding with a factory reset.
Congratulations! You have successfully performed a factory reset on your Roku TV. This process can help resolve persistent issues and provide a fresh start for your device.
Option 3: Hard Reset
If you’re facing stubborn issues that are not resolved by a soft or factory reset, a hard reset may be necessary. A hard reset involves physically disconnecting the power supply to your Roku TV and can help resolve some persistent issues. Here’s how to perform a hard reset:
- Locate the power cord connected to your Roku TV.
- Reach behind your Roku TV and unplug the power cord from the electrical outlet or power strip.
- Wait for approximately 10-15 seconds to ensure that the TV’s internal memory is fully cleared.
- Plug the power cord back into the electrical outlet or power strip.
- Turn on your Roku TV by pressing the power button on the TV or using the remote control.
A hard reset is a more drastic measure and should only be used as a last resort when other troubleshooting methods have failed. It can help in resolving issues such as freezing, crashing, or unresponsiveness of your Roku TV.
Disconnecting the power cord allows the internal components of your Roku TV to fully reset and clear any temporary or lingering issues. Waiting for a brief period before reconnecting the power cord ensures that all residual electrical charges are dissipated.
After plugging in the power cord and turning on your Roku TV, the device should boot up as usual. You can then check if the issues you were experiencing have been resolved. It may take a few moments for your Roku TV to fully restart and reconnect to your network.
Keep in mind that a hard reset will not erase your installed channels or settings. However, it’s worth noting that certain preferences or configurations may be reset to their default values.
Performing a hard reset is a simple yet effective way to troubleshoot persistent issues with your Roku TV. However, it’s important to exhaust other troubleshooting methods before resorting to a hard reset, as it does not always guarantee a fix.
Now that you’re familiar with the hard reset option, you can confidently approach troubleshooting more stubborn issues with your Roku TV.
Step 1: Unplugging the power cord
Performing a hard reset on your Roku TV involves physically disconnecting the power cord. This step is crucial as it allows the internal components of your TV to reset and clear any lingering issues. Follow these steps to unplug the power cord:
- Locate the power cord connected to your Roku TV.
- Reach behind your Roku TV and carefully unplug the power cord from the electrical outlet or power strip.
Locate the power cord connected to your Roku TV. Typically, it is a thick cable with an adapter at one end and a plug at the other end. The plug is inserted into an electrical outlet or a power strip. Take note of the power cord’s location to ensure you can easily reconnect it later.
To unplug the power cord, reach behind your Roku TV and carefully disconnect it from the electrical outlet or power strip. Gently grasp the plug and firmly pull it out, ensuring that you do not damage the cord or the outlet.
By unplugging the power cord, you are effectively cutting off the power supply to your Roku TV. This step allows the TV’s internal memory and electronic components to fully reset, which can help resolve stubborn issues or glitches.
It is important to wait for a few moments after unplugging the power cord before proceeding to the next step. This waiting time ensures that any residual electric charges in the TV’s circuits are discharged, enhancing the effectiveness of the hard reset.
Now that you have successfully unplugged the power cord from your Roku TV, you can move on to the next step of the hard reset process, which is waiting for approximately 10-15 seconds before reconnecting the power cord.
Step 2: Waiting for 10-15 seconds
After unplugging the power cord from your Roku TV, the next step in performing a hard reset is to wait for approximately 10-15 seconds. This waiting period allows the TV’s internal memory to fully clear and ensures a more effective reset. Follow these steps:
- After unplugging the power cord, set a timer or simply count in your head.
- Wait patiently for approximately 10-15 seconds before proceeding.
Once you have unplugged the power cord, it’s important to give your Roku TV an adequate amount of time to reset itself. Waiting for 10-15 seconds allows the internal memory and electronic components of your TV to completely discharge any residual electric charges.
During this waiting period, it’s helpful to set a timer or count in your head to ensure that you wait the appropriate amount of time. This waiting period is crucial as it ensures a more effective reset when you reconnect the power cord.
Waiting for 10-15 seconds gives the internal circuitry of your Roku TV enough time to fully reset, resolving any lingering issues or glitches that may have been present. It’s essential not to rush this step to ensure the effectiveness of the hard reset process.
Take this opportunity to ensure that the power cord is safely disconnected and there are no obstructions or damage present. You can also check for any loose connections before proceeding to the next step.
After the 10-15 second waiting period, you are ready to move on to the next step of the hard reset process, which is plugging the power cord back in and reconnecting your Roku TV to the power source.
Step 3: Plugging the power cord back in
After waiting for approximately 10-15 seconds, the next step in performing a hard reset on your Roku TV is to plug the power cord back in. This step will reconnect the power supply and allow your TV to restart. Follow these steps to plug the power cord back in:
- Take the power cord that you previously unplugged from your Roku TV.
- Insert the plug end of the power cord into an electrical outlet or a power strip.
- Ensure that the power cord is securely connected to the power source.
Retrieve the power cord that you previously disconnected from your Roku TV. The power cord typically has an adapter at one end and a plug at the other end. Take the plug end and insert it into an electrical outlet or a power strip, depending on your setup.
Make sure that the power cord is securely connected to the power source. Gently push the plug into the outlet or power strip until it fits snugly. Double-check to ensure that there is no loose connection or wobbling.
By plugging the power cord back in, you are restoring the power supply to your Roku TV. This step enables the TV to receive the necessary electrical power to start up and resume its normal functions.
It’s important to note that after plugging in the power cord, you should avoid immediately turning on your Roku TV. Proceed to the next step and wait for a brief moment to allow the TV to initialize and stabilize.
Congratulations! You have successfully completed step three of the hard reset process, which is plugging the power cord back in. All that’s left now is to proceed to the final step of turning on your Roku TV.
Step 4: Turning on your Roku TV
After plugging the power cord back into your Roku TV, the final step in performing a hard reset is to turn on your TV. Follow these steps to power on your Roku TV:
- Locate the power button on your Roku TV or on the remote control.
- Press the power button to turn on your Roku TV.
Take a moment to locate the power button on your Roku TV. The location of the power button may vary depending on the model of your TV. It is typically located either on the front or one of the sides of the TV panel.
If you prefer, you can also use the power button on your Roku TV remote control. Look for the power symbol, usually represented as a circle with a vertical line on the top-right corner of the button. Press this button to turn on your Roku TV.
After pressing the power button, wait for a few moments as your Roku TV starts up. You may see the Roku logo or a similar startup screen displayed on your TV. It may take a short while for your TV to complete the startup process.
Once your Roku TV has finished starting up, you should be greeted with the home screen or the screen you normally see when using your Roku TV. From here, you can navigate through the on-screen menus, access your favorite apps, and enjoy your Roku TV as usual.
If you notice that the issues you were experiencing before the hard reset persist even after turning on your Roku TV, you may need to pursue additional troubleshooting steps or consider contacting Roku customer support for assistance.
Congratulations! You have successfully completed the hard reset process and turned on your Roku TV. By performing a hard reset, you have cleared any latent issues and restored your TV to its default state.
Conclusion
Resetting your Roku TV can be a highly effective solution for resolving various issues, improving performance, and starting fresh. Whether you opt for a soft reset, factory reset, or hard reset, each method offers its own advantages and levels of reset intensity.
A soft reset is a quick and non-invasive way to address minor issues without erasing your installed apps or personalized settings. It can help improve performance and stability, making it an ideal first step when troubleshooting common problems.
A factory reset, on the other hand, provides a more comprehensive solution by erasing all installed channels, settings, and user data. This is recommended when you face persistent issues or want to start afresh. However, remember to back up any important data before proceeding.
In more stubborn cases, a hard reset may be necessary. This involves physically disconnecting the power cord of your Roku TV to fully reset the system. While it does not erase your settings or channels, it should be used as a last resort when other troubleshooting methods fail.
By following the step-by-step instructions provided in this article, you can confidently perform the reset method that best suits your needs. Whether you’re experiencing performance issues, network connectivity problems, or simply want a clean slate, a reset can help rejuvenate your Roku TV.
Remember, before proceeding with any reset method, it’s crucial to back up any important data or settings to avoid permanent loss. Additionally, try other troubleshooting methods and reach out to Roku customer support if needed.
We hope this guide has been helpful in guiding you through the process of resetting your Roku TV. By understanding the different options available and following the provided steps, you can easily troubleshoot and overcome various challenges, ensuring an enjoyable streaming experience.