Introduction
Welcome to our guide on how to turn on roaming on your Android device. If you’re a frequent traveler or planning to travel abroad, it’s essential to understand and enable roaming on your phone. Roaming allows you to connect to a different mobile network while you’re outside your home network coverage area. This feature comes in handy when you need to stay connected, make calls, send messages, or use data services while you’re away from home.
Roaming enables mobile phone users to access voice, messaging, and data services even when they are in a different geographical location, ensuring that they remain connected while on the go. It’s important to note that roaming services may vary depending on your service provider and the country you are visiting. Some service providers may offer international roaming as part of your plan, while others may require you to activate it separately or pay additional charges.
Whether you’re traveling for business or pleasure, having your Android device with full roaming capabilities can greatly enhance your experience and make it easier to stay connected with your loved ones or business colleagues. In this guide, we will walk you through different methods to turn on roaming on your Android device, ensuring that you’re ready to use your phone no matter where you are in the world.
What is Roaming?
Roaming is a mobile network service that allows your phone to connect to a different network when you’re outside the coverage area of your home network. When you travel to a different country or an area where your home network does not have coverage, your phone can search for available networks and connect to them. This enables you to make calls, send text messages, and access the internet using mobile data, just as you would on your home network.
When you activate roaming on your Android device, it essentially bridges the gap between your home network and the visiting network. This enables you to access voice, messaging, and data services on the visiting network, allowing for uninterrupted communication while you’re away.
Roaming is made possible through agreements between different mobile network operators that enable them to share their networks. These agreements allow you to use your phone in locations where your home network does not have coverage. However, it’s important to note that roaming services may come with additional charges, depending on your service provider and the country you are visiting.
While roaming, you can use your phone just like you would at home, but there are a few things to keep in mind. The cost of using services while roaming can be higher than when using your home network, so it’s important to be aware of the potential charges. It’s recommended to check with your service provider regarding their roaming plans and fees before you travel, so you can make an informed decision and avoid any unexpected charges.
Additionally, it’s worth noting that while roaming, you may experience differences in network quality and coverage compared to your home network. This is because the visiting network may have different infrastructure and technology in place. While most modern networks can provide reliable service, there might be instances where network performance is not as optimal as it would be on your home network.
Why Do You Need Roaming?
Roaming is essential for anyone who travels frequently or plans to travel abroad. It provides several benefits that ensure you stay connected and can use your phone’s features while you’re away from your home network. Here are some reasons why you need roaming:
- Stay Connected: Roaming allows you to stay connected with family, friends, and colleagues even when you’re traveling internationally. You can make and receive calls, send text messages, and use data services, ensuring that you can stay in touch no matter where you are.
- Access to Data Services: With roaming enabled, you can access the internet and use data services on your Android device while you’re abroad. This means you can check emails, browse the web, use social media, and even stream content, ensuring that you can stay connected and productive during your travels.
- Emergency Situations: Having roaming enabled can be crucial in case of emergencies. Being able to make emergency calls or contact local authorities can provide peace of mind when you’re in an unfamiliar place.
- Convenience: Roaming eliminates the need to purchase a local SIM card or rely on public Wi-Fi networks while you’re abroad. You can use your own phone number and continue using your device as you would at home, making it convenient and familiar.
- Business Communication: For business travelers, roaming is essential for staying connected with clients, colleagues, and accessing important work-related information while on the go. It allows you to make important business calls, respond to emails, and access company resources, ensuring that you can maintain productivity and efficiency during your travels.
While roaming offers numerous benefits, it’s important to be mindful of the potential costs associated with it. Roaming charges can vary depending on your service provider and the country you’re visiting. It is recommended to review your service provider’s roaming plans and fees before you travel to avoid any surprises on your bill.
In the next section, we will explore different methods to turn on roaming on your Android device, enabling you to enjoy all the benefits it has to offer.
How to Turn on Roaming on Android
If you’re using an Android device and want to enable roaming, you have several methods to choose from. We’ll walk you through each method below:
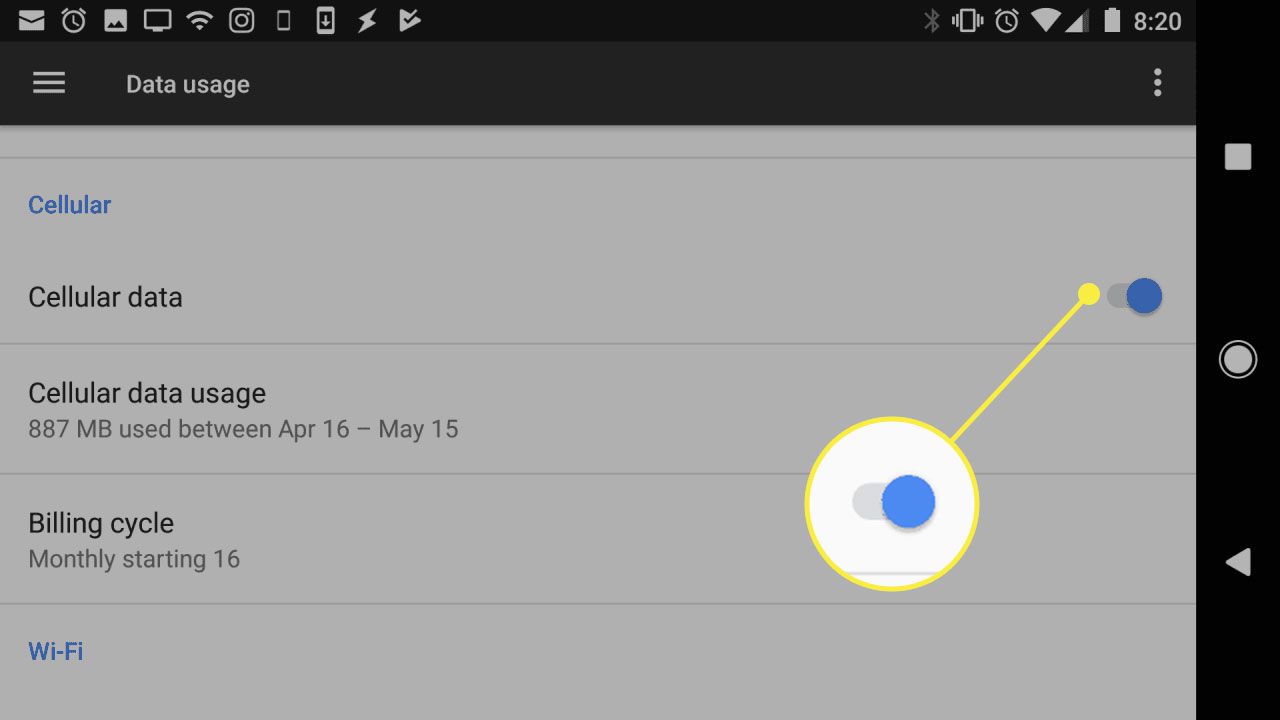
- Method 1: Using the Settings Menu
- Open the “Settings” app on your Android device.
- Scroll down and tap on “Network & internet.”
- Tap on “Mobile network.”
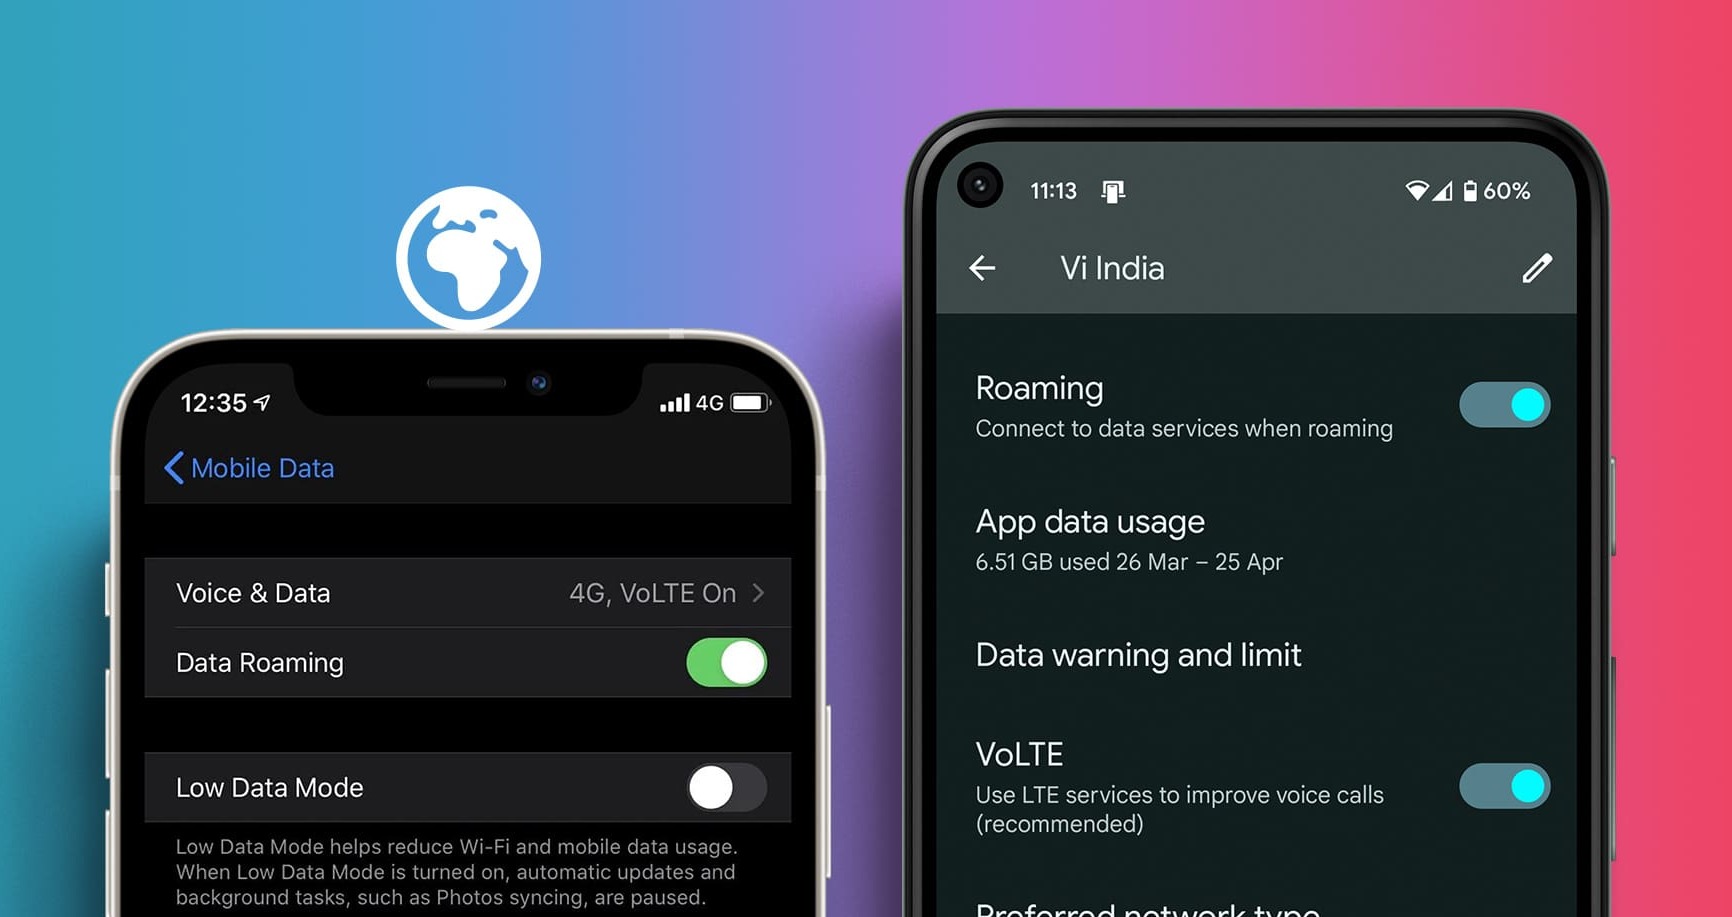
- Toggle the “Data roaming” switch to the “On” position.
- Method 2: Using the Quick Settings Panel
- Swipe down from the top of your screen to open the quick settings panel.
- Expand the panel if needed to view all quick settings.
- Look for the “Mobile data” or “Data roaming” icon (the exact name may vary depending on your device).
- Tap on the icon to enable data roaming.
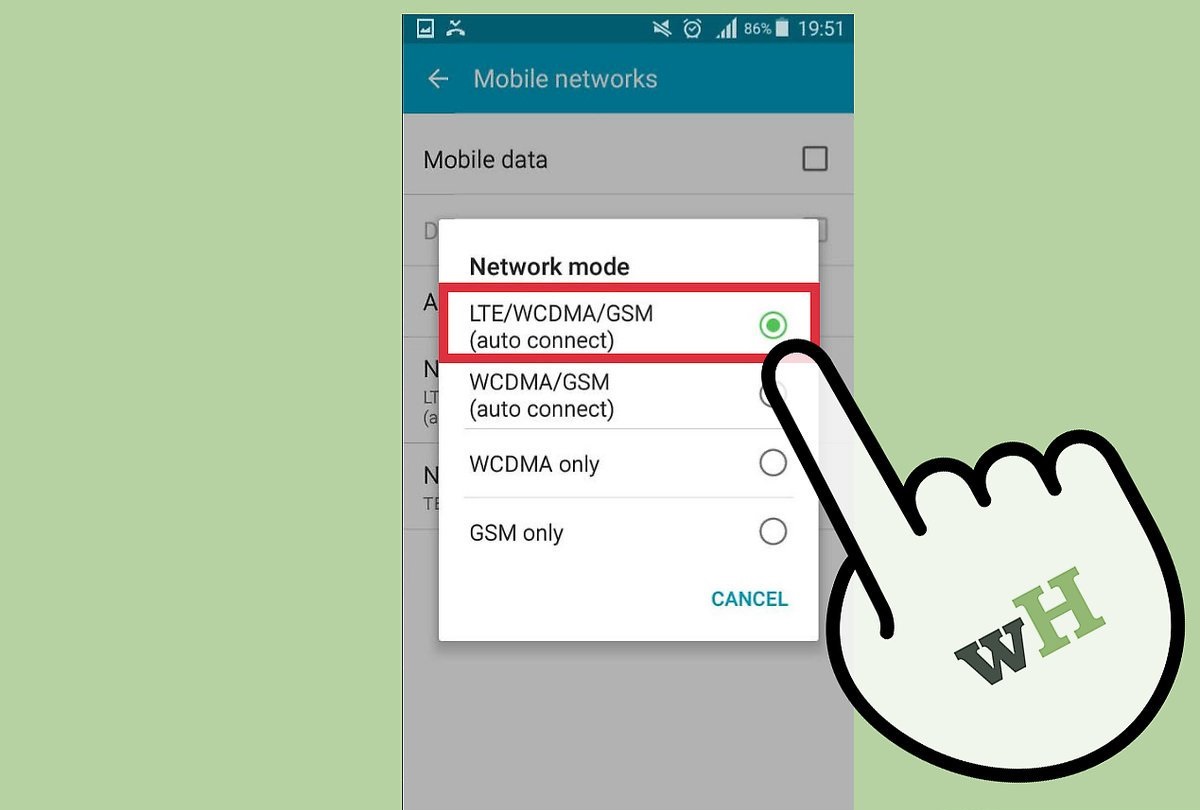
- Method 3: Changing Network Settings
- Open the “Settings” app on your Android device.
- Scroll down and tap on “Network & internet.”
- Tap on “Mobile network.”
- Tap on “Advanced” or “More” (the exact option may vary).
- Toggle the “Data roaming” switch to the “On” position.
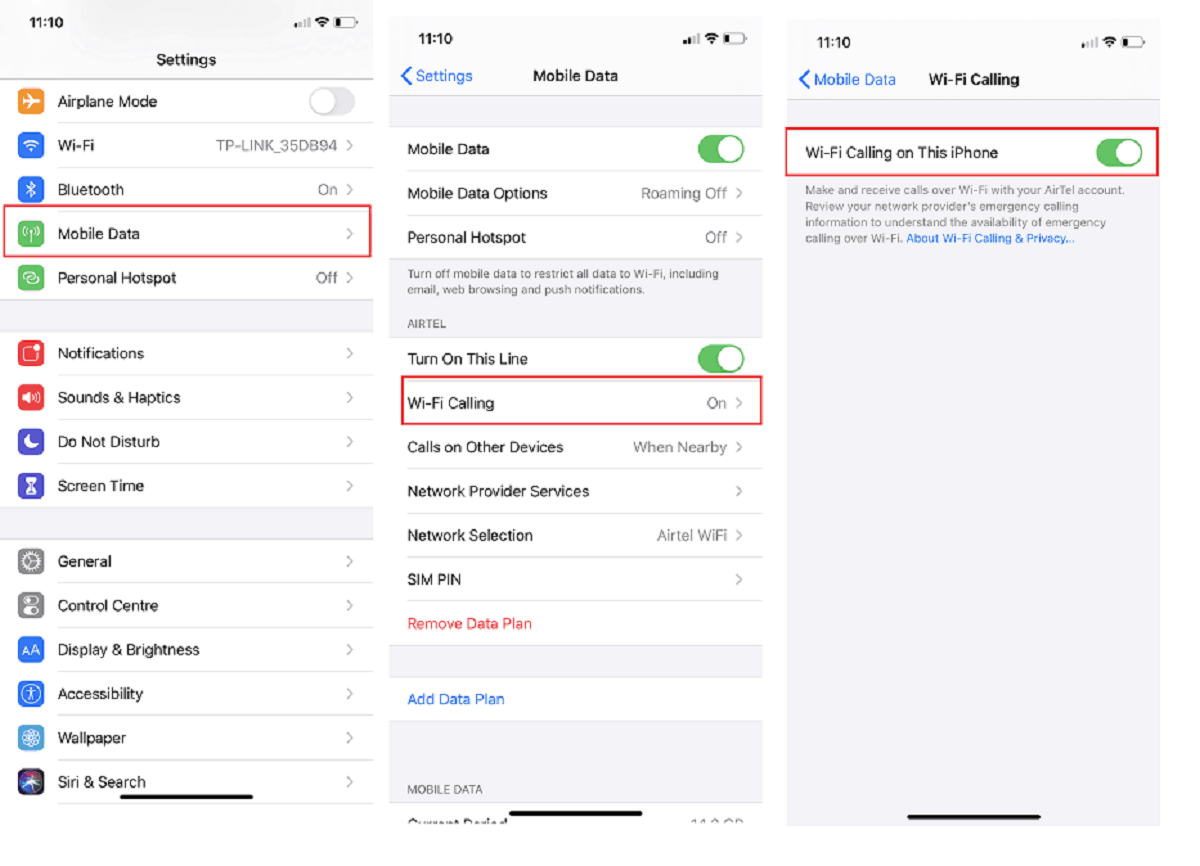
- Method 4: Contacting Your Service Provider
- Open the “Settings” app on your Android device. You can usually find the app icon in your app drawer or by swiping down from the top of your screen and tapping on the gear-shaped icon.
- Scroll down and tap on “Network & internet.” This option may be named differently depending on your device, such as “Connections” or “Wireless & networks.”
- Tap on “Mobile network.” This option is usually located towards the top of the list.
- Toggle the “Data roaming” switch to the “On” position. This option may be labeled as “Roaming” or “International roaming” depending on your device and Android version.
- Swipe down from the top of your screen to open the quick settings panel. This can be done by dragging your finger downwards from the top edge of the screen.
- Expand the panel if needed to view all available quick settings. You can usually do this by swiping down with two fingers instead of one.
- Look for the “Mobile data” or “Data roaming” icon in the quick settings panel. The exact name and icon may vary depending on your device’s manufacturer and Android version.
- Tap on the “Mobile data” or “Data roaming” icon to enable data roaming. The icon may change color or display a specific symbol indicating that roaming is now active.
- Open the “Settings” app on your Android device. You can usually find the app icon in your app drawer or by swiping down from the top of your screen and tapping on the gear-shaped icon.
- Scroll down and tap on “Network & internet.” This option may be named differently depending on your device, such as “Connections” or “Wireless & networks.”
- Tap on “Mobile network.” This option is usually located towards the top of the list.
- Tap on “Advanced” or “More” (the exact option may vary depending on your device).
- Toggle the “Data roaming” switch to the “On” position. This option may be labeled as “Roaming” or “International roaming” depending on your device and Android version.
- Locate the customer service contact information for your service provider. You can usually find this information on their website or by referring to any documentation you received when you signed up for your mobile plan.
- Call or email your service provider’s customer support team to inquire about enabling roaming on your account. Be prepared to provide them with your account details and any relevant information about your device.
- Explain the issue you’re facing and request assistance in enabling roaming on your Android device. The customer support representative will guide you through the necessary steps or make the required changes to your account settings to enable roaming.
- Using the Settings Menu
- Using the Quick Settings Panel
- Changing Network Settings
- Contacting Your Service Provider
To turn on roaming via the settings menu, follow these steps:
If your Android device has a quick settings panel, you can turn on roaming using the following steps:
In some cases, you may need to modify your network settings to enable roaming. Here’s how:
If you’re having trouble finding the roaming option or enabling it through the settings, it’s recommended to contact your service provider directly. They can guide you through the process and ensure that roaming is enabled on your account.
It’s important to remember that roaming services and settings may vary depending on your service provider and the specific Android device you’re using. If you are unsure about any of the steps or need further assistance, it’s always best to reach out to your service provider’s customer support for guidance.
Now that you know how to turn on roaming on your Android device, you can stay connected while traveling and enjoy all the benefits that roaming has to offer.
Method 1: Using the Settings Menu
If you prefer to enable roaming on your Android device using the settings menu, here’s a step-by-step guide:
Once you’ve followed these steps, roaming will be enabled on your Android device. You will now be able to connect to different mobile networks when you’re outside your home network coverage area.
Enabling roaming through the settings menu provides you with a straightforward and easy way to turn on this feature. It allows you to have more control over your network settings and enables you to switch between roaming and non-roaming modes effortlessly whenever needed.
However, it’s important to keep in mind that enabling roaming may result in additional charges on your mobile bill. Roaming charges vary depending on your service provider and the country you’re visiting, so it’s recommended to check with your provider regarding their specific rates before traveling.
If you experience any issues or if the option to enable roaming is not available in the settings menu, you can try one of the alternative methods mentioned in this guide or contact your service provider for further assistance.
Now that you’ve learned how to enable roaming using the settings menu, you can enjoy the benefits of staying connected and using your Android device while traveling outside your home network coverage area.
Method 2: Using the Quick Settings Panel
If your Android device has a quick settings panel, you can easily turn on roaming using the following steps:
By following these simple steps, you can quickly enable roaming on your Android device using the quick settings panel. This method can be especially convenient when you need to enable or disable roaming on the go, without navigating through multiple settings menus.
It’s important to note that while enabling roaming through the quick settings panel may be efficient, it’s crucial to be aware of the potential costs associated with roaming. Roaming charges can vary depending on your service provider and the country you’re visiting. It’s recommended to check with your provider to understand the specific rates and any applicable data packages or roaming plans that may help reduce costs.
If you cannot find the “Mobile data” or “Data roaming” icon in your quick settings panel, your device may not have this option available. In that case, you can try one of the other methods mentioned in this guide to turn on roaming, such as using the settings menu or contacting your service provider for assistance.
Now that you know how to enable roaming using the quick settings panel, you can easily switch between roaming and non-roaming modes to stay connected while traveling outside your home network coverage area.
Method 3: Changing Network Settings
In some cases, you may need to modify your network settings to enable roaming on your Android device. Here’s how you can do it:
After following these steps, roaming will be enabled on your Android device, allowing you to connect to different mobile networks when you’re outside your home network coverage area.
Changing network settings to enable roaming gives you more control over your device’s connectivity options. It allows you to modify additional settings related to roaming, such as preferred networks or network mode, which can optimize your roaming experience.
Keep in mind that enabling roaming may result in additional charges on your mobile bill. Roaming charges vary depending on your service provider and the country you’re visiting, so it’s crucial to check with your provider beforehand to understand the specific rates and any available data packages or roaming plans that may help reduce costs.
If you encounter any difficulties enabling roaming through the network settings or if the option to enable roaming is not available, consider trying one of the alternative methods described in this guide, such as using the settings menu or contacting your service provider for assistance.
Now that you know how to enable roaming by changing network settings, you can confidently stay connected while traveling outside your home network coverage area.
Method 4: Contacting Your Service Provider
If you’re having trouble finding the roaming option or enabling it through the settings on your Android device, contacting your service provider directly can provide the necessary guidance and assistance. Here’s what you can do:
By contacting your service provider, you can be assured of receiving accurate and specific instructions tailored to your device and mobile plan. They can help troubleshoot any issues you may encounter and ensure that you have access to roaming services when you need them.
Remember, it’s important to inquire about the roaming charges associated with your mobile plan. Your service provider can provide details on any additional costs for using roaming services, such as voice calls, text messages, and data usage, in different countries.
If you’re planning a trip, it’s advisable to contact your service provider well in advance to discuss roaming options, including any available data packages or roaming plans that could help reduce charges while abroad.
Now that you know how to contact your service provider for assistance, you can ensure that roaming is properly enabled on your Android device and make the most of your mobile plan while traveling outside your home network coverage area.
Conclusion
Enabling roaming on your Android device is essential for staying connected and using your phone’s features while traveling outside your home network coverage area. Whether you’re a frequent traveler or planning a trip abroad, knowing how to turn on roaming is crucial to ensure seamless communication and access to data services.
In this guide, we explored four methods to enable roaming on your Android device:
Each method provides a different approach to enable roaming, offering flexibility depending on your device model and personal preference. By following these methods, you can easily activate roaming and enjoy the benefits of staying connected while you’re away from your home network coverage.
However, it’s important to be aware that activating roaming may result in additional charges, depending on your service provider and the country you’re visiting. It’s recommended to check with your provider regarding their specific roaming plans, packages, and rates to avoid any unwanted surprises on your mobile bill.
If you encounter any difficulties or if the options to enable roaming are not available on your device, reaching out to your service provider’s customer support can provide the necessary assistance to enable roaming on your account.
Now that you’re equipped with knowledge on how to enable roaming on your Android device, you can confidently explore new destinations or travel for business, knowing that you can stay connected and use your phone’s features wherever you go.