Introduction
Welcome to our guide on how to use Wi-Fi Calling on Android! In an increasingly connected world, having a reliable way to make calls wherever you are is crucial. While traditional cellular networks are widely available, they may not always provide the best coverage, especially in areas with weak signal or inside buildings.
That’s where Wi-Fi Calling comes in. It’s a feature that allows you to make and receive calls using a Wi-Fi network instead of relying solely on a cellular network. This means you can make calls from places with a good Wi-Fi connection, such as your home, office, or public Wi-Fi hotspots, even if your cellular signal is weak or nonexistent.
Wi-Fi Calling is available on most modern Android devices and requires minimal setup. By utilizing your existing Wi-Fi network, Wi-Fi Calling can bring greater convenience and flexibility to your communication needs.
In this guide, we will go over the benefits of Wi-Fi Calling and provide step-by-step instructions on how to enable and set up Wi-Fi Calling on Android devices. We will also address common troubleshooting issues to ensure a smooth experience. So, whether you’re looking to improve call quality, save on roaming charges, or simply have a backup option for making calls, read on to discover how Wi-Fi Calling can enhance your Android phone usage.
What is Wi-Fi Calling?
Wi-Fi Calling is a feature that allows you to use a Wi-Fi network to make and receive phone calls instead of relying solely on a cellular network. It works by routing your voice calls over the internet, bypassing traditional cellular towers. This technology enables you to make calls even when you have a weak or no cellular signal, as long as you have a stable Wi-Fi connection.
When you make a call using Wi-Fi Calling, your voice is converted into digital packets and sent over the internet to the recipient, similar to how voice calls are transmitted over Voice over Internet Protocol (VoIP) services like Skype or WhatsApp. This process ensures that your call quality remains clear and uninterrupted, particularly in areas with a strong Wi-Fi signal.
Wi-Fi Calling is particularly beneficial in areas with limited cellular coverage, such as rural or remote locations, or within buildings with thick walls that weaken cellular signals. By utilizing Wi-Fi networks, you can make and receive calls without the need for a strong cellular connection, eliminating dropped calls or poor call quality that may occur in such situations.
It’s important to note that Wi-Fi Calling is different from other internet-based calling services, such as Voice over IP (VoIP) or video calling apps. With Wi-Fi Calling, you can use your regular phone number to make and receive calls, just as you would with a traditional cellular network. This means that you can still dial emergency services and receive calls from non-Wi-Fi Calling enabled phones.
Furthermore, Wi-Fi Calling allows for seamless call handoffs between Wi-Fi and cellular networks. If your phone detects a stronger cellular signal while on a Wi-Fi call, it will automatically switch the call to the cellular network without any disruption. This feature ensures that your calls remain uninterrupted, even when transitioning between Wi-Fi and cellular coverage areas.
Now that you have a clear understanding of what Wi-Fi Calling is and its benefits, let’s move on to the next section, where we will explore the advantages of using Wi-Fi Calling on your Android device.
Benefits of Wi-Fi Calling
Wi-Fi Calling offers numerous advantages that can greatly enhance your calling experience on your Android device. Let’s explore some of the key benefits:
1. Expanded Coverage: One of the biggest advantages of Wi-Fi Calling is the ability to make and receive calls in areas with weak or no cellular signal. By utilizing available Wi-Fi networks, you can stay connected even in places where your cellular network may not reach, such as basements, remote locations, or inside buildings with thick walls.
2. Improved Call Quality: Wi-Fi Calling often results in better call quality compared to a weak cellular signal. With a stable Wi-Fi connection, you can experience crystal-clear voice calls with minimal distortion or dropped calls.
3. Cost Savings: Wi-Fi Calling can save you money, especially when making calls while roaming internationally. By using Wi-Fi networks instead of your mobile carrier’s network, you can avoid expensive international roaming charges and make calls for free or at affordable rates using Wi-Fi Calling apps.
4. Seamless Call Handoffs: Wi-Fi Calling allows for smooth transitions between Wi-Fi and cellular networks. If you start a call on Wi-Fi and move to an area with a stronger cellular signal, your phone will automatically switch the call to the cellular network without any interruptions.
5. Multi-Device Syncing: Some carriers and Android devices support Wi-Fi Calling on multiple devices, including tablets and laptops. This means you can make and receive calls using your existing phone number on various devices, providing flexibility and convenience.
6. Reliable Emergency Calls: Wi-Fi Calling ensures that you can dial emergency services even when you have no cellular signal. In situations where your safety is at risk, being able to make emergency calls over Wi-Fi can be a lifesaver.
7. Enhanced Battery Life: Making calls using Wi-Fi consumes less battery power compared to making calls using a cellular network. This can result in extended battery life, especially in areas with poor cellular coverage where your phone would otherwise constantly search for a signal.
These are just a few of the many benefits that Wi-Fi Calling brings to Android device users. Now that you know the advantages, let’s move on to the next section, where we will explore the requirements for using Wi-Fi Calling on your Android device.
Requirements for Wi-Fi Calling on Android
Before you can start using Wi-Fi Calling on your Android device, there are a few requirements to keep in mind. These requirements may vary depending on your carrier and device manufacturer, but here are the general prerequisites:
1. Carrier Support: You need to have a carrier that supports Wi-Fi Calling. Most major carriers offer this feature, but it’s always a good idea to check with your carrier to ensure that Wi-Fi Calling is available on your account.
2. Compatible Device: Your Android device needs to be compatible with Wi-Fi Calling. Most modern Android smartphones and tablets support this feature, but older or entry-level devices may not be compatible. Check with your device manufacturer or carrier for a list of supported devices.
3. Active Plan: To use Wi-Fi Calling, you must have an active cellular plan with your carrier. Wi-Fi Calling is typically included in postpaid plans, but it may not be available on prepaid or lower-tier plans. Contact your carrier to verify if Wi-Fi Calling is included in your plan.
4. Updated Software: Ensure that your Android device is running the latest software version provided by your device manufacturer. Wi-Fi Calling may require specific software updates to work properly, so it’s important to keep your device up to date.
5. Stable Wi-Fi Connection: In order to use Wi-Fi Calling, you need to be connected to a stable Wi-Fi network. Ensure that you have a reliable Wi-Fi connection with sufficient bandwidth to support voice calls.
6. Proper Settings: Your device’s Wi-Fi Calling settings must be properly configured. Depending on your device and carrier, these settings can be found in the phone or network settings menu. You may need to enable Wi-Fi Calling and provide necessary information, such as your emergency address, for the feature to work correctly.
It’s important to note that the availability and requirements for Wi-Fi Calling may vary based on your carrier and geographic location. Some carriers may offer additional features or restrictions with Wi-Fi Calling, so it’s always a good idea to consult your carrier’s website or contact their customer support for specific details.
Now that you’re aware of the requirements for Wi-Fi Calling, let’s move on to the next section, where we will guide you through the process of enabling Wi-Fi Calling on your Android device.
Enabling Wi-Fi Calling on Android
Enabling Wi-Fi Calling on your Android device is a straightforward process. However, the steps may vary slightly depending on your device manufacturer and carrier. Here is a general guide to help you enable Wi-Fi Calling:
1. Check for Compatibility: Ensure that your Android device and carrier support Wi-Fi Calling. Check with your device manufacturer and carrier’s website to confirm compatibility.
2. Update Software: Make sure your device is running the latest software version. Software updates often include bug fixes and improvements for Wi-Fi Calling.
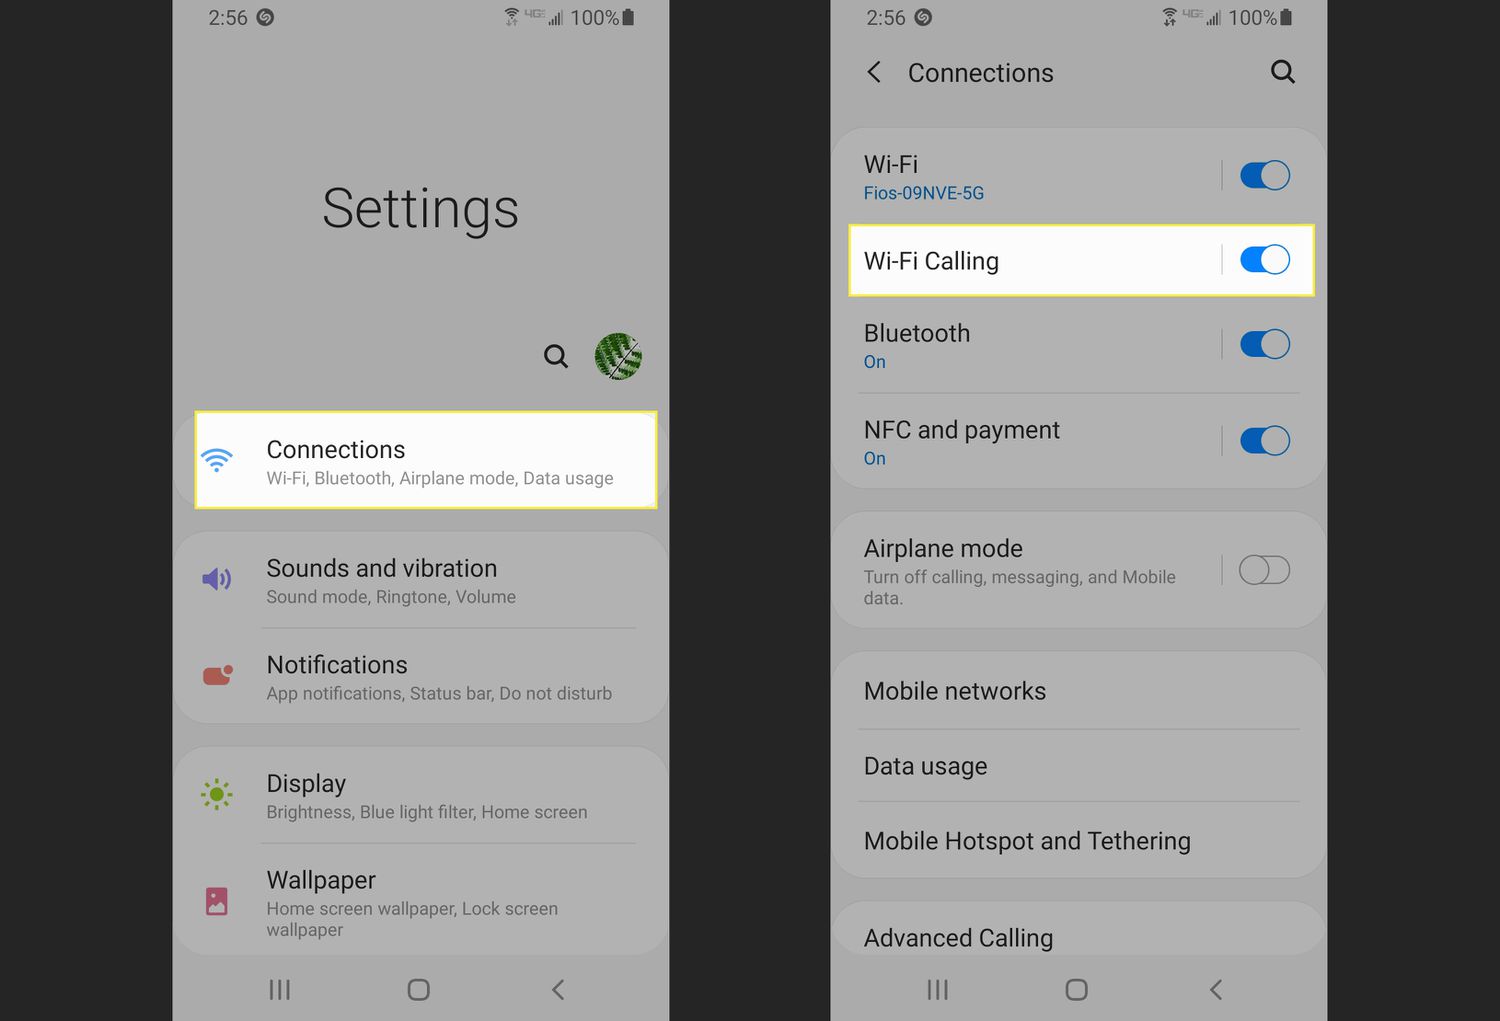
3. Open Phone Settings: Go to your device’s Settings app and locate the Phone or Call settings. The exact location may vary depending on your device model.
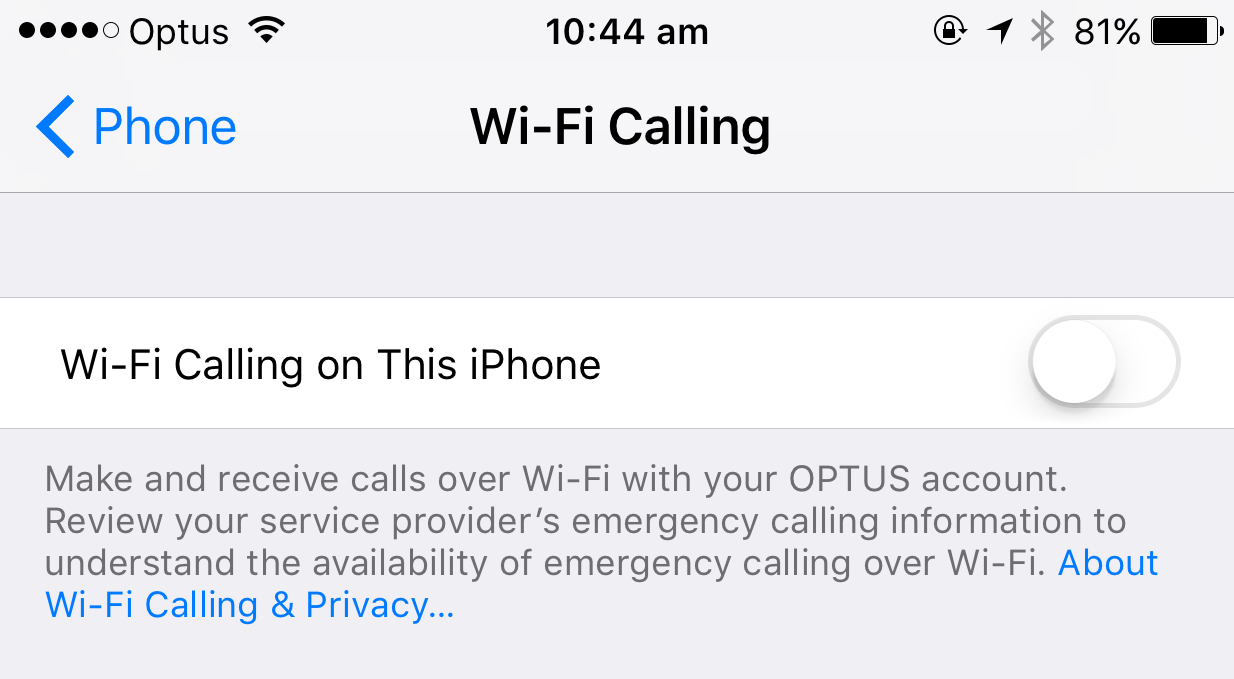
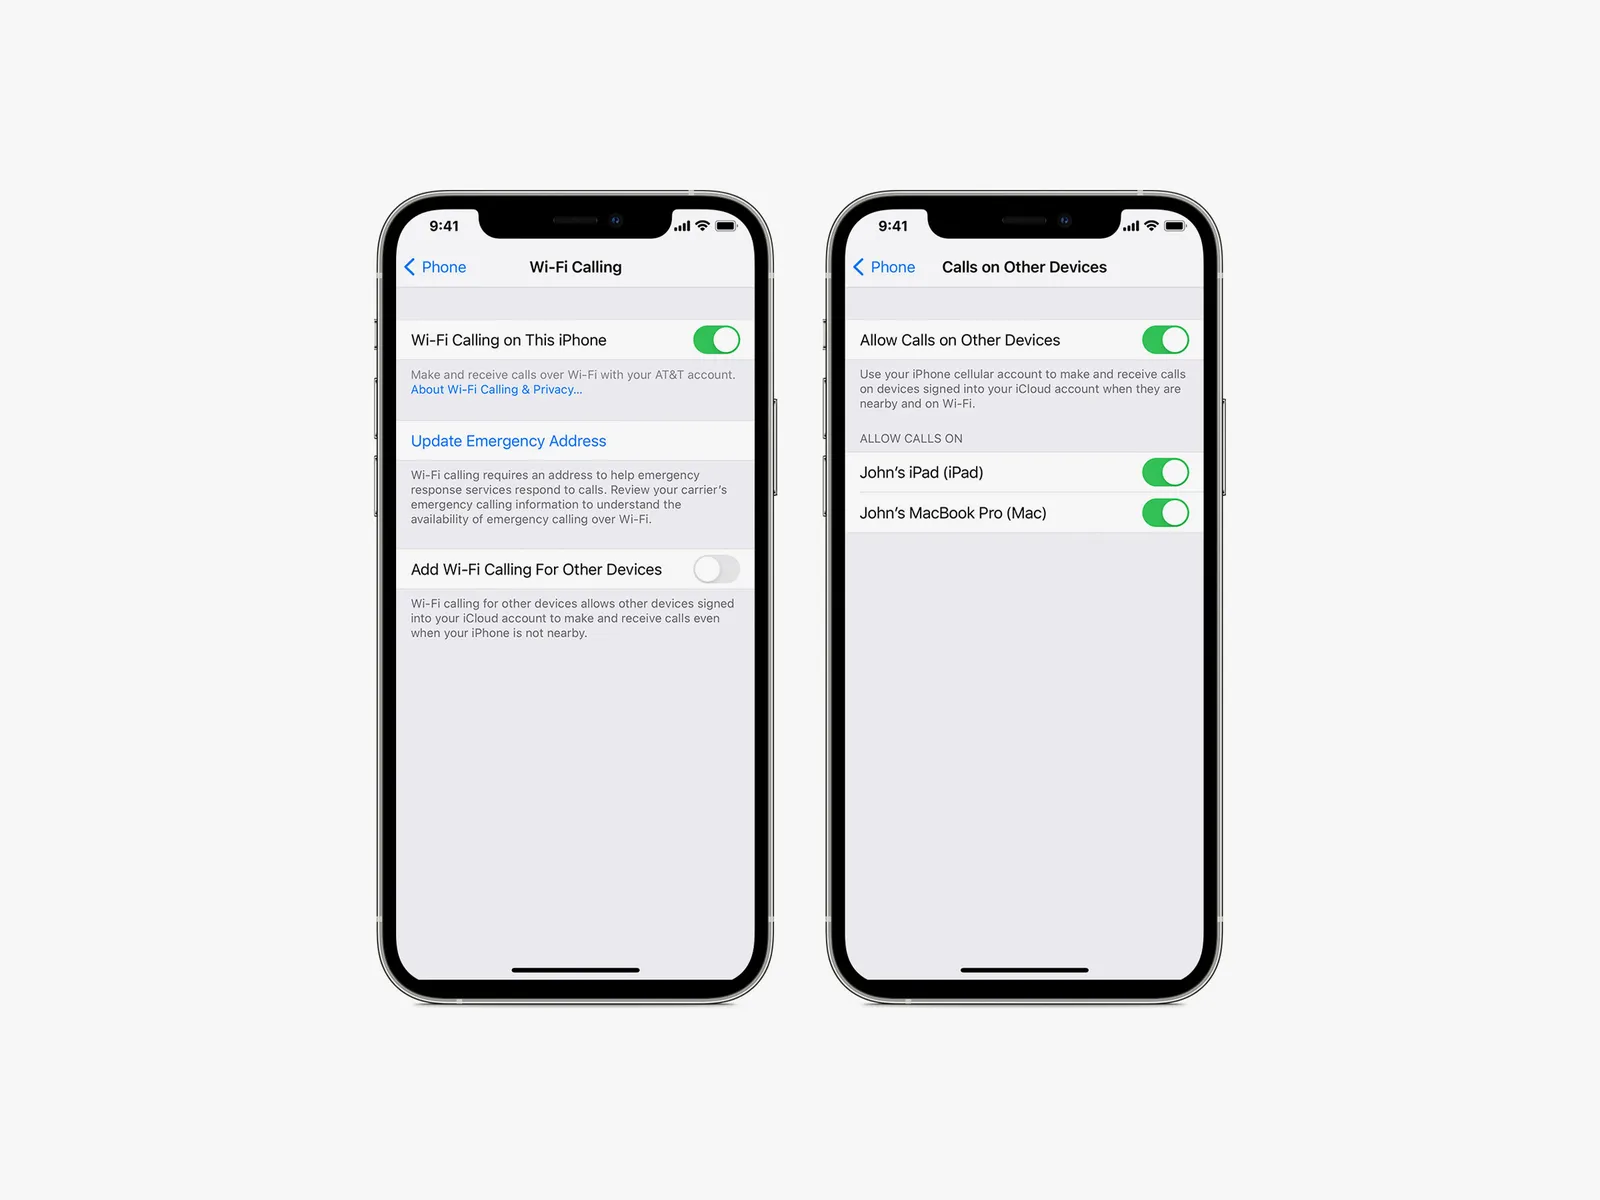
4. Find Wi-Fi Calling: Look for the Wi-Fi Calling option in the Phone settings. It may be labeled as “Wi-Fi Calling,” “Advanced Calling,” or something similar.
5. Enable Wi-Fi Calling: Toggle the Wi-Fi Calling switch to enable the feature. You may be prompted to read and accept terms and conditions.
6. Set Emergency Address: Some carriers require you to provide your emergency address for Wi-Fi Calling. Follow the prompts to enter your address accurately to ensure emergency services can locate you in case of an emergency.
7. Configure Preferred Network: In some cases, you may have the option to choose your preferred network for Wi-Fi Calling. You can set it to Wi-Fi preferred or Wi-Fi and Cellular preferred, depending on your preference.
8. Test Wi-Fi Calling: Once enabled, make a test call using Wi-Fi Calling to ensure it’s working properly. Dial a phone number as you normally would, and the call should go through using the Wi-Fi network.
Keep in mind that the steps mentioned above are a general guide, and the actual process may differ depending on your device and carrier. If you encounter any difficulties or have specific questions, it’s recommended to consult your device manufacturer’s support documentation or reach out to your carrier’s customer support for assistance.
Now that you have enabled Wi-Fi Calling on your Android device, let’s move on to the next section, where we will guide you through the process of setting up Wi-Fi Calling on your Android device.
Setting Up Wi-Fi Calling on Android
Once you have enabled Wi-Fi Calling on your Android device, the next step is to set it up and ensure it is configured correctly. Here’s a step-by-step guide to help you set up Wi-Fi Calling on your Android device:
1. Confirm Wi-Fi Connection: Make sure you are connected to a stable Wi-Fi network with a strong signal. This is essential for reliable Wi-Fi Calling.
2. Open Phone Settings: Go to your device’s Settings app and navigate to the Phone or Call settings.
3. Locate Wi-Fi Calling Settings: Look for the Wi-Fi Calling option in the Phone settings. It may be found under the Wi-Fi & Networks, Connections, or Network settings, depending on your device.
4. Select Account Type: Choose your account type for Wi-Fi Calling. You may have options like “Personal” or “Business.” Select the relevant account type for your needs.
5. Enter Necessary Information: Follow the prompts to enter any required information, such as your emergency address or additional verification details. Fill in all the necessary fields accurately.
6. Verify Phone Number: You may need to verify your phone number to fully activate Wi-Fi Calling. This verification process typically involves receiving and entering a verification code sent via SMS.
7. Complete the Setup: Follow the on-screen instructions to complete the setup process for Wi-Fi Calling. These instructions may include accepting terms and conditions or configuring additional preferences.
8. Make a Test Call: Once the setup is complete, make a test call using Wi-Fi Calling to ensure it is working properly. Dial a phone number and check that the call goes through using the Wi-Fi network.
It’s important to note that the exact steps and options may vary depending on your device manufacturer and carrier requirements. If you encounter any difficulties during the setup process or have specific questions, it’s recommended to consult your device manufacturer’s support documentation or contact your carrier’s customer support for assistance.
Now that you have successfully set up Wi-Fi Calling on your Android device, you can enjoy the benefits of making and receiving calls using a Wi-Fi network. In the next section, we will address common troubleshooting issues you may encounter with Wi-Fi Calling on Android.
Troubleshooting Wi-Fi Calling Issues on Android
While Wi-Fi Calling on Android is generally a reliable feature, you may encounter occasional issues. Here are some common troubleshooting steps to help you resolve Wi-Fi Calling issues:
1. Check Wi-Fi Connection: Ensure that you are connected to a stable and secure Wi-Fi network. Weak or unstable Wi-Fi signals can cause issues with Wi-Fi Calling. Try switching to a different Wi-Fi network to see if the problem persists.
2. Restart Your Device: Sometimes, simply restarting your Android device can resolve temporary glitches. Power off your device, wait for a few seconds, and then power it on again.
3. Disable and Re-enable Wi-Fi Calling: Go to your device’s Phone settings, disable Wi-Fi Calling, wait for a few seconds, and then enable it again. This can refresh the connection and resolve any temporary issues.
4. Update Software: Ensure that your Android device has the latest software updates. Software updates often include bug fixes and improvements that can address Wi-Fi Calling issues.
5. Reset Network Settings: Resetting your network settings can help resolve connectivity issues. Go to your device’s settings, locate the ‘Network settings reset’ option (may vary depending on your device), and follow the instructions to reset network settings.
6. Verify Carrier Support: Check with your carrier to ensure that Wi-Fi Calling is properly enabled on your account. There might be carrier-specific settings or requirements that need to be fulfilled.
7. Disable Battery Optimization: Some Android devices may optimize battery usage by limiting certain background functions, including Wi-Fi Calling. To ensure uninterrupted Wi-Fi Calling, go to your device’s settings, locate ‘Battery’ or ‘Battery optimization,’ and disable optimization for the Wi-Fi Calling app or feature.
8. Contact Carrier Support: If the issue persists, it may be specific to your carrier or account. Contact your carrier’s customer support for further assistance. They can help troubleshoot carrier-specific issues or provide additional guidance.
If you have followed the troubleshooting steps and are still experiencing issues with Wi-Fi Calling on your Android device, it’s recommended to reach out to your device manufacturer’s support or contact your carrier’s customer support for further assistance. They will be able to provide specific troubleshooting guidance based on your device and carrier settings.
Now that you’re equipped with troubleshooting tips, you can address common Wi-Fi Calling issues on your Android device. In the next section, we will conclude our guide on Wi-Fi Calling on Android.
Conclusion
Congratulations! You have reached the end of our guide on how to use Wi-Fi Calling on Android. By enabling Wi-Fi Calling, you can stay connected and make and receive calls even in areas with weak or no cellular signal.
We started by understanding what Wi-Fi Calling is and the benefits it brings. Wi-Fi Calling allows you to make calls over a Wi-Fi network rather than relying solely on a cellular network. Not only does it expand coverage and improve call quality, but it can also save you money, offer seamless call handoffs, and provide multi-device syncing capabilities.
We then explored the requirements for Wi-Fi Calling on Android, ensuring that your device, carrier, and software meet the necessary criteria. Following that, we guided you through the process of enabling and setting up Wi-Fi Calling on your Android device, step by step.
If you encounter any issues along the way, we provided troubleshooting tips to help you resolve common Wi-Fi Calling problems. From checking your Wi-Fi connection to updating software and verifying carrier support, these troubleshooting steps can help you overcome any obstacles that may arise.
Remember, every Android device and carrier may have slight variations in the steps and options involved in enabling and using Wi-Fi Calling. It’s important to refer to your device manufacturer’s documentation or consult your carrier’s support if you encounter any specific difficulties.
With Wi-Fi Calling enabled on your Android device, you can now enjoy the freedom of making and receiving calls using a Wi-Fi network. Stay connected in areas with weak cellular coverage, save on roaming charges, and experience enhanced call quality even in challenging environments.
Thank you for reading our guide, and we hope it has been helpful in enabling and utilizing Wi-Fi Calling on your Android device. Stay connected and enjoy the convenience and flexibility that Wi-Fi Calling brings!