Introduction
Having a reliable and fast internet connection is essential in today’s digital age, especially when you’re on the go. Whether it’s for checking emails, browsing the web, or streaming media, enabling cellular data on your Android device allows you to access the internet wherever you are, without relying solely on Wi-Fi networks.
In this guide, we will walk you through the steps to turn on cellular data on your Android device. Whether you’re using a smartphone or a tablet, activating cellular data is a straightforward process that can be done within the device settings.
Once you have enabled cellular data, you can take advantage of your mobile data plan to stay connected. This can be especially useful when Wi-Fi is not available or when you’re traveling and need internet access on the go.
So, if you’re ready to unlock the power of cellular data on your Android device, let’s dive into the step-by-step process to turn it on and start enjoying seamless internet connectivity. Let’s get started!
Step 1: Go to the Settings Menu
The first step to turning on cellular data on your Android device is to navigate to the settings menu. You can find the settings icon on your home screen or in the app drawer. It typically looks like a gear or a cogwheel.
Once you locate the settings icon, tap on it to open the settings menu. On some Android devices, you may need to swipe down from the top of the screen to access the notification panel, and then tap on the gear icon to open settings.
When you open the settings menu, you will see a list of various options and categories related to your device’s settings. Scroll through the list until you find the option labeled “Network & Internet” or something similar. The exact placement and labeling may vary depending on the Android version and device manufacturer.
Tap on “Network & Internet” to access the network settings and continue with the process of enabling cellular data on your Android device.
Opening the settings menu allows you to access various other settings that can be customized to enhance your Android experience. From here, you can manage Wi-Fi connections, Bluetooth devices, and much more. However, for the purpose of this guide, focus on finding the “Network & Internet” option to proceed to the next step.
Step 2: Select “Network & Internet”
After opening the settings menu on your Android device, the next step is to select the “Network & Internet” option. This option allows you to manage all aspects related to network connectivity, including cellular data settings.
Scroll through the settings menu until you find the “Network & Internet” option. It is usually located towards the top of the menu, but the exact placement may vary depending on your device’s manufacturer and Android version.
Once you locate the “Network & Internet” option, tap on it to access the network settings.
Within the “Network & Internet” settings, you will find a range of options related to network connectivity. This includes Wi-Fi, Mobile network, Hotspot & tethering, and more. To activate cellular data, we will focus on the “Mobile network” option.
Tap on “Mobile network” to proceed to the next step and configure the cellular data settings on your Android device.
Note that the labeling may vary slightly, depending on your device. Some Android devices may use “Cellular networks” or similar wording instead of “Mobile network.” Regardless of the specific labeling, look for the option that refers to cellular data network settings.
By selecting the “Network & Internet” option, you are now one step closer to turning on cellular data and enjoying seamless internet connectivity on your Android device.
Step 3: Tap on “Mobile Network”
After accessing the “Network & Internet” settings on your Android device, the next step is to tap on the “Mobile Network” option. This is where you can configure the settings related to your cellular data connection.
Scroll down the menu until you find the “Mobile Network” option. It is usually located towards the middle or bottom section of the settings menu, but the exact placement may vary depending on your device’s manufacturer and Android version.
Once you locate the “Mobile Network” option, tap on it to access the cellular data settings.
Within the “Mobile Network” settings, you will find various options related to your cellular data connection. These options may include data roaming, network mode, access point names (APN), and more.
To enable cellular data, make sure that the toggle switch next to “Mobile Data” is turned on. This will activate the cellular data connection on your Android device.
Some devices may have additional options or submenus within the “Mobile Network” settings. These options allow you to further customize your cellular data settings, such as choosing the preferred network type or managing data usage.
Take a moment to explore these options and configure them according to your preferences. Adjusting these settings can help optimize your Android device’s cellular data connection and ensure a smooth browsing experience.
By tapping on the “Mobile Network” option and enabling the “Mobile Data” toggle switch, you have successfully activated cellular data on your Android device. Now you can enjoy fast and reliable internet access wherever you go.
Step 4: Turn on “Mobile Data”
Now that you have accessed the “Mobile Network” settings on your Android device, it’s time to turn on the “Mobile Data” feature. This allows your device to connect to the internet using cellular data.
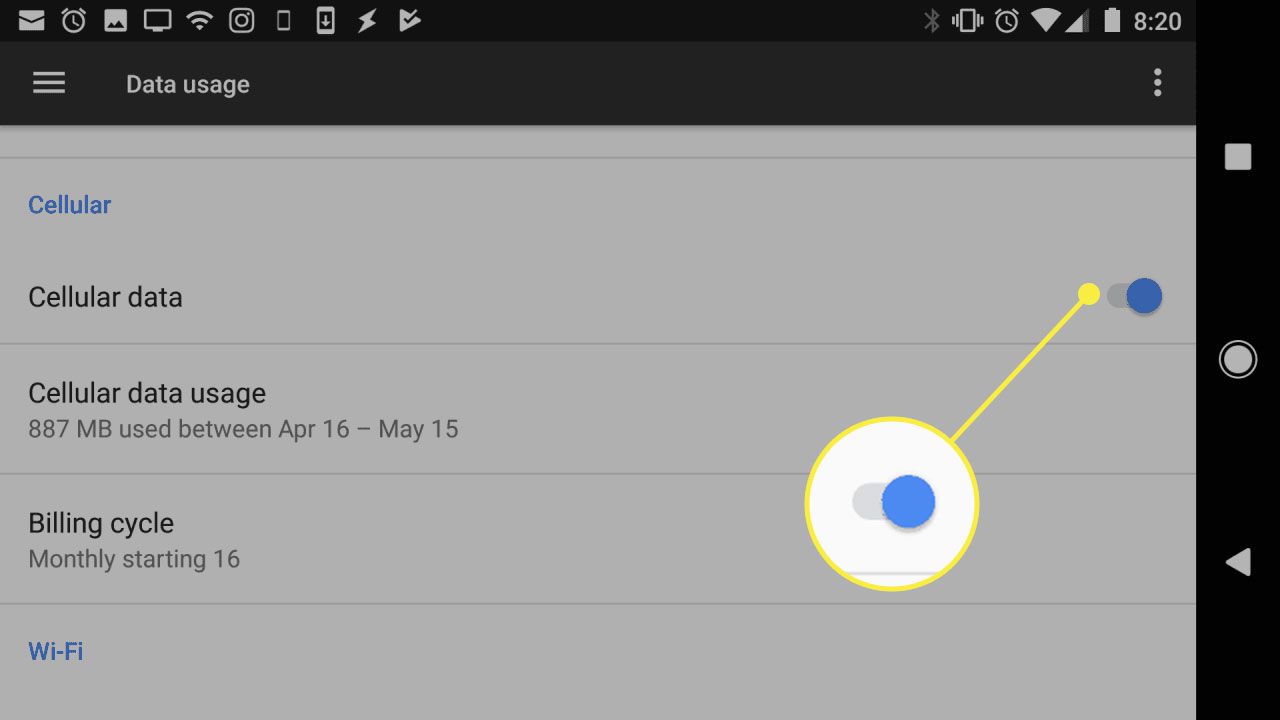
Within the “Mobile Network” settings, locate the toggle switch next to the “Mobile Data” option. This switch controls whether the cellular data connection is enabled or disabled on your device.
If the toggle switch is currently turned off, simply tap on it to turn on “Mobile Data”. The switch will change to indicate that cellular data is now enabled.
If the toggle switch is already turned on, there’s no need to make any changes. The cellular data connection is already active on your Android device.
Enabling “Mobile Data” allows your device to use its cellular network to access the internet. This means you can browse websites, use online apps, and stream media even when you’re not connected to a Wi-Fi network.
It’s important to note that using cellular data may consume data from your mobile plan, depending on your carrier and data plan. Be mindful of your data usage to avoid exceeding your plan’s limits or incurring additional charges.
By turning on “Mobile Data” within the “Mobile Network” settings, you have successfully activated cellular data on your Android device. You are now ready to enjoy the benefits of seamless internet connectivity on the go.
Step 5: Configure Additional Cellular Data Settings (optional)
Once you have enabled cellular data on your Android device, you may want to explore and configure additional settings to optimize your cellular data usage and enhance your browsing experience. While this step is optional, it can be beneficial to customize these settings according to your preferences.
Within the “Mobile Network” settings, you may find various options that allow you to further configure your cellular data settings. Here are a few common settings you may want to consider:
- Data Roaming: This setting determines whether your device can connect to cellular networks when you’re traveling abroad or outside your carrier’s coverage area. Consider enabling or disabling data roaming based on your needs.
- Network Mode: Depending on your device and carrier, you may have the option to select the preferred network mode. Options may include 2G, 3G, 4G, or LTE. Choosing the appropriate network mode can impact the speed and coverage of your cellular data connection.
- APN (Access Point Names): Access Point Names define the settings required to establish a data connection with your carrier’s network. In some cases, you may need to manually configure the APN settings to ensure proper cellular data functionality. Contact your carrier for the correct APN settings if necessary.
- Data Usage: Android devices provide tools to monitor and manage your data usage. You can set data limits, receive alerts when nearing the limit, and track app-specific data usage. This can help you stay within your data plan and avoid unexpected charges.
Take the time to explore these settings and adjust them according to your preferences and requirements. It’s important to note that the available options may vary depending on your device, Android version, and carrier.
By configuring additional cellular data settings, you can personalize your Android device’s internet connection to ensure optimal performance and seamless browsing experience.
Conclusion
Enabling cellular data on your Android device allows you to stay connected to the internet wherever you go. By following the simple steps outlined in this guide, you can easily activate cellular data and enjoy a seamless browsing experience.
We started by accessing the settings menu and navigating to “Network & Internet.” From there, we tapped on “Mobile Network” and turned on the “Mobile Data” toggle switch. Finally, we explored additional settings that can be customized to optimize your cellular data usage.
Remember to monitor your data usage to stay within your plan limits and avoid any unexpected charges. Take advantage of the available settings and options to personalize your Android device’s cellular data connection.
Now that you have successfully enabled cellular data, you can enjoy fast and reliable internet access on the go. Whether you’re checking emails, browsing the web, or streaming media, the power of cellular data is at your fingertips.
Stay connected, stay productive, and enjoy the freedom of seamless internet connectivity on your Android device!