Introduction
Are you interested in turning your Android tablet into a mobile hotspot? With the hotspot feature enabled, you can share your tablet’s internet connection with other devices, such as smartphones, laptops, or tablets. This can be incredibly useful when you’re on the go and need to access the internet but don’t have Wi-Fi available.
In this article, we will guide you through the process of turning on the hotspot on your Android tablet. Whether you want to connect your phone to your tablet, or if you’re looking to provide internet access to multiple devices, we’ve got you covered.
Creating a mobile hotspot on your Android tablet allows you to share your cellular data connection with other devices. This can be particularly handy when you’re traveling or in an area with a weak or nonexistent Wi-Fi signal. By following the simple steps outlined below, you’ll be able to turn your Android tablet into a powerful and convenient hotspot in no time.
So, let’s dive in and explore how to enable the hotspot feature on your Android tablet. By the end of this guide, you’ll be ready to connect your other devices to your tablet’s hotspot and enjoy seamless internet access wherever you go.
Step 1: Open Settings
The first step is to open the settings menu on your Android tablet. The settings menu is where you can access and customize various features and options on your device.
To open the settings menu, locate the gear icon on your tablet’s home screen or app drawer. Tap on the gear icon to access the settings.
Once you’re in the settings menu, you’ll see a list of different options and categories. The settings menu may vary slightly depending on the make and model of your Android tablet, but the overall layout and organization should be similar.
Take a moment to familiarize yourself with the different sections in the settings menu. You’ll find options for Wi-Fi, Bluetooth, sound, display, battery, and more. We’ll be looking for the option to enable the hotspot in the next steps.
Now that you have successfully opened the settings menu on your Android tablet, let’s move on to the next step where we’ll find and tap on the “Connections” option.
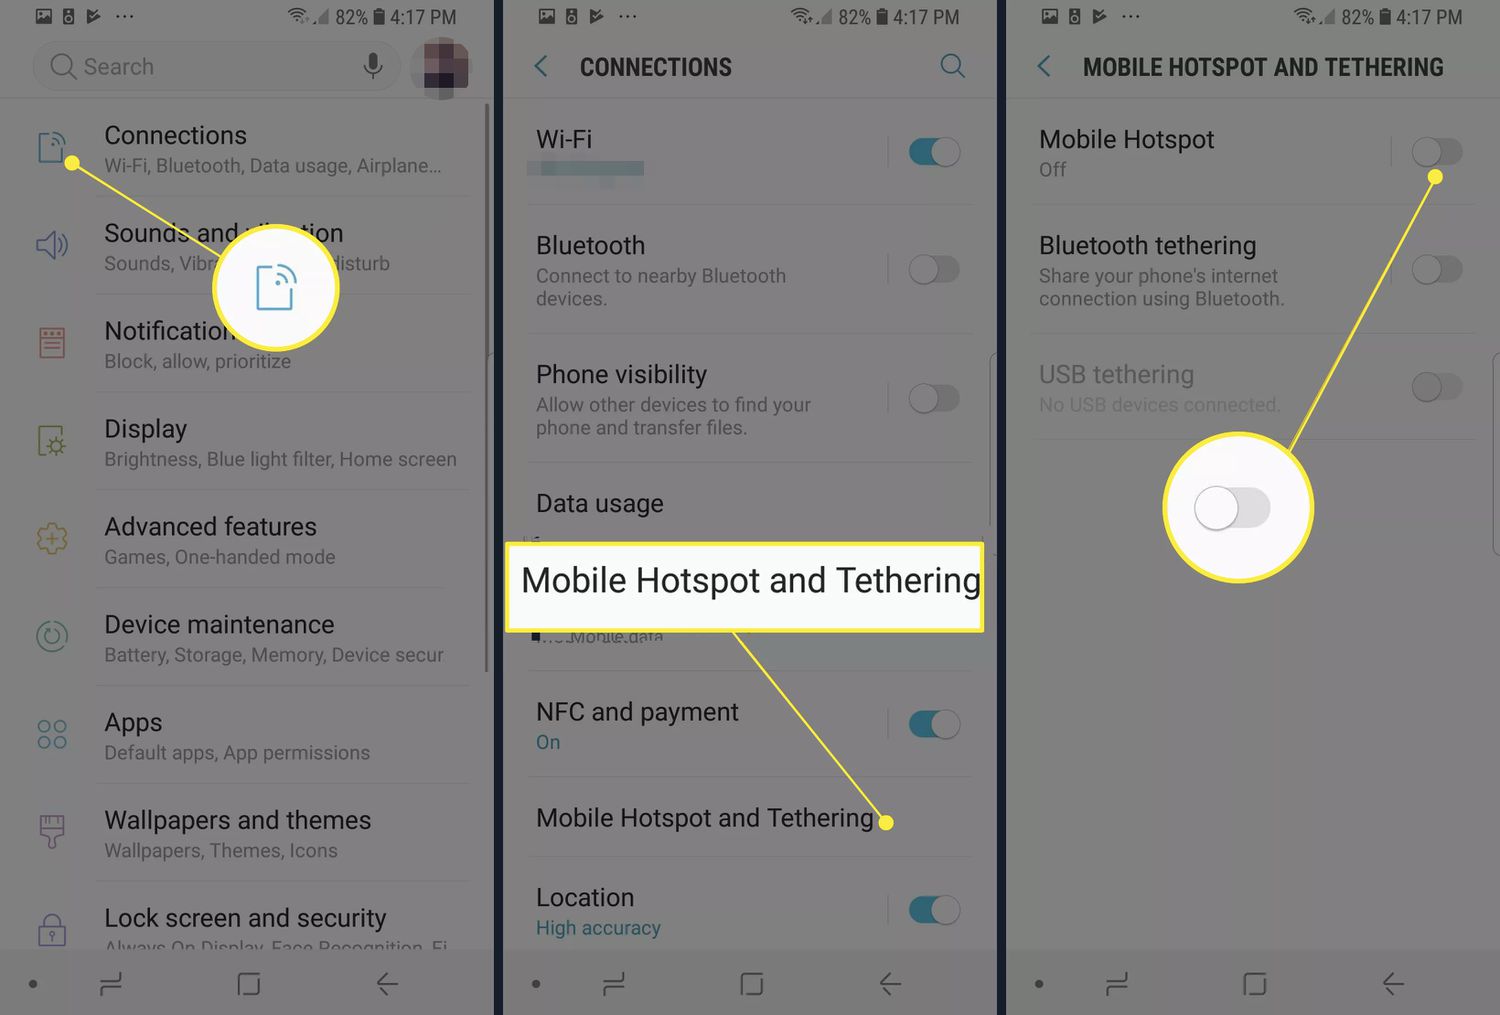
Step 2: Find and Tap on “Connections”
After opening the settings menu on your Android tablet, you’ll need to navigate to the “Connections” section. This is where you’ll find various options related to connecting and managing different types of connections on your device.
In the settings menu, scroll down or swipe left to access the different sections. Look for the “Connections” option, which may be located near other categories like “Network & Internet” or “Wireless & Networks.”
Once you’ve found the “Connections” section, tap on it to access the available connection settings.
Within the “Connections” section, you’ll find a range of options including Wi-Fi, Bluetooth, NFC, and mobile networks. On some Android devices, the “Mobile Hotspot and Tethering” option may be directly accessible within the “Connections” section. If that’s the case, skip ahead to Step 3. Otherwise, continue reading.
If you don’t see the “Mobile Hotspot and Tethering” option within the “Connections” section, don’t worry. The location of this option may vary depending on the Android version and manufacturer of your tablet. In such cases, you may need to look for the “Wireless & Networks” or “Network & Internet” sections to find the hotspot settings.
Once you locate the relevant section, tap on it to proceed to the next step where we’ll enable the mobile hotspot option.
Step 3: Tap on “Mobile Hotspot and Tethering”
Now that you’re in the “Connections” section of the settings menu on your Android tablet, it’s time to find and tap on the “Mobile Hotspot and Tethering” option. This option allows you to enable and configure the hotspot feature on your device.
Scroll down or swipe left within the “Connections” section to explore the available settings. Look for the “Mobile Hotspot and Tethering” option, which is typically located under the “Wireless & Networks” or “Network & Internet” category.
Once you’ve located the “Mobile Hotspot and Tethering” option, tap on it to access the hotspot settings.
Within the “Mobile Hotspot and Tethering” settings, you’ll find various options related to tethering and hotspot functionality. The exact layout and organization of these settings may vary depending on your tablet’s operating system version and manufacturer interface.
Keep in mind that some Android devices may label this option as “Mobile Hotspot,” “Portable Hotspot,” or simply “Hotspot.”
By tapping on the “Mobile Hotspot and Tethering” option, you’re one step closer to enabling the hotspot on your Android tablet. Continue to the next step where we’ll learn how to enable the mobile hotspot feature.
Step 4: Enable Mobile Hotspot
Now that you’ve accessed the “Mobile Hotspot and Tethering” settings on your Android tablet, it’s time to enable the mobile hotspot feature. Enabling the hotspot will allow other devices to connect and share your tablet’s internet connection.
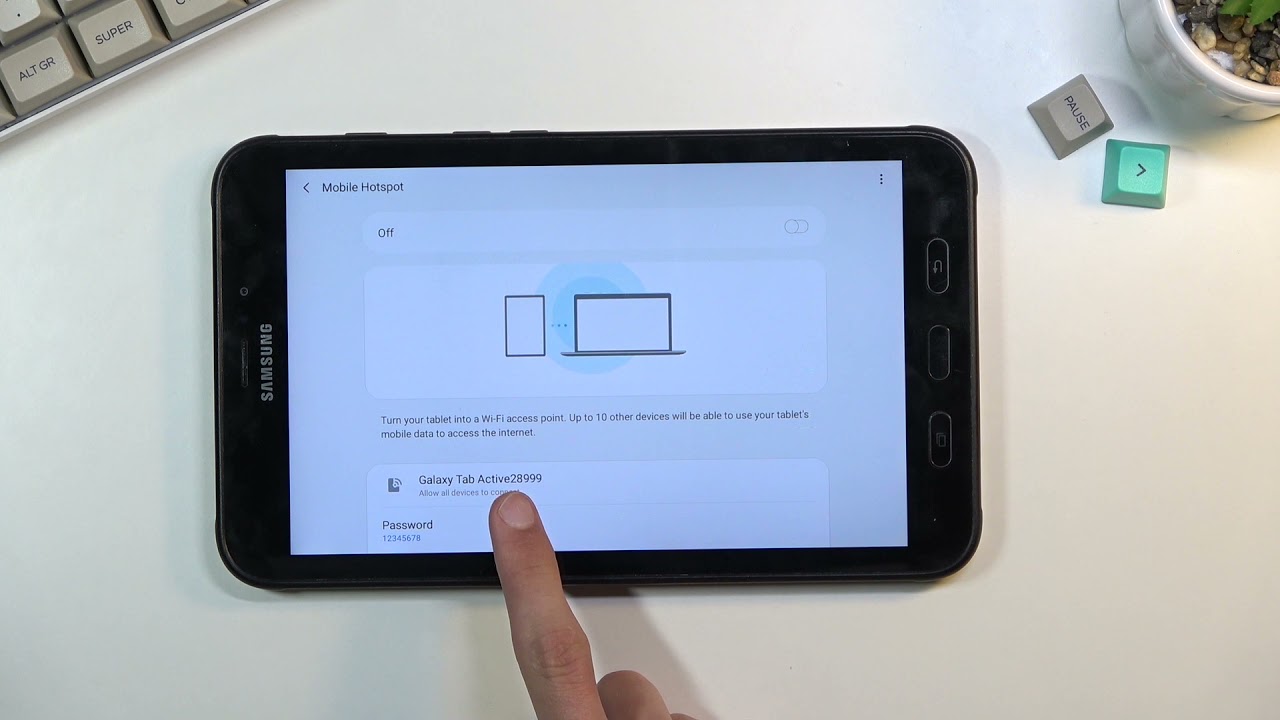
Within the “Mobile Hotspot and Tethering” settings, you’ll see an option labeled “Mobile Hotspot” or “Portable Hotspot.” This is the toggle switch that controls the activation of the hotspot feature.
Tap on the toggle switch to enable the mobile hotspot. You may be prompted to review and accept a disclaimer or terms of use before proceeding.
Once you’ve enabled the mobile hotspot, your Android tablet will start broadcasting a Wi-Fi network. Other devices, such as smartphones, laptops, or tablets, can now connect to this network to access the internet through your tablet’s cellular data connection.
It’s important to note that enabling the mobile hotspot feature on your Android tablet may consume additional battery power and use your cellular data plan. Be mindful of your data usage and consider any limitations or charges associated with your data plan.
With the mobile hotspot enabled on your Android tablet, you’re ready to move on to the next step where we’ll explore how to configure hotspot settings.
Step 5: Configure Hotspot Settings
After enabling the mobile hotspot feature on your Android tablet, it’s time to configure the hotspot settings according to your preferences and requirements. Configuring the settings will allow you to customize the hotspot network name, password, and other options.
Within the “Mobile Hotspot and Tethering” settings, look for the “Hotspot Settings” or “Configure Hotspot” option. Tap on it to access the hotspot configuration options.
Here are some key settings you may consider adjusting:
- Network Name (SSID): This is the name that will be displayed when other devices search for available Wi-Fi networks. It’s recommended to choose a descriptive and unique name for your hotspot network.
- Password: Set a strong and secure password to ensure that only authorized devices can connect to your hotspot. Avoid using easily guessable passwords, and consider using a combination of letters, numbers, and symbols.
- Security Type: Depending on your tablet’s operating system version, you may have options like WPA2, WPA, or Open security. It’s generally recommended to select WPA2 for better security.
- Allowed Devices: Some Android tablets allow you to specify which devices can connect to your hotspot. This can provide an added layer of control and security over your hotspot network.
Take your time to review and adjust these settings based on your preferences. Once you’re satisfied with the hotspot configuration, tap on the “Save” or “Apply” button to apply the changes.
Remember that the hotspot settings may vary slightly depending on your tablet’s operating system version and manufacturer interface. The options and terminology used might differ, but the general concept remains the same.
With the hotspot settings configured, your Android tablet is ready to share its internet connection with other devices. Let’s move on to the final step where we’ll explore how to connect devices to your hotspot.
Step 6: Connect Devices to Hotspot
Now that you have successfully enabled and configured the hotspot on your Android tablet, it’s time to connect other devices to it. By connecting devices to your hotspot, they’ll be able to access the internet using your tablet’s cellular data connection.
On the device you want to connect to the hotspot, go to the Wi-Fi settings. This can usually be found in the settings menu or by swiping down from the top of the screen and accessing the quick settings panel.
In the Wi-Fi settings, you should see a list of available Wi-Fi networks. Look for the network name (SSID) that you configured for your hotspot. Tap on it to connect.
If you have set a password for your hotspot, you will be prompted to enter it. Input the password correctly, and the device will attempt to connect to the hotspot network.
Once the device is successfully connected to the hotspot, you’ll see the Wi-Fi icon appear in the device’s status bar. This indicates that the device is now connected to the internet using your Android tablet’s cellular data connection.
Repeat the above steps for each device you want to connect to the hotspot. Depending on your tablet’s capabilities, you may be able to connect multiple devices simultaneously, allowing everyone to enjoy internet access on their respective devices.
It’s worth noting that the speed and performance of your hotspot connection may depend on factors such as your tablet’s cellular signal strength, the number of connected devices, and the data plan you have with your mobile carrier.
When you’re finished using the hotspot, be sure to disable it to conserve battery power and avoid unnecessary data usage. You can do this by returning to the “Mobile Hotspot and Tethering” settings on your Android tablet and turning off the mobile hotspot.
With devices successfully connected to your Android tablet’s hotspot, you can now enjoy seamless internet access on the go. Whether you’re traveling, in a remote location, or simply in need of a temporary Wi-Fi connection, your tablet’s hotspot feature provides a convenient solution.
That concludes our guide on how to turn on the hotspot on your Android tablet. We hope you found this step-by-step tutorial helpful and that you’re now able to utilize this feature effectively. Stay connected and enjoy the benefits of your Android tablet’s mobile hotspot feature wherever you go!
Conclusion
Congratulations! You have successfully learned how to turn on the hotspot on your Android tablet. By following the steps outlined in this guide, you can now share your tablet’s internet connection with other devices, providing you with convenient access to the internet even when Wi-Fi is not available.
The ability to turn your Android tablet into a mobile hotspot is incredibly useful, whether you’re traveling, in a remote area, or simply in need of a temporary internet connection. With just a few taps, you can create a Wi-Fi network that allows other devices to connect and utilize your tablet’s cellular data connection.
Remember to keep in mind your data usage and any limitations or charges associated with your data plan. It’s essential to set a strong password and configure your hotspot settings to ensure a secure and reliable connection.
Connecting devices to your Android tablet’s hotspot is a straightforward process. Just navigate to the Wi-Fi settings on the device you want to connect, select your hotspot network, enter the password (if required), and you’re ready to go. Enjoy seamless internet access on multiple devices!
When you’re finished using the hotspot, be sure to disable it to conserve battery power and avoid unnecessary data usage. You can easily turn off the mobile hotspot in the settings menu of your Android tablet.
We hope this guide has been helpful in enabling and using the hotspot feature on your Android tablet. Stay connected wherever you go and make the most of your tablet’s capabilities.
Thank you for reading, and we wish you happy browsing on your Android tablet!