Introduction
Welcome to this guide on how to share your screen on Discord using a Mac. Discord is a popular communication platform, widely used by gamers, professionals, and communities worldwide. With the screen-sharing feature, you can easily share your screen with others, making it ideal for collaborative work, presentations, or simply showing off gameplay. In this article, we will walk you through the step-by-step process of enabling and using screen sharing on Discord using a Mac.
Sharing your screen on Discord allows you to showcase your activities, whether it’s sharing a document, demonstrating a software tutorial, or streaming your favorite game to your friends. It enables seamless communication and collaboration, enhancing the overall Discord experience. However, it’s important to note that screen sharing on Discord is currently only available in voice channels, not in direct messaging.
In the following sections, we will cover all the necessary steps to enable screen sharing on Discord. We will also explore various customizable options, such as choosing specific application windows or sharing your entire screen. So, without further ado, let’s dive into the guide and get started with sharing your screen on Discord using a Mac!
Prerequisites
Before we proceed with the screen-sharing setup on Discord, ensure that you meet the following prerequisites:
- A Mac computer: Make sure you have a Mac device running macOS. Discord is compatible with macOS versions 10.10 or higher.
- A stable internet connection: Ensure that your internet connection is reliable to avoid any disruptions during screen sharing.
- Discord app: Download and install the Discord app on your Mac. You can find the latest version of Discord on their official website, and it’s available for free.
- Discord account: If you don’t already have one, create a Discord account. You can sign up for an account on Discord’s website or through the mobile app.
Once you have met these prerequisites, you’re ready to proceed with the screen-sharing setup on Discord. It’s important to have the necessary equipment and environment in place to ensure a smooth experience for both you and the participants who will be viewing your shared screen.
Now that you have the prerequisites covered, let’s move on and walk through the step-by-step process of sharing your screen on Discord using a Mac.
Step 1: Download and Install Discord
The first step to enable screen sharing on Discord is to download and install the Discord application on your Mac. Follow these steps:
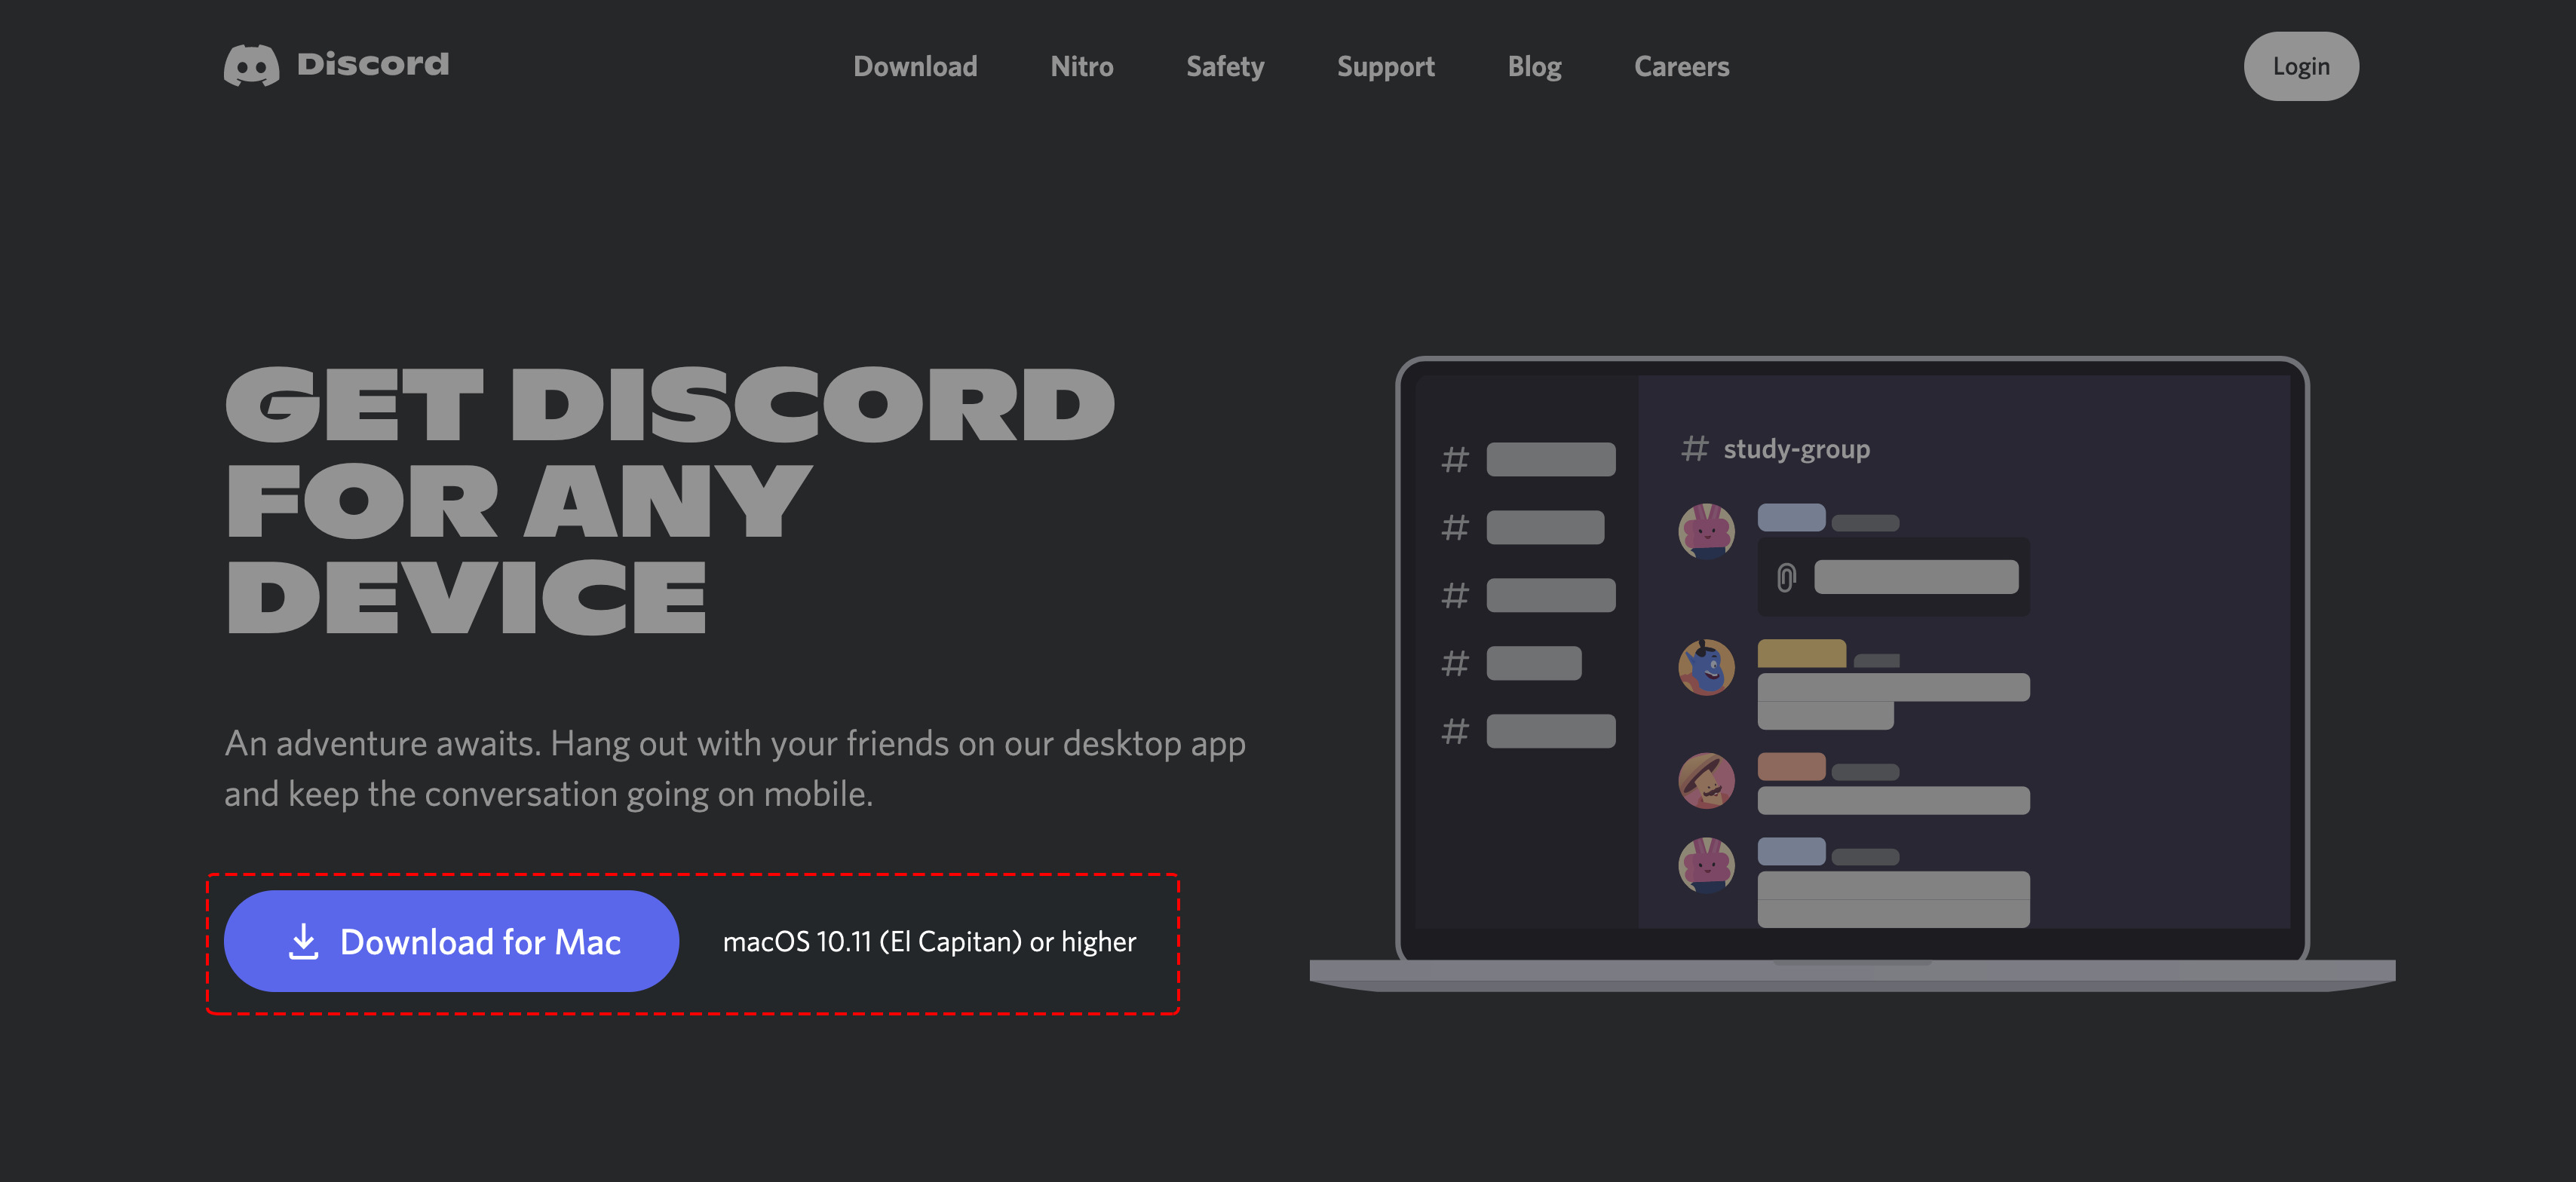
- Open your preferred web browser and navigate to the official Discord website.
- On the Discord homepage, locate and click on the “Download for Mac” button.
- This will initiate the download of the Discord installation file (typically a .dmg file).
- Once the download is complete, open the downloaded file by double-clicking on it. This will mount the Discord installation package.
- In the mounted package, you will find the Discord application icon. Drag and drop this icon into your “Applications” folder to install Discord.
- After the installation is complete, you can find the Discord app in your Applications folder. Double-click on the Discord icon to launch the application.
Now that you have successfully downloaded and installed Discord on your Mac, you are ready to proceed to the next step: logging in to Discord.
Step 2: Launch Discord
After you have installed Discord on your Mac, it’s time to launch the application. Follow these steps:
- Navigate to your “Applications” folder and locate the Discord app icon.
- Double-click on the Discord icon to open the application.
- Once Discord is launched, the initial login screen will appear.
- If you already have a Discord account, enter your email address and password in the provided fields. Then click on the “Login” button to proceed.
- If you don’t have a Discord account, click on the “Register” button to create a new account. Follow the prompts to set up your account, including providing an email address, username, and password.
- After logging in or creating a new account, Discord will open, and you will be directed to the default home screen.
With Discord successfully launched on your Mac and you logged in to your account, you’re now ready to move on to the next step: joining or creating a server on Discord.
Step 3: Log in to Discord
Once you have launched Discord on your Mac, the next step is to log in to your Discord account. Follow these steps:
- In the Discord application window, you will see a login screen with fields for your email address and password.
- Enter your registered email address in the “Email” field.
- In the “Password” field, enter the password associated with your Discord account.
- After ensuring that the login credentials are correct, click on the “Login” button.
- If the entered login credentials are valid, you will be successfully logged in to your Discord account, and Discord will open.
- If you encounter any login issues, double-check your email address and password to ensure they are correct. If you forgot your password, you can reset it by clicking on the “Forgot your password?” link and following the necessary steps.
Once you have logged in to your Discord account, you can start using the various features and functionalities offered by Discord, including screen sharing. Now let’s proceed to the next step: joining or creating a server on Discord.
Step 4: Join or Create a Server
After logging in to Discord on your Mac, the next step is to join or create a server. Discord servers are communities where you can connect with other users who share similar interests. To join or create a server, follow these steps:
- On the left-hand side of the Discord application window, you will see a column with various options. Look for the “Add a Server” button, which is represented by a plus (+) icon.
- Click on the “Add a Server” button. This will open a new window with two options: “Join a Server” and “Create a Server.”
- If you already have an invitation link to a server, click on the “Join a Server” option. Enter the invitation link in the provided field and click “Join.”
- If you want to create your own server, click on the “Create a Server” option. Enter the desired server name and choose a region for your server. Then click the “Create” button.
- Once you have joined or created a server, Discord will open the server interface, where you can access text channels, voice channels, and other features specific to that server.
Now that you are part of a server on Discord, you can proceed to the next step: choosing a voice channel for screen sharing. Keep in mind that screen sharing on Discord is currently only available in voice channels, not in direct messaging.
Step 5: Choose a Voice Channel
Once you have joined or created a server on Discord, the next step is to choose a voice channel where you will initiate the screen sharing. Follow these steps:
- In the Discord application window, locate the server that you want to use for screen sharing. Servers are listed on the left-hand side of the application.
- Click on the server’s name to expand it and reveal the available text and voice channels.
- Look for the voice channel that you want to use for screen sharing. Voice channels are typically listed under the “Voice Channels” section.
- Click on the voice channel’s name to join it. Once you join a voice channel, you will be able to communicate with other users who are also in that channel.
Choosing a voice channel is a crucial step, as screen sharing is only available in voice channels on Discord. Make sure to select the appropriate voice channel for your intended screen sharing session.
Now that you have joined a voice channel, you are ready to enable screen sharing in Discord. In the next step, we will walk you through the process of enabling screen sharing and start sharing your screen.
Step 6: Enable Screen Sharing
With Discord open and in the voice channel of your choice, you can now enable screen sharing. Follow these steps to enable screen sharing on Discord:
- In the voice channel interface, you will see a row of icons at the bottom. Look for the icon that resembles a computer screen with an arrow pointing upwards.
- Click on the screen sharing icon. This will open a new dialog box where you can customize your screen sharing settings.
- In the screen sharing settings dialog box, you will be presented with three options: “Your Entire Screen,” “Application Window,” and “Chrome Tab.” Choose the option that suits your needs.
- If you select “Your Entire Screen,” Discord will share your entire screen with the participants in the voice channel.
- If you choose “Application Window,” Discord will allow you to select a specific window or application to share. You can choose from a list of currently open applications.
- If you opt for “Chrome Tab,” Discord will let you select a specific tab from the Google Chrome browser to share.
- Once you have made your selection, click on the “Go Live” button to start sharing your screen.
By following these steps, you have successfully enabled screen sharing on Discord. The participants in the voice channel will now be able to view your shared screen, allowing for collaboration, presentations, and more.
In the next step, we will cover various customizable options to enhance your screen sharing experience on Discord. Stay tuned!
Step 7: Start Sharing Your Screen
Now that you have enabled screen sharing on Discord, it’s time to start sharing your screen with others in the voice channel. Follow these steps to begin sharing:
- After enabling screen sharing, you will see a preview of your screen in the center of the Discord window.
- Review the preview to ensure that you are sharing the correct screen, application window, or Chrome tab.
- If everything looks good, click on the “Share” button located in the bottom-right corner of the screen sharing preview.
- Once you click “Share,” your screen will be transmitted to the participants in the voice channel.
- The participants will be able to see what you are sharing on their Discord screens.
While sharing your screen, you can also continue to communicate with the other members in the voice channel using your microphone. This allows for real-time collaboration and discussion during the screen sharing session.
Remember, screen sharing on Discord is a powerful feature that enables you to demonstrate, explain, and collaborate effectively with others. Use it to enhance presentations, conduct tutorials, or simply share your experiences with your friends or community.
Now that you have started sharing your screen, let’s move on to the next step, where we explore various customizable options to enhance your screen sharing experience on Discord.
Step 8: Customize Your Screen Sharing Options
Discord offers several customizable options to enhance your screen sharing experience. These options allow you to adjust the settings according to your preferences and specific needs. Follow these steps to customize your screen sharing options:
- While sharing your screen on Discord, you will see a control bar at the top of the screen sharing window.
- Move your cursor to the top of the screen to reveal the control bar.
- Within the control bar, you will find various options to customize your screen sharing session.
- Audio Sharing: Click on the microphone icon to toggle audio sharing on or off. Enabling audio sharing allows the participants to hear the sounds from your computer while you are sharing your screen.
- Video Overlay: Click on the video overlay icon to toggle the display of your profile picture or video camera feed on the screen being shared. This can add a personal touch to your screen sharing session.
- Quality Settings: Click on the gear icon to access quality settings for your screen sharing. Adjusting the quality settings can optimize the performance of your screen sharing session based on your internet connection.
- Pause Sharing: To briefly pause the screen sharing without ending the session, click on the pause icon. This can be useful if you need to access sensitive information or switch to a different application temporarily.
By customizing these options, you can tailor your screen sharing experience on Discord to suit your specific requirements. It allows you to control what and how you share with the participants in the voice channel.
Now that you are familiar with customizing the screen sharing options, let’s move on to the next step: stopping screen sharing on Discord.
Step 9: Stop Screen Sharing
When you are ready to conclude your screen sharing session on Discord, it’s important to know how to stop sharing your screen. Follow these steps to stop screen sharing:
- In the screen sharing window, locate the control bar at the top of the screen.
- Move your cursor to the top of the screen to reveal the control bar.
- Within the control bar, you will find the “Stop Sharing” button.
- Click on the “Stop Sharing” button to end the screen sharing session.
- Once you stop sharing, the participants in the voice channel will no longer see your screen. You will return to the regular Discord interface.
Stopping screen sharing is as simple as clicking a button, and it allows you to regain your privacy and control over your screen and applications.
Remember to stop screen sharing once you have achieved your objective or no longer wish to share your screen with others. It’s a good practice to respect the privacy and boundaries of the participants in the voice channel.
Congratulations! You have completed the process of screen sharing on Discord using your Mac. Now you can confidently share your screen, collaborate with others, and enhance your communication experience on Discord.
It’s important to note that the steps and options discussed in this guide may vary slightly based on updates to the Discord application. Discord regularly updates its features and interface to provide the best user experience. If you encounter any difficulties, refer to the official Discord documentation or seek assistance from the Discord community.
Conclusion
Screen sharing on Discord using a Mac opens up a world of possibilities for collaboration, communication, and sharing experiences. Whether you’re giving a presentation, working on a project with your team, or simply engaging in a fun gaming session, Discord’s screen sharing feature allows you to connect and interact with others seamlessly.
In this guide, we walked through the step-by-step process of sharing your screen on Discord using a Mac. We covered everything from downloading and installing Discord to customizing your screen sharing options. By following these steps, you can confidently navigate the process and make the most out of your screen sharing sessions on Discord.
Remember to ensure you meet the prerequisites, have the Discord application installed, and are logged in to your account. Join or create a server, choose a voice channel, and enable screen sharing. Customize your settings according to your needs, start sharing your screen, and don’t forget to stop sharing when you’re finished.
Discord’s screen sharing feature enhances collaboration, learning, and sharing experiences with others. It allows you to visually demonstrate concepts, provide support, and engage in real-time interactions, all within the Discord platform.
Now that you have gained a thorough understanding of screen sharing on Discord using a Mac, you are ready to take advantage of this powerful feature. Experiment, explore, and enjoy the benefits of sharing your screen on Discord!