Introduction
Welcome to this guide on how to screen share on Discord! Discord is a popular communication platform used by gamers, professionals, and communities to connect and interact with each other. Whether you want to show off your gaming skills, collaborate on a project, or provide a tutorial to your friends, screen sharing on Discord can be a useful feature.
In this article, we will walk you through the step-by-step process of screen sharing on Discord. By following these simple instructions, you’ll be able to share your screen with others in no time. So, let’s dive in and learn how to make the most of this powerful feature on Discord!
But before we get started, it’s important to note that screen sharing is available on the desktop version of Discord for Windows, macOS, and Linux. The mobile versions of Discord do not currently support screen sharing.
Please keep in mind that screen sharing may require a good internet connection and computer performance to ensure smooth and uninterrupted sharing.
Now, let’s get down to business and learn how to screen share on Discord!
Step 1: Download and install the Discord app
The first step in screen sharing on Discord is to download and install the Discord app on your device. Discord is available for Windows, macOS, and Linux, so make sure to choose the version that is compatible with your operating system.
To download Discord, you can visit the official Discord website or search for “Discord” in your preferred search engine. Once you find the official website, navigate to the download section and choose the version that matches your operating system.
After downloading the Discord installation file, open it to begin the installation process. Follow the on-screen instructions to complete the installation. Once the installation is complete, you’ll need to create an account or log in if you already have one.
Creating an account on Discord is easy. Simply enter your desired username, email address, and password. You may also need to solve a captcha or go through a verification process to ensure you’re a human user.
Once you’ve created your account or logged in, you’re ready to start using Discord and begin your journey into screen sharing!
Quick tip: Discord also offers a web version that you can use without downloading the app. However, screen sharing is currently only available on the desktop version, so it’s recommended to use Discord on your computer for this feature.
Step 2: Create or join a server on Discord
Once you have installed and logged into the Discord app, the next step is to create or join a server. Servers in Discord act as communities or groups where you can interact with other users who share similar interests.
If you want to create your own server, click on the “plus” button on the left side of the Discord interface. Select “Create a Server” and follow the prompts to set up your server. Give your server a unique name, select a region closest to your location, and choose an image for your server icon. You can also customize various other settings according to your preferences.
If you prefer to join an existing server, you can either ask someone to invite you or browse through the server directories available on Discord. These directories categorize servers based on different interests and categories, making it easy for you to find a server that suits your needs. Simply click on the server invitation link or use the search functionality to join the server you’re interested in.
Once you have created or joined a server, you will see the server listed on the left-hand side of the Discord interface. By clicking on the server name, you can access the server’s channels and interact with other members in text channels, voice channels, or video channels.
Pro tip: As a server member, make sure to familiarize yourself with the server rules and guidelines to ensure a positive and respectful experience for yourself and others.
Now that you have created or joined a server on Discord, you’re one step closer to unleashing the power of screen sharing in your virtual communication!
Step 3: Launch a voice or video call
Before you can start screen sharing on Discord, you’ll need to launch a voice or video call. This will allow you to create a connection with the person or group you want to share your screen with.
To initiate a voice or video call, follow these steps:
- Open the Discord app and navigate to the server where you want to initiate the call.
- On the left-hand side, you’ll find a list of voice channels. Choose a voice channel by clicking on it.
- Once you’re in the voice channel, you’ll see a toolbar at the bottom of the Discord interface. Click on the phone or camera icon, depending on whether you want to start a voice or video call.
- If you’re starting a video call, make sure you have a webcam connected to your computer so that others can see you.
When the call is initiated, other members in the voice channel will receive a notification. They can choose to join the call if they wish to participate.
Pro tip: If you want to mention specific users in your server, you can use the @ symbol followed by their username to notify them about the call. For example, “@username, let’s start a voice call!”
Once you have launched a voice or video call, you’re ready to move on to the next step: screen sharing on Discord. Remember, screen sharing is available during voice and video calls, so make sure you have an active call before proceeding.
Step 4: Access the screen share feature
Now that you’re in a voice or video call on Discord, it’s time to access the screen share feature. Screen sharing allows you to broadcast your screen to other participants in the call, enabling them to see exactly what you’re seeing on your computer.
To access the screen share feature, follow these steps:
- While in the voice or video call, look for the toolbar at the bottom of the Discord interface. You’ll see various icons, including the microphone, camera, and screen share icons.
- Click on the screen share icon, which looks like a computer monitor.
- A pop-up window will appear, giving you options to choose which screen or application you want to share.
You can choose to share your entire screen or just a specific application window. Discord also allows you to share audio along with your screen, which can be useful if you want to share video and audio content simultaneously.
Note: Keep in mind that screen sharing on Discord is currently only available one-to-one or in small group calls. If you’re in a server with a large number of participants, you may need to join a voice channel with fewer people in order to access the screen share feature.
Now that you have accessed the screen share feature, you’re ready to move on to the next step: choosing the specific screen or application you want to share with others on Discord.
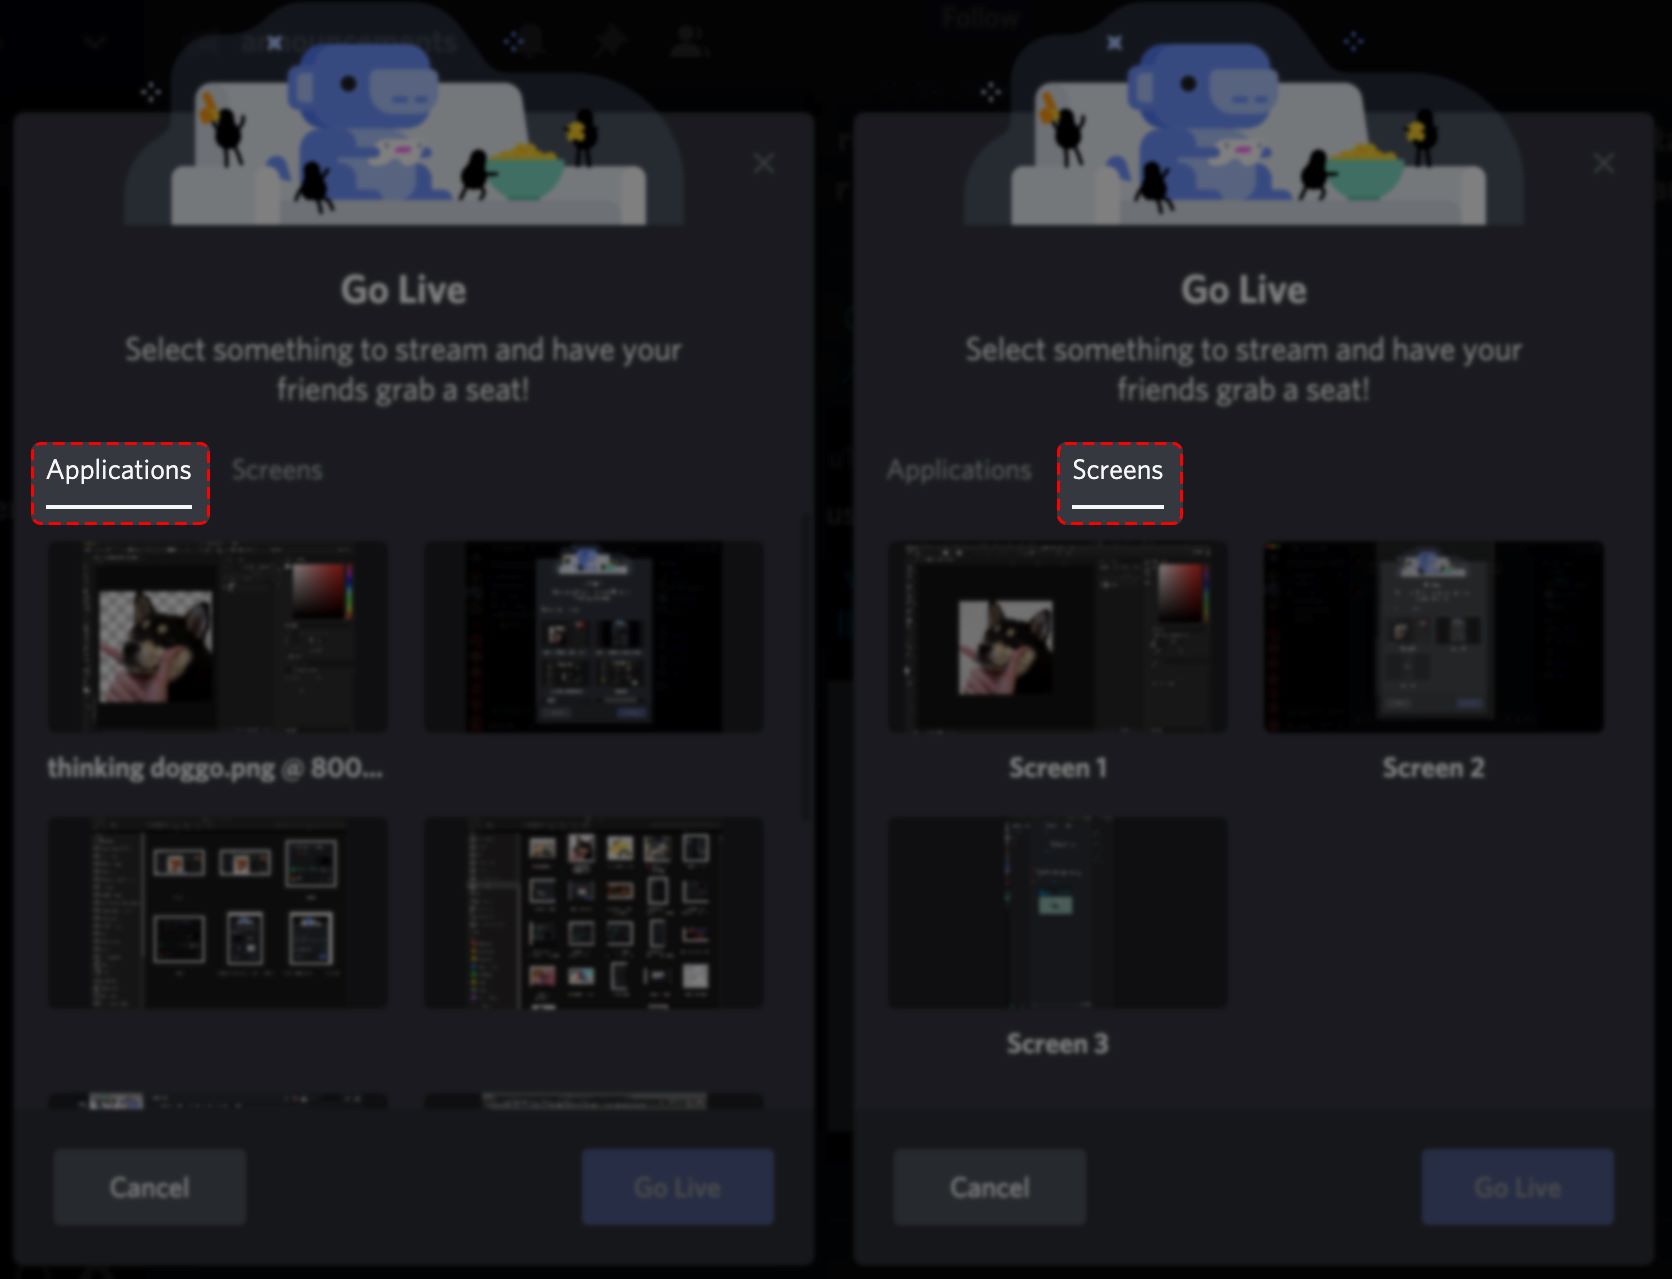
Step 5: Choose the screen you want to share
After accessing the screen share feature on Discord, the next step is to choose the screen or application you want to share with other participants in the call. This allows you to control exactly what others will see on their screens while you’re presenting.
To choose the screen you want to share, follow these steps:
- Once you click on the screen share icon in the voice or video call toolbar, a pop-up window will appear.
- In the pop-up window, you’ll see a list of available screens and applications that you can share.
- If you want to share your entire screen, click on the screen that displays your desktop or main workspace.
- If you want to share a specific application window, locate and click on the window you want to share. This could be a web browser, a document editor, a game, or any other application you’re using at the moment.
Once you have selected the screen or application you want to share, it will be highlighted or outlined in the pop-up window. This indicates that others will see this specific screen content when you begin screen sharing on Discord.
If you need to switch screens or applications during the call, you can simply repeat this process and choose a different screen or application to share.
Pro tip: Before sharing your screen, it’s a good idea to organize your desktop and close any unnecessary applications or documents. This will help ensure a cleaner and more focused presentation for the viewers.
Now that you have chosen the screen or application you want to share, you’re ready to proceed with the next step: beginning the screen sharing session on Discord!
Step 6: Begin screen sharing on Discord
Now that you have selected the screen or application you want to share, it’s time to begin the screen sharing session on Discord. This will allow others in the call to see exactly what you’re presenting on your screen.
To start screen sharing on Discord, follow these steps:
- Once you have chosen the screen or application to share, click on the “Go Live” button located in the bottom right corner of the pop-up window.
- After clicking the “Go Live” button, Discord will start the screen sharing process.
- A live preview of your shared screen will appear on your screen, indicating that the screen sharing session has started.
Once your screen sharing session is live, other participants in the call will be able to see your shared screen or application. They will be able to follow along with your actions and view any content you present.
Important reminder: When you’re sharing your screen on Discord, keep in mind that others will also be able to see notifications and pop-ups on your computer screen. Take care to close any personal or confidential information that you don’t want to be visible to others.
In addition to sharing your screen, Discord also allows you to enable audio sharing. This will transmit the sound from your computer to other participants in the call, making it easier to provide a complete multimedia experience during your presentation.
Now that you have started the screen sharing session, you’re ready to move on to the next step: adjusting the screen share settings to fit your needs.
Step 7: Adjust screen share settings
Once you have begun the screen sharing session on Discord, you may want to adjust the screen share settings to customize your experience and ensure smooth communication with other participants.
Here are some settings you can consider adjusting:
- Enable/disable audio sharing: If you want to share audio from your computer along with your screen, make sure to enable audio sharing in the screen share settings. This will allow others to hear any sounds or audio playing on your computer while you’re screen sharing.
- Toggle on/off mouse cursor visibility: You have the option to enable or disable the visibility of your mouse cursor during the screen sharing session. This can be useful if you want to draw attention to specific areas or actions on your screen.
- Adjust screen quality: Discord provides options to adjust the screen share quality based on your internet connection and computer performance. You can choose between options such as auto, 720p, and 1080p to optimize the screen sharing experience.
- Switch between screens or applications: If you need to switch between different screens or applications during the screen sharing session, Discord allows you to easily do so. Simply bring up the screen share settings and select the new screen or application you want to share.
By adjusting these screen share settings, you can tailor your presentation to meet your specific needs and preferences. This ensures that you can deliver the best possible screen sharing experience for all participants in the call.
Now that you have adjusted the screen share settings, you’re almost ready to wrap up your screen sharing session. The final step is to end the screen share and conclude your presentation on Discord.
Step 8: End the screen share session
When you’ve completed your screen sharing session on Discord, it’s important to properly end the session to ensure a smooth transition and allow other participants to resume their own activities.
To end the screen share session, follow these simple steps:
- Locate the screen share toolbar at the top of your screen while screen sharing on Discord.
- In the toolbar, you’ll find an option to stop or end the screen share session. It may be indicated by an icon resembling a computer monitor or a “Stop sharing” button.
- Click on the icon or button to stop sharing your screen.
Once you’ve ended the screen share session, your screen will no longer be visible to others in the call. You will be returned to the regular voice or video call interface on Discord.
Remember to inform the other participants that you have ended the screen share session so they are aware that your screen is no longer being shared. This will allow them to continue their conversation or activities as needed.
If you need to start a new screen sharing session at any point, you can simply follow the earlier steps to access the screen share feature again.
Now that you have successfully ended the screen share session, you can reflect on your presentation and discuss any additional topics or questions with the other participants.
Congratulations! You have mastered the art of screen sharing on Discord, and you’re now equipped to share your screen, collaborate, and engage with others effectively and effortlessly.
Conclusion
Screen sharing on Discord is an incredibly useful feature that allows you to share your screen or specific applications with others during voice or video calls. Whether you are gaming, collaborating on a project, or providing a tutorial, screen sharing enhances communication and enables a more immersive and interactive experience.
In this guide, we have walked you through the step-by-step process of screen sharing on Discord. We covered everything from downloading and installing the Discord app to creating or joining a server, launching a voice or video call, accessing the screen share feature, choosing the screen or application to share, adjusting settings, and finally, ending the screen share session with ease.
Remember that while screen sharing has numerous benefits, it’s important to use this feature responsibly and considerately. Ensure that you only share content that is appropriate and relevant to the conversation at hand. Be mindful of any sensitive or confidential information that may be visible on your screen and close any unnecessary applications or documents before sharing your screen.
By following the steps outlined in this guide, you can confidently engage in screen sharing on Discord and significantly enhance your communication and collaboration with others. So go ahead, download Discord, create a server, and start sharing your screen with the world!
Happy screen sharing!