Introduction
Welcome to the world of Discord! Whether you’re a gamer looking to connect with friends or a community manager seeking a platform for communication, Discord is an excellent choice. With its intuitive interface, comprehensive features, and cross-platform compatibility, Discord has become the go-to application for gamers and communities alike.
In this guide, we will walk you through the process of downloading Discord on your PC. Whether you’re a Windows, Mac, or Linux user, the steps are relatively straightforward and can be completed in just a few minutes.
Before we dive into the steps, let’s take a moment to understand what Discord is. Essentially, Discord is a free voice, video, and text communication platform designed for gamers. It provides a seamless and interactive experience for users to connect with their buddies or form communities centered around their favorite games or shared interests.
With Discord, you can create or join servers, which act as virtual hangout spots. Within these servers, you have channels dedicated to different topics or activities. You can chat, share media, voice chat during gameplay, and even stream your screen, making it a versatile platform for various types of interactions.
Now that you have a basic understanding of Discord, let’s get started with the steps to download it on your PC. Whether you’re a seasoned Discord user or a newbie, this guide will ensure you have a smooth installation process and are ready to dive into the vibrant Discord community.
Step 1: Go to the Discord Website
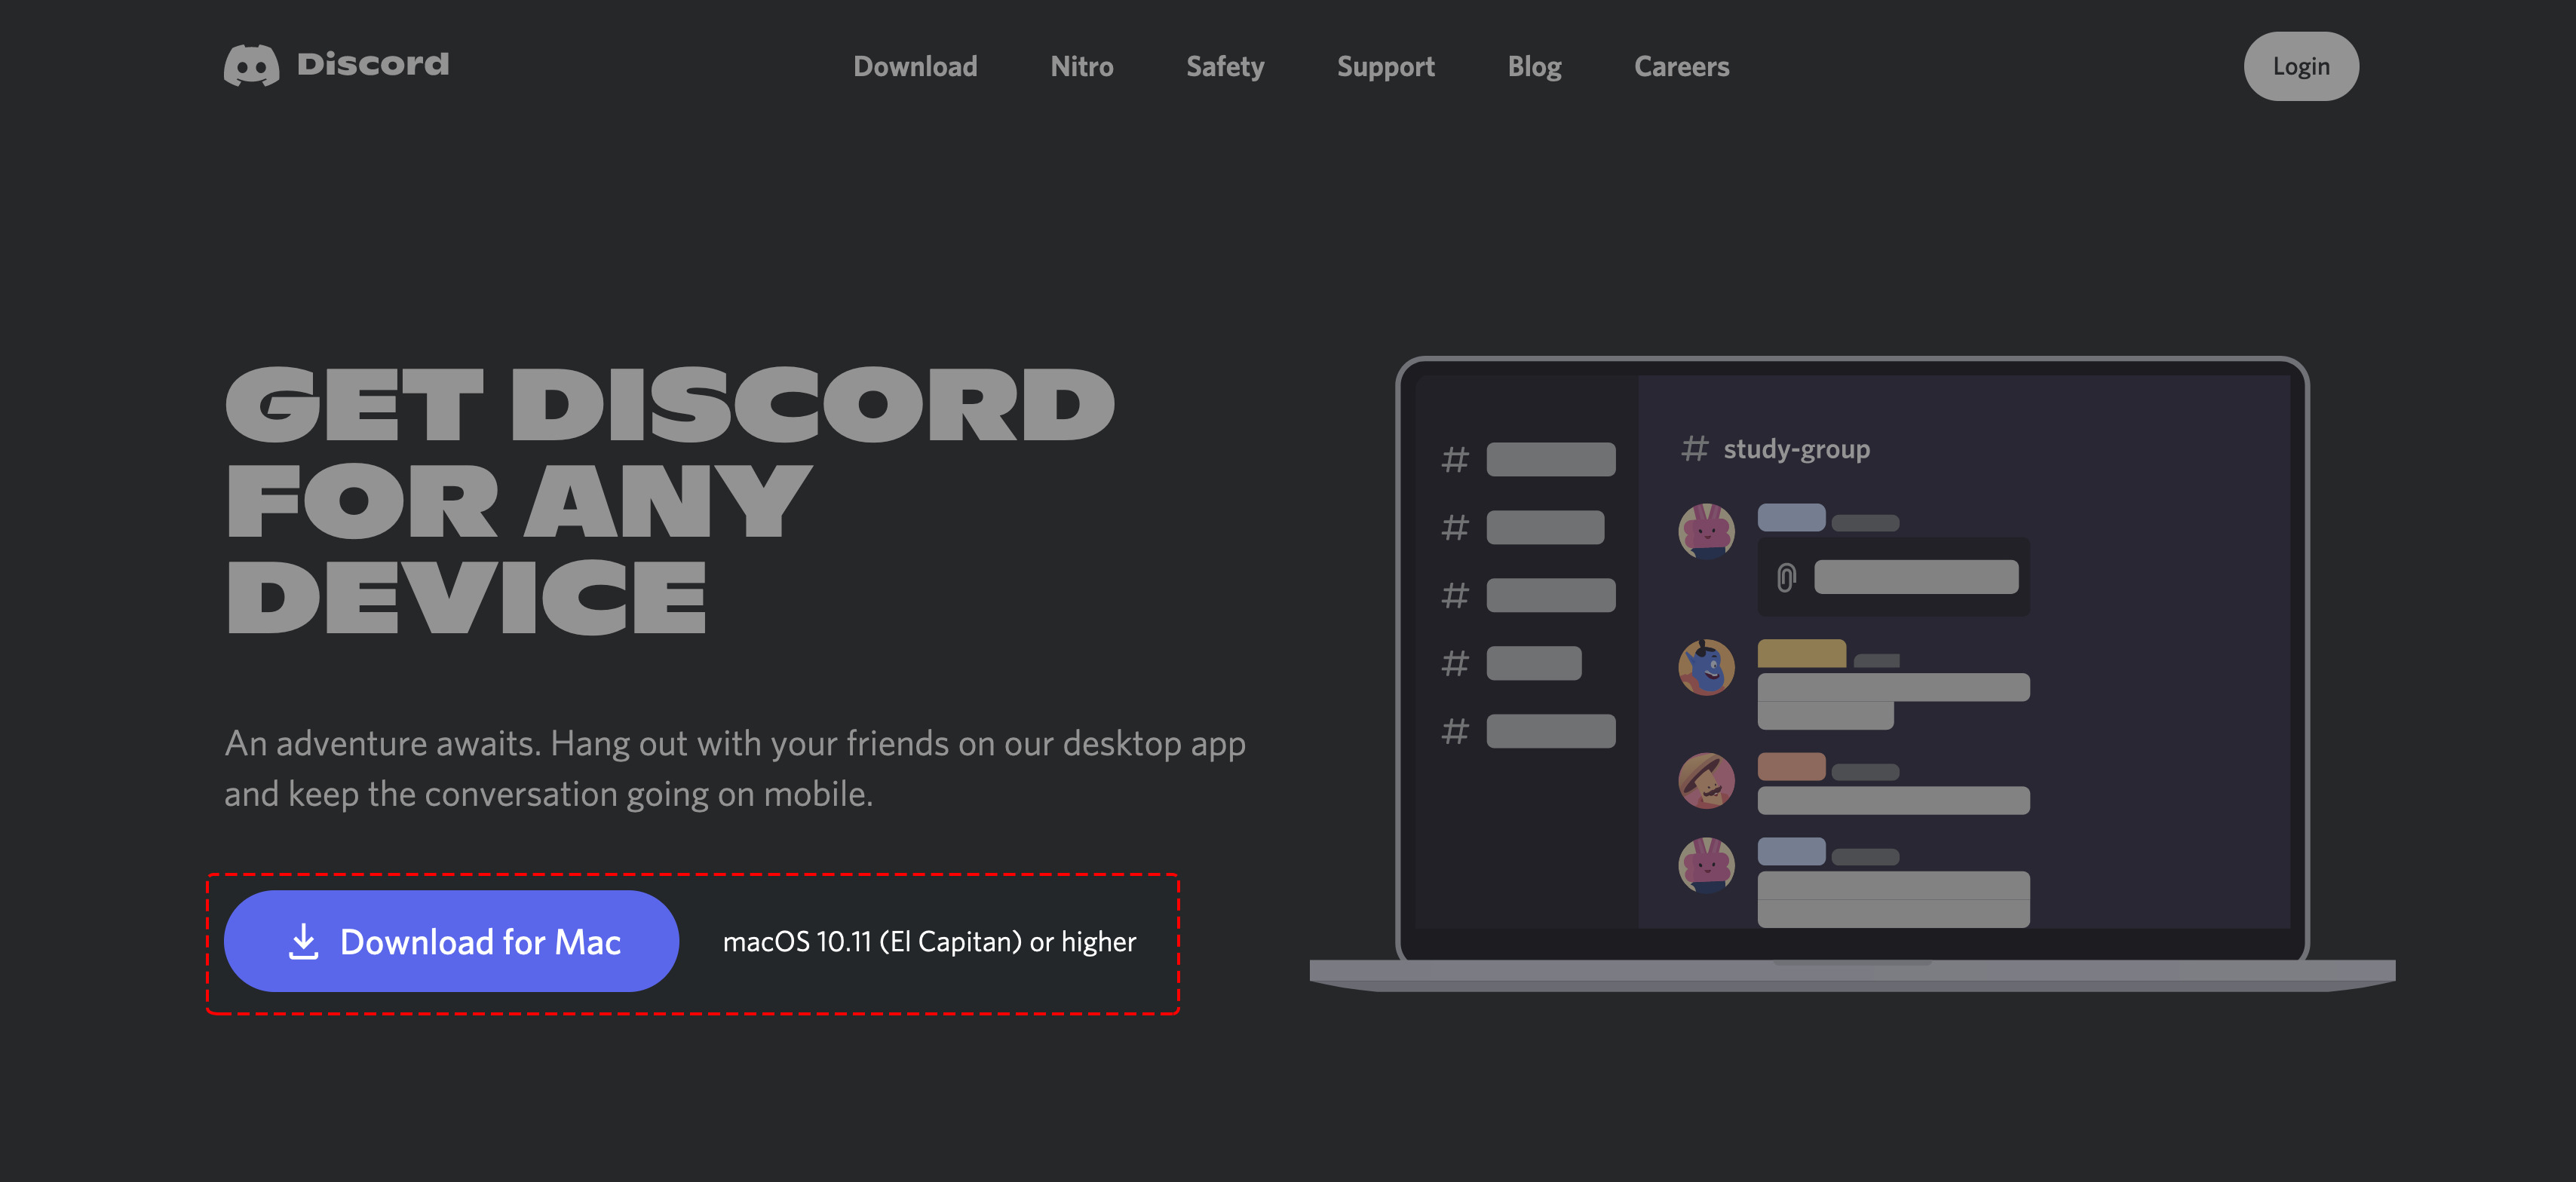
The first step to downloading Discord on your PC is to visit the official Discord website. To do this, open your preferred web browser and type in the URL: https://discord.com.
Once you’re on the Discord website, you’ll be greeted by a clean and user-friendly interface. Take a moment to explore the website—it provides valuable information about Discord’s features, pricing plans, and more. However, for now, our focus is on downloading the application.
At the center of the Discord website, you’ll find a large blue button with the text “Download for Windows” if you’re using a Windows PC, “Download for macOS” if you’re on a Mac, or “Download for Linux” if you’re using a Linux-based operating system. Click on the appropriate button for your PC.
This will initiate the download process for the Discord installer file. The installer file is relatively small in size, so it won’t take up much of your internet bandwidth. Once the download is complete, you’re ready to move on to the next step.
Note: If you’re using a different browser or have a specific preference for downloading files, you can also right-click on the download button and choose “Save link as” or a similar option to save the installer file to a specific location on your PC.
Now that you’ve successfully reached the Discord website and downloaded the installer file, let’s move on to the next step: choosing the correct version of Discord for your PC.
Step 2: Click on the Download Button
Now that you’re on the official Discord website, the next step is to click on the “Download” button specific to your operating system.
Take a moment to ensure that you’re on the correct download page for your PC’s operating system. If you’re on a Windows PC, make sure you’re clicking the “Download for Windows” button. If you’re on a Mac, click the “Download for macOS” button, and if you’re using Linux, click the “Download for Linux” button.
Once you’ve identified the correct download button, click on it to initiate the download process.
Depending on your browser settings, you might be prompted to confirm the download or choose a location to save the installer file. If prompted, follow the on-screen instructions to proceed.
It’s worth noting that Discord is a lightweight application, so the download should complete relatively quickly, even if you’re on a slower internet connection. The installer file is typically around 50-60 MB in size, so be patient while the download completes.
Once the download is finished, you’re all set to move on to the next step—installing Discord on your PC.
Note: If you encounter any issues with the download or have any concerns about the authenticity of the website, make sure you’re on the official Discord website at https://discord.com. This ensures the download is safe and secure.
Now that you’ve successfully downloaded the Discord installer file, let’s proceed to the next step: choosing the correct version of Discord for your PC.
Step 3: Choose the Correct Version
After successfully downloading the Discord installer file, the next step is to choose the correct version of Discord based on your PC’s operating system.
If you’re using a Windows PC, the downloaded file should be in the “.exe” format, which stands for executable. This format is compatible with Windows operating systems.
If you’re on a macOS device, the downloaded file will have the “.dmg” extension, which is the standard format for macOS installation files.
For Linux users, the downloaded file will be in a format specific to Linux distributions, such as “.deb” for Debian-based distributions or “.rpm” for Red Hat-based distributions.
It’s essential to choose the correct file format for your operating system to ensure a smooth installation process and compatibility with your PC.
If you have any doubts about which version to select, you can check your PC’s operating system information to confirm. On Windows, you can go to “Settings” and then click on “System” or “About” to view your operating system details. On macOS, you can click on the Apple logo at the top left corner of your screen, then select “About This Mac.” On Linux, you can open Terminal and type in the command “lsb_release -a” to display your Linux distribution information.
Once you have identified the correct version of Discord for your PC, double-click on the installer file to begin the installation process. If prompted for permission, allow the installer to make changes to your device.
Note: If you accidentally downloaded the wrong version of Discord, don’t worry. Simply delete the incorrect installer file and go back to the Discord website to download the correct version.
With the correct version of Discord ready for installation, let’s proceed to the next step: running the Discord installer on your PC.
Step 4: Run the Discord Installer
Now that you have the correct version of Discord downloaded on your PC, it’s time to run the installer and begin the installation process.
Locate the Discord installer file that you downloaded in the previous steps. It should be saved in your Downloads folder or in the location where you chose to save it.
Double-click on the installer file to run it. Depending on your operating system, you might see a security prompt asking for permission to run the installer. Click “Yes” or “Allow” to proceed.
The Discord installer wizard will now open. The first screen you see will typically be the Discord Terms of Service. It’s important to read through these terms to understand your rights and responsibilities when using Discord. Once you’ve reviewed the terms, check the box to indicate that you agree to them, and then click “Next” or “Continue.”
The wizard will guide you through the remaining installation steps, including choosing the installation location and any additional options you may have, such as creating desktop shortcuts or adding Discord to the Start menu or taskbar.
During the installation process, you might see a progress bar indicating the status of the installation. The time it takes to install Discord will vary depending on your PC’s performance and internet speed, but it should generally be a quick process.
Once the installation is complete, you’ll see a confirmation screen, indicating that Discord has been successfully installed on your PC. You can usually click on a “Finish” or “Close” button to close the installer.
Congratulations! You have now successfully run the Discord installer on your PC. The next step is to sign in or create a Discord account so you can start using Discord’s features and connect with your friends and communities.
Let’s move on to the next step: signing in or creating a Discord account.
Step 5: Complete the Installation Process
After running the Discord installer and confirming that the application has been successfully installed on your PC, it’s time to complete the installation process.
Once the installation is complete, you may see a prompt asking if you want to launch Discord immediately. You can choose to launch Discord right away or close the prompt and manually open Discord later.
If you have chosen to launch Discord immediately, the application will open, and you will be presented with the Discord login screen.
If you already have a Discord account, enter your email or phone number and password in the respective fields, and then click on the “Login” button to proceed. If you have enabled two-factor authentication on your account, you will also need to enter the authentication code when prompted.
If you don’t have a Discord account yet, click on the “Register” button to create a new account. Follow the on-screen instructions to enter your desired username, email or phone number, password, and any other information required to complete the registration process.
After logging in or creating an account, you might be prompted to customize your Discord experience. This includes choosing your profile picture, setting a status message, and adjusting privacy settings. Take your time to personalize these options according to your preferences.
Once you have completed the initial setup and customization, you will be directed to the Discord home screen, where you can start exploring all the features and functionalities Discord has to offer.
From here, you can join or create servers, add friends, join voice channels, text chat with other users, and much more. Discord offers an array of features that cater to various interests and needs, and the possibilities are virtually endless.
Congratulations! You have now completed the installation process and are ready to start using Discord on your PC to connect and communicate with friends, fellow gamers, and communities.
Now that you have successfully completed the installation, take some time to familiarize yourself with the Discord interface and its different components.
In the next step, we will explore how to customize your Discord settings to optimize your experience on the platform.
Step 6: Sign in or Create a Discord Account
After completing the installation process, the next step is to sign in to your existing Discord account or create a new Discord account if you don’t have one.
If you already have a Discord account, simply launch the Discord application on your PC. You will be greeted with the Discord login screen. Enter your registered email or phone number and password in the respective fields and click on the “Login” button to proceed.
If you have enabled two-factor authentication (2FA) on your account, you will be prompted to enter the authentication code generated by the authentication app on your phone or other registered devices.
If you don’t have a Discord account yet, click on the “Register” button on the Discord login screen to create a new account.
Fill in the required fields on the registration page, including your desired username, email or phone number, and password. Make sure to choose a strong and secure password to protect your account.
You may also have the option to verify your email or phone number during the registration process. This step helps to secure your account and enables you to recover your account if you ever lose access.
Once you’ve filled in all the necessary information, click on the “Register” or “Create Account” button to complete the account creation process.
After signing in or creating your Discord account, you may be prompted to add friends or join existing servers. You can search for your friends using their Discord usernames, or you can request their unique Discord tags to send friend requests. To join servers, you can either search for specific communities or receive invite links from friends or communities you’re interested in.
Congratulations! You have now successfully signed in to your Discord account or created a new account. You are ready to explore and enjoy all the features Discord has to offer.
Now that you’re signed in to your Discord account, let’s move on to the next step: customizing your Discord settings.
Step 7: Customize Your Discord Settings
After signing in to your Discord account, it’s time to personalize your Discord experience by customizing your settings.
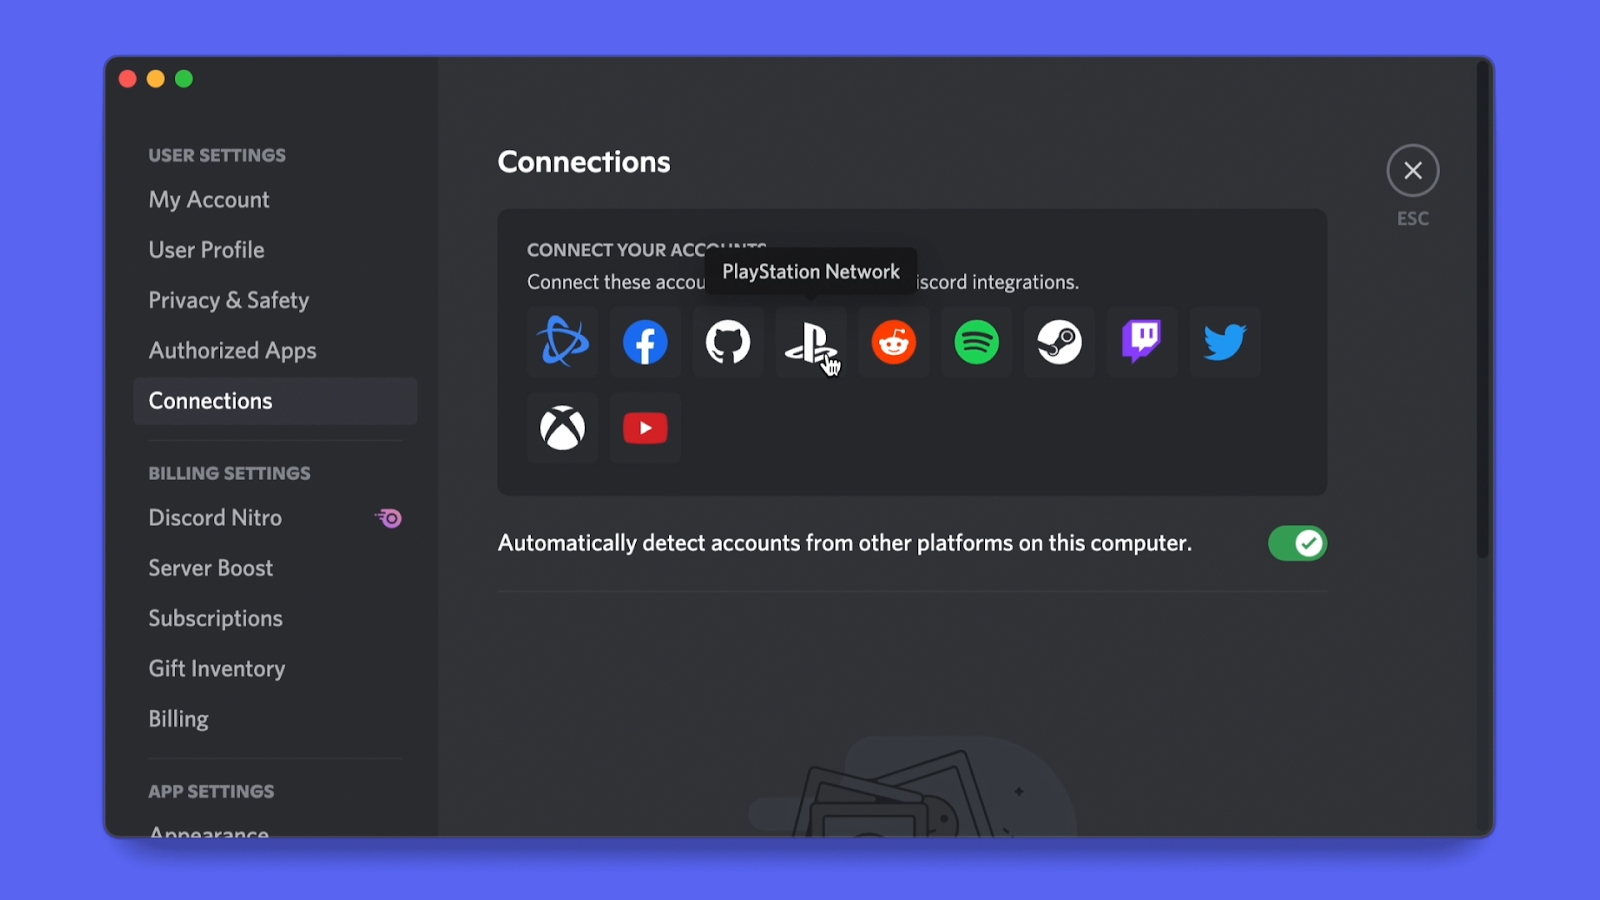
To access the settings, click on the gear icon located at the bottom left corner of the Discord window. This will open the Discord settings menu.
Within the settings menu, you’ll find various categories that allow you to adjust different aspects of your Discord experience, such as appearance, notifications, voice and video settings, and privacy options.
Here are some key settings you may want to consider customizing:
- Appearance: Customize the theme and color scheme of Discord to suit your personal preference. You can also change the layout and font settings.
- Notifications: Configure how you receive notifications for messages, mentions, friend requests, and other activities on Discord. You can choose to receive desktop notifications, push notifications on mobile, or disable notifications altogether.
- Voice and Video: Adjust your microphone and speaker settings for voice calls or video chats on Discord. You can also configure advanced options such as noise suppression, echo cancellation, and input sensitivity.
- Privacy and Safety: Manage your privacy settings, including who can send you friend requests, who can direct message you, and how your online status is displayed to others. You can also enable two-factor authentication (2FA) for added security.
- Keybinds: Customize keyboard shortcuts for quick access to Discord features, such as mute/unmute, push to talk, and switching between channels.
Take your time to explore the different settings categories and adjust them according to your preferences. Feel free to experiment and find the settings that enhance your Discord experience.
Keep in mind that you can always come back to the Discord settings menu whenever you need to make changes or readjust your settings.
Once you have customized your settings to your satisfaction, you’re ready to fully immerse yourself in the Discord experience. Join communities, participate in conversations, voice chat with friends, and make the most of all the features Discord has to offer.
In the next step, we’ll cover the basics of getting started with Discord on your PC and how to navigate the Discord interface.
Step 8: Start Using Discord on PC
Now that you have completed the setup process and customized your Discord settings, it’s time to start using Discord on your PC.
The Discord interface consists of various components, each serving a specific purpose to make your communication and interaction seamless.
Here are some key elements of the Discord interface you should familiarize yourself with:
- Servers: Servers are the backbone of Discord, where communities gather to connect and collaborate. You can join existing servers or create your own. To join a server, click on the plus (+) icon in the left sidebar and enter a valid invitation link. To create a server, click on the plus (+) icon, select “Create a Server,” and follow the prompts to set up your server.
- Channels: Within each server, you’ll find channels that serve as dedicated spaces for specific topics or conversations. Text channels are used for sending and receiving messages, while voice channels allow for real-time voice communication. You can join or leave channels by clicking on their respective names.
- User List: The user list displays all the members currently online in the server. You can see their usernames, avatars, and online status. You can also right-click on a user to access various options, such as sending direct messages, adding them as friends, or managing server permissions.
- Text Chat: Text chat allows you to send messages, emojis, and files to other users in the server. Simply click on the desired text channel and start typing in the input field at the bottom of the Discord window. Press Enter to send your message.
- Voice Chat: Voice chat enables you to have real-time voice conversations with other users in a voice channel. To join a voice channel, simply click on its name, and your microphone will be activated as long as it’s enabled in your settings. You can also adjust voice settings, such as volume and input sensitivity, by clicking on the gear icon in the bottom left corner of a voice channel.
- Direct Messages: Direct messages are private conversations between you and other Discord users. You can initiate a direct message by clicking on the plus (+) icon in the left sidebar and selecting “Message.” Enter the username or Discord tag of the person you want to message and start your conversation.
These are just a few essential elements of Discord on PC. As you explore the platform further, you’ll discover additional features and functionalities, such as screen sharing, server moderation tools, bots, and more.
Remember that Discord is designed to be user-friendly and intuitive. Don’t hesitate to experiment, ask questions, and explore the various options available to you.
Now that you’re familiar with the basics of using Discord on your PC, it’s time to embark on your Discord journey. Connect with friends, join communities, engage in conversations, and make the most of this incredible communication platform.
Enjoy your Discord experience!
Conclusion
Congratulations! You have successfully learned how to download Discord on your PC. Discord is an incredible platform that offers a seamless and interactive communication experience for gamers and communities.
In this guide, we walked you through the step-by-step process of downloading Discord, selecting the correct version for your operating system, running the installer, signing in or creating a new Discord account, customizing your settings, and finally, getting started with Discord on your PC.
By following these steps, you are now equipped to connect with friends, join gaming communities, collaborate with teammates, and enjoy all the features Discord has to offer.
Remember to take advantage of the customization options available to personalize your Discord experience. From changing your appearance settings to adjusting your privacy and notification preferences, Discord allows you to tailor the platform to your liking.
As you continue to use Discord, make sure to explore the various features and functionalities it offers. From joining voice channels for real-time conversation to participating in text chat discussions, Discord provides a versatile platform for communication and collaboration.
Don’t forget to regularly check for updates to ensure you have the latest version of Discord with all the latest features and bug fixes.
Whether you’re a gamer, community manager, or simply looking for a versatile communication tool, Discord is an excellent choice. Enjoy connecting with friends, building communities, and experiencing the vibrant Discord community.
Happy Discord-ing!