Introduction
Welcome to the magical world of Disney! Whether you’ve recently experienced the enchantment of a Disney vacation or have plans to embark on one in the future, capturing and preserving the memories is an important part of the experience. And that’s where Disney Memory Maker comes in.
Disney Memory Maker is a fantastic service offered by Disney that allows you to digitally collect and download all the photos and ride videos taken by Disney’s professional photographers and ride cameras throughout your vacation. With Memory Maker, you won’t have to worry about carrying around a camera or missing out on capturing those special moments. All you need to do is smile and enjoy every magical moment, while the Memory Maker photographers and ride cameras capture the memories for you.
In this guide, we will walk you through the step-by-step process of downloading all the photos from your Disney Memory Maker. Whether you want to relive those thrilling rides, cherish the character meet and greets, or commemorate the joy on your loved one’s faces, this guide will show you how to effortlessly access and save those precious memories.
We will explore how to purchase the Disney Memory Maker, link it to your My Disney Experience account, and then capture all the magical photos and ride videos throughout your vacation. Finally, we will delve into the various options for downloading and organizing your Disney memories.
So, let’s get started on this journey to unlock the digital treasure trove of memories captured by Disney Memory Maker!
What is Disney Memory Maker?
Disney Memory Maker is a must-have service for anyone planning a trip to the Walt Disney World Resort in Florida. It is a digital photo package that allows you to capture and download all the photos and ride videos taken by Disney’s professional photographers and ride cameras throughout your vacation.
With Disney Memory Maker, you won’t have to worry about lugging around a camera or missing out on capturing those special moments. Disney’s team of talented photographers will be present throughout the parks, capturing every magical moment as you explore the enchanting world of Disney. From character meet and greets to iconic park landmarks, they will ensure that your memories are beautifully documented.
But Memory Maker doesn’t stop at just photos. It also includes ride videos from select attractions such as Tower of Terror and Seven Dwarfs Mine Train. So, not only can you relive the excitement of these unforgettable experiences, but you can also rewatch the reactions of yourself and your loved ones as you embark on these thrilling adventures.
One of the best features of Disney Memory Maker is the convenience it provides. You don’t have to worry about asking strangers to take your photos or carrying around multiple devices. Instead, you can focus on enjoying the magic of Disney and let the Memory Maker photographers capture all the joy and excitement of your vacation.
Once all the photos and videos are taken, they are automatically linked to your My Disney Experience account, making them easily accessible and ready for download. This means that you can view, share, and download your memories from your smartphone, tablet, or computer. It’s a convenient and hassle-free way to preserve the highlights of your Disney adventures.
Disney Memory Maker is available for purchase either in advance or during your visit to the Walt Disney World Resort. By purchasing it in advance, you can take advantage of a discount and start planning your magical photo opportunities even before you arrive at the parks.
Now that you know what Disney Memory Maker is, let’s dive into the step-by-step process of how to make the most of this incredible service and download all your photos and videos from your Disney vacation.
Step 1: Purchase the Disney Memory Maker
The first step in accessing and downloading all the photos from your Disney Memory Maker is to purchase the Memory Maker package. There are two options for purchasing: in advance or during your visit to the Walt Disney World Resort.
If you want to take advantage of a discount and start planning your magical photo opportunities before you even set foot in the parks, it’s recommended to purchase the Disney Memory Maker in advance. By doing so, you can save some extra cash and ensure that your Memory Maker is ready to go as soon as you arrive.
To purchase the Disney Memory Maker in advance, simply visit the official Disney website or download the My Disney Experience mobile app. Navigate to the Memory Maker section and follow the prompts to add it to your cart and complete the purchase. Keep in mind that the Memory Maker purchase is linked to your My Disney Experience account, so be sure to sign in or create an account if you haven’t already.
If you decide to wait until you’re at the parks to purchase the Memory Maker, you can do so at designated locations such as Resort hotel desks, ticket windows, or select merchandise locations. Simply inquire about the Memory Maker package, and a Disney Cast Member will assist you in making the purchase.
When purchasing the Memory Maker, be sure to review the terms and conditions and familiarize yourself with the usage guidelines. This will ensure that you understand all the benefits and limitations of the service and can make the most of your Disney vacation memories.
Once you have purchased the Disney Memory Maker, it will be linked to your My Disney Experience account, ready to capture and store all the magical moments that lie ahead. In the next step, we will explore how to link your Memory Maker to your My Disney Experience account to ensure seamless access to your photos and videos.
Step 2: Link your Memory Maker to your My Disney Experience Account
Once you have purchased the Disney Memory Maker, the next step is to link it to your My Disney Experience account. This will ensure that all the photos and videos captured by the Memory Maker photographers and ride cameras are seamlessly connected to your account for easy access and download.
To link your Memory Maker, follow these simple steps:
- Sign in to your My Disney Experience account either through the official Disney website or the My Disney Experience mobile app. If you don’t have an account, you can easily create one by following the prompts.
- Once signed in, navigate to the “My Reservations and Tickets” section of your account. Here, you will see a list of your booked experiences and tickets.
- Locate and select the Memory Maker option within the list of tickets and reservations.
- On the Memory Maker page, you will find an option to link your Memory Maker. Click on the “Link” or “Link Memory Maker” button to proceed.
- Follow the prompts to input the necessary details, such as the confirmation number or associated email address, to link your Memory Maker to your account.
- After successfully linking your Memory Maker, you will receive a confirmation message. You can now proceed to enjoy your Disney vacation, knowing that every photo and video captured will be stored in your My Disney Experience account.
By linking your Memory Maker to your My Disney Experience account, you ensure that all your memories are stored in one centralized location. This makes it convenient to access and download your photos and videos from various devices, such as your smartphone, tablet, or computer.
It’s important to note that once your Memory Maker is linked to your account, it will remain active for a certain period of time. This timeframe typically starts on the day you activate your Memory Maker by downloading your first photo or video. During this active period, you can collect an unlimited number of photos and videos, making it easy to capture every magical moment.
With your Memory Maker successfully linked to your My Disney Experience account, you are now ready to embark on your Disney adventure, knowing that all your memories will be preserved and easily accessible. In the next step, we will dive into capturing photos and ride videos throughout your Disney vacation.
Step 3: Capture Photos and Ride Videos throughout your Disney Vacation
Now that your Disney Memory Maker is linked to your My Disney Experience account, it’s time to embark on your Disney vacation and start capturing all the magical moments. From character meet and greets to iconic attractions, Disney’s Memory Maker photographers and ride cameras will be there to ensure that every special memory is beautifully documented.
Throughout the parks, you will find Disney photographers stationed in various locations, ready to capture your best smiles and poses. They will use their expertise to create stunning shots against the backdrop of iconic park landmarks, such as Cinderella Castle or Spaceship Earth. Don’t hesitate to approach them and ask for a photo. They will gladly take your picture and make it a memorable experience.
In addition to the Disney photographers, certain attractions within the parks are equipped with ride cameras that capture your reactions as you experience the thrills and excitement. From the Tower of Terror to Seven Dwarfs Mine Train, these ride videos add a unique dimension to your Disney vacation memories.
To maximize your Memory Maker experience, keep the following tips in mind:
- Always wear your MagicBand or carry your park ticket. This will ensure that the Memory Maker photographers can easily link your photos to your My Disney Experience account.
- When approaching a Disney photographer, feel free to request specific poses or photo ideas. They are often happy to accommodate your special requests and create personalized photos.
- Smile and enjoy the moment! The Memory Maker photographers are skilled at capturing candid and natural shots. Let your joy and excitement shine through in every photo.
- On rides with video capture, be aware of the camera’s location and make sure you’re facing it during the ride. This will ensure that your reactions are captured and included in your Memory Maker.
- Feel free to download your Memory Maker photos throughout your vacation. This allows you to start reliving the memories and sharing them with friends and family right away.
Remember, with the Disney Memory Maker, there’s no limit to the number of photos you can capture. So, make the most of this service and let the Memory Maker photographers and ride cameras help you create a treasure trove of magical memories.
Now that you know how to capture the photos and ride videos, let’s move on to the next step: downloading the photos from your Disney Memory Maker.
Step 4: Downloading the Photos from Disney Memory Maker
After enjoying your Disney vacation and capturing countless magical memories with Disney Memory Maker, it’s time to download and save those precious photos and ride videos. Disney makes it easy for you to access and download your memories through your My Disney Experience account.
There are two options for downloading your photos: you can either download them individually or download them all at once as a digital package. Let’s explore both options:
Option 1: Downloading Photos Individually
If you prefer to download specific photos or only need a few select memories, you can choose to download the photos individually. Follow these steps:
- Sign in to your My Disney Experience account either through the official Disney website or the My Disney Experience mobile app.
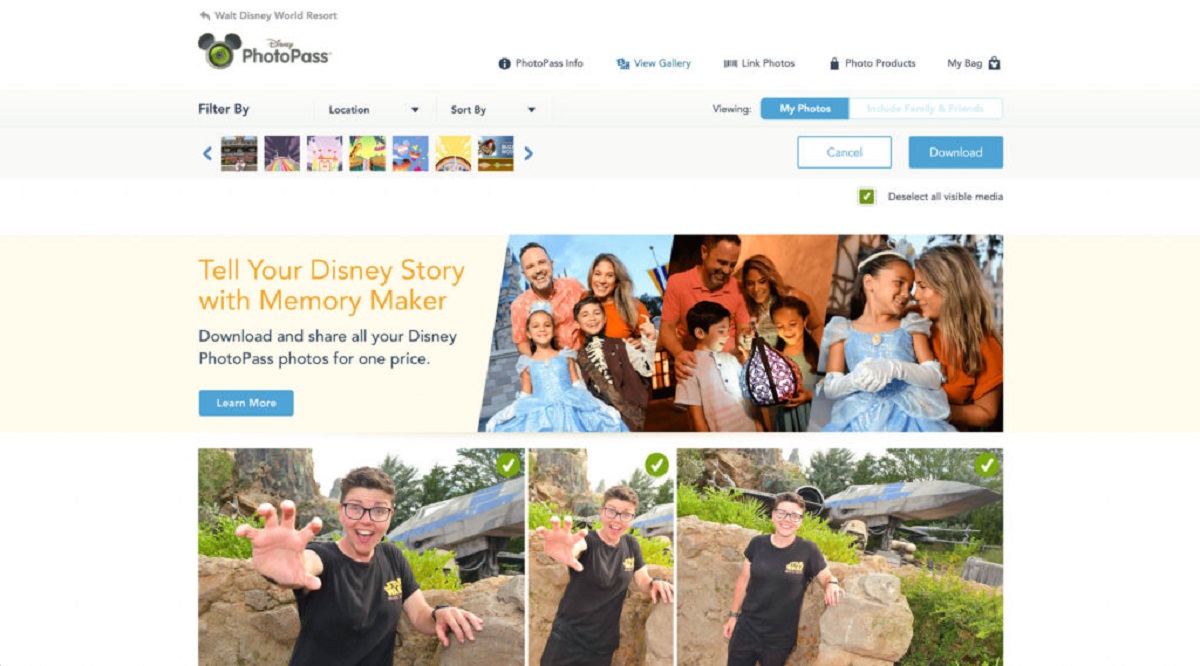
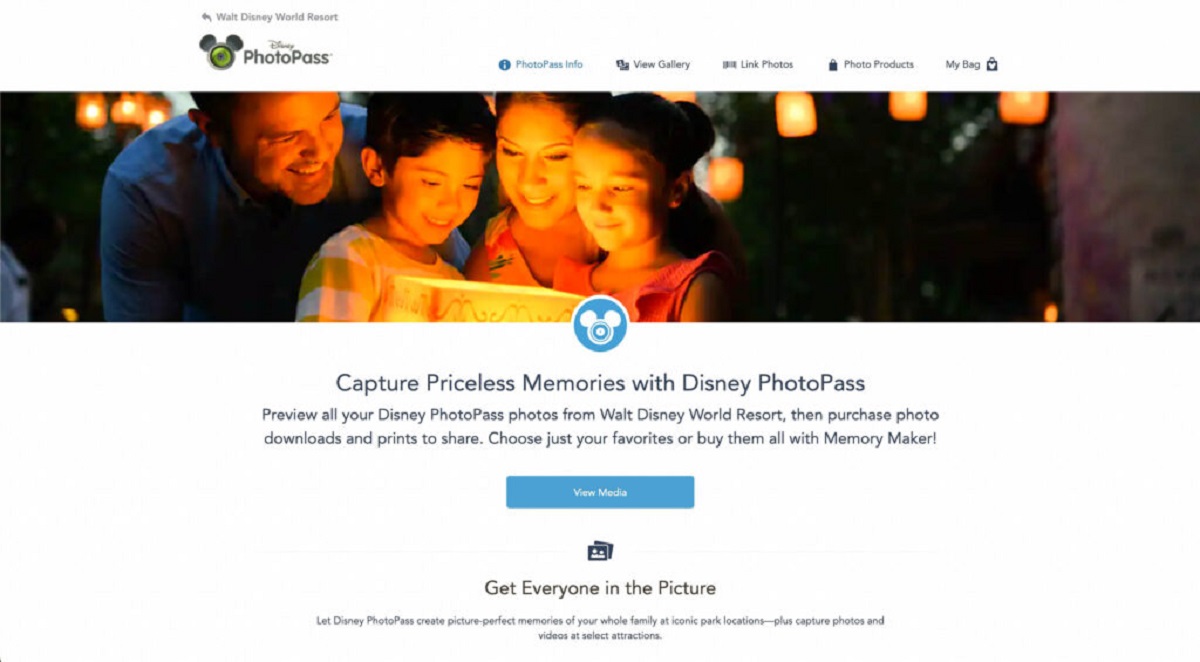
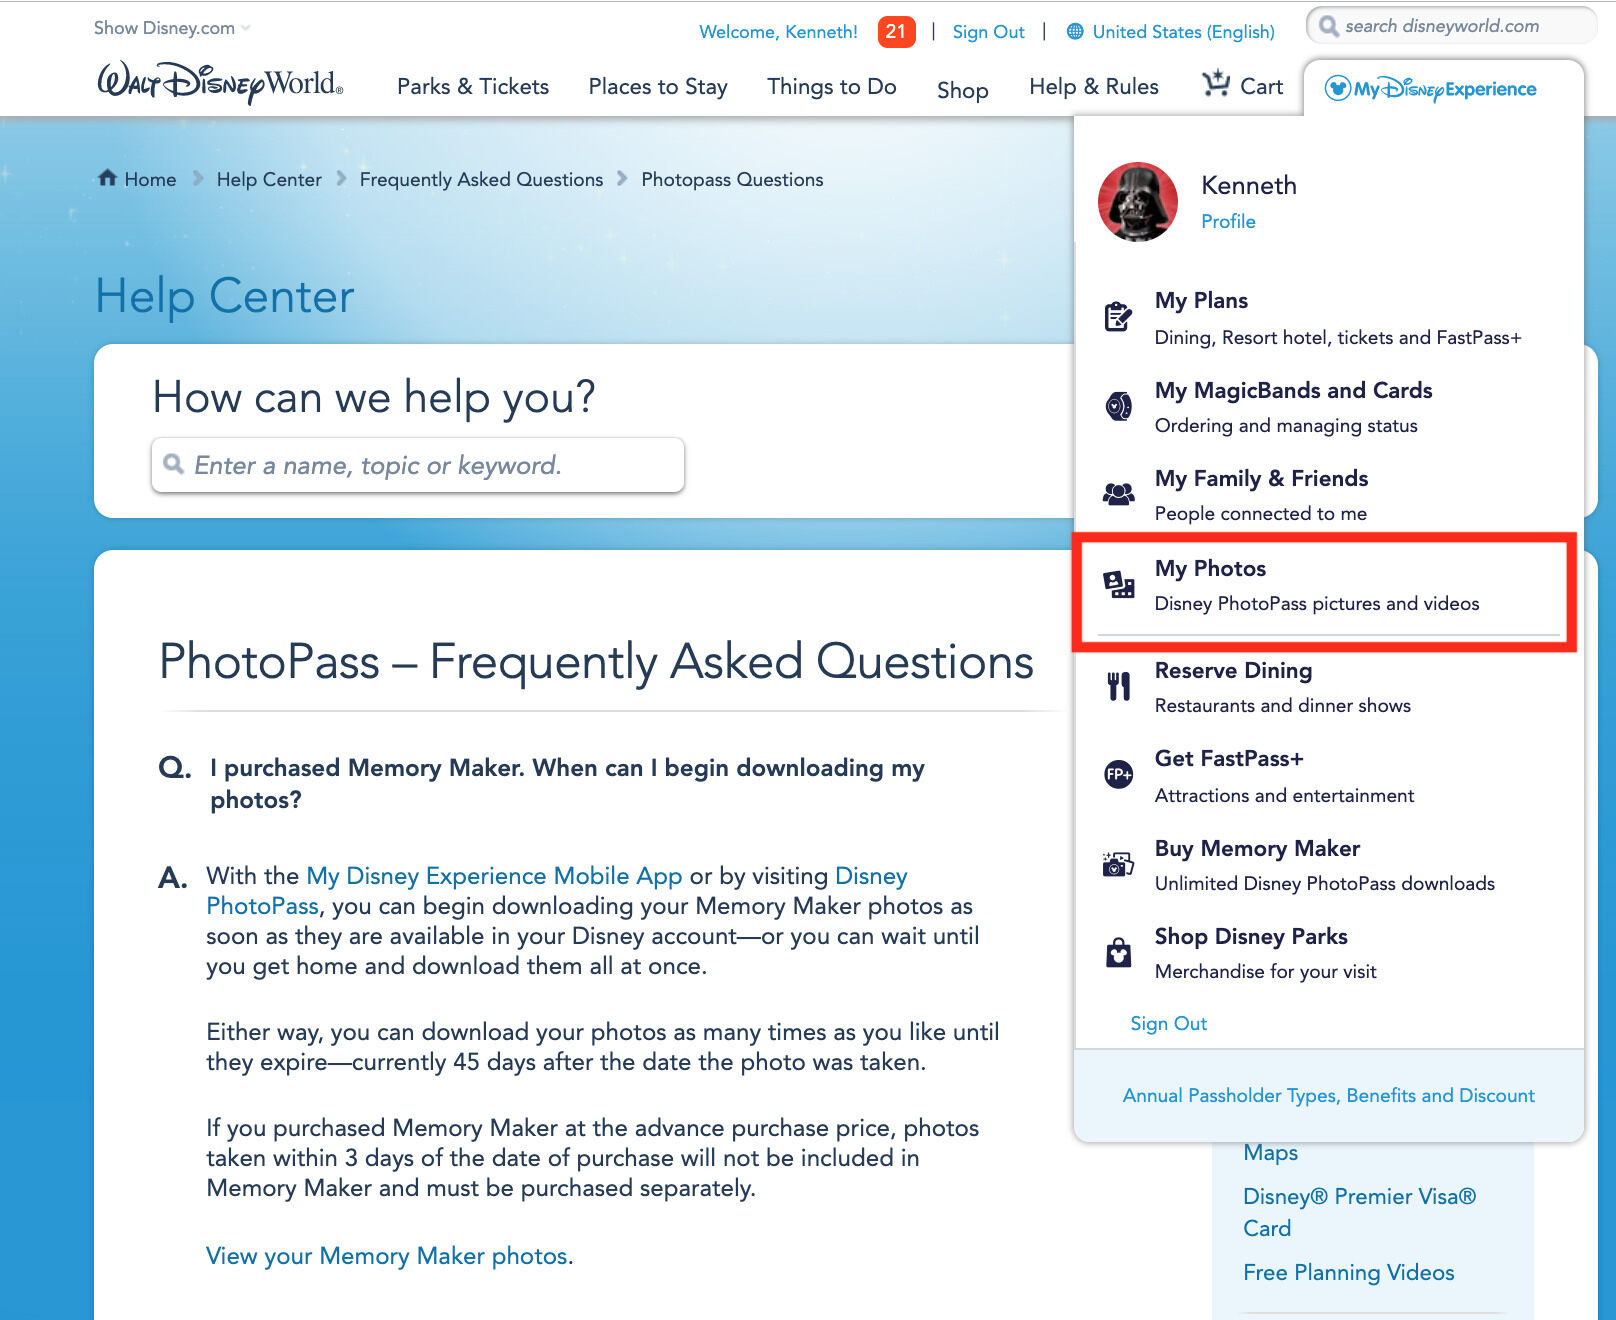
- Navigate to your account’s PhotoPass section. Here, you will find all the photos and videos captured by the Memory Maker photographers and ride cameras during your vacation.
- Browse through the gallery of photos and select the ones you want to download.
- Once you’ve chosen a photo, click on the download icon or link associated with it.
- The photo will then be downloaded to your device, and you can save it to your desired location, such as your computer or cloud storage.
- Repeat this process for each additional photo you want to download individually.
Downloading the photos individually gives you the flexibility to choose and prioritize the memories that mean the most to you. It’s a convenient option if you only want specific photos or if you want to quickly share a particular memory with friends and family.
Option 2: Downloading All Photos at Once
If you want to download all the photos and ride videos captured by Disney Memory Maker, you can choose the option to download them all as a digital package. Follow these steps:
- Sign in to your My Disney Experience account either through the official Disney website or the My Disney Experience mobile app.
- Navigate to your account’s PhotoPass section, where all your Disney memories are stored.
- Look for the option to download all photos. It may be labeled as “Download All” or a similar term.
- Click on the “Download All” option, and Disney will package all your photos and ride videos into a digital file for you to download.
- Once the download is complete, you can unzip or extract the files to access your photos and videos.
- Save the downloaded files to your desired location, such as your computer or external storage.
Downloading all your photos and videos at once is a convenient option if you want to have all your memories in one place or if you prefer to have a digital backup of your Disney vacation memories.
With either option, it’s important to validate the files you have downloaded to ensure that they are valid and have been successfully saved. Sometimes, technical issues or internet connectivity may cause file download errors, so carefully verifying your downloaded files will help ensure that you have access to all your cherished memories.
Now that you know how to download your Disney Memory Maker photos, it’s time to move on to the next step: organizing and saving your Disney memories.
Option 1: Downloading Photos Individually
If you prefer to have control over which photos you download from your Disney Memory Maker, you can choose to download them individually. This option allows you to carefully select and save specific memories that hold a special place in your heart. Follow these simple steps to download photos individually:
- Sign in to your My Disney Experience account on the official Disney website or the My Disney Experience mobile app.
- Navigate to your account’s PhotoPass section, where all the photos and videos captured by Disney Memory Maker are stored.
- Browse through the gallery of photos and select the ones you wish to download. You can use the filter options to sort the photos by date, location, or even by the attraction where they were taken.
- Click on a photo to view it in full size and access the photo information and download options.
- Look for the download icon or link associated with the photo. It is usually represented by a downward arrow or a “Download” button.
- Click on the download icon or link, and the photo will be saved to your device.
- You can now choose where to save the photo, whether it’s in a folder on your computer, an external hard drive, or your preferred cloud storage service.
- Repeat this process for each individual photo you want to download.
By downloading your photos individually, you have the flexibility to select and prioritize the memories that mean the most to you. This option is especially useful if you only want specific photos for a project, a photo book, or to share with friends and family.
Remember to verify that the downloaded photos are valid and have been successfully saved. Double-checking the file size, resolution, and quality can give you peace of mind and ensure that you have the best digital copies of your Disney memories.
Now that you know how to download photos individually from your Disney Memory Maker, you can curate your own collection of magical memories that truly capture the essence of your Disney vacation. Next, we’ll explore the second option for downloading your photos: downloading all of them at once as a digital package.
Option 2: Downloading All Photos at Once
If you prefer the convenience of downloading all the photos and videos from your Disney Memory Maker at once, you can choose the option to download them as a complete digital package. This option allows you to have a comprehensive collection of all your memories in one convenient download. Here’s how you can download all your photos at once:
- Sign in to your My Disney Experience account on the official Disney website or the My Disney Experience mobile app.
- Navigate to your account’s PhotoPass section, where all the photos and videos captured by Disney Memory Maker are stored.
- Look for the option to download all photos. Generally, you will find a “Download All” button or a similar option.
- Click on the “Download All” button, and Disney will package all your photos and videos into a single digital file.
- Wait for the download to complete. The time it takes may vary depending on the number of photos and videos you have.
- Once the download is finished, you can unzip or extract the downloaded file to access your photos and videos.
- Choose a location to save the files, such as a dedicated folder on your computer, external storage, or a cloud storage service.
Downloading all your photos and videos at once provides you with a convenient way to have a complete digital archive of your Disney vacation memories. You can easily browse through all the photos and watch the ride videos from the comfort of your own device.
It’s worth noting that the downloaded file may be large, especially if you have accumulated numerous photos and videos during your trip. Ensure that you have enough storage space on your device or preferred storage destination to accommodate the file. If necessary, consider using an external hard drive or cloud storage to store the file and free up space on your device.
By downloading all your photos and videos at once, you have the opportunity to relive your entire Disney vacation through a comprehensive collection of memories. It’s a convenient option if you want to create a photo book or a slideshow to share with friends and family, or if you simply want to keep all the memories in one place.
Now that you know how to download all your photos and videos from your Disney Memory Maker at once, you’re all set to preserve and enjoy the complete collection of your magical Disney vacation memories.
Step 5: Organizing and Saving your Disney Memories
Now that you have downloaded all your photos and videos from your Disney Memory Maker, it’s time to organize and save your Disney vacation memories in a way that allows for easy access and long-lasting enjoyment. Here are some tips on how to effectively organize and protect your cherished Disney memories:
Create Folders and Subfolders
Start by creating a dedicated folder on your computer or storage device specifically for your Disney memories. Within this main folder, you can further organize your photos and videos by creating subfolders based on different categories or themes. Some ideas for subfolders could be “Character Meet and Greets,” “Attractions,” “Parades and Shows,” or “Magical Moments.” This way, you can easily locate and browse through specific memories whenever you want to reminisce.
Use Descriptive File Names
When saving your photos and videos, consider using descriptive file names that reflect the content of the memory. This will make it easier to locate specific photos in the future. For example, instead of “IMG_1234.jpg,” rename the file to something like “Mickey-Meet-Greet-2021.jpg.” Including details like the date, location, or people in the photo will also help jog your memory and make your digital collection more meaningful.
Backup and Protect your Memories
It is crucial to protect your Disney memories by creating backup copies. Consider utilizing cloud storage services or external hard drives to create duplicate copies of your photos and videos. This way, even if you encounter a technical issue or accidentally delete a file, you have another copy readily available. Remember to periodically check and update your backups to ensure that all your memories are safely stored.
Share and Relive the Magic
Your Disney memories are meant to be shared with friends, family, and fellow Disney enthusiasts. Take the opportunity to showcase your favorite photos and videos by creating albums to share digitally or printing them as physical mementos. You can also create personalized photo books, calendars, or even wall displays to bring the magic of Disney into your home. Don’t forget to share your memories on social media platforms or with online Disney communities to spread the joy of your Disney vacation.
Keep the Magic Alive
Organizing and saving your Disney memories is not a one-time task. Make it a habit to update your digital collection whenever you go on future Disney vacations or attend Disney events. By continuously organizing and preserving your memories, you’ll have a growing archive of magical moments that you can revisit and enjoy for years to come.
With your Disney memories organized and saved, you can now relish the joy, laughter, and enchantment of your Disney vacation whenever you desire. Cherish these precious moments and let the magic of Disney live on through your memories.
Conclusion
Congratulations, you’ve successfully navigated the process of accessing, downloading, and organizing your Disney Memory Maker photos and videos. By following the step-by-step guide, you’ve learned how to make the most of this incredible service and preserve the magical moments from your Disney vacation.
With Disney Memory Maker, you no longer have to worry about capturing every special memory yourself. Instead, you can fully immerse yourself in the enchanting world of Disney, knowing that professional photographers and ride cameras are capturing every smile, laugh, and thrilling moment for you.
Purchasing the Disney Memory Maker and linking it to your My Disney Experience account is just the beginning. By capturing photos and videos throughout your vacation, you’ve created a treasure trove of memories that reflect the joy and magic of your Disney adventure.
Whether you choose to download your photos individually or all at once, the flexibility of Disney Memory Maker allows you to curate your own collection of cherished memories. Remember to organize and save your Disney memories in a way that makes it easy for you to revisit those magical moments whenever you desire.
Don’t forget to share your Disney memories with loved ones and fellow Disney enthusiasts. Whether it’s through digital albums, photo books, or online platforms, your Disney vacation memories are meant to be celebrated and enjoyed by others.
Disney Memory Maker truly provides a convenient and magical way to capture, relive, and share the memories from your Disney vacation. So, go ahead and download those photos, organize your collection, and keep the magic alive through the power of Disney Memory Maker!