Introduction
Welcome to the world of Disney Photopass, where magical memories are captured and preserved forever. Whether you’ve recently visited one of the Disney theme parks or participated in a special event, you can now relive those precious moments by downloading your photos from Disney Photopass. This service allows you to browse, select, and download your favorite photos captured by professional Disney photographers.
Downloading photos from Disney Photopass is a simple and convenient process. In this guide, we will walk you through the step-by-step instructions to help you download your cherished memories. From logging into your Disney account to saving the photos to your device or computer, we’ve got you covered. So grab your magical hat and get ready to dive into the world of Disney Photopass!
Before we begin, it’s important to note that you will need an active Disney account to access and download your photos. If you don’t have an account yet, you can easily create one on the official Disney website. Once you’re all set up, you’re just a few clicks away from reliving the magic!
Step 1: Log in to your Disney account
The first step to downloading your photos from Disney Photopass is to log in to your Disney account. If you already have an account, simply visit the official Disney website and click on the “Sign In” option located in the top right corner of the page. Enter your email address and password, then click “Sign In.”
If you don’t have a Disney account yet, you can easily create one by clicking on the “Create Account” option on the sign-in page. Follow the prompts to provide the necessary information and create a unique username and password for your account. Once your account is created, proceed to log in using the steps mentioned above.
It’s important to ensure that you are entering the correct login credentials to access your Disney account. Double-check that your email address and password are accurate before clicking “Sign In.”
Upon successfully logging in, you will be directed to your Disney account dashboard, where you can access various features and services, including Disney Photopass.
Keep in mind that if you are logging in from a shared or public device, it’s advisable to log out of your Disney account once you have finished downloading your photos to maintain the security and privacy of your account.
Step 2: Navigate to your Photos
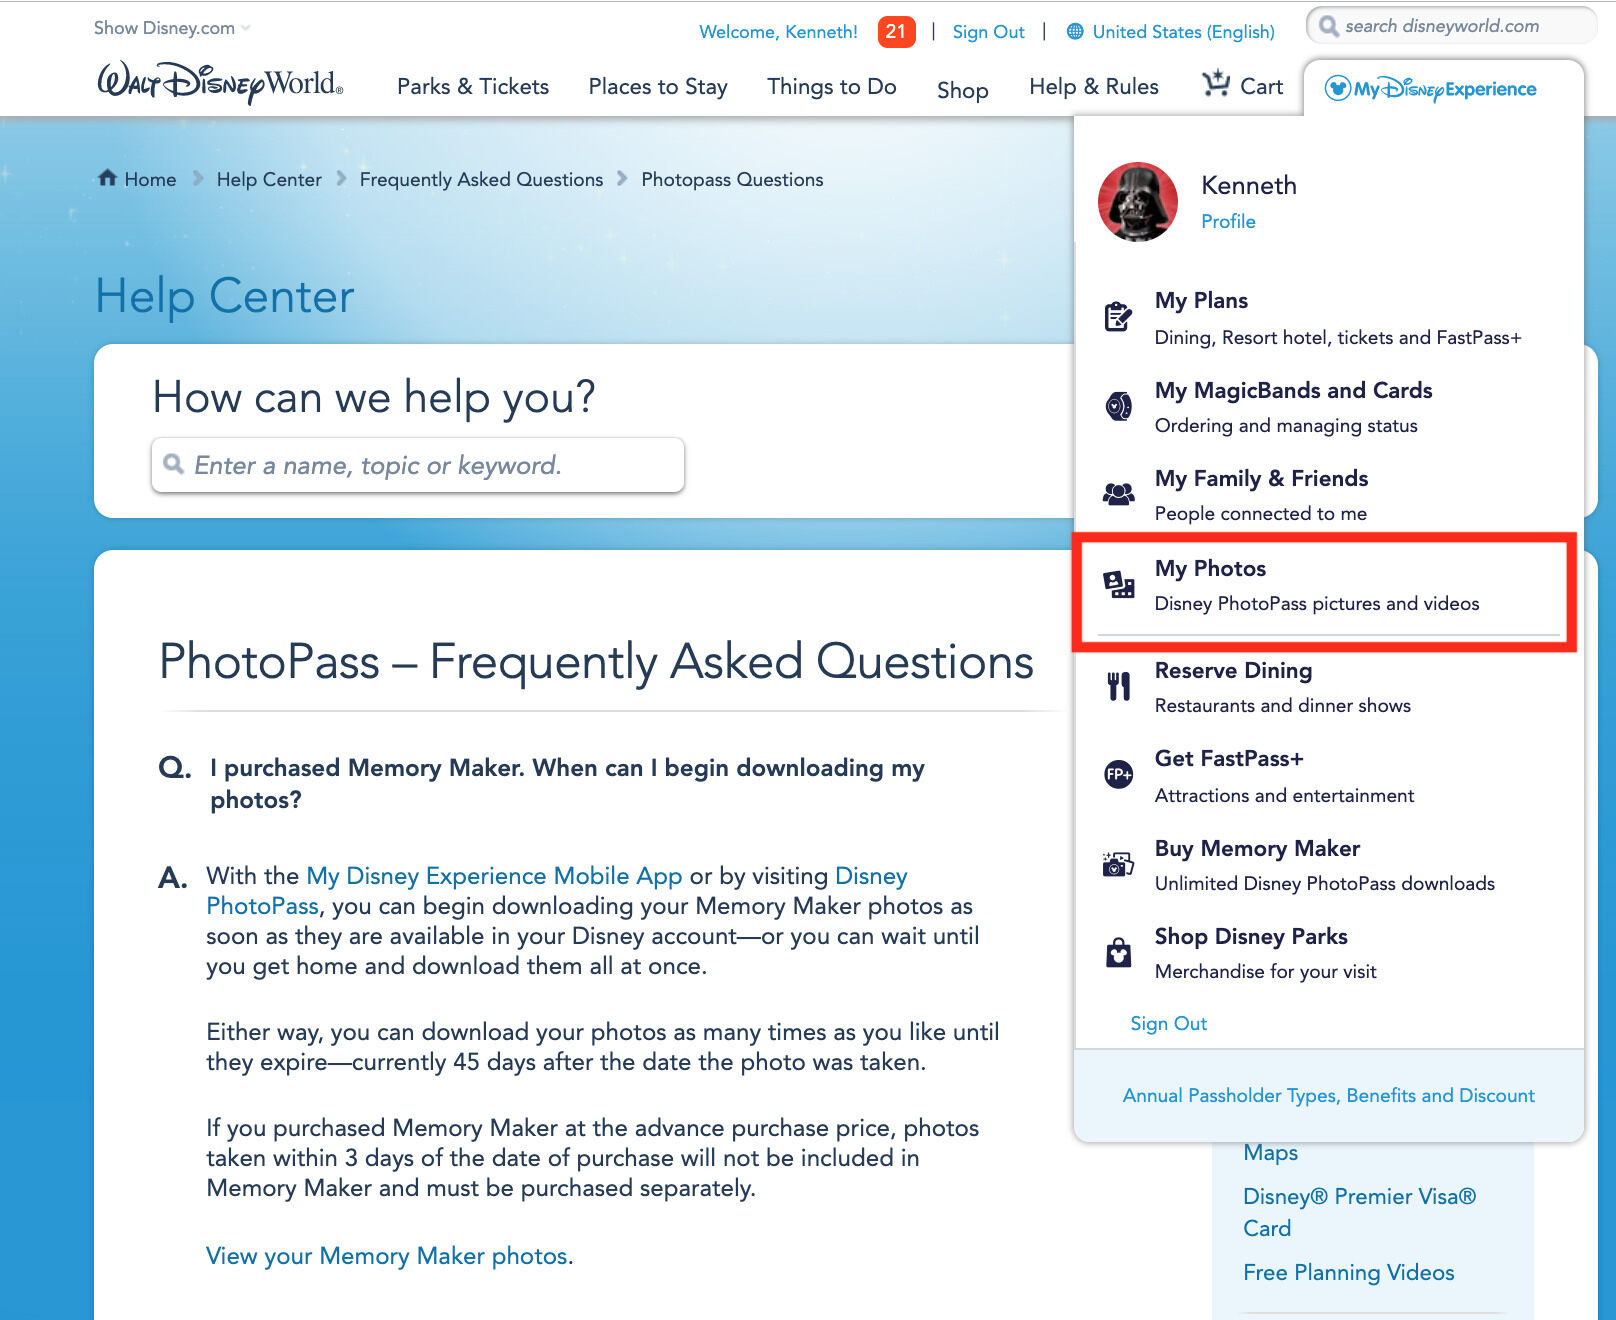
Once you have successfully logged in to your Disney account, it’s time to navigate to your photos on Disney Photopass. To do this, look for the “My Photos” or “Photopass” option in the navigation menu. The exact wording may vary depending on the Disney website version or app you are using.
Click on the “My Photos” or “Photopass” option to enter the Disney Photopass section. Here, you will find all the photos that have been captured during your visit to the Disney parks or events.
Depending on the timeframe of your visit or the number of photos you have, you may see multiple pages or a grid view of your photos. You can use pagination or scroll through the pages to explore them all.
As you browse through your photos, you can use various options to refine your search. For example, you can filter the photos by date, location, or by specific attractions or characters. This can come in handy if you are looking for photos from a particular day or want to focus on specific memories.
Take your time to explore all the photos and relive the magical moments captured by the Disney photographers. Once you have found the photos you want to download, move on to the next step to learn how to select them for downloading.
Step 3: Select the photos you want to download
Now that you’re in the Disney Photopass section and browsing through your photos, it’s time to select the ones you want to download. Before proceeding, make sure you have a clear idea of the photos you’d like to keep as a treasured memory.
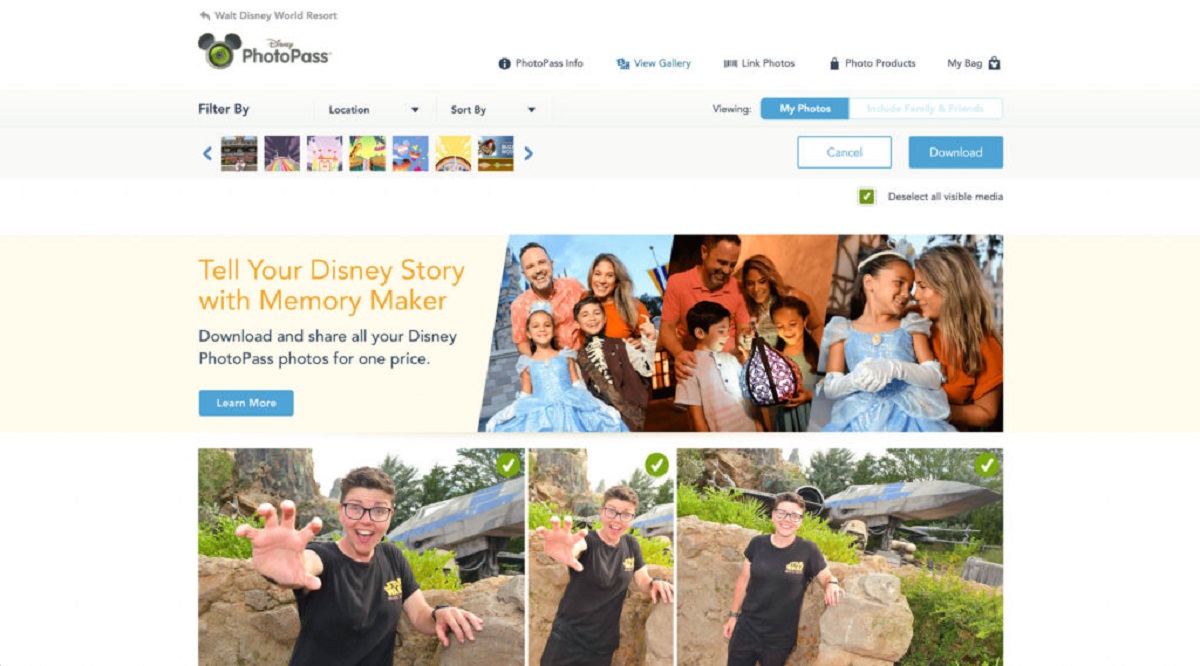
To select a photo for downloading, simply click on it. You will notice that a checkmark or a highlight appears to indicate that the photo has been selected. If you change your mind and want to deselect a photo, just click on it again to remove the checkmark or highlight.
If you have a large number of photos and want to download all of them, you can use the “Select All” option, typically located at the top or bottom of the photo grid. This allows you to quickly select all the photos on the page or in the current filter view.
For convenience, some Disney Photopass platforms also offer the option to select photos in bulk by clicking and dragging across multiple photos. This feature can be especially helpful when you have a continuous series of shots or want to select a specific range of photos.
Remember, you have the freedom to select as many or as few photos as you like. It’s your personal collection, and you should choose the ones that hold the most meaning and create the most magical memories for you.
Once you have made your selections, move on to the next step to discover how to download the chosen photos.
Step 4: Choose the download option
After selecting the photos you want to download from Disney Photopass, it’s time to choose the download option. Disney offers different ways to download your photos, depending on the platform you’re using.
One common download option is to click on the “Download” or “Save” button, usually located near the selected photos or at the top of the page. Clicking on this button will initiate the download process for the chosen photos.
In some cases, Disney may offer additional download options, such as downloading the photos in a specific resolution (e.g., high quality for printing or lower resolution for online sharing). You can select the desired download resolution based on your preferences and intended use for the photos.
Furthermore, some Disney Photopass platforms provide the option to download the photos individually or as a batch. If you have selected multiple photos, you can choose to download them all together in a single zip file. This is a convenient option, especially when you want to download a large number of photos at once.
Remember to have sufficient storage space available on your device or computer to accommodate the downloaded photos. High-resolution images, in particular, can take up significant storage space, so ensure you have enough space before initiating the download.
Once you have chosen your preferred download options, proceed to the next step to save the photos to your device or computer and bring the magic to life!
Step 5: Save the photos to your device or computer
After selecting the download options for your chosen photos from Disney Photopass, it’s time to save them to your device or computer. Follow these simple steps to ensure your magical memories are safely stored:
- Click on the “Download” or “Save” button to initiate the download process for the selected photos.
- A pop-up window or prompt will appear, asking you to choose the destination folder or location where you want to save the photos. Select a suitable folder on your device or computer where you can easily locate and access the downloaded photos. Consider creating a new folder specifically for Disney Photopass photos to keep them organized.
- Click “Save” or “OK” to start the download. The photos will then be downloaded from Disney Photopass and saved to the designated folder on your device or computer.
- Depending on the speed of your internet connection and the size of the photos, the download process may take a few seconds to several minutes. Be patient and ensure you have a stable internet connection to avoid interruptions during the download.
- Once the download is complete, navigate to the designated folder on your device or computer. You will find the downloaded photos stored there. Double-check that all the photos you selected are present and ready to be enjoyed.
Now you have successfully saved the photos from Disney Photopass to your device or computer! You can access them anytime and relive the magical memories captured by the talented Disney photographers. Remember to back up your photos to an external storage device or cloud service to ensure they are safeguarded for years to come.
In the next step, we will guide you on how to check your downloaded photos to confirm that everything has been successfully saved.
Step 6: Check your downloaded photos
Once you have saved the photos from Disney Photopass to your device or computer, it’s important to double-check and ensure that the downloaded photos are intact and of the highest quality. Follow these steps to confirm that everything has been successfully saved:
- Navigate to the folder on your device or computer where you saved the downloaded photos. This is the designated location you chose during the download process.
- Open the folder and browse through the photos to make sure they are all there. Take a moment to appreciate the magical memories captured by the Disney photographers.
- Zoom in on the photos and examine them closely. Check for any blurriness, pixelation, or distortion that may have occurred during the download process. If any issues are detected, it may be necessary to re-download the affected photos from Disney Photopass.
- Compare the downloaded photos to the preview versions on Disney Photopass. Ensure that the colors, clarity, and overall quality of the downloaded photos match your expectations.
- If you are satisfied with the quality and content of the downloaded photos, congratulations! You have successfully downloaded and saved your cherished memories from Disney Photopass.
Keep in mind that it’s always a good practice to back up your downloaded photos to a separate location, such as an external hard drive, cloud storage, or another device. This provides an extra layer of protection against accidental deletion or loss of the photos.
Now that you have confirmed the integrity of your downloaded photos, you can enjoy reliving the magical moments captured by Disney Photopass anytime you wish. Share the joy with friends, family, and fellow Disney enthusiasts, and let the magic continue!
Conclusion
Congratulations! You have successfully learned how to download your cherished photos from Disney Photopass. By following these simple steps – logging in to your Disney account, navigating to your photos, selecting the photos you want to download, choosing the download options, saving the photos to your device or computer, and checking the downloaded photos – you have brought the magic of Disney into your own personal collection.
Downloading your photos from Disney Photopass allows you to capture and preserve the enchanting memories created during your visit to the Disney parks or special events. Whether it’s a candid shot with your favorite Disney character, a thrilling ride moment frozen in time, or a heartwarming family portrait, these photos serve as precious reminders of the joy and wonder experienced at the happiest place on earth.
Remember, as an SEO writer writing HTML content, it’s important to use HTML markup to maintain the quality and validity of the code. Validate your HTML document regularly to ensure it meets the necessary standards and to avoid any potential errors.
Now that you have mastered the art of downloading photos from Disney Photopass, you can relish in the memories for years to come. So go ahead, share your magical moments, print your favorite photos as keepsakes, or use them as vibrant wallpapers on your devices.
Keep exploring, capturing, and preserving the enchantment with Disney Photopass. Create your own magical photo album and revisit the joy whenever you need it. The memories may fade, but the photos and the magic will always remain!