Setting up a Splitwise Account
If you’re looking for a hassle-free way to split expenses and manage shared costs among friends, roommates, or travel buddies, look no further than Splitwise. With its intuitive interface and user-friendly features, Splitwise has become the go-to app for streamlining group expenses.
To get started, simply download the Splitwise app on your smartphone or visit their website on your computer. Next, create a new account by providing your email address or logging in using your existing Google or Facebook account. It’s quick, easy, and secure.
Once you’ve set up your account, take a moment to personalize your profile. Add a profile picture and update your settings to customize your experience. You can set your preferred currency, adjust privacy settings, and even enable email notifications to stay up-to-date with your group’s activity.
Now that your account is ready, it’s time to create your first group. Whether you’re planning a trip, splitting monthly bills with roommates, or just need a way to keep track of shared expenses, groups are the foundation of Splitwise.
To create a group, click on the “Create a group” button in the app or website. Give your group a name that reflects its purpose, such as “Apartment Expenses” or “Weekend Getaway.” You’ll also have the option to add a group icon for easy recognition.
With your group set up, it’s time to invite your friends. To add members to the group, simply enter their email addresses or use the convenient “Invite Friends” feature, which allows you to send invitation links via messaging apps or social media. Once your friends join, they’ll be able to contribute to the group and stay updated on shared expenses.
That’s it! You’ve successfully set up your Splitwise account and created your first group. Now you can start adding expenses and splitting costs with ease.
Splitwise takes the hassle out of managing group expenses, ensuring that everyone’s contributions are fairly accounted for. So why wait? Start organizing your shared expenses today and say goodbye to confusion and awkward calculations.
Now that you’re familiar with setting up a Splitwise account, let’s dive deeper into how to create and manage a new group.
Creating a New Group
One of the key features of Splitwise is the ability to create groups to manage shared expenses with specific people or for a particular purpose. Creating a new group is a simple process that allows you to bring together the individuals involved in the expense-sharing scenario.
To create a new group on Splitwise, log in to your account and navigate to the dashboard. Look for the button that says “Create a group” and click on it. You will then be prompted to enter a name for the group. Choose a descriptive and easily recognizable name that reflects the purpose of the group. For example, if you are planning a trip with friends, you could name the group “Europe Adventure 2022.”
After entering the group name, you also have the option to add an icon or image to represent the group. This can be useful for visually identifying the group at a glance, especially if you have multiple groups on your Splitwise account.
Once the group is created, it’s time to invite friends or group members to join. You can manually enter their email addresses or use the built-in invite feature provided by Splitwise. This feature allows you to send invitation links via email or even share them directly through messaging apps or social media platforms.
Once your friends receive the invitation, they can join the group by accepting the invitation link. They will be prompted to create a Splitwise account if they don’t have one already. Once they join the group, they will have access to the shared expense list and can start adding expenses or contributing to existing ones.
By creating a new group, you can effectively organize and manage shared expenses with specific individuals or for a specific purpose. It simplifies the process of tracking who owes what and ensures that everyone involved is kept informed about the expenses and their shares.
Now that you know how to create a new group, you can start managing your shared expenses more efficiently. In the next section, we’ll explore how to add friends to a group and make expense tracking even easier.
Adding Friends to a Group
After creating a new group on Splitwise, the next step is to add friends or group members who will be involved in sharing the expenses. Adding friends to a group allows everyone to collaborate and contribute to the expenses, making it easier to track and split costs accurately.
To add friends to a group, navigate to the group page on Splitwise. Look for the “Add friends” or “Invite friends” option, usually located near the top or in the group settings menu.
There are a couple of ways you can add friends to a group. The first method is to manually enter their email addresses one by one. Simply type in the email address of each friend you want to add, and hit the “Add” or “Invite” button. Splitwise will send them an invitation to join the group via email.
The second method is to use the built-in “Invite Friends” feature provided by Splitwise. This feature allows you to share an invitation link through various channels such as email, messaging apps, or social media platforms. Simply click on the “Invite Friends” button, select the desired platform or app, and send the invitation to your friends. They can click on the link to join the group.
Once your friends receive the invitation and join the group, they will have access to the shared expense list and can contribute by adding their own expenses or contributing to existing ones. Splitwise makes it easy for everyone to collaborate and stay on top of shared finances.
It’s important to note that each friend you add to the group must have a Splitwise account. If a friend doesn’t have an account, they will be prompted to create one when they accept the invitation and join the group. Creating an account is a quick and straightforward process, ensuring that everyone can participate in managing the shared expenses smoothly.
By adding friends to a group on Splitwise, you create a collaborative environment where everyone can contribute to tracking and splitting the expenses accurately. It fosters transparency and eliminates confusion, making expense management a breeze.
Now that you know how to add friends to a group, let’s explore how to add expenses to the group and effectively track shared costs.
Adding Expenses to a Group
Once you’ve set up a group and added friends to it on Splitwise, it’s time to start tracking the expenses. Adding expenses to a group is a simple and straightforward process that allows you to keep a record of expenditures and ensure accurate splitting among group members.
To add an expense to a group, navigate to the specific group page on Splitwise. Look for the “Add an expense” or similar button, usually located prominently on the page.
When adding an expense, you will be prompted to enter various details to accurately record the transaction. Start by entering the amount spent, and choose the currency if necessary. Next, provide a brief description or name for the expense to help identify it easily. For example, if you purchased groceries for the group, you could enter “Grocery Bill.”
Next, select the friends or group members who are involved in the expense. Splitwise allows you to choose specific individuals or split the expense equally among all members. You can even assign different percentages or amounts to different individuals if the expense is not evenly split.
Splitwise also provides an option to categorize the expense. This can be helpful when you want to track specific types of expenses, such as rent, utilities, or dining out. Simply choose the appropriate category from the available options or create a custom category if needed.
Additionally, you have the option to attach any relevant receipts or notes to the expense. This can be useful for keeping a record of receipts or adding additional details about the transaction.
Once you’ve entered all the necessary details, click on the “Save” or “Add Expense” button to record the expense in the group. The expense will be visible to all group members, allowing everyone to stay informed about the shared costs.
By adding expenses to a group on Splitwise, you ensure transparency and accuracy in tracking shared costs. It eliminates the need for manual calculations and helps everyone involved stay on top of their financial contributions.
Now that you know how to add expenses to a group on Splitwise, let’s explore how to split the expenses among group members accurately and effortlessly.
Splitting Expenses Among Friends
Splitting expenses among friends is made easy and convenient with Splitwise. Whether you’re sharing the bill at a restaurant, splitting rent with roommates, or dividing travel expenses, Splitwise provides various methods to ensure fair and accurate distribution of costs.
When you add an expense to a group on Splitwise, you have the option to split the cost among group members in different ways. The default option is to split the expense equally among all members, which works well for expenses that are evenly shared.
If the expense is not evenly divided, Splitwise allows you to customize how the cost is split. You can choose to split it by exact amounts, percentages, or shares. This flexibility is particularly useful when different individuals owe different portions of the expense.
For example, let’s say you and your friends went out for dinner, and the bill was $120. However, one friend only ordered an appetizer and drinks, totaling $30, while the rest of you shared the main course, which was $90. Splitwise lets you assign $30 to the friend who ordered the appetizer and $90 split equally among the others, ensuring everyone pays their fair share.
Splitwise also offers the option to exclude certain individuals from a specific expense. If someone did not participate in a particular activity or does not owe a specific expense, you can simply uncheck their name during the expense creation process.
It’s important to note that Splitwise takes into account the ongoing balance between group members. If one person consistently pays for more expenses, Splitwise calculates the balance accordingly and adjusts future expenses to ensure fairness in the long run.
Moreover, Splitwise provides real-time updates on each individual’s share and balances within the group. This makes it easier for everyone to keep track of their contributions and eliminates the need for constant calculations.
Splitwise simplifies the process of splitting expenses among friends, roommates, or travel buddies, ensuring fairness and transparency. By utilizing the various splitting options available, you can accurately allocate costs and maintain harmonious financial relationships.
Now that you understand how to split expenses among friends on Splitwise, let’s delve into the different payment options available to settle these shared costs.
Understanding Different Payment Options
Splitwise provides convenient payment options to help settle shared expenses among friends. Understanding these payment options can make the process of reimbursing or settling debts easier and more efficient.
One payment option available on Splitwise is to manually settle up with your friends outside of the app. This option is useful if you prefer to exchange cash or use a different payment method to reimburse your friends. Splitwise does not handle the actual transfer of funds, but it helps you keep track of who owes whom.
In addition to manual settlements, Splitwise also integrates with popular payment platforms such as Venmo, PayPal, and Square Cash. This allows you to easily send money to your friends directly within the app. Simply connect your Splitwise account with your preferred payment platform, and you’ll be able to initiate transfers with a few clicks.
Splitwise also offers the option to record partial payments. This is particularly useful when a friend pays you back in installments or if you receive partial payments from multiple friends. Splitwise keeps track of these partial payments and updates the balances accordingly, making it easier to manage outstanding debts.
It’s important to note that Splitwise does not charge any fees for using its payment integrations. However, depending on the payment platform you choose, there may be nominal fees involved for certain types of transactions or for transferring funds to your bank account.
Splitwise also provides a “Settle Up” feature, which allows you to settle all outstanding debts with just a few clicks. This feature is particularly useful when there are multiple expenses and debts within a group. With a single action, you can settle all the debts among the group members and start with a clean slate.
By understanding and utilizing these different payment options on Splitwise, you can efficiently settle shared expenses with your friends. Whether you prefer manual settlements, integrated payment platforms, or partial payments, Splitwise provides flexibility to accommodate your preferred method.
Now that you have a grasp of the payment options available on Splitwise, let’s explore how you can effectively manage debts and IOUs within the app.
Managing Debts and IOUs
Splitwise is not just an expense-tracking app; it’s also a powerful tool for managing debts and IOUs among friends. Keeping track of who owes whom can be complicated, but Splitwise simplifies the process and ensures that everyone’s debts are accurately recorded and settled.
When you add an expense to Splitwise and split it among group members, the app automatically calculates the individual balances and updates them accordingly. This means that each person’s outstanding debt or IOU is continuously tracked and adjusted with each new expense.
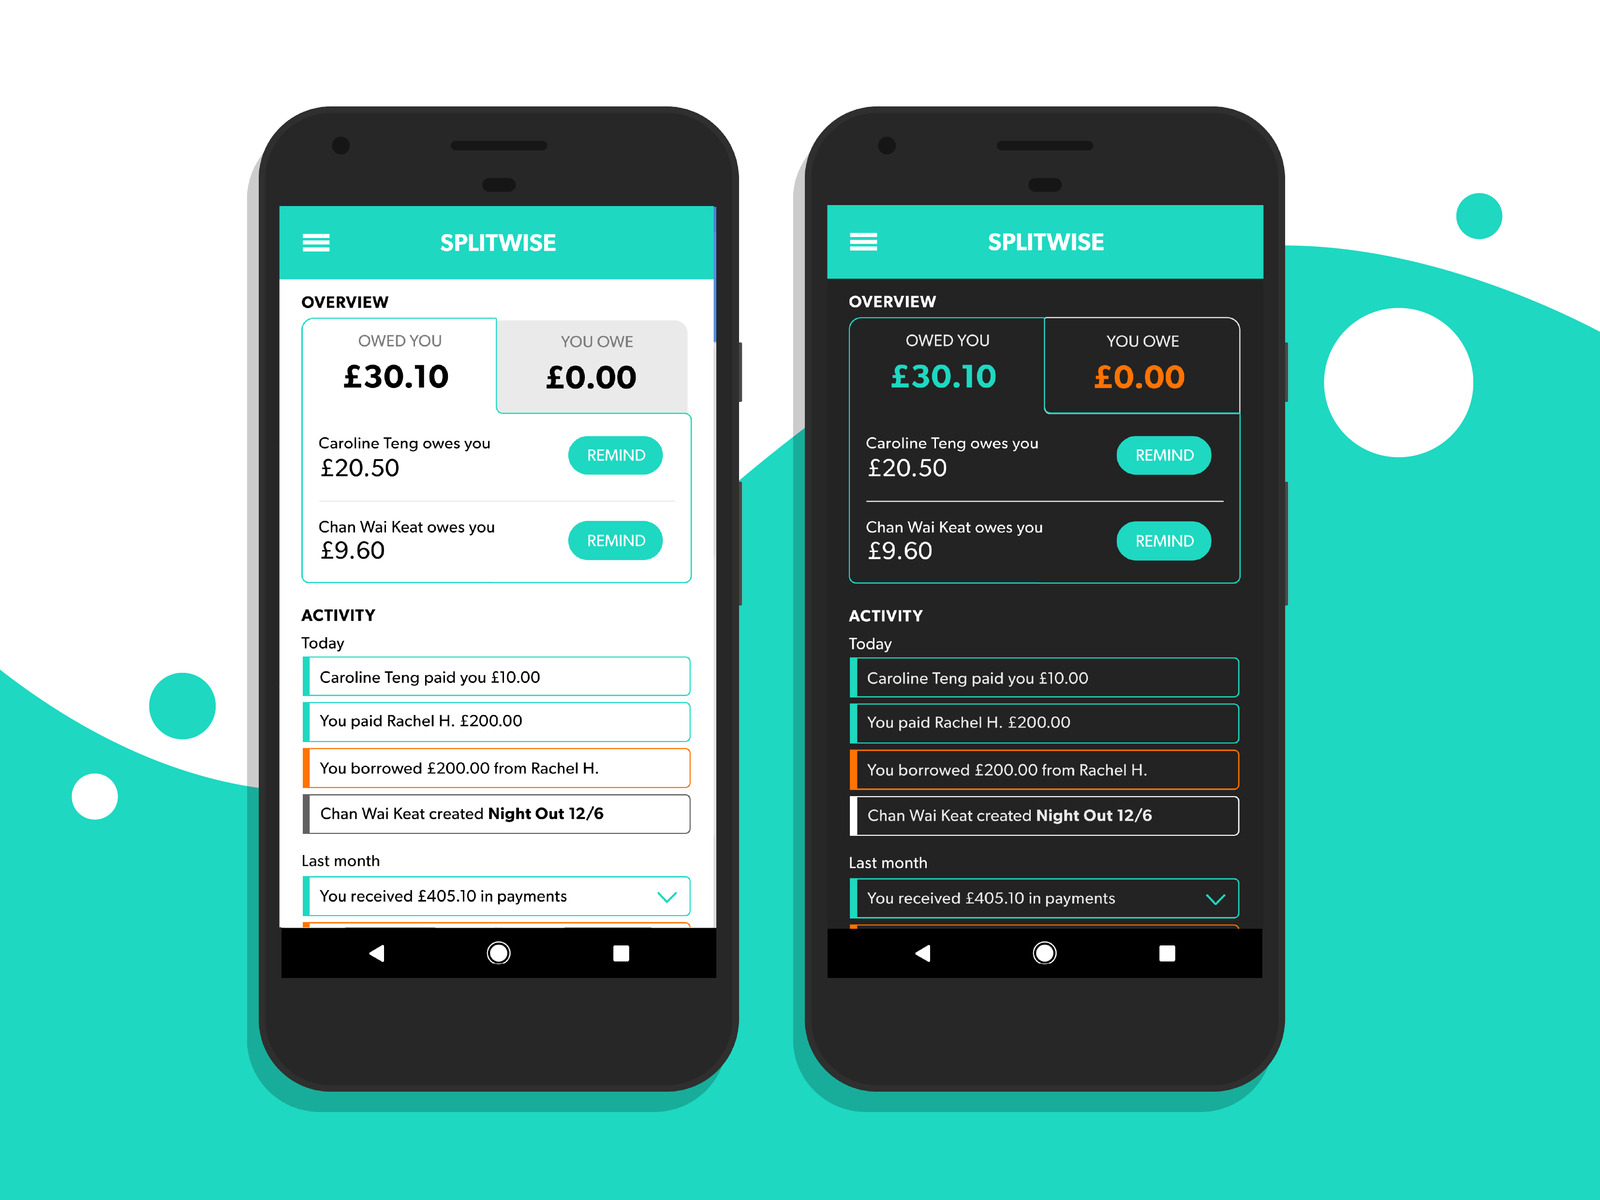
The detailed balance sheet within the app shows the amount owed by each member and to whom. This makes it easy to see at a glance who owes you money or who you owe money to. Splitwise also provides notifications and reminders to help you stay on top of settling your debts and ensuring that nothing falls through the cracks.
Tracking debts and IOUs becomes especially important when managing multiple expenses within a group. Splitwise allows you to view the complete history of past transactions, including who paid for each expense and how it was split. This level of transparency helps prevent misunderstandings and ensures that everyone’s contributions are accounted for.
In addition to tracking debts, Splitwise also handles complex scenarios where someone pays for multiple expenses on behalf of the group. For example, if one person covers the cost of groceries, utilities, and rent, Splitwise factors in these multiple expenses and adjusts the balances accordingly.
Splitwise also provides a Simplify Debts feature, which calculates the most efficient way to settle debts within a group. By analyzing all the outstanding debts among the group members, Splitwise suggests the fewest number of payments needed to settle all the balances. This feature can save time and simplify the process of settling up.
With Splitwise, managing debts and IOUs becomes effortless. By tracking individual balances, providing reminders, and offering the Simplify Debts feature, Splitwise ensures that everyone’s financial obligations are properly managed and settled.
Now that you understand how to use Splitwise to manage debts and IOUs, let’s explore how to edit and delete expenses in case of any changes or mistakes.
Using the Simplify Debts Feature
When managing shared expenses among friends, settling debts can sometimes be a complex process. However, Splitwise simplifies this process with its innovative Simplify Debts feature. By utilizing this feature, you can streamline the settlement of debts within a group, saving time and reducing the number of transactions needed.
The Simplify Debts feature analyzes all the outstanding debts and IOUs within a group and calculates the most efficient way to settle them. It identifies opportunities to “triangulate” debts, where one person can pay another person directly instead of making separate payments to multiple individuals.
To use the Simplify Debts feature, navigate to the group page in the Splitwise app or website. Look for the option that says “Simplify Debts” or similar, usually found in the group settings or actions menu.
When you activate the Simplify Debts feature, Splitwise does the hard work for you. It computes the most optimal set of transactions needed to settle all the debts within the group. This means that instead of making multiple individual payments, you can follow the suggested transactions and settle all debts with the fewest number of transactions.
The Simplify Debts feature takes into account the balances and the direction of debts within the group. It ensures that everyone’s obligations are accurately addressed and that each person’s outstanding debt is efficiently settled.
This feature is especially useful when managing larger and more complex groups or when dealing with a series of expenses over time. It saves the hassle of manually calculating and settling debts and provides a clear plan for settling up.
It’s important to note that the Simplify Debts feature does not handle the actual transfer of funds. It simply suggests the optimal way to settle debts within the group. You will still need to make the necessary payments outside of Splitwise, either through cash, bank transfers, or using the integrated payment options available on the platform.
By using the Simplify Debts feature on Splitwise, you can simplify the process of settling debts within a group. It eliminates the need for complex calculations and reduces the number of transactions required, making the settlement process more efficient and straightforward.
Now that you know how to use the Simplify Debts feature, let’s explore how to edit and delete expenses on Splitwise when needed.
Editing and Deleting Expenses
Even with careful tracking, it’s possible that you may need to make adjustments to expenses that have been added to Splitwise. Whether it’s correcting an error, updating the details, or removing an expense altogether, Splitwise provides the flexibility to edit and delete expenses as needed.
To edit an expense, navigate to the group page and locate the specific expense you want to modify. Click on the expense to view its details and look for the “Edit” or “Modify” option, typically displayed in the expense details screen.
When editing an expense, you can update various aspects, such as the amount, description, category, or even the individuals involved in the expense. This allows you to ensure accuracy and keep the expense details up to date.
For example, if you made an error in the amount entered for a dinner expense, simply edit the expense, correct the amount, and save the changes. Splitwise will automatically recalculate the balances and adjust the expense accordingly.
In some cases, you may need to delete an expense completely. This could be due to a duplicate entry, an expense that is no longer relevant, or an incorrect entry that cannot be easily corrected. To delete an expense, navigate to the group page, find the specific expense, and look for the “Delete” or “Remove” option. Confirm the deletion, and the expense will be removed from the group.
When you edit or delete an expense on Splitwise, the app ensures that the balances and debts among the group members are updated accordingly. This maintains the integrity of the shared expenses and ensures accurate records of financial contributions.
It’s important to note that when you edit or delete an expense, it may impact the historical records and calculations. Therefore, it’s advisable to communicate any changes with the group members to maintain transparency and avoid confusion.
With the ability to edit and delete expenses, Splitwise gives you control over your shared expenses and ensures that the recorded information is accurate and up to date.
Now that you know how to make adjustments to expenses, let’s explore how you can view your balance and transaction history within Splitwise.
Viewing Your Balance and History
Splitwise makes it easy to keep track of your balances and view your transaction history within a group. By providing access to your financial records, Splitwise ensures transparency and helps you stay informed about your financial obligations.
To view your balance and history, navigate to the specific group page in Splitwise. Look for the “Balance” or “Summary” section, typically displayed prominently on the group page. Here, you will find an overview of your financial position within the group.
The balance section shows the total amount that you owe to the group or that the group members owe to you. It gives you a clear snapshot of your financial status within the group and enables you to quickly see if you owe any money or if you are owed any funds.
In addition to the balance, Splitwise provides a transaction history that allows you to view all the expenses and payments related to the group. This history shows a detailed record of who paid for each expense, how it was split, and any subsequent payments made.
You can delve into the transaction history to review the details of each transaction, ensuring that nothing is overlooked. This feature is particularly useful for reconciling any discrepancies, tracking shared expenses over time, or simply staying informed about your financial contributions.
Splitwise also offers the option to export your transaction history for your records. This allows you to have a digital or printed copy of all the financial transactions within the group, providing a comprehensive record of your shared expenses.
By having access to your balance and transaction history on Splitwise, you can stay on top of your financial commitments and ensure that everything is accurately recorded. It promotes transparency and clarity among group members, facilitating smooth expense management.
Now that you understand how to view your balance and transaction history, let’s explore how to settle up your debts on Splitwise.
Settling Up Your Debts on Splitwise
Once you’ve tracked your expenses, split costs among friends, and kept an eye on your balances, it’s time to settle up your debts on Splitwise. Settling up allows you to reimburse your friends or receive payments for the amounts owed, bringing your financial commitments to a close.
To settle up on Splitwise, begin by reviewing your balance within the specific group. This balance indicates the total amount that you owe or that is owed to you by the group members. It provides a clear indication of the financial transactions that need to be settled.
Once you’re ready to settle your debts, you have a few options depending on your preferred payment method and the agreed-upon approach within your group. Splitwise offers various payment options to accommodate different preferences.
If you prefer to settle up manually outside of the app, you can exchange cash or use a payment method that is convenient for all parties involved. Splitwise helps by providing the necessary information about the amount owed by each person and who they owe it to, making it easy to distribute the correct payments.
Alternatively, Splitwise integrates with popular payment platforms such as Venmo, PayPal, and Square Cash. These integrations allow you to initiate payment transfers directly within the app, making the reimbursement process quicker and more streamlined. Simply connect your Splitwise account with your preferred payment platform and follow the instructions provided.
Splitwise also provides a “Settle Up” feature that allows you to settle all outstanding debts with a single action. This feature is particularly useful when there are multiple expenses and debts within a group. By clicking on the “Settle Up” button, Splitwise calculates the necessary payments for each member to settle their balances and updates the group accordingly.
During the settlement process, it’s important to communicate with your friends and ensure that everyone is on the same page. Discuss the preferred payment method and confirm the amounts to be reimbursed. Open and clear communication helps avoid any confusion or misunderstandings.
By settling up your debts on Splitwise, you ensure that everyone receives the payments they are owed or reimburses their friends accurately. It brings a sense of closure to the shared expenses and promotes financial harmony within the group.
Now that you know how to settle up your debts on Splitwise, you can confidently manage shared expenses and maintain healthy financial relationships with your friends.