Introduction
Welcome to the world of seamless financial management with Splitwise and Venmo. If you’re tired of keeping track of shared expenses among friends or roommates, these two platforms are here to simplify your life. Splitwise helps you track and manage your shared expenses, while Venmo allows you to easily transfer money to friends.
Whether it’s splitting bills after a group dinner, sharing rent and utilities, or going on a vacation together, Splitwise and Venmo make it effortless to keep track of who owes what and settle up with the tap of a button. In this guide, we will walk you through the process of connecting your Splitwise and Venmo accounts, adding expenses, connecting with friends, and settling up.
By using Splitwise, you can record detailed expenses, including who paid for what, and then Splitwise calculates the balances and sends friendly reminders to your friends who owe you or vice versa. And when it comes time to settle up, Venmo makes it a breeze to transfer money, allowing you to pay friends back instantly without the need for cash or checks.
With Splitwise and Venmo, you can wave goodbye to endless calculations, awkward conversations about money, and the frustration of keeping track of expenses manually. Let’s dive in and discover how to connect Splitwise to Venmo and take control of your shared expenses!
Step 1: Sign up for Splitwise and Venmo
The first step in connecting Splitwise to Venmo is to create accounts on both platforms. If you already have one of the accounts, you can skip that particular platform and proceed.
To sign up for Splitwise, visit their website or download the mobile app from the App Store or Google Play. Click the “Sign Up” button and enter your email address and a secure password. You can also sign up with your Google or Facebook account for convenience. Once you’ve completed the registration process, you’re ready to use Splitwise!
Next, sign up for Venmo by downloading the Venmo app on your smartphone or visiting the Venmo website. Click on “Sign Up” and enter your phone number or email address. Follow the prompts to create a secure password and link a bank account or debit card. Venmo uses your bank account or card to transfer money between you and your friends. Once you’ve finished setting up your Venmo account, you’re ready to connect it with Splitwise.
It’s essential to note that Splitwise and Venmo are both secure platforms that prioritize the safety of your financial information. They use encryption and other security measures to protect your data.
Now that you have successfully signed up for both Splitwise and Venmo, you’re ready to move on to the next step and link your accounts together.
Step 2: Link your Splitwise and Venmo accounts
With your Splitwise and Venmo accounts created, the next step is to link them together to streamline your expense management. The integration between these two platforms allows for seamless coordination and easy settlement of shared expenses.
To link your Splitwise and Venmo accounts, follow these simple steps:
- Open the Splitwise app or website and log in to your account.
- On the Splitwise homepage, navigate to the “Settings” section. This is typically represented by an icon that looks like a gear or three stacked lines.
- In the settings menu, find and select the “Connections” or “Linked Accounts” option.
- Look for the option to link your Venmo account. Click on it and follow the prompts to authorize Splitwise to access your Venmo account.
- You may be redirected to the Venmo website or app where you’ll need to log in to your Venmo account.
- Authorize the connection between Splitwise and Venmo by granting the necessary permissions. This allows Splitwise to view your Venmo transactions and make settling up with friends easier.
- Once the accounts are successfully linked, you’ll receive a confirmation message or notification.
It’s important to note that linking your Splitwise and Venmo accounts is a one-time setup process. Once the integration is complete, you can enjoy the benefits of easy expense tracking and quick settlement of shared bills. Linked accounts enable Splitwise to access relevant Venmo transactions, simplifying the process of splitting expenses and settling debts.
Now that your Splitwise and Venmo accounts are linked, you’re ready to move on to the next steps and start managing your shared expenses effortlessly.
Step 3: Connect with friends on Splitwise
Now that your Splitwise and Venmo accounts are linked, it’s time to connect with your friends on Splitwise. This step is crucial for ensuring accurate expense tracking and seamless collaboration.
To connect with friends on Splitwise, follow these simple steps:
- Open the Splitwise app or website and log in to your account.
- Once logged in, navigate to the “Friends” section. This is typically represented by an icon that looks like two people.
- In the “Friends” section, look for the option to add a friend. It may be labeled as “Add Friends,” “Connect with Friends,” or something similar.
- To add a friend, you have multiple options depending on your preference:
- Search by name or email address: Enter your friend’s name or email address in the search bar and click “Add” or “Invite.” If your friend is already on Splitwise, you’ll be able to send them a friend request to connect. If they are not yet on Splitwise, an invitation will be sent to them.
- Share a personalized invitation link: This option allows you to generate a unique invitation link that you can share with your friends via text message, email, or any other messaging platform. When your friend clicks on the link and signs up for Splitwise, they will automatically connect with you.
- Once you have added or connected with your friends on Splitwise, they will appear in your friends list.
- You can also create groups to manage expenses with specific sets of friends. Group expenses are a convenient way to split bills for activities such as vacations, house rent, or shared utilities.
By connecting with your friends on Splitwise, you can easily track shared expenses and ensure everyone stays on the same page regarding who owes what. Splitwise makes it effortless to divide bills accurately and keep a clear record of each person’s contributions.
Now that you have connected with your friends on Splitwise, it’s time to move on to the next step and start adding expenses to your account.
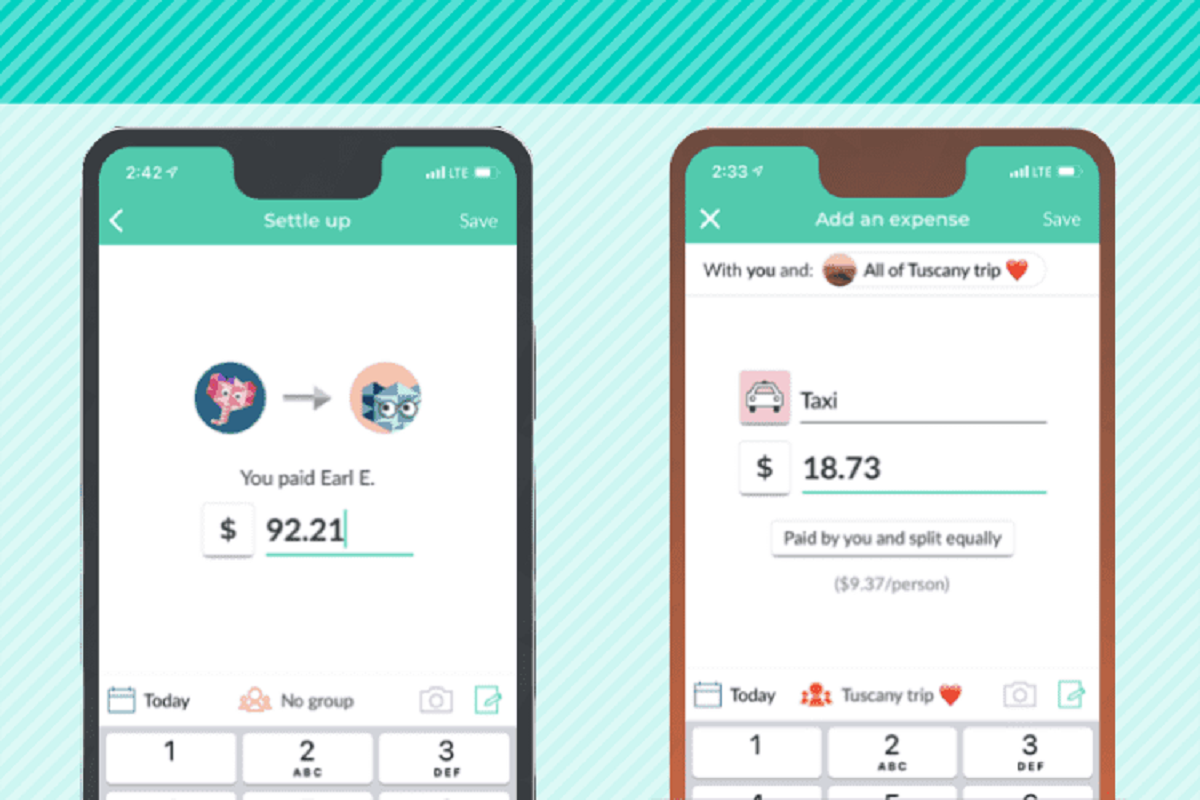
Step 4: Add expenses on Splitwise
Now that you have connected with your friends on Splitwise, it’s time to start adding expenses and keeping track of shared costs. Adding expenses in Splitwise is a straightforward process that allows for accurate tracking and easy division among friends.
To add expenses on Splitwise, follow these simple steps:
- Open the Splitwise app or website and log in to your account.
- On the main page, look for the option to add an expense. This is typically represented by a plus (+) button or an icon that resembles a receipt.
- Enter the details of the expense, including the amount, description, and category.
- Select the friends involved in the expense. Splitwise makes it easy to add multiple friends, as well as divide expenses equally or assign specific amounts to each person.
- If you’re adding an expense for a group, select the appropriate group from the drop-down menu. This ensures that the expense is recorded within the correct context.
- Choose whether the expense has been paid or is still owed. If it has been paid, you can select the payment method, such as cash, credit card, or Venmo.
- Click “Save” or “Add” to add the expense to Splitwise.
With Splitwise, you can also split and track various types of expenses, including bills, groceries, rent, utilities, and more. The platform provides flexibility and customization options to cater to your specific needs. You can even categorize expenses for better organization and analysis.
By adding expenses on Splitwise, you can accurately keep track of who owes what and simplify the process of splitting bills and settling debts. The platform does the math for you and sends friendly reminders to your friends, ensuring transparency and accountability.
Now that you know how to add expenses on Splitwise, it’s time to move on to the next step and settle up with Venmo.
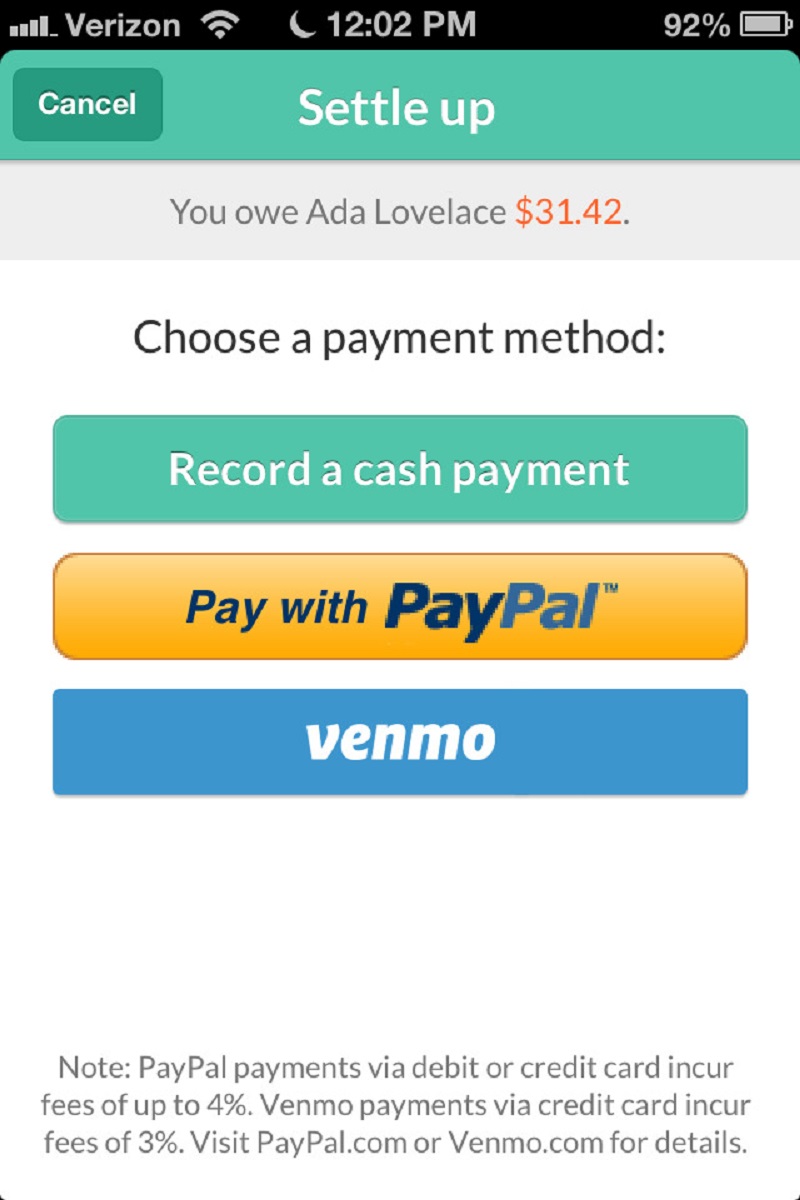
Step 5: Settle up with Venmo in Splitwise
After adding expenses on Splitwise, the next step is to settle up with your friends using Venmo. Venmo makes it convenient to transfer money and settle debts, eliminating the need for cash or checks.
To settle up with Venmo in Splitwise, follow these simple steps:
- Open the Splitwise app or website and log in to your account.
- On the main page, navigate to the “Dashboard” or “Activity” section. This is typically represented by an icon that resembles a bell or a list.
- In the activity section, you’ll see a summary of your recent transactions and pending balances.
- Find the pending balance with a friend that you want to settle.
- Click on the pending balance to open the details page.
- On the details page, select the option to settle up with Venmo. This will generate a request or payment link for the exact amount owed.
- Copy the Venmo payment link and send it to your friend via text message, email, or any other messaging platform.
- Your friend can click on the Venmo payment link and complete the transaction using their Venmo account.
- Once the payment is made, the pending balance on Splitwise will be updated, and the expense will be marked as settled.
- Repeat these steps for any other pending balances you want to settle using Venmo.
By settling up with Venmo in Splitwise, you can easily transfer money to your friends and ensure that everyone is paid back accurately and promptly. Venmo provides a secure and hassle-free way to handle financial transactions, making it convenient for everyone involved.
Now that you know how to settle up with Venmo in Splitwise, it’s time to move on to the final step and explore how to view transaction history on both platforms.
Step 6: View transaction history on Venmo and Splitwise
Once you have settled up using Venmo in Splitwise, it’s essential to be able to track and review your transaction history on both platforms. This allows you to keep a record of all your shared expenses and payments for future reference.
To view your transaction history on Venmo, follow these simple steps:
- Open the Venmo app on your smartphone or visit the Venmo website.
- Log in to your Venmo account using your email address or phone number.
- In the Venmo app, tap on the “☰” icon at the top left corner to open the menu. On the website, look for the menu or dropdown arrow.
- Select the “Transactions” or “Activity” option from the menu.
- You will now see a list of your recent transactions in Venmo, including both payments received and payments sent.
- You can use the search bar or filter options to find specific transactions or navigate through pages to view older transactions.
To view your transaction history on Splitwise, follow these simple steps:
- Open the Splitwise app or website and log in to your account.
- On the main page, navigate to the “Dashboard” or “Activity” section. This is typically represented by an icon that resembles a bell or a list.
- Here, you will find a summary of your recent activity, including expenses added, balances, and payments.
- You can click on any transaction to view the details, including the amount, description, and friends involved.
- Scroll through the activity list or use the search bar to find specific transactions or filter by date, category, or friend.
By regularly reviewing your transaction history on both Splitwise and Venmo, you can ensure that all expenses are accurately recorded and settlements are properly accounted for. This also helps in maintaining transparency and resolving any discrepancies that may arise.
Congratulations! You have successfully learned how to connect Splitwise to Venmo, add expenses, connect with friends, settle up, and view transaction history on both platforms. With these tools at your disposal, managing shared expenses and finances has never been easier.
Conclusion
Congratulations on completing the guide on connecting Splitwise to Venmo and simplifying your shared expense management. By following the steps outlined in this guide, you can now seamlessly track expenses, connect with friends, settle up, and view transaction history on both platforms.
Splitwise provides a robust platform for keeping track of shared expenses, allowing you to easily add expenses, assign them to friends, and split bills accurately. With its user-friendly interface and convenient features, it takes the hassle out of managing shared finances.
Venmo, on the other hand, offers a seamless way to settle up with your friends. By linking your Venmo account to Splitwise, you can transfer money effortlessly and handle payments in a secure and efficient manner. Venmo eliminates the need for cash or checks and allows for instant transactions.
Remember to regularly review your transaction history on both Splitwise and Venmo to stay on top of your shared expenses and ensure accuracy. By doing so, you can maintain transparency, track payments, and avoid any potential disputes or misunderstandings among friends.
Now that you have the knowledge and tools to effectively manage your shared expenses with Splitwise and Venmo, you can experience the convenience and peace of mind that come with organized financial management.
So, start connecting with your friends on Splitwise, adding expenses accurately, settling up with Venmo, and staying on top of your financial transactions. By utilizing these platforms, you can streamline your shared expense management and focus on enjoying meaningful experiences with your friends and loved ones.