Introduction
Welcome to the world of seamless financial management and convenient expense splitting! If you’re tired of tracking and settling expenses manually with your friends or housemates, then you’ve come to the right place. In this article, we’ll show you how to connect two popular platforms, Splitwise and Venmo, to simplify your financial interactions with others.
Splitwise is a powerful expense-sharing app that allows you to split bills, IOUs, and shared expenses with ease. It keeps track of who owes what, ensuring that everyone is on the same page when it comes to settling up. Venmo, on the other hand, is a widely used mobile payment platform that enables you to send and receive money effortlessly.
By connecting Splitwise and Venmo, you can seamlessly settle expenses directly from within Splitwise, making it a one-stop solution for expense tracking and payment. No more hassle of manually calculating splits or transferring money separately; everything can be conveniently handled within these two platforms.
In this step-by-step guide, we will walk you through the process of connecting Splitwise and Venmo, ensuring that you have a smooth experience managing your expenses and payments. So without further ado, let’s dive in and get started!
Step 1: Sign up for Splitwise
The first step in connecting Splitwise and Venmo is to sign up for a Splitwise account. Simply visit the Splitwise website or download the mobile app from the App Store or Google Play Store. Sign up using your email address or log in with your Google or Facebook account for convenience.
Once you’ve created your Splitwise account and logged in, take a moment to familiarize yourself with the platform’s interface. You’ll find various sections such as dashboard, groups, and expenses, which will become essential as you start using Splitwise to manage your expenses.
Splitwise allows you to create groups, add members, and track expenses within each group. This feature is particularly useful if you’re sharing expenses with friends, roommates, or family members. Whether it’s splitting rent, utilities, grocery bills, or travel expenses, Splitwise has got you covered.
Before moving on to the next steps, take some time to explore the different settings and options available in your Splitwise account. Familiarize yourself with the user interface, as this will make it easier for you to navigate through the process of connecting Splitwise with Venmo.
Don’t worry if you’re new to Splitwise and don’t have any existing expenses to track. You can still follow along with this guide and learn how to connect Splitwise and Venmo. Once you start using Splitwise for your expense management, you’ll discover how convenient and efficient it is to split expenses and settle debts.
Now that you’ve signed up for Splitwise and have a basic understanding of the platform, let’s move on to the next step: creating a group on Splitwise.
Step 2: Create a group on Splitwise
Now that you have a Splitwise account, it’s time to create a group where you can track and split expenses with your friends, roommates, or family members. Here’s a step-by-step guide on how to create a group on Splitwise:
- On the Splitwise dashboard, navigate to the “Groups” section and click on the “Create a group” button.
- Give your group a name that clearly identifies its purpose. For example, if you’re sharing expenses with your roommates, you can name the group “Roommates Expenses.”
- Invite the members you want to share expenses with by entering their email addresses. You can add multiple members to the group by separating the email addresses with commas.
- Choose whether the group will be “Split equally” or use the “Exact shares” option, where you can specify the individual shares for each member. If the expenses are split equally among all members, select the “Split equally” option; otherwise, choose the “Exact shares” option.
- Click on the “Save” or “Create” button to create the group.
Once the group is created, all the invited members will receive an email notification to join the group. They will need to accept the invitation and create their own Splitwise accounts if they haven’t already done so.
Now that you have successfully created a group on Splitwise, you can start adding expenses and keep track of who owes what. Splitwise automatically calculates and updates the balances for each member, making it easy to settle debts later on.
Continue to the next step to learn how to add expenses to your newly created group on Splitwise.
Step 3: Add expenses on Splitwise
Now that you have created a group on Splitwise, it’s time to start adding expenses and tracking who owes what. Adding expenses on Splitwise is a straightforward process. Follow the steps below:
- Go to your Splitwise dashboard and select the desired group where you want to add the expense.
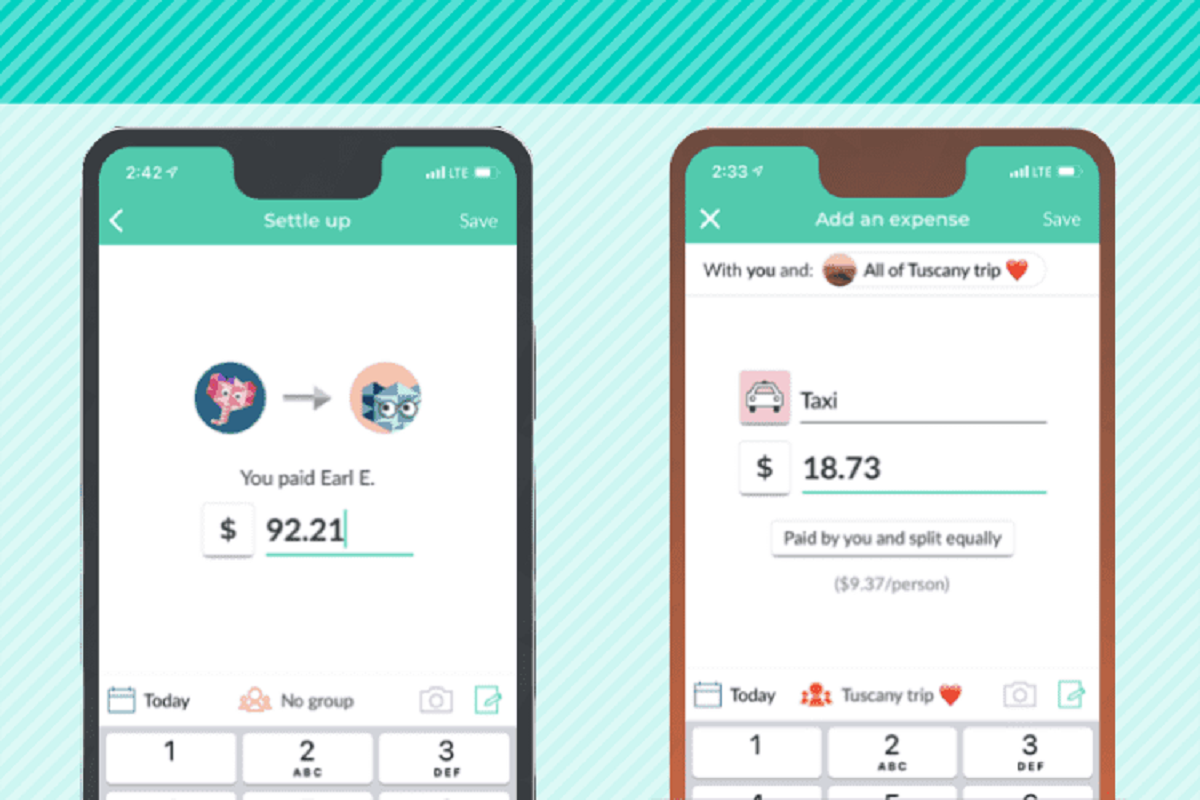
- Click on the “Add an expense” button.
- Enter the details of the expense, including the amount, a brief description, and the date of the expense.
- If you’re adding the expense for a specific category, you can choose from the predefined categories or create a custom category.
- Select the members who shared the expense by checking their names.
- Specify how the expense should be split among the selected members. You can choose to split it equally or specify individual shares.
- Attach any relevant receipts or documents to the expense if needed.
- Click on the “Save” or “Add” button to add the expense to the group.
Splitwise will then calculate and update the balances for each member automatically based on the expense details and the splitting method you chose. This ensures that everyone is aware of their share and simplifies the process of settling expenses later on.
You can continue adding more expenses to the group as they occur. Splitwise keeps a comprehensive record of all expenses within the group, making it easier to track and manage expenses over time.
Now that you know how to add expenses on Splitwise, let’s move on to the next step and learn how to sign up for Venmo.
Step 4: Sign up for Venmo
If you haven’t already, it’s time to sign up for Venmo, the popular mobile payment platform that will enable you to seamlessly connect with Splitwise. Follow the steps below to sign up for Venmo:
- Download the Venmo app from the App Store or Google Play Store, or visit the Venmo website on your desktop.
- Open the app or website and click on the “Sign up” or “Create Account” button.
- Enter your email address or sign up using your Facebook or Google account.
- Verify your email address by clicking on the verification link sent to your email. If you signed up with Facebook or Google, your email address may already be verified.
- Create a strong password for your Venmo account.
- Provide the additional required information, such as your mobile number, date of birth, and legal name.
- Review the Privacy Policy and the User Agreement, and click on “Agree” to proceed.
- Set up additional security features, such as a PIN code or fingerprint recognition, to secure your Venmo account.
- Once you’ve completed the sign-up process, you’re ready to start using Venmo to send and receive payments.
Venmo provides a convenient and secure way to transfer money to individuals within your network. You can connect your bank account or debit card to your Venmo account to fund your transactions.
Now that you have successfully signed up for Venmo, let’s move on to the next step: linking your Splitwise account with Venmo to streamline your expense settlements.
Step 5: Link your Splitwise account with Venmo
Now that you have both Splitwise and Venmo accounts, it’s time to connect them to enjoy the seamless integration between the two platforms. By linking your Splitwise account with Venmo, you’ll be able to settle expenses directly within Splitwise using Venmo’s convenient payment options. Follow the steps below to link your Splitwise account with Venmo:
- Open the Splitwise website or mobile app and log in to your Splitwise account.
- Navigate to the settings or account section of Splitwise, often represented by a gear or profile icon.
- Look for the “Connected Accounts” or “Payment Method” option and select “Venmo” from the available options.
- You may be prompted to authorize Splitwise to access your Venmo account. Click on “Authorize” or “Grant Access” to proceed.
- If you haven’t already, log in to your Venmo account using your Venmo credentials.
- Once you’ve successfully connected your Splitwise account with Venmo, you’ll see a confirmation message or an indication that the linking is complete.
Now that your Splitwise account is linked with Venmo, you’ll be able to settle expenses directly through Venmo without leaving the Splitwise platform. This integration provides a seamless experience and makes managing your expenses and payments even more convenient.
It’s important to note that when you settle an expense using Venmo in Splitwise, the transaction will be recorded and updated in your Splitwise account, ensuring that all the balances and shares are accurately accounted for.
Now that you have successfully linked your Splitwise account with Venmo, let’s move on to the next step: connecting Splitwise with Venmo on the mobile app.
Step 6: Connect Splitwise with Venmo on the mobile app
If you prefer to manage your expenses and settle debts on the go, the Splitwise mobile app provides a convenient option. By connecting Splitwise with Venmo on the mobile app, you can easily access and settle expenses using your Venmo account directly from your smartphone. Follow the steps below to connect Splitwise with Venmo on the mobile app:
- Open the Splitwise mobile app on your device.
- Log in to your Splitwise account if prompted.
- Navigate to the settings or account section of the app.
- Select the “Connected Accounts” or “Payment Method” option.
- Choose “Venmo” as your preferred payment method from the available options.
- You may be prompted to sign in to your Venmo account. Enter your Venmo credentials to proceed.
- Grant Splitwise access to your Venmo account if requested.
- Once the connection is established, you’ll receive a confirmation message or see that your Splitwise account is linked with Venmo.
After connecting Splitwise with Venmo on the mobile app, you can easily settle expenses with your friends or group members using Venmo. Simply select the expense you want to settle, choose the Venmo option, and follow the prompts to complete the payment.
This integration streamlines the process of managing expenses on the go and allows for quick and hassle-free expense settlements. You’ll have all your expense management and payment needs in one place, right at your fingertips.
Now that you have successfully connected Splitwise with Venmo on the mobile app, let’s move on to the next step: settling expenses using Venmo on Splitwise.
Step 7: Settle expenses using Venmo on Splitwise
Now that you have linked your Splitwise and Venmo accounts, it’s time to utilize the seamless integration between the two platforms to settle your expenses effortlessly. Splitwise allows you to settle up with your friends or group members directly using Venmo. Here’s how you can settle expenses using Venmo on Splitwise:
- Open the Splitwise app or website and log in to your account.
- Navigate to the group where the expense you want to settle is located.
- Locate the expense you wish to settle and click on it to view the details.
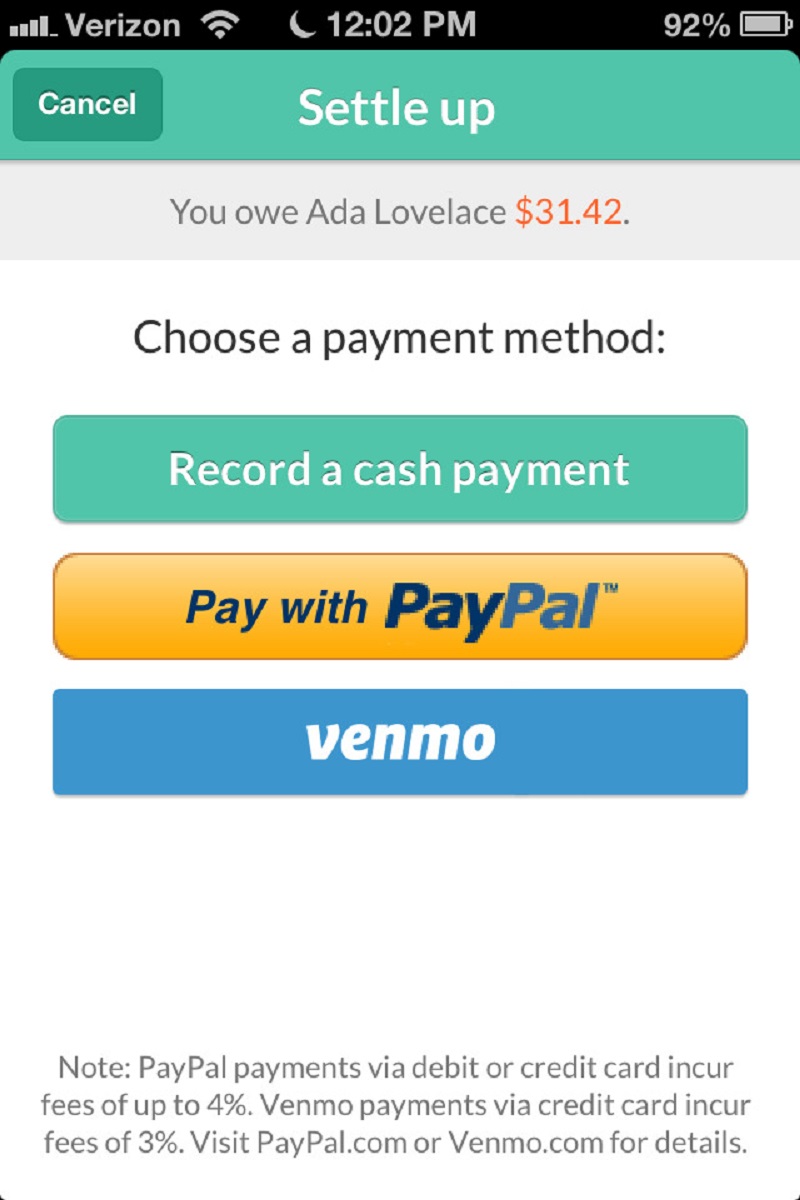
- Look for the “Settle up” or “Pay with Venmo” option next to the expense details.
- Click on the Venmo option to initiate the settlement process.
- You will be redirected to the Venmo platform, where you can review the expense details.
- Enter the payment amount and any additional notes or information if necessary.
- Click on the “Pay” or “Confirm” button to complete the payment using Venmo.
- Once the payment is processed, you’ll receive a confirmation on Venmo and Splitwise, indicating that the expense has been settled.
By using Venmo to settle expenses, you can quickly and securely transfer money to your friends or group members without the hassle of handling cash or bank transfers separately. This seamless integration simplifies the process of settling debts and ensures accurate record-keeping within Splitwise.
Remember to review the expense details carefully before initiating the payment to ensure everything is accurate. If you have any questions or discrepancies, you can communicate directly with your friends or group members within Splitwise to clarify any concerns.
With the ability to settle expenses using Venmo on Splitwise, managing your finances and splitting expenses has never been easier. Take advantage of this integrated feature to streamline your expense settlements and maintain clarity and transparency in your shared expenses.
Congratulations! You have successfully learned how to connect Splitwise with Venmo and use their seamless integration to manage and settle expenses efficiently. Enjoy the convenience of tracking expenses, splitting bills, and settling debts with ease!
Conclusion
Managing expenses and splitting bills can often be a cumbersome and time-consuming task. However, by connecting Splitwise and Venmo, you can simplify and streamline this process, making it more efficient and convenient. Throughout this step-by-step guide, we have explored how to sign up for Splitwise and Venmo, create groups, add expenses, and connect both platforms to settle debts seamlessly.
With Splitwise, you can easily track expenses within different groups and keep a record of who owes what. By linking your Splitwise account with Venmo, you can settle these expenses directly within Splitwise using Venmo’s payment options, eliminating the need for separate transactions and transfers.
Whether you’re splitting rent with roommates, sharing travel expenses with friends, or managing expenses in any other group setting, the integration of Splitwise and Venmo makes the process more transparent and efficient. The ability to settle expenses seamlessly within Splitwise using Venmo simplifies financial interactions and ensures accurate record-keeping.
Remember to regularly update your expenses in Splitwise and make timely settlements using Venmo to keep track of your shared expenses and maintain financial harmony within your groups. Communication is key, so don’t hesitate to discuss any discrepancies or clarifications with your friends or group members through Splitwise’s messaging feature.
By following the steps outlined in this guide, you can harness the power of Splitwise and Venmo to manage your finances and shared expenses effortlessly. Say goodbye to the hassle of manual calculations and multiple money transfers; embrace the convenience of this integrated solution.
Now that you have the knowledge and tools at your disposal, it’s time to take control of your expenses, simplify your financial interactions, and enjoy a stress-free experience managing shared finances with Splitwise and Venmo.