Introduction
Welcome to Splitwise, the ultimate expense-sharing platform! Whether you’re splitting bills with roommates, managing expenses with friends, or keeping track of shared expenses in a group, Splitwise has got you covered. This step-by-step guide will walk you through how to record a payment on Splitwise, ensuring that all your financial transactions are accurately and conveniently managed.
Splitwise allows you to easily keep track of who owes whom, simplifying the process of settling bills and ensuring transparency among all parties involved. Whether you’re reimbursing a friend for dinner, splitting rent with roommates, or repaying a loan, the payment recording feature on Splitwise makes it a breeze to document and keep a record of your expenses.
In this guide, we will explain the process of recording a payment on Splitwise, highlighting the necessary steps and providing helpful tips along the way. By following these simple instructions, you will be able to keep your expenses organized and avoid any confusion or misunderstandings.
So, let’s get started and learn how to accurately record a payment on Splitwise, ensuring that every transaction is properly documented and accounted for. By the end of this guide, you’ll be a pro at managing your expenses on Splitwise!
Step 1: Open the Splitwise app or website
The first step in recording a payment on Splitwise is to open the Splitwise app on your mobile device or navigate to the Splitwise website on your computer’s browser. Splitwise is available as both a mobile app for iOS and Android devices and a web-based platform for desktop users, giving you the flexibility to access and manage your expenses from any device.
If you’re using the mobile app, locate the Splitwise icon on your home screen or app drawer and tap on it to open the app. For desktop users, launch your preferred web browser and enter the Splitwise website address in the URL bar or search for “Splitwise” in your favorite search engine, and click on the official website link in the search results.
Once you have successfully opened the Splitwise app or website, you will be able to access all the features and functionalities offered by the platform, including the ability to record payments and settle expenses.
It’s important to note that Splitwise requires users to create an account in order to use its services. If you don’t already have an account, you will need to sign up for one before proceeding. Signing up is a quick and easy process that requires providing some basic information such as your name, email address, and creating a password. If you already have an account, simply enter your login credentials to proceed.
Now that you have successfully opened the Splitwise app or website and logged in to your account, you’re ready to move on to the next step of recording a payment.
Step 2: Log in to your Splitwise account
Once you have opened the Splitwise app or website, the next step is to log in to your account. Logging in allows you to access your personal profile, view your expense history, and record payments with ease.
If you’re using the Splitwise mobile app, you will be prompted to enter your login credentials on the login screen. Simply enter your registered email address and password, then tap on the “Log In” button to proceed. If you have enabled biometric authentication (such as fingerprint or facial recognition) on your device, you may also have the option to log in using these methods for added convenience.
For desktop users, the login screen will be displayed on the Splitwise website. Here, you will need to enter your email address and password in the provided fields. After that, click on the “Log In” button to access your account.
If you have forgotten your password, don’t worry! Splitwise provides a password reset option. Simply click on the “Forgot password” or “Reset password” link on the login screen, and instructions will be sent to your registered email address on how to reset your password. Follow the steps provided in the email to regain access to your account.
It’s important to ensure that you log in to the correct Splitwise account associated with your expenses. Double-check that you have entered the correct email address and password to avoid any confusion or potential errors.
Once you have successfully logged in to your Splitwise account, you’re one step closer to recording your payment and maintaining accurate expense records.
Step 3: Navigate to the “Groups” tab
After logging in to your Splitwise account, the next step is to navigate to the “Groups” tab. This tab allows you to manage and organize your expenses based on different groups or categories, making it easier to track and record payments accurately.
In the Splitwise app, you can find the “Groups” tab at the bottom of the screen, represented by an icon that resembles people or a group of users. Tap on this icon to access the Groups tab. On the Splitwise website, you will typically find the “Groups” tab in the navigation menu at the top of the screen. Click on the “Groups” tab to proceed.
Once you are in the Groups tab, you will see a list of all the groups that you are a part of. These groups can include shared households, trips with friends, or any other shared expenses. Scroll through the list or use the search bar provided to quickly locate the specific group for which you want to record a payment.
If you are part of only one group, you will automatically be taken to that group’s page. In this case, you can skip to the next step. However, if you belong to multiple groups, ensure that you select the correct group that the payment is being recorded for.
The Groups tab provides a comprehensive overview of each group’s expenses, including any outstanding balances and recent activity. It allows you to keep track of the expenses associated with each group and ensures that all payments are accurately attributed.
Navigating to the Groups tab is a crucial step in the payment recording process, as it allows you to access and manage the specific group for which you are recording a payment.
Now that you have successfully reached the Groups tab, you’re ready to move on to the next step of recording your payment on Splitwise.
Step 4: Select the group that the payment is being recorded for
Now that you have navigated to the “Groups” tab, the next step is to select the specific group for which you want to record a payment. This ensures that the payment is attributed to the correct group and all the members involved.
In the Splitwise app, you will see a list of all the groups that you are part of. Scroll through the list or use the search functionality to find the group you are looking for. Once you have located the group, tap on it to select it.
On the Splitwise website, you will typically see a list of your groups displayed on the Groups page. Look for the group name or use the search bar if needed. Click on the group name to select it.
It’s important to choose the correct group to ensure that the payment is recorded and visible to the members who are part of that group. Selecting the wrong group may result in confusion and inaccurate expense tracking.
Remember, Splitwise allows you to record payments separately for each group you are a part of. This is particularly useful if you have multiple shared expenses with different groups of people. By selecting the appropriate group, you can make sure that the payment is associated with the right set of individuals.
Once you have selected the group for which the payment is being recorded, you’re ready to proceed to the next step of recording the payment on Splitwise. This ensures that the payment is attributed to the correct group and all its members are aware of the transaction.
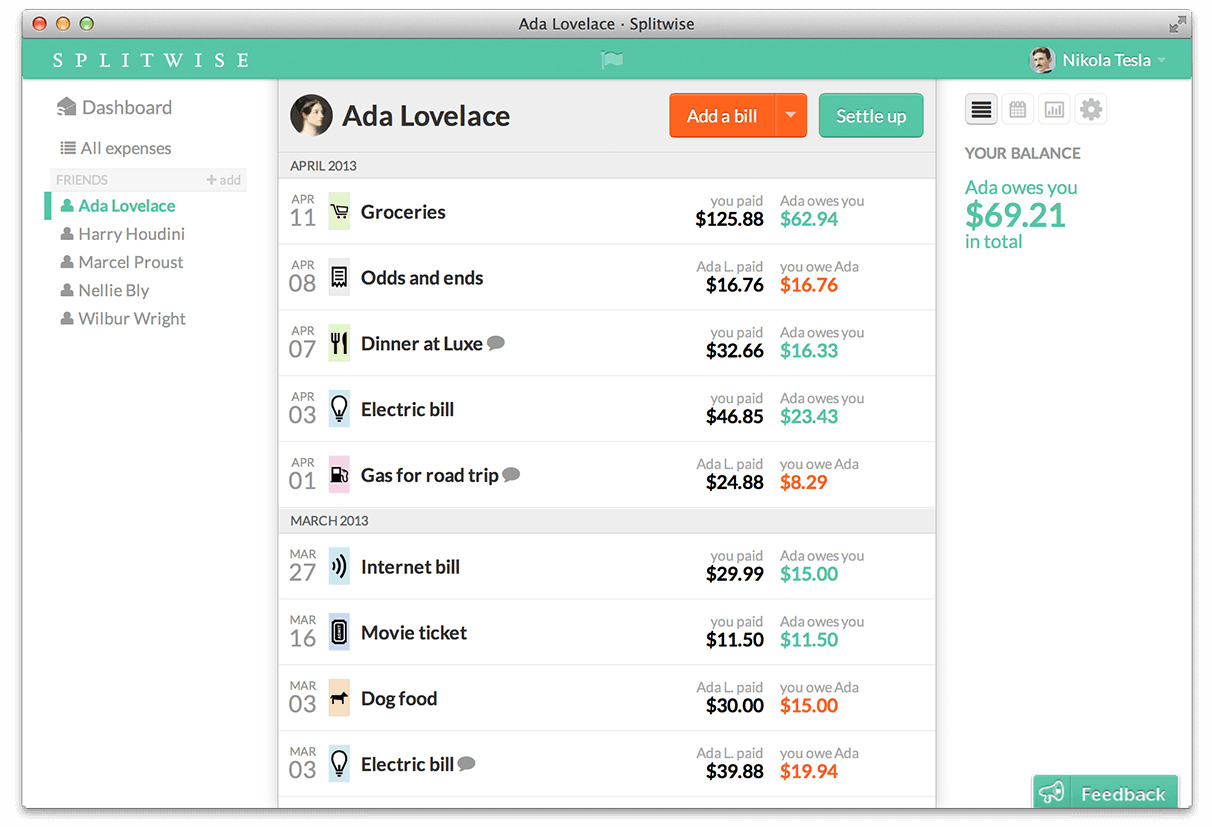
Step 5: Click on the “Settle Up” button
After selecting the appropriate group for which you want to record a payment, the next step is to click on the “Settle Up” button. This button allows you to initiate the payment recording process and accurately track the expenses within the chosen group.
In the Splitwise app, you will typically find the “Settle Up” button prominently displayed at the top or bottom of the group page. Look for a button labeled “Settle Up” or similar verbiage and tap on it.
On the Splitwise website, you can usually find the “Settle Up” button located on the group page as well. It may be displayed as a button or a link with the text “Settle Up”. Click on this button or link to proceed.
Clicking on the “Settle Up” button signifies that you are ready to record the payment and settle the expenses within the selected group. It directs you to the payment recording interface where you can enter the relevant details and ensure accurate tracking.
Before proceeding, make sure you have the necessary information handy, such as the amount of the payment, the payer, and the recipients. Taking a moment to gather these details will help streamline the payment recording process and ensure accuracy.
Once you have clicked on the “Settle Up” button, you are ready to move on to the next step of entering the payment amount and other relevant information. This step ensures that the payment is properly registered within the selected group and attributed to the correct individuals.
Step 6: Enter the amount of the payment
After clicking on the “Settle Up” button, you will be directed to the payment recording interface. The next step in recording a payment on Splitwise is to enter the amount of the payment. This allows Splitwise to accurately update the expense balances and keep track of the financial transactions.
In the payment recording interface, you will see a field or input box where you can enter the payment amount. Depending on the Splitwise app version or website layout, this field may be labeled as “Payment Amount” or “Amount”.
Enter the exact amount of the payment in the designated field. Make sure to enter the correct numerical value without any symbols or currency signs. For example, if the payment amount is $50, simply enter “50” in the field.
If the payment amount includes decimal points, use the appropriate decimal notation. For example, if the payment amount is $25.50, enter “25.50” in the field.
It’s important to ensure that you enter the correct payment amount to reflect the transaction accurately. Double-check the amount to avoid any discrepancies or incorrect calculations.
Additionally, Splitwise offers the option to split the payment equally among the recipients or to customize the individual shares. If the payment is divided unequally, you can specify the portion attributed to each recipient in the subsequent steps.
Once you have entered the payment amount, you’re ready to proceed to the next step of selecting the payer and recipients. This step ensures that the payment is properly assigned and recorded for the individuals involved in the expense.
Step 7: Choose the payer and recipients
After entering the payment amount, the next step in recording a payment on Splitwise is to choose the payer and recipients. This step ensures that the payment is properly attributed to the individuals involved in the expense and accurately reflects their financial obligations.
In the payment recording interface, you will typically find options to select the payer and recipients of the payment. The payer is the person who made the payment, while the recipients are the individuals who should be reimbursed or whose balances should be adjusted.
When selecting the payer, you will usually have the option to choose from a predefined list of members in the group or enter a custom name if the person making the payment is not part of the group. Select the appropriate name or enter the payer’s name in the designated field.
For selecting the recipients, Splitwise will generally display a list of all the members in the group. You can choose one or multiple recipients who are eligible for reimbursement or expense adjustment.
If the payment is split equally among all the group members, you may find an option to select the “Split Equally” button. This will automatically divide the payment amount equally among all the recipients.
Alternatively, if the payment is divided unequally or based on specific proportions, you can manually enter the share for each recipient. Simply enter the appropriate values in the respective fields or select the proportionate share for each individual.
Double-check the payer and recipients to ensure that the payment is allocated correctly. Verifying the selection will help to avoid any discrepancies or errors in recording the payment.
Once you have chosen the payer and recipients, you’re ready to move on to the next step of adding a description or note, which can provide additional context or details about the payment.
Step 8: Add a description or note (optional)
In the process of recording a payment on Splitwise, you have the option to add a description or note to provide additional context or details about the payment. This step is optional but can be helpful for keeping a record of specific transactions or providing any necessary explanations.
In the payment recording interface, you will typically find a text box or field labeled “Description” or “Note”. Here, you can type in any relevant information that you want to associate with the payment.
For example, if the payment is for a shared dinner at a restaurant, you can enter details such as the name of the restaurant, the date of the outing, or the occasion. This can serve as a reminder and help everybody involved in the group to recall the specific expense.
If the payment is for a specific purpose, such as reimbursing someone for groceries or repaying a loan, you can provide additional details of the transaction. This can include the items purchased or the terms of the loan agreement.
Adding a description or note can also be useful for communicating any adjustments, credits, or discounts applied to the payment. It helps in maintaining transparency and avoids any confusion or misinterpretation among the group members.
Remember, the description or note field has a character limit, so make sure to provide concise and relevant information within the given space. If you have additional details, consider using bullet points or highlighting the most important information.
Once you have added the optional description or note, you’re ready to proceed to the next step of selecting the payment method. This ensures that the payment is appropriately recorded and allows you to maintain accurate expense records on Splitwise.
Step 9: Select the payment method
After adding a description or note, the next step in recording a payment on Splitwise is to select the payment method. This step allows you to specify how the actual transaction was made, whether it be through cash, bank transfer, digital payment platforms, or other means.
In the payment recording interface, you will typically find a dropdown menu or a list of payment methods to choose from. This may include options such as “Cash”, “Bank Transfer”, “Credit Card”, or specific digital payment platforms like PayPal or Venmo.
Select the payment method that corresponds to how the payment was made. If you don’t see the exact payment method listed, choose the closest option available or select “Other” if applicable.
Specifying the payment method is important for accurate expense tracking and reconciliation. It helps in maintaining a clear record of how each payment was settled and provides transparency among the group members.
If the payment was made using a digital payment platform, you may have the option to include additional details such as the transaction ID or reference number. This can provide further clarity and facilitate easy tracking of the payment.
Double-check the selected payment method to ensure accuracy before proceeding. Making sure that the correct payment method is recorded will help in organizing your expenses and maintaining accurate financial records.
Once you have selected the payment method, you’re ready to move on to the next step of submitting the payment record. This step finalizes the entry and ensures that the payment is properly recorded within Splitwise.
Step 10: Submit the payment record
After selecting the payment method, the next step in recording a payment on Splitwise is to submit the payment record. This finalizes the entry and ensures that the transaction is accurately recorded within Splitwise.
In the payment recording interface, you will typically find a button labeled “Submit”, “Save”, or “Record Payment”. Click on this button to submit the payment record.
By clicking “Submit”, you confirm that all the details provided are accurate and that the payment has been recorded correctly. This action updates the expense balances, adjusts the owed amounts, and notifies the group members about the transaction.
Before submitting, take a moment to review all the information entered, including the payment amount, payer, recipients, description, and payment method. Double-checking these details ensures that the payment record is comprehensive and error-free.
Once you have reviewed the payment details and are confident that everything is accurate, click the “Submit” button to finalize the payment recording process.
After submitting the payment record, Splitwise will typically display a confirmation message indicating that the payment has been recorded successfully. This confirmation assures you that the payment has been registered within the chosen group and that the balances have been updated accordingly.
It is important to note that once a payment record is submitted, it cannot be modified or deleted. However, you can always add a new transaction record to adjust any discrepancies or make additional payments as needed.
Now that you have submitted the payment record, you can proceed to the final step of verifying the payment record on Splitwise. This ensures that the transaction has been accurately recorded and visible to all the group members.
Step 11: Verify the payment record on Splitwise
After submitting the payment record, the final step in recording a payment on Splitwise is to verify the payment record. This step ensures that the transaction has been accurately recorded and is visible to all the group members.
Return to the group page or navigate to the specific expense section on Splitwise where you recorded the payment. Here, you will be able to review the payment record and ensure that all the entered details are displayed correctly.
Check the payment amount to confirm that it matches the actual transaction. Verify that the payer and recipients are accurately listed, reflecting the individuals involved in the expense. Review the description or note to ensure that the additional context or details provided are visible.
It is also important to verify that the payment method you selected is correctly displayed. This helps to ensure that the payment record accurately reflects how the transaction was made.
If you notice any discrepancies or errors in the payment record, you can take steps to rectify them. Splitwise typically provides options to edit or update the payment record, allowing you to make necessary adjustments if needed.
Moreover, verifying the payment record allows you to maintain transparency and clear communication among the group members. It ensures that everyone is aware of the payment and can access the necessary information related to the expense.
By verifying the payment record, you can have confidence in the accuracy and integrity of your financial transactions on Splitwise, reducing the chances of any misunderstandings or discrepancies.
With the payment record successfully verified, you have completed the process of recording a payment on Splitwise. You can now rest assured knowing that your expenses are properly tracked, balances are updated, and financial obligations are accurately reflected within the chosen group.
Conclusion
Recording a payment on Splitwise is a simple and efficient way to manage and track expenses within your shared groups. By following the step-by-step process outlined in this guide, you can ensure that your financial transactions are accurately recorded and that everyone stays on top of their balances.
We started by opening the Splitwise app or website and logging in to our account. Then, we navigated to the “Groups” tab and selected the specific group for which we wanted to record a payment. Clicking on the “Settle Up” button allowed us to enter the payment amount, choose the payer and recipients, and include an optional description or note for additional context.
Next, we selected the payment method and submitted the payment record. Finally, we verified the payment record on Splitwise to ensure accuracy and transparency.
By following these steps, you can effectively manage your shared expenses, accurately record payments, and maintain clear communication among your group members. Splitwise empowers you to stay organized and eliminates the need for manual calculations or constant reminders.
Remember, Splitwise provides a user-friendly interface and offers additional features to further enhance your expense-tracking experience. Take advantage of features such as bill splitting, recurring expenses, and notifications to streamline your financial management process.
Now that you know how to record a payment on Splitwise, you can confidently keep track of your expenses, settle bills, and ensure fairness within your shared groups. With Splitwise as your go-to expense-sharing platform, managing finances has never been easier!