Introduction
Welcome to Splitwise, a popular expense-splitting app that helps you keep track of shared expenses with friends, roommates, or travel companions. Whether you’re splitting the bill at a restaurant, sharing rent and utilities, or planning a group trip, Splitwise simplifies the process of managing and settling expenses. In this guide, we will walk you through the process of marking an expense as paid on Splitwise.
Keeping track of shared expenses can be a challenge, especially when dealing with multiple people and various expenditures. Splitwise offers a user-friendly platform that allows you to create and manage groups, add expenses, and notify others about their share. Once an expense is added, you can easily mark it as paid, and Splitwise will automatically update everyone’s balance accordingly.
By marking an expense as paid, you not only ensure accurate record-keeping but also maintain transparency and fairness among all participants. It promotes clear communication and prevents any misunderstandings or disputes that may arise from financial matters.
Now let’s delve into the step-by-step process of marking an expense as paid on Splitwise.
Step 1: Log in to Splitwise
To begin, open your preferred web browser and navigate to the Splitwise website (www.splitwise.com). If you haven’t created an account yet, you can easily sign up for a new account by providing your email address and choosing a password.
Once you have successfully created an account, enter your login credentials – email address and password – to access your Splitwise account. If you have previously logged in, you may be directed to your account dashboard automatically.
Logging in ensures that you have access to your personalized settings, groups, and expenses. It also allows you to view and manage your shared expenses from any device with internet access, providing flexibility and convenience.
Remember to keep your login credentials secure and avoid sharing them with anyone to protect your account and maintain confidentiality.
Now that you’re logged in, let’s move on to the next step!
Step 2: Navigate to the Expenses tab
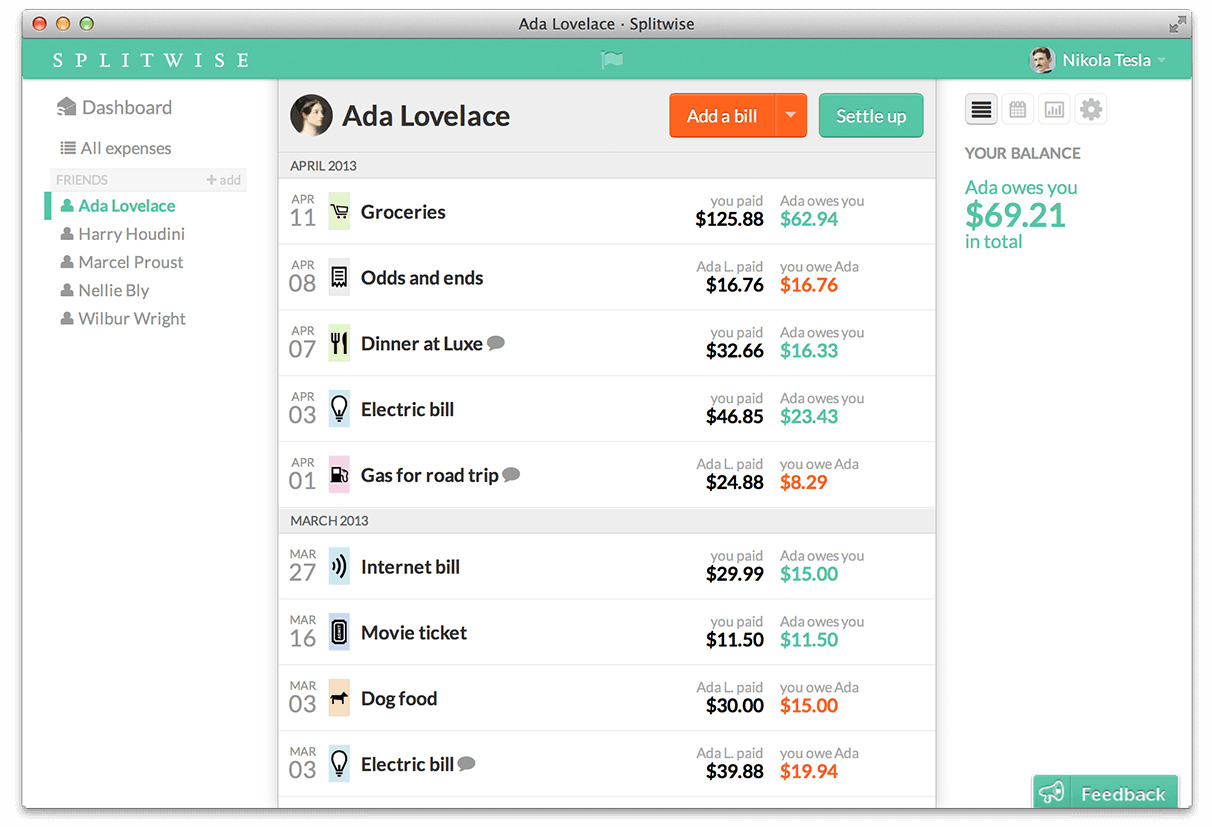
Once you’re logged into your Splitwise account, you’ll need to navigate to the Expenses tab. The Expenses tab is where you can view, add, and manage your shared expenses.
To get to the Expenses tab, look for the navigation menu located either at the top or side of the Splitwise interface. The specific location may vary depending on the device you’re using and any recent updates to the Splitwise platform.
Click on the Expenses tab in the navigation menu, and you should be directed to a page that displays all the expenses associated with your Splitwise account. On this page, you’ll find a list of your existing expenses, along with relevant details such as date, description, amount, and the people involved in each expense.
The Expenses tab provides a comprehensive overview of your financial transactions, making it easier to track and manage expenses across different categories and groups. Whether you’re looking for a specific expense or browsing through your recent transactions, this tab is your go-to destination.
Now that you’re on the Expenses tab, let’s move on to the next step!
Step 3: Locate the expense you want to mark as paid
Once you’re on the Expenses tab, you’ll need to locate the specific expense that you want to mark as paid. Splitwise organizes expenses chronologically, with the most recent expenses displayed at the top of the list.
If you have a long list of expenses or belong to multiple groups, finding the expense may require a bit of scrolling or filtering. Splitwise provides helpful search and filter options to make this process easier.
To locate the expense you want to mark as paid, here are a few methods you can use:
- Scroll through the list: If you know the approximate date of the expense, you can scroll through the list and locate it based on the date and description. Splitwise uses a clean and organized layout, making it simple to scan through your expenses.
- Use the search bar: Splitwise offers a search bar at the top of the Expenses tab. You can enter relevant keywords such as the name of the person involved, the description of the expense, or the category to narrow down the results and locate the desired expense.
- Filter by group: If you belong to multiple groups on Splitwise, you can filter the expenses by group. This is particularly useful if you’re looking for an expense within a specific group or want to separate personal expenses from group expenses.
Once you have successfully located the expense you want to mark as paid, you’re ready to move on to the next step!
Step 4: Click on the expense
After locating the expense you want to mark as paid, the next step is to click on the specific expense to access its details and make the necessary updates.
In Splitwise, each expense is represented as a separate entry with relevant information such as the date, description, amount, and the people involved. By clicking on the expense, you can view all the details associated with it.
To click on the expense, simply hover your cursor over the expense entry in the list. The cursor should change to indicate that the expense is clickable. Click on the expense, and it will open up in a new window or a pop-up/modal, depending on the interface design of Splitwise.
By clicking on the expense, you gain access to additional options and functionalities to manage the expense effectively. This includes updating the payment status, adding notes or comments, attaching receipts, and more.
Take a moment to review the details of the expense within the newly opened window. Familiarizing yourself with the expense’s information will help you ensure that you’re marking the correct expense as paid.
Now that you have clicked on the expense, let’s proceed to the next step!
Step 5: Update the payment status
Now that you’re viewing the details of the expense, it’s time to update the payment status to indicate that the expense has been paid.
In Splitwise, updating the payment status is a straightforward process. Look for the payment status field or option within the expense details window. It is usually displayed prominently, accompanied by a label such as “Payment Status” or “Mark as Paid”.
Click on the payment status field to reveal the available options. Splitwise typically provides two options to choose from: “Unpaid” and “Paid”. By default, the payment status is set to “Unpaid” for all new expenses.
To mark the expense as paid, select the “Paid” option from the dropdown menu or click on the checkbox/button associated with the “Paid” option. This action will update the payment status for the expense.
After marking the expense as paid, you may notice that Splitwise automatically adjusts the balances between the participants involved in the expense. This feature simplifies the process of settling debts and ensures that everyone’s records remain accurate and up to date.
Remember, if multiple people are involved in the expense, each person will need to independently update the payment status on their own Splitwise accounts to reflect the payment.
Now that you have updated the payment status, let’s move on to the next step!
Step 6: Add a receipt if necessary
If you have a receipt for the expense that you marked as paid, Splitwise allows you to attach it for future reference or to share it with others involved in the expense.
Adding a receipt is an optional step, but it can be beneficial for maintaining a complete record of your expenses and providing evidence of payment if needed.
To add a receipt, look for the “Add Receipt” or “Attach Receipt” option within the expense details window. In some cases, this option may be denoted by a paperclip icon or a button labeled “Upload”.
Clicking on the “Add Receipt” option will prompt you to upload and attach the receipt file. Splitwise supports various file formats, including images (JPEG, PNG) and PDF documents, making it convenient to store and access digital receipts.
Choose the method that works best for you:
- Upload from your device: If you have a digital copy of the receipt saved on your device, click on the “Upload” or “Choose File” button and locate the receipt file from your computer or mobile device. Select the file and confirm the upload to attach it to the expense.
- Take a photo of the receipt: Splitwise also offers the option to use your device’s camera to capture a photo of the physical receipt. Click on the “Take Photo” or camera icon to access your device’s camera and align the receipt within the frame. Once you’ve captured the photo, save it to attach it to the expense.
Remember, adding a receipt is not mandatory, but it can serve as a useful reference and provide additional documentation for your expenses.
Now that you’ve learned how to add a receipt, let’s move on to the final step!
Step 7: Save the changes
After you have marked the expense as paid and optionally added a receipt, it’s important to save the changes to ensure that your updates are recorded in Splitwise.
To save the changes, look for a button or option that allows you to save or update the expense. This button is usually labeled “Save” or “Update”.
Click on the save button, and Splitwise will update the payment status of the expense to “Paid” and attach the receipt, if provided. The changes will be saved and reflected in your Splitwise account.
It’s a good practice to review the expense details once more before saving to ensure accuracy. Double-check the payment status, attached receipts, and any other relevant information.
By saving the changes, you are not only finalizing the payment status but also maintaining a clear and updated record of the expense. This makes it easier to track your financial transactions and settle debts.
Congratulations! You have successfully marked the expense as paid and saved the changes on Splitwise.
Remember, it’s important to communicate with the other participants involved in the expense to inform them of the payment and ensure that everyone is on the same page. This helps maintain transparency and avoids any confusion or discrepancies.
Now that you have completed all the necessary steps, you can confidently manage and keep track of your shared expenses on Splitwise.
Conclusion
Managing shared expenses can often be a complicated and time-consuming process. However, with Splitwise, marking expenses as paid becomes a seamless and efficient task.
In this guide, we have walked through the step-by-step process of marking an expense as paid on Splitwise. We started by logging in to your Splitwise account and navigating to the Expenses tab. Then, we located the specific expense you wanted to mark as paid and clicked on it to access the details. After that, we updated the payment status to indicate that the expense had been paid. Additionally, we learned how to add a receipt to the expense for future reference.
Finally, we saved all the changes, ensuring that they were recorded in Splitwise and accurately reflected in our account balances.
By following these steps, you can effectively manage your shared expenses, maintain transparency among group members, and keep track of your financial transactions. Splitwise simplifies the process of splitting expenses, allowing you to focus on enjoying shared experiences rather than worrying about financial calculations and record-keeping.
Remember to communicate with your group members and inform them of any updates to payment status or attached receipts. Effective communication fosters trust and ensures that everyone is on the same page when it comes to shared expenses.
Now that you possess the knowledge and skills to mark expenses as paid on Splitwise, you can confidently navigate the platform and manage your financial transactions with ease.
So go ahead and explore the features and functionalities of Splitwise, and enjoy the convenience of effortlessly managing your shared expenses!