Introduction
Welcome to Splitwise, a popular app that helps you track and manage expenses with friends, family, and roommates. While Splitwise simplifies the process of splitting bills and sharing expenses, there may come a time when you need to leave a group due to various reasons such as a change in living situations, financial arrangements, or personal preferences.
In this article, we will guide you through the process of leaving a group on Splitwise, ensuring a smooth transition and helping you maintain financial clarity.
Splitting expenses and managing finances in a group can be challenging, especially when there are multiple people involved. Splitwise helps to streamline the process by allowing you to create groups and easily keep track of shared expenses. However, if you find yourself no longer part of a specific group or wish to discontinue your participation, it’s important to know how to navigate through the app to ensure a seamless departure.
By following the steps outlined in this guide, you’ll be able to leave a group on Splitwise hassle-free. Whether you’re moving out of a shared apartment, ending a joint project, or simply want to declutter your Splitwise account, we’ve got you covered.
So, let’s jump right in and discover how to leave a group on Splitwise!
Step 1: Open the Splitwise App
The first step to leaving a group on Splitwise is to open the app on your mobile device. Ensure that you have the latest version of the app installed to have access to all the features and updates.
If you don’t already have the Splitwise app, you can download it for free from the App Store for iOS devices or the Google Play Store for Android devices.
Once you have the app installed and open, you’ll need to sign in to your Splitwise account using your registered email address and password. If you don’t have an account yet, you can easily create one by following the prompts on the login screen.
After logging in, you’ll be greeted with the Splitwise home screen, which displays an overview of your expenses and any active groups you’re a part of.
Take a moment to familiarize yourself with the app’s interface, as this will make navigating through the steps much easier. The app typically has a user-friendly design, with clearly labeled tabs and intuitive buttons for easy access to different features.
Now that you’re in the app and ready to proceed, let’s move on to the next step in leaving a group on Splitwise.
Step 2: Navigate to the Groups Tab
Once you’re logged into the Splitwise app, the next step is to navigate to the “Groups” tab. This tab will display all the groups that you’re currently a part of, making it easy for you to manage your expenses and interactions within each group.
To access the Groups tab, look for the navigation menu or bar at the bottom or top of the app screen. The specific location may vary depending on the device and operating system you’re using.
Clicking on the Groups tab will take you to a new screen where you can see a list of all the groups you belong to. Each group will be displayed with its name, total balance, and the number of members.
If you have a large number of groups, you may need to scroll through the list to find the specific group you wish to leave. However, if you only have a few groups, the one you need will likely be visible on the screen without scrolling.
If you can’t immediately spot the Groups tab or are having trouble navigating to it, you can use the search function within the app and type in “Groups” to quickly locate the relevant section.
Once you’ve successfully accessed the Groups tab and identified the group you want to leave, let’s move on to the next step in the process.
Step 3: Select the Group You Want to Leave
Now that you’re on the Groups tab of the Splitwise app, the next step is to select the specific group that you want to leave. This will allow you to access the group’s settings and proceed with the process of leaving it.
Scan through the list of groups on the Groups tab until you find the one you want to leave. The group’s name will be displayed prominently, along with relevant details such as the total balance and the number of members.
Tap on the name of the group to select it. This will redirect you to a new screen dedicated to that specific group, where you can view all the details, expenses, and interactions associated with it.
It’s important to ensure that you’re selecting the correct group before proceeding further, as leaving a group on Splitwise is a permanent action and cannot be undone. Take a moment to double-check the name and familiarize yourself with the group’s activity to confirm that you’ve selected the right one.
If you have a large number of groups and are having difficulty finding the specific group you want to leave, you can use the search function within the app to type in the group’s name and quickly locate it.
Once you’ve successfully selected the group you wish to leave, you’re ready to move on to the next step and access the group’s settings.
Step 4: Tap on the Group Name
After selecting the desired group on the Splitwise app, the next step is to tap on the group’s name. This will allow you to access the group’s settings and make changes, including the option to leave the group.
On the group’s dedicated screen, you will see the group name prominently displayed at the top. A quick tap on the group name will open up a menu or options list that provides various settings and actions related to the group.
Make sure to tap precisely on the group name rather than anywhere else on the screen to ensure that the menu or options list appears. This is an essential step as it ensures that you have access to the necessary functions to proceed with leaving the group.
The design and layout of the menu or options list may vary slightly depending on the version of the Splitwise app you’re using. However, you can typically expect to see options such as “Group Settings,” “Leave Group,” or something similar.
Take a moment to review the available options and confirm that “Leave Group” is one of them. If you don’t see the option to leave the group in the initial menu, you may need to navigate further by selecting “Group Settings” or a similar option before finding the “Leave Group” option.
Once you’ve successfully tapped on the group name and accessed the relevant menu or options list, you’re ready to proceed with the next step: opening the group settings.
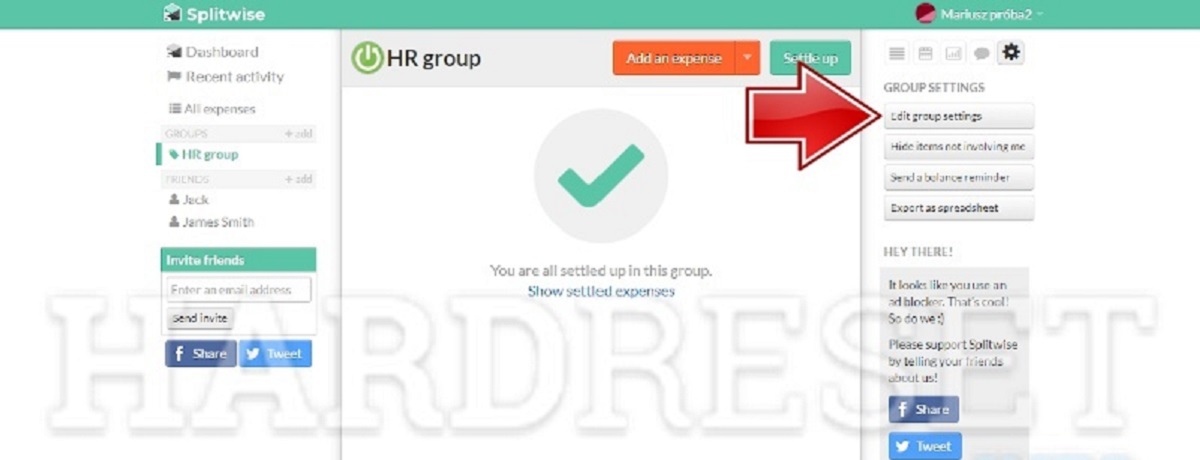
Step 5: Open Group Settings
After tapping on the group name in the Splitwise app, the next step is to open the group settings. This will allow you to access and make changes to various aspects of the group, including the option to leave the group.
On the menu or options list that appears after tapping the group name, look for the “Group Settings” option. This option is typically located towards the top or bottom of the list, depending on the design and layout of the app.
Once you’ve identified the “Group Settings” option, tap on it to open the group settings screen. Here, you’ll find a range of options and preferences that you can customize to suit your needs within the group.
Group settings may include options such as notification preferences, currency settings, email frequency, and more. These settings are useful for tailoring your experience within the group and personalizing how you receive updates and notifications.
While in the group settings, it’s essential to locate the specific option to leave the group. The phrasing may vary, but it’s commonly labeled as “Leave Group,” “Remove Yourself from the Group,” or something similar.
If you’re having trouble finding the “Leave Group” option, you can try scrolling down the settings screen or exploring any submenus or secondary settings panels within the group settings.
Once you’ve successfully opened the group settings and located the option to leave the group, you’re ready to proceed with the next step: leaving the group itself.
Step 6: Leave the Group
Now that you’ve accessed the group settings and located the option to leave the group, it’s time to take the final step and leave the group on Splitwise. Leaving the group will remove you from all associated expenses and interactions, providing a clean break from the group’s financial activities.
Tap on the option to leave the group, which will initiate a confirmation prompt or dialog box. The purpose of this prompt is to ensure that you intend to leave the group and to prevent any accidental departures.
Before confirming your decision, it’s important to consider a few factors:
- Review the consequences of leaving the group: Leaving a group means that you will no longer have access to the group’s expenses, balances, and interactions. Make sure you’ve settled any outstanding expenses or obligations and that you’re comfortable with leaving the group.
- Communicate with other group members: If leaving the group may have consequences for other members, it’s considerate to inform them of your decision beforehand. This allows for a smooth transition and ensures that everyone is aware of any changes in financial arrangements.
Once you’ve carefully considered these factors, go ahead and confirm your decision to leave the group by selecting the appropriate option when prompted. This action is typically labeled as “Leave Group,” “Confirm,” or “Yes” in the prompt.
After confirming, the Splitwise app will remove you from the group and update your account accordingly. You will no longer be able to view or interact with the group’s expenses, and your name will be removed from the list of members.
It’s important to note that leaving a group is a permanent action and cannot be undone. To rejoin the group, you would need to be added again by one of the current members.
With the group successfully left, you’ve completed the process of leaving a group on Splitwise. Congratulations!
Step 7: Confirm the Action
In the final step of leaving a group on Splitwise, you need to confirm your action. After selecting the option to leave the group, you will be prompted to confirm your decision to ensure there are no accidental departures.
The confirmation prompt typically appears as a dialog box or pop-up message on your screen. It will provide you with a summary of the action you’re about to take and ask for your confirmation before proceeding.
Take a moment to review the details in the prompt and ensure that you want to leave the group. Double-check the group name, any special messages or warnings in the prompt, and any potential consequences for leaving the group.
If you have any doubts or want to reconsider your decision, this is the time to do so. You can choose to cancel the action and remain part of the group by selecting the appropriate option in the prompt.
However, if you’re certain that you want to leave the group, go ahead and confirm the action by selecting the appropriate option in the prompt. This is commonly labeled as “Leave Group,” “Confirm,” or “Yes.”
After confirming, Splitwise will immediately remove you from the group and update your account settings. You will no longer have access to the group’s shared expenses, balances, and interactions.
Make sure to note any important information or settle any outstanding expenses before leaving the group, as you will not be able to access the group’s data once you’ve departed.
With the action confirmed, congratulations! You have successfully left the group on Splitwise and can now move forward with your financial arrangements independently.
Remember that leaving a group is a permanent decision. If you ever want to rejoin the group in the future, you will need to be added back by one of the current members.
Conclusion
Leaving a group on Splitwise is a straightforward process that can be completed in just a few simple steps. By following the outlined steps, you can leave a group with ease and ensure a smooth transition from shared expenses and financial arrangements.
Remember to carefully consider your decision before leaving a group. Review any outstanding expenses, communicate with other group members, and ensure that you’re comfortable with the consequences of departing from the group.
The Splitwise app provides a user-friendly interface that allows you to access the group settings and leave the group effortlessly. With just a few taps, you can remove yourself from the group and discontinue your involvement in its financial activities.
Always keep in mind that leaving a group on Splitwise is permanent. If you ever wish to rejoin the group in the future, you will need to be added back by one of the current members.
Now that you’re equipped with the knowledge of how to leave a group on Splitwise, you can confidently manage your expenses and financial interactions within the app. Whether your circumstances change, or you simply want to redirect your focus, knowing how to leave a group ensures you have control over your financial commitments.
Don’t hesitate to explore the other features and capabilities of Splitwise to make the most of your experience with expense tracking and sharing within groups. The app offers various tools and options to simplify the process of splitting bills, settling debts, and managing expenses with ease.
So, go ahead and take the necessary steps to leave a group on Splitwise whenever the need arises. Maintain financial clarity, enjoy seamless expense management, and make the most of your financial journey.