Introduction
Welcome to Splitwise, a convenient and efficient way to settle up shared expenses with friends, family, and colleagues. Splitwise is a popular expense-sharing app that simplifies the process of splitting bills and managing shared expenses in groups. Whether you’re planning a trip with friends, living with roommates, or organizing a party, Splitwise helps you keep track of who owes whom.
Gone are the days of messy calculations and awkward conversations about money. With Splitwise, you can easily split bills and keep a record of all the transactions, ensuring fairness and transparency among all members of your group. So, if you’re tired of the hassle of splitting expenses manually or using spreadsheets, it’s time to embrace Splitwise and make your life simpler.
In this guide, we’ll walk you through the step-by-step process of using Splitwise to settle up shared expenses efficiently. From creating a Splitwise account to adding friends, tracking expenses, and finally settling up, we’ve got you covered. By the end of this guide, you’ll be a Splitwise pro, effortlessly managing your group expenses and saving valuable time and energy.
So, without further ado, let’s dive into the world of Splitwise and discover how to streamline your expense-sharing process. Get ready to bid adieu to the complexities of splitting bills and embrace the simplicity of Splitwise.
Step 1: Create a Splitwise Account
The first step in getting started with Splitwise is to create your own account. To do this, follow these simple steps:
- Visit the Splitwise website or download the Splitwise app from the App Store or Google Play Store.
- Click on the “Sign Up” button or “Create Account” option.
- Fill in your basic details like name, email address, and password.
- Choose a unique username that will be associated with your Splitwise account. This username will be visible to your friends and group members.
- Once you have provided all the necessary information, click on the “Create Account” button.
- After successfully creating your Splitwise account, you will receive a confirmation email. Click on the link provided in the email to verify your account.
Remember to choose a strong and secure password for your Splitwise account to ensure the safety of your personal information and transactions.
By creating a Splitwise account, you gain access to all the features and functionalities offered by the platform. Having your own account allows you to easily manage and track your expenses, join and create groups, and settle up with your friends. It also enables you to maintain a record of all your transactions, making it easier to keep track of your financial activities.
Now that you’ve created your Splitwise account, it’s time to move on to the next step: creating a group.
Step 2: Create a Group
Creating a group in Splitwise allows you to efficiently manage shared expenses with a specific set of individuals. Whether it’s a group of friends, roommates, or colleagues, creating a group ensures that everyone involved has access to the same set of expenses and can easily track and settle them. Here’s how you can create a group:
- Log in to your Splitwise account.
- On the homepage or dashboard, look for the “Create a Group” button or option.
- Click on “Create a Group” and provide a name for your group. Be specific and choose a name that represents the purpose of the group.
- Next, invite the members you want to include in the group. You can do this by entering the email addresses of the individuals or by searching for their Splitwise usernames.
- Once you have added all the members, you can customize the group settings. This includes choosing how expenses will be split among group members (equally, by percentage, or unevenly), setting a default currency, and specifying how often you want to be reminded about pending expenses.
- After configuring the group settings, click on the “Create Group” or “Save” button to finalize the group creation.
Congratulations! You have successfully created your group in Splitwise. Now, all the members of the group will have access to the shared expenses and can start adding and tracking their expenses. Creating a group streamlines the expense-sharing process and ensures transparency and accountability among all members.
Remember to communicate with the other members of the group and make sure they also create their Splitwise accounts and join the group. This will ensure that everyone is on the same page when it comes to tracking and settling shared expenses.
Now that your group is set up, let’s move on to the next step: adding friends to the group.
Step 3: Add Friends to the Group
Now that your group is created, it’s time to add friends or group members to start sharing expenses and keeping track of who owes whom. Adding friends to the group is a simple process in Splitwise. Follow these steps to get started:
- Log in to your Splitwise account and navigate to the group you want to add friends to.
- Look for the “Add Friends” or “Invite Friends” button within the group interface.
- Enter the email addresses of the friends you want to add to the group. Alternatively, you can search for their Splitwise usernames.
- If your friends are already Splitwise users, they will receive a notification and an invitation to join the group. If they are not Splitwise users, they will receive an email with instructions to sign up and join the group.
- Once your friends accept the invitation and join the group, they will have access to all the shared expenses and can start adding and tracking their own expenses.
Adding friends to the group allows for better expense management and transparency. It ensures that all members can see and contribute to the expenses within the group, making it easier to keep track of who owes money and who needs to settle up.
It’s important to communicate with your friends and ensure that they join the group and start adding their expenses. This way, everyone can stay updated on the shared expenses and contribute their fair share to maintain balance and fairness.
Now that you have added friends to your group, let’s move on to the next step: adding expenses.
Step 4: Add Expenses
Adding expenses in Splitwise is a crucial step in accurately tracking and splitting shared costs among group members. By adding expenses, you can keep a detailed record of who paid for what and precisely divide the expenses among the members. Follow these steps to add expenses:
- Log in to your Splitwise account and go to the group for which you want to add an expense.
- In the group interface, look for the “Add Expense” button or option.
- Select the individual who paid for the expense from the dropdown list or enter their name manually.
- Enter the details of the expense, including the amount spent, a description of the expense, and the date.
- If the expense was shared among multiple group members, select the individuals who need to split the bill.
- Choose the appropriate method to split the expense, whether it’s equally, by percentage, or unevenly.
- Click on the “Save” or “Add Expense” button to finalize adding the expense to the group.
By adding expenses, you ensure transparency and accuracy in tracking the financial transactions within the group. Each member can see the details of the expense and their share, making it easier for everyone to keep track of their financial obligations.
Don’t forget to communicate with your group members and encourage them to add their expenses as well. This way, the group expenses stay up to date, and everyone stays accountable for their contributions.
Now that you know how to add expenses, let’s move on to the next step: reviewing and updating expenses.
Step 5: Review and Update Expenses
Once you’ve added expenses to your Splitwise group, it’s essential to regularly review and update them to ensure accuracy and fairness. Reviewing and updating expenses allows you to stay on top of your financial obligations and make any necessary adjustments. Follow these steps to review and update expenses in Splitwise:
- Log in to your Splitwise account and navigate to the relevant group.
- Look for the “Expenses” tab or section within the group interface.
- Review all the expenses listed and ensure that they are correctly recorded.
- If you notice any mistakes or need to make adjustments, click on the expense to edit the details.
- You can edit the amount, description, date, and even add comments to provide additional context.
- If the expense was shared among multiple group members and you need to make changes to the split, click on the “Edit Split” option and adjust the percentages or amounts accordingly.
- Once you have reviewed and updated the necessary expenses, click on the “Save” or “Update” button to finalize the changes.
Regularly reviewing and updating expenses ensures that the financial records within the group are accurate and up to date. It helps maintain transparency and accountability among all members, making it easier to settle up and ensure fairness.
Don’t hesitate to communicate with your group members if you notice any discrepancies or have questions regarding specific expenses. Open and clear communication is key to resolving any issues and keeping everyone on the same page.
Now that you know how to review and update expenses, let’s move on to the final step: settling up.
Step 6: Settle Up
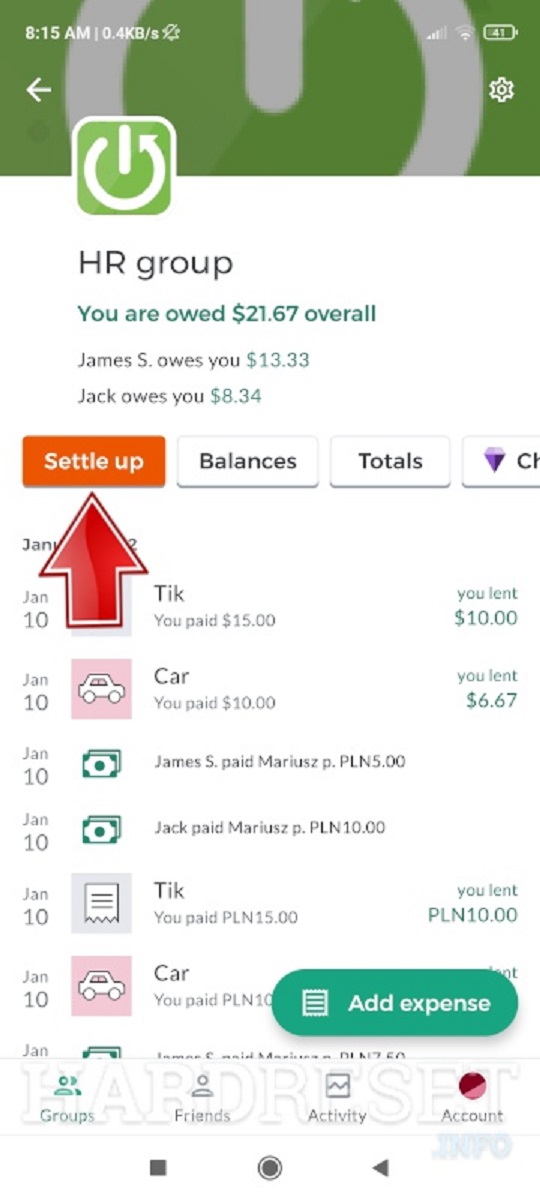
Settling up is the final step in the Splitwise process, where you reconcile the shared expenses and ensure that everyone pays their fair share. Splitwise provides a convenient way to settle up debts among group members, making it easy to keep track of who owes whom. Follow these steps to settle up in Splitwise:
- Log in to your Splitwise account and go to the group for which you want to settle up.
- In the group interface, look for the “Settle Up” or “Settle Debts” button.
- Splitwise will automatically calculate the debts among the group members based on the recorded expenses and the split settings.
- You’ll see a list of all the debts and who owes whom. The positive amounts indicate money owed to you, and the negative amounts represent what you owe to others.
- Decide how you want to settle the debts. You can make a payment directly within the Splitwise app or arrange a separate payment method with the group members involved.
- Mark each debt as “Paid” once it has been settled.
- Once all the debts are settled, the group’s balances will be zero, and everyone’s financial obligations will be resolved.
Settling up in Splitwise ensures that everyone is on an equal financial footing within the group. It simplifies the process of repaying debts and helps maintain healthy financial relationships among friends, roommates, or colleagues.
Remember to communicate with the group members and keep them informed of the settlement process. Being transparent and proactive in settling up can help avoid any misunderstandings and ensure a smooth resolution.
Congratulations! You have successfully learned how to settle up in Splitwise. Now you can enjoy a balanced and fair financial dynamic within your group.
Conclusion
Congratulations on mastering the art of using Splitwise to manage shared expenses and settle up with ease. By following the steps outlined in this guide, you can efficiently split bills, keep track of expenses, and ensure fairness among group members.
Splitwise simplifies the process of managing shared expenses, whether you’re planning a trip, living with roommates, or organizing an event. With features like group creation, expense tracking, and settlement calculations, Splitwise takes the hassle out of splitting bills and eliminates the need for manual calculations or complicated spreadsheets.
Remember to communicate with your group members and encourage them to create Splitwise accounts and join the group. Active participation and timely recording of expenses are crucial for maintaining accuracy and transparency within the group.
As you continue to use Splitwise, explore its additional features, such as splitting expenses in different currencies, creating recurring expenses, and generating reports. These features can further enhance your experience and provide valuable insights into your shared financial activities.
With Splitwise, managing shared expenses has never been easier. Say goodbye to conflict-ridden calculations and confusion over who owes what. Embrace the simplicity and convenience of Splitwise, and enjoy a seamless expense-sharing experience.
Now that you’re equipped with the knowledge and skills to navigate Splitwise successfully, go ahead and organize your next group outing, share expenses effortlessly, and settle up with confidence.
Start using Splitwise today and streamline your expense-sharing process like never before!