Introduction:
Welcome to Splitwise, a popular expense tracking app that simplifies the process of splitting bills and expenses among friends, roommates, and groups. Being part of a group in Splitwise can be convenient for managing shared expenses, but there may come a time when you need to exit a group for various reasons. Whether you have moved out of a shared space, are no longer participating in certain expenses, or simply want to declutter your Splitwise account, leaving a group is a straightforward process.
In this guide, we will walk you through the steps required to exit a group in Splitwise, ensuring that you can easily remove yourself from the group and settle any outstanding balances, if necessary. By following these steps, you can maintain a well-organized Splitwise profile and have more control over your expense management.
Please note that leaving a group in Splitwise will not delete any of your past transactions or affect your personal account in any way. It simply removes you from the group and stops future notifications and updates associated with that group.
Now that you understand the purpose of this guide, let’s jump into the step-by-step process of exiting a group in Splitwise.
Step 1: Open the Splitwise app
To begin, make sure you have the Splitwise app installed on your mobile device. You can download it from the App Store for iOS or the Google Play Store for Android. Once you have the app installed, open it to access your Splitwise account.
If you don’t have an account yet, you can easily sign up for a new one by providing your email address, creating a password, and following the necessary verification steps. Splitwise provides a user-friendly interface, making it convenient for anyone to track expenses and manage groups effortlessly.
After logging into your Splitwise account, you will be taken to the homepage where you can see an overview of all your existing groups, friends, and recent activity. Take a moment to familiarize yourself with the app’s layout and navigation options.
Note that if you are using Splitwise on a web browser, the steps may vary slightly. However, the core functionalities and options to exit a group remain the same. In this guide, we will primarily focus on the steps for the mobile app version.
Now, let’s move on to the next step and navigate to the group page where you want to exit.
Step 2: Navigate to the group page
Once you have opened the Splitwise app and logged into your account, it’s time to find the group that you want to exit. The group page contains all the information and activities related to that specific group, such as expenses, group members, and settings.
To navigate to the group page, locate the “Groups” tab at the bottom of the screen. It is usually represented by an icon with multiple people or a similar symbol. Tap on this tab to access your list of groups.
In the “Groups” section, you will see a list of all the groups you are currently a part of. Scroll through the list or use the search bar to find the specific group that you want to exit. Once you have located the group, tap on its name to open the group page.
On the group page, you will find various tabs and options related to managing the group’s expenses and settings. Take a moment to explore these different sections and familiarize yourself with the layout of the group page.
Now that you have successfully navigated to the group page, let’s move on to the next step and find the option to leave the group.
Step 3: Find the “Leave group” option
In this step, we will guide you on how to locate the “Leave group” option within the Splitwise app. This option allows you to remove yourself from the group while ensuring a smooth transition of any pending expenses or balances.
Once you are on the group page, look for the settings icon or the three-dot menu symbol typically found in the top right corner of the screen. This symbol indicates that there are additional options and settings available for the group.
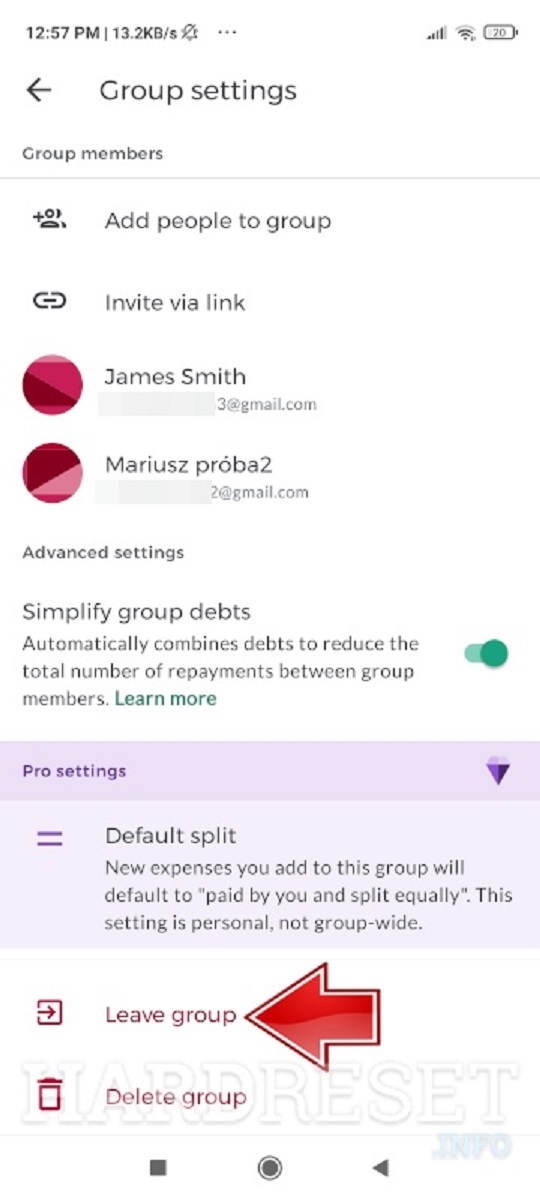
Tap on the settings icon or the three-dot menu to open the group settings page. Here, you will find a list of various options related to managing the group’s settings, members, and expenses.
Scroll through the settings page until you come across the “Leave group” option. It may be labeled as “Leave” or “Exit,” depending on the version of the app you are using. Tap on this option to initiate the process of leaving the group.
Before leaving the group, it’s essential to consider any outstanding balances or expenses that need to be settled. Splitwise provides a feature to ensure that all the shared expenses are settled amongst the group members before you exit.
If there are any pending balances, Splitwise will prompt you to indicate how you would like to settle them. You can choose to settle the balance immediately or transfer the responsibility to another member of the group. Select the appropriate option based on your preference and the agreements within the group.
Now that you have found the “Leave group” option and addressed any pending balances, let’s move on to the next step and confirm your decision to exit the group.
Step 4: Confirm Your Decision to Leave the Group
Once you have located the “Leave group” option and taken care of any pending balances, you are ready to confirm your decision to exit the group. This step finalizes the process of removing yourself from the group.
When you select the “Leave group” option, a confirmation prompt will appear on your screen. The prompt will usually ask you to confirm whether you are sure about leaving the group. Take a moment to review the prompt and ensure that you are making the correct decision.
If you have any reservations or doubts, it may be helpful to communicate with the other group members before proceeding. Discuss your reasons for leaving and make sure everyone is on the same page regarding the decision.
If you are certain about leaving the group, tap on the confirmation button to solidify your decision. You will receive a notification or confirmation message indicating that you have successfully exited the group.
At this point, you will no longer receive notifications or updates about expenses or activities within the group. However, it’s important to note that your past transactions and history within the group will remain intact. You can still access this information in your Splitwise account for future reference.
Now that you have confirmed your decision to leave the group, let’s move on to the final step: settling any pending balances before fully exiting the group.
Step 5: Settle Any Pending Balances
Before fully exiting the group, it is important to settle any pending balances to ensure a smooth transition and a fair distribution of expenses among the remaining group members.
When you initiate the process of leaving a group in Splitwise, the app will prompt you to settle any outstanding balances you may have with other members of the group. This step helps maintain financial clarity and minimizes confusion when managing shared expenses.
Splitwise provides several options to settle balances. You can choose to settle immediately, transfer the responsibility to another member, or adjust the balance manually based on mutual agreements within the group.
If you prefer to settle the balance immediately, select this option and follow the prompts to complete the payment. Splitwise integrates with various payment platforms, allowing you to conveniently send or receive money to settle your debts.
If you trust another group member to handle the remaining balances, you can transfer the responsibility to them. This option is helpful when there is a designated person managing the group finances or when the remaining group members agree to assume the outstanding debts.
If the balances need to be adjusted manually based on mutual agreements, you can communicate with the group members and make the necessary adjustments in Splitwise. Ensure that everyone is aware of the changes and agrees to the new balances before proceeding.
By settling any pending balances before leaving the group, you not only maintain financial transparency but also foster a sense of trust and fairness among the group members.
Now that you have settled any pending balances, you have successfully completed the process of exiting the group in Splitwise.
Conclusion:
Congratulations! You have successfully learned how to exit a group in Splitwise. By following the step-by-step process outlined in this guide, you can easily remove yourself from a group and manage your expenses more efficiently.
Remember, leaving a group in Splitwise is a simple and straightforward process. It involves opening the Splitwise app, navigating to the group page, finding the “Leave group” option, confirming your decision to exit, and settling any pending balances if necessary.
By leaving a group, you can declutter your Splitwise account and focus on managing expenses that are relevant to you. Whether you have moved out of a shared space or no longer wish to participate in certain expenses, exiting a group allows you to regain control of your finance management.
It’s important to note that leaving a group does not delete any past transactions or affect your personal account in any way. Your transaction history remains intact, and you can access it for future reference.
If you ever need to rejoin a group or create a new one in the future, you can easily do so using the same Splitwise account. The app’s user-friendly interface and comprehensive features make it convenient for you to handle shared expenses with ease and transparency.
Now that you are well-equipped with the knowledge to exit a group in Splitwise, go ahead and navigate the app to manage your expenses with increased control and efficiency. Enjoy your Splitwise journey!