Introduction
Are you still using an older version of Windows and looking to upgrade to the latest and greatest? Look no further than Windows 10, the most recent operating system from Microsoft that offers a host of new features and improvements. Whether you’re a home user or a business professional, Windows 10 provides a seamless and optimized computing experience.
With its sleek interface, enhanced security, and compatibility with a wide range of devices, Windows 10 has quickly become the preferred choice for users worldwide. Whether you’re working on a desktop, laptop, or tablet, Windows 10 offers a user-friendly interface, empowering you to be more productive and efficient in your everyday tasks.
In this article, we’ll walk you through the steps to upgrade your current Windows version to Windows 10. We’ll cover both automatic and manual upgrade options, so you can choose the method that works best for you. Whether you’re a tech-savvy individual or a non-technical user, upgrading to Windows 10 is a straightforward process, and we’ll guide you every step of the way.
Before diving into the upgrade process, it’s important to ensure that your system meets the necessary requirements to run Windows 10 smoothly. This includes having a compatible processor, sufficient memory, and available storage space. Don’t worry, we’ll cover the system requirements in detail to help you determine if your machine is ready for the upgrade.
So, if you’re ready to take your Windows experience to the next level, let’s get started on the journey of upgrading to Windows 10!
System Requirements
Before upgrading to Windows 10, it’s important to ensure that your computer meets the necessary system requirements. This will ensure that the operating system runs smoothly and efficiently on your machine. Here are the minimum requirements for Windows 10:
- Processor: 1 gigahertz (GHz) or faster processor
- RAM: 1 gigabyte (GB) for 32-bit or 2 GB for 64-bit
- Storage: 16 GB for 32-bit OS or 20 GB for 64-bit OS
- Graphics card: DirectX 9 or later with WDDM 1.0 driver
- Display: 800×600 resolution
- Internet connection: Internet access is required for updates and to download Windows 10
It’s also recommended to have a few additional system specifications to maximize the performance of Windows 10:
- Processor: 2 GHz or faster
- RAM: 4 GB or more
- Storage: 30 GB or more
- Graphics card: DirectX 12 compatible
- Display: 1280×720 resolution or higher
Additionally, it’s important to ensure that your computer’s drivers and software are up to date. This will help ensure compatibility with Windows 10 and minimize any potential issues during the upgrade process. You can check for driver updates on your computer manufacturer’s website or by using Windows Update.
If your computer meets the minimum requirements, you’re ready to proceed with the upgrade. However, if your system falls short of the requirements, you may need to consider upgrading certain components or even purchasing a new computer to enjoy the full benefits of Windows 10.
Now that you’re familiar with the system requirements for Windows 10, let’s move on to the next step: Getting started with the upgrade process!
Getting Started
Before diving into the upgrade process, it’s essential to prepare your computer and gather the necessary information. This will help ensure a smooth and hassle-free upgrade to Windows 10. Here are some steps to get started:
- Back up your data: Before making any changes to your operating system, it’s crucial to back up your important files and documents. This will safeguard your data in case of any unexpected issues during the upgrade process. You can use an external hard drive, cloud storage, or any other backup method of your choice.
- Check for compatibility: Visit the Microsoft website to verify if your installed software and hardware are compatible with Windows 10. The site provides a compatibility checker tool that will scan your system and identify any potential issues that may arise during the upgrade.
- Create a system restore point: It’s always a good practice to create a system restore point before making any significant changes to your computer. This allows you to revert back to a stable state in case something goes wrong during the upgrade process. To create a restore point, go to the Control Panel, navigate to “System and Security,” and click on “System.”
- Make note of your Windows key: If you’re using a previous version of Windows, make sure to keep a record of your Windows product key. This key may be required during the upgrade process to activate Windows 10.
- Ensure a stable internet connection: Upgrading to Windows 10 requires a stable and reliable internet connection. Make sure you’re connected to a high-speed network to avoid any interruptions or delays during the download and installation.
By following these steps, you’ll be well-prepared and equipped to start the Windows 10 upgrade process. The next section will cover the two different upgrade options available: automatic and manual. Whether you prefer a hands-off approach or want more control over the process, we’ve got you covered!
Option 1: Automatic Upgrade
If you prefer a hassle-free and automated approach, Windows 10 provides an option for automatic upgrades. This method is suited for users who want a simple and straightforward process without much manual intervention. Here’s how you can upgrade to Windows 10 automatically:
- Check for updates: Make sure your current Windows version is up to date by checking for updates through the Windows Update feature. This can be done by going to the Control Panel, clicking on “System and Security,” and selecting “Windows Update.” Let Windows search for available updates and install any pending ones.
- Reserve your upgrade: Once your system is up to date, you can reserve your free upgrade to Windows 10. Look for the Windows icon in the taskbar notification area, usually located on the bottom right corner of your screen. Click on it to launch the “Get Windows 10” app.
- Follow the prompts: The app will guide you through the process of reserving and scheduling your upgrade. Simply follow the on-screen prompts to reserve your copy of Windows 10 and select a convenient time for the upgrade to take place. Windows will notify you when it’s ready to install.
- Installation begins: When the scheduled time arrives, Windows will automatically download and install Windows 10 in the background. You can continue using your computer during this process, but it’s recommended to save your work and close any open programs to avoid any potential interruptions.
- Set up Windows 10: Once the installation is complete, your computer will restart, and you’ll be greeted with the new Windows 10 setup screen. Follow the on-screen instructions to complete the initial setup, including sign-in options, privacy settings, and customization preferences.
With the automatic upgrade option, Windows 10 will be installed on your computer seamlessly. This method eliminates the need for manual intervention and makes the upgrade process more convenient for users who prefer a hands-off approach.
If, however, you prefer more control over the upgrade process, including the ability to choose when to install the update, move on to Option 2: Manual Upgrade. We’ll walk you through the steps to manually upgrade your current Windows version to Windows 10.
Option 2: Manual Upgrade
If you prefer more control over the upgrade process or want to customize certain aspects, a manual upgrade to Windows 10 is the way to go. This method allows you to take charge of the upgrade process and gives you the flexibility to choose when and how to install Windows 10. Here’s how you can manually upgrade to Windows 10:
- Check for updates: Before proceeding with the upgrade, ensure that your current Windows version is up to date. Go to the Control Panel, click on “System and Security,” and select “Windows Update.” Let Windows search for and install any available updates.
- Prepare your PC: It’s essential to prepare your computer for the upgrade by closing all applications and saving your work. Make sure you have a stable internet connection and sufficient disk space for the installation.
- Download the Windows 10 installation tool: Visit the Microsoft website and download the Windows 10 installation tool, also known as the Media Creation Tool. This tool allows you to create installation media or directly upgrade your current Windows version.
- Launch the Media Creation Tool: Once the tool is downloaded, run it and choose the “Upgrade this PC now” option. This will initiate the upgrade process, and the tool will begin downloading the necessary files for Windows 10.
- Install Windows 10: Once the download is complete, the tool will prompt you to choose whether you want to keep your files and apps or perform a clean install. Select the option that suits your preferences, and let the tool proceed with the installation.
- Set up Windows 10: After the installation process is complete, your computer will restart, and you’ll be guided through the setup process. Follow the on-screen instructions to configure sign-in options, privacy settings, and other customization preferences.
By opting for the manual upgrade option, you have more control over the entire process. You can choose when to initiate the upgrade, customize installation options, and have the flexibility to perform a clean install if desired. However, keep in mind that this method requires more user involvement compared to the automatic upgrade option.
Now that you’re familiar with both automatic and manual upgrade options, you’ll be able to choose the method that works best for you. Whether you prefer a hands-off approach or want to customize the upgrade process, upgrading to Windows 10 is within your reach.
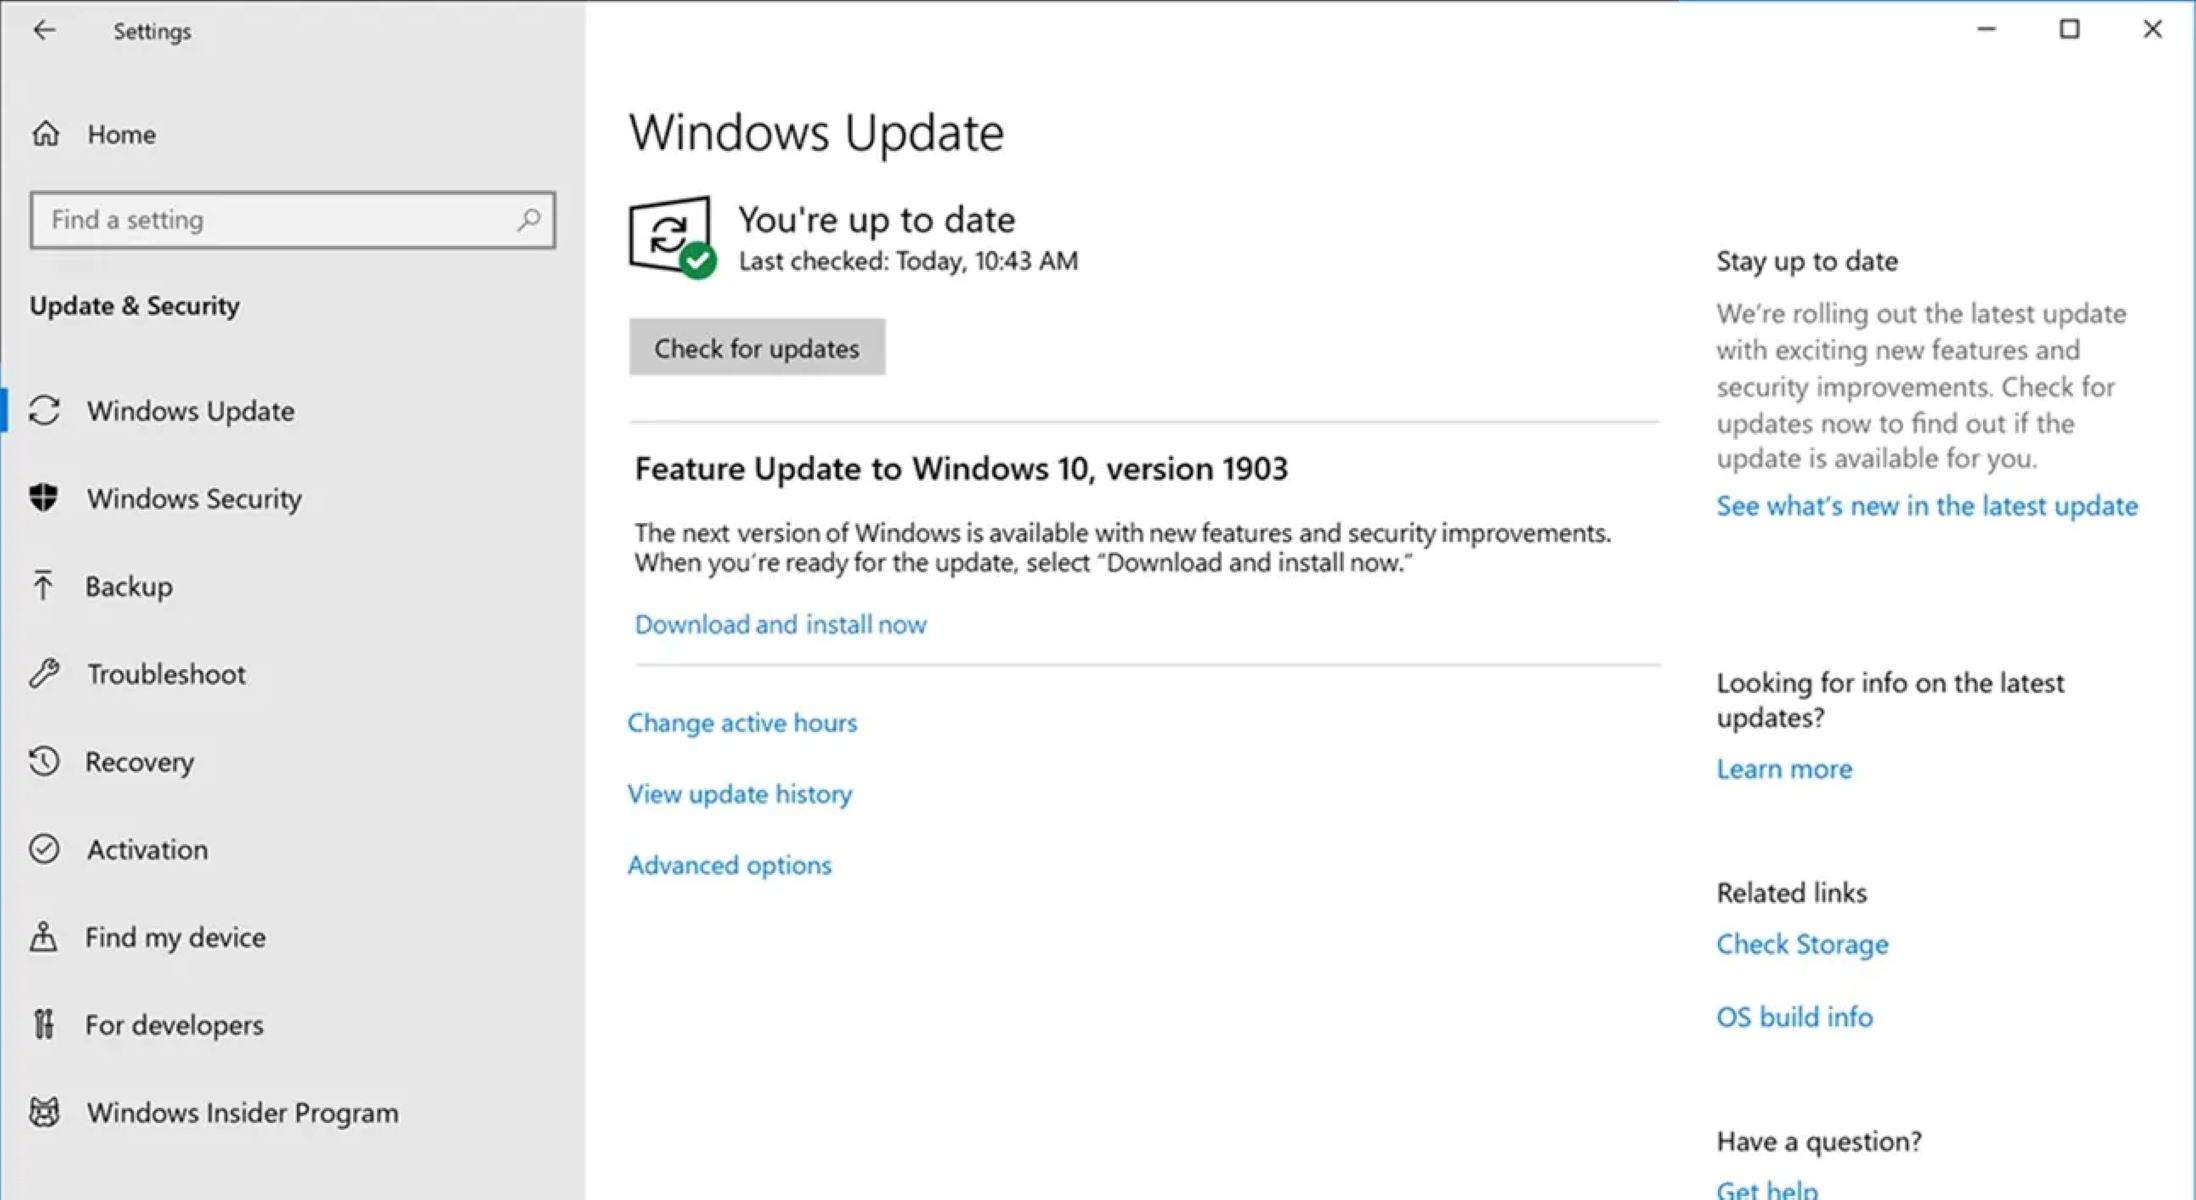
Step 1: Check for Updates
Before proceeding with the upgrade to Windows 10, it’s crucial to ensure that your current Windows version is up to date. Checking for updates will ensure that you have the latest security patches, bug fixes, and system enhancements, which can help make the upgrade smoother. Follow these steps to check for updates:
- Open the Control Panel: Click on the “Start” button and search for “Control Panel.” Click on the “Control Panel” option that appears in the search results.
- Select Windows Update: In the Control Panel window, locate and click on the “Windows Update” option. This will open the Windows Update settings.
- Check for updates: Within the Windows Update settings, click on the “Check for updates” button. Windows will now search for available updates for your system.
- Install updates: If there are any updates available, Windows will display a list of them. Click on the “Install updates” button to begin the installation process. Depending on the size and number of updates, this may take some time.
- Restart your computer: After the updates have been installed, you’ll be prompted to restart your computer. Save any unsaved work and click on the “Restart now” button to restart your computer.
- Verify successful update: Once your computer restarts, repeat the steps above to open the Windows Update settings. Check for updates again to confirm that all available updates have been installed. You should see a message stating that your device is up to date.
By following these steps, you can ensure that your current Windows version is fully updated before moving on to the upgrade process. This will help prevent any potential compatibility issues and ensure a smoother transition to Windows 10.
Now that you’ve checked for updates, you’re ready to move on to the next step: preparing your PC for the Windows 10 upgrade. This step involves making necessary preparations to ensure a successful installation, and we’ll cover it in detail in the next section.
Step 2: Prepare Your PC
Before proceeding with the upgrade to Windows 10, it’s important to prepare your PC to ensure a smooth and successful installation. This step involves a few necessary preparations that will help minimize any potential issues and ensure a hassle-free upgrade. Follow these steps to prepare your PC for the Windows 10 upgrade:
- Back up your files: Before making any changes to your operating system, it’s essential to back up your important files and data. You can use an external hard drive, cloud storage, or any other backup method of your choice. This will safeguard your data in case of any unforeseen issues during the upgrade process.
- Free up disk space: Windows 10 requires a certain amount of free disk space to install and operate properly. Before upgrading, it’s a good idea to clean up your hard drive and free up some space. You can uninstall unnecessary programs, delete temporary files, and use the Disk Cleanup tool to remove unnecessary files.
- Ensure compatibility: It’s important to check if your hardware and software are compatible with Windows 10. Visit the Microsoft website and use the compatibility checker tool to scan your system for any potential issues. It will identify any hardware or software components that may not work correctly with Windows 10.
- Review system requirements: Verify that your PC meets the minimum system requirements for Windows 10. This includes having a compatible processor, sufficient RAM, and available storage space. If your PC falls short of the requirements, you may need to consider upgrading certain components or even purchasing a new PC.
- Check for driver updates: Ensure that your system drivers are up to date. Visit your computer manufacturer’s website and download the latest drivers for your hardware components. Updated drivers can help improve performance and compatibility with Windows 10.
By following these steps, you will ensure that your PC is well-prepared for the Windows 10 upgrade. Backing up your files, freeing up disk space, checking compatibility, reviewing system requirements, and updating drivers are crucial for a successful installation.
In the next step, we’ll cover how to download Windows 10 and initiate the installation process. It’s an exciting part of the upgrade journey, so let’s move on to Step 3: Download Windows 10!
Step 3: Download Windows 10
Now that your PC is prepared, it’s time to download Windows 10. Follow these steps to get the installation files and initiate the upgrade process:
- Visit the Microsoft website: Open your web browser and go to the official Microsoft website. Navigate to the Windows 10 download page.
- Create installation media: On the download page, you’ll find the option to create Windows 10 installation media. This option allows you to download the installation files and create a bootable USB drive or DVD, which can be used for installation on multiple devices or as a backup for future upgrades.
- Download the Media Creation Tool: Choose the appropriate version of the Media Creation Tool based on your current Windows version. Click on the download link to start downloading the tool.
- Run the Media Creation Tool: Once the download is complete, locate the downloaded file and run the Media Creation Tool. You may be prompted to give administrative permissions to the tool.
- Accept the terms and conditions: On the initial screen of the Media Creation Tool, you’ll be presented with the license terms and conditions. Read them carefully and click on the “Accept” button to proceed.
- Select upgrade this PC: On the next screen, you’ll have two options: “Upgrade this PC now” or “Create installation media for another PC.” Choose the “Upgrade this PC now” option to directly upgrade your current Windows version to Windows 10.
- Wait for the download to complete: The Media Creation Tool will now start downloading the necessary files for Windows 10. The time it takes to download depends on your internet connection speed. It’s recommended to have a stable and fast internet connection to avoid any interruptions.
Once the download is complete, you’ll be ready to move on to the installation process. In the next step, we’ll cover how to install Windows 10 on your PC. It’s an exciting part of the upgrade journey, so let’s move on to Step 4: Install Windows 10!
Step 4: Install Windows 10
With the Windows 10 installation files downloaded, it’s time to proceed with the installation process. Follow these steps to install Windows 10 on your PC:
- Launch the installation: Locate the downloaded Windows 10 installation files and double-click on the executable file to launch the installation process.
- Choose your preferences: On the initial setup screen, you’ll be prompted to choose your language, time zone, and keyboard layout. Select the options that correspond to your preferences and click on the “Next” button.
- Enter the product key: If prompted, enter your Windows 10 product key. This step may vary depending on your specific situation. If you’re upgrading from a previous Windows version, the product key may already be pre-entered for you.
- Accept the license terms: Read and accept the license terms for using Windows 10. Click on the “Accept” button to proceed.
- Select the installation type: You’ll be presented with two installation options: “Upgrade” and “Custom.” Choose the “Upgrade” option to keep your files, settings, and applications intact during the installation process. If you prefer a clean installation, choose the “Custom” option and follow the on-screen instructions.
- Wait for the installation to complete: The installation process will now begin, and your PC will restart multiple times during this process. Ensure that you don’t interrupt the installation and let it proceed until it’s complete.
- Set up Windows 10: Once the installation is finished, you’ll be prompted to set up Windows 10. Follow the on-screen instructions to customize your settings, create user accounts, and complete the initial setup process.
During the installation process, it’s important to be patient and allow sufficient time for the installation to complete. Your PC will restart multiple times, and it may take some time before you can start exploring the new features of Windows 10.
Congratulations! You’ve successfully installed Windows 10 on your PC. In the next step, we’ll cover the final part of the upgrade process: setting up Windows 10. Let’s move on to Step 5: Set up Windows 10!
Step 5: Set up Windows 10
After successfully installing Windows 10, it’s time to set up the operating system to personalize it and optimize it according to your preferences. Follow these steps to complete the setup process:
- Choose your region and language: During the initial setup, you’ll be prompted to choose your region and language settings. Select the appropriate options and click on the “Next” button.
- Connect to a network: If your PC is connected to a Wi-Fi network, you’ll be prompted to enter the network credentials to connect to the internet. Select your network and enter the password if required.
- Review and customize privacy settings: Windows 10 offers various privacy settings that allow you to control how your data is shared with Microsoft and other apps. Take the time to review these settings and customize them according to your preferences.
- Sign in with a Microsoft account: If you have a Microsoft account, such as Outlook or Hotmail, you can sign in with your existing account. This will sync your data across multiple devices and provide access to Microsoft services. Alternatively, you can choose to create a local account for your PC.
- Customize your PC settings: Windows 10 offers a range of customization options to personalize your PC. You can choose your desktop background, select a theme, customize the Start menu, and configure various other settings to make Windows 10 feel like your own.
- Install necessary apps and software: Once the initial setup is complete, you can start installing necessary apps and software on your PC. Visit the Microsoft Store, download your favorite apps, and install any additional software required for your workflow or entertainment needs.
By following these steps, you will be able to set up Windows 10 according to your preferences and make it feel like your own operating system. Take the time to explore the settings and options available to fully customize the user experience.
Congratulations! You have now successfully upgraded your PC to Windows 10 and completed the setup process. Enjoy exploring the new features, enhanced performance, and improved security that Windows 10 offers.
Troubleshooting Common Issues
While upgrading to Windows 10 is generally a seamless process, there may be occasional issues that you encounter. Here are some common issues that users may face during or after the upgrade, along with suggested troubleshooting steps:
1. Compatibility Issues: If certain hardware or software components are not compatible with Windows 10, it may cause compatibility issues. Check the manufacturer’s website for driver or software updates that are compatible with Windows 10. If updates are not available, consider contacting the manufacturer for further assistance or exploring alternative solutions.
2. Activation Problems: Occasionally, you may experience activation issues, particularly if you have made significant changes to your hardware. Ensure that you’re using a genuine product key and try reactivating Windows 10. If the issue persists, contact Microsoft support for further assistance.
3. Installation Errors: If you encounter errors during the installation process, try restarting your computer and initiating the installation again. Ensure that your internet connection is stable and that you have sufficient disk space. If the problem persists, use the Windows Update Troubleshooter tool to identify and resolve any underlying issues.
4. Driver Incompatibilities: Outdated or incompatible drivers can cause various issues after the upgrade. Visit your computer manufacturer’s website and download the latest drivers for your hardware components. Alternatively, use the Device Manager in Windows 10 to update drivers automatically or troubleshoot driver-related issues.
5. Performance Problems: If you notice a decrease in performance or slow system performance after the upgrade, try optimizing your PC by disabling unnecessary startup programs, running a disk cleanup, and performing regular maintenance tasks such as disk defragmentation. Additionally, ensure that your computer meets the recommended system requirements for Windows 10.
6. Application Compatibility: Some older applications may not be compatible with Windows 10. Visit the software developer’s website to check for any updates or patches that ensure compatibility. If you’re unable to find a solution, consider using compatibility mode or seeking alternative software options that are compatible with Windows 10.
If you encounter any other issues during or after the upgrade, it’s recommended to visit the official Microsoft support website or reach out to their customer support for guidance. They have extensive resources and competent support personnel who can help you troubleshoot and resolve any specific problems you may encounter.
With proper troubleshooting and support, you can overcome any challenges and fully enjoy the benefits of Windows 10 on your PC.
Conclusion
Congratulations on successfully completing the upgrade to Windows 10! By following the step-by-step process outlined in this guide, you have now unlocked a world of new features, enhanced security, and improved performance with Windows 10.
Throughout the upgrade process, you learned how to check for updates, prepare your PC, download Windows 10, install the operating system, and set it up according to your preferences. Troubleshooting common issues was also covered to help you overcome any hurdles you may encounter along the way.
Remember, Windows 10 provides a user-friendly interface and a range of customization options, allowing you to tailor your PC experience to suit your needs. Take the time to explore and familiarize yourself with the new features, such as the revamped Start menu, the Microsoft Store, Cortana, and the improved Taskbar functionality.
Should you need any further assistance or encounter any specific issues, don’t hesitate to consult Microsoft’s extensive support resources or reach out to their customer support. They are there to help you get the most out of your Windows 10 experience.
Now that you’ve successfully upgraded to Windows 10, enjoy exploring the countless possibilities and making the most of its advanced features. Whether you’re a home user, a business professional, or a student, Windows 10 offers a versatile and robust platform to enhance your productivity and creativity.
Thank you for choosing Windows 10, and happy computing!