Introduction
Welcome to the comprehensive guide on how to upgrade from Windows 7 to Windows 10. As the end of support for Windows 7 approaches, it’s crucial to ensure that you are equipped with the latest operating system to safeguard your computer’s security and enjoy the enhanced features and functionality offered by Windows 10.
Upgrading to Windows 10 is a relatively straightforward process, and this guide will walk you through each step to ensure a smooth transition. Before we dive into the details, it’s important to note that upgrading from Windows 7 to Windows 10 is not free. You will need a valid Windows 10 license, either by purchasing one or by taking advantage of any upgrade offers that may be available.
In this guide, we’ll cover everything you need to know to successfully upgrade to Windows 10. We’ll start by discussing the importance of backing up your data before proceeding with the upgrade. Next, we’ll examine the compatibility requirements to ensure that your computer meets the necessary criteria for a successful Windows 10 installation.
Once we’ve covered data backup and compatibility, we’ll proceed to download the Windows 10 installation files. We’ll then guide you through creating an installation media, which is essential for installing Windows 10 on your computer. Following that, we’ll walk you through running the setup and choosing the appropriate installation options.
After the installation process is complete, we’ll help you set up Windows 10, transfer your data and settings from Windows 7, and install and update drivers to ensure optimal performance. Finally, we’ll wrap up by providing tips on customizing Windows 10 to suit your preferences.
By the end of this guide, you’ll be ready to make the leap from Windows 7 to Windows 10 confidently, armed with all the necessary knowledge and guidance to ensure a successful upgrade. So let’s get started!
Back Up Your Data
Prior to upgrading from Windows 7 to Windows 10, it’s crucial to back up your data to prevent the loss of any important files or information. While the upgrade process is designed to preserve your files, it’s always better to be safe than sorry.
You have several options for backing up your data. One common method is to use an external hard drive or USB flash drive to manually copy and paste your important files to the removable storage device. This ensures that even if something goes wrong during the upgrade process, your files will be safely stored and easily accessible once you’ve completed the transition to Windows 10.
Another option is to utilize cloud storage services such as Microsoft OneDrive, Google Drive, or Dropbox. These services offer a certain amount of free storage, and you can easily upload your files to the cloud. This has the advantage of keeping your data safe and accessible from anywhere, even if your computer experiences hardware failure.
Additionally, you may choose to create a system image of your entire Windows 7 installation. This creates a snapshot of your entire system, including the operating system, applications, and user data. Should anything go wrong during the upgrade process, you can restore your computer to its previous state using the system image.
Regardless of the method you choose, it’s important to ensure that all of your essential files, including documents, photos, videos, and any other personal data, are backed up. Take the time to organize your files and determine which ones are truly important to you. This will help streamline the backup process and prevent unnecessary clutter in your data storage.
Once you’ve backed up your data, verify that your backup is successful by checking to make sure all of your important files are present and intact. It’s always a good idea to double-check before proceeding with the upgrade to Windows 10.
Backing up your data is an essential step before upgrading to Windows 10. It provides peace of mind and ensures that your important files are safeguarded throughout the entire process. So, take the time to complete this crucial step before moving forward.
Check Compatibility
Before diving into the Windows 10 upgrade, it’s important to ensure that your computer meets the necessary compatibility requirements. This step is crucial to ensure a smooth and successful transition to the new operating system.
Firstly, you need to check if your computer meets the minimum hardware requirements for Windows 10. These include a 1 GHz or faster processor, 1 GB RAM for the 32-bit version or 2 GB for the 64-bit version, 16 GB of free hard disk space for the 32-bit version or 20 GB for the 64-bit version, and a DirectX 9 or later graphics card.
You can easily check your system specifications by going to the Control Panel and selecting “System.” Here, you’ll find information about your processor, RAM, and system type (32-bit or 64-bit). If your computer doesn’t meet these minimum requirements, you may need to consider upgrading your hardware or sticking with Windows 7.
In addition to the hardware requirements, it’s crucial to check for software compatibility. Ensure that your essential applications and programs are compatible with Windows 10. Visit the developers’ websites or contact their support for information on Windows 10 compatibility. If any of your crucial software is not compatible, you may need to seek alternatives or postpone the upgrade until compatibility is ensured.
It’s also important to consider any peripherals you use with your computer, such as printers, scanners, and external devices. Ensure that there are Windows 10 drivers available for these devices. Check the manufacturers’ websites or contact their support for the latest driver information.
Another crucial aspect of compatibility is the availability of drivers for your computer’s components, such as the graphics card, network interface, and sound card. Ensure that there are Windows 10 drivers available for all of your hardware components. Manufacturers often provide updated drivers on their websites, so be sure to download and install the latest versions before proceeding.
Checking compatibility before upgrading to Windows 10 is essential to avoid any compatibility issues or driver conflicts. Ensuring that your hardware, software, and peripherals are compatible will save you time and frustration during the upgrade process.
If your computer meets all the necessary compatibility requirements, you are ready to move on to the next step: downloading Windows 10.
Download Windows 10
Once you’ve confirmed that your computer meets the necessary compatibility requirements, the next step is to download the Windows 10 installation files. Microsoft provides a simple and convenient way to download the latest version of Windows 10 directly from their website.
To begin, open your web browser and navigate to the official Microsoft website. Look for the “Downloads” or “Windows” section, where you’ll find the option to download Windows 10. Make sure you download the correct version based on your system type (32-bit or 64-bit).
Click on the download link, and your browser will begin downloading the Windows 10 installation files. The file size may vary, so ensure that you have a stable internet connection and enough storage space on your computer to accommodate the download.
During the download process, you may be prompted to create a Microsoft account or sign in using your existing account. This step is optional, but having a Microsoft account can provide additional benefits such as access to OneDrive and seamless integration with Microsoft services.
While the download is in progress, it’s a good idea to take this time to review and read about the new features and improvements offered by Windows 10. Familiarize yourself with the changes so that you can make the most out of your new operating system.
Once the download is complete, you’ll have a Windows 10 ISO file or an executable file, depending on the method you choose. If you have the ISO file, you will need to create a bootable USB drive or DVD. Microsoft offers a tool called the “Windows USB/DVD Download Tool” that simplifies this process.
If you have the executable file, you can simply double-click on it to start the installation process. The installer will guide you through the necessary steps to upgrade your operating system from Windows 7 to Windows 10.
Downloading Windows 10 is the crucial first step towards upgrading your operating system. By following the official Microsoft website, you can be confident that you are downloading the legitimate and latest version of Windows 10.
Once you have downloaded the installation files, it’s time to create an installation media in order to proceed with the upgrade process.
Create an Installation Media
After downloading the Windows 10 installation files, the next step is to create an installation media. This is necessary to install Windows 10 on your computer, as it allows you to boot from the media and initiate the installation process.
To create an installation media, you will need a USB flash drive or a blank DVD with sufficient storage capacity. It’s recommended to use a USB flash drive, as it is faster, more convenient, and can be reused for future installations.
Microsoft provides a tool called the “Media Creation Tool” that simplifies the process of creating an installation media. You can find this tool on the official Microsoft website, in the same section where you downloaded the Windows 10 installation files.
Once you have the Media Creation Tool, double-click on it to open it. You may be prompted to grant administrator privileges, so make sure to allow the tool to make changes to your computer.
Follow the instructions provided by the tool, including selecting the language, edition, and architecture (32-bit or 64-bit) of Windows 10 that you want to install. Choose the option to create installation media (USB flash drive, DVD, or ISO file) for another PC.
Insert your USB flash drive or blank DVD into your computer. Make sure that the storage device is properly recognized and accessible. The Media Creation Tool will detect the storage device and provide the option to use it as the installation media.
Select the appropriate storage device and click on “Next” to start the process. The tool will then format the storage device and copy the necessary files to create the installation media. This process may take some time, so be patient and avoid interrupting it.
Once the creation of the installation media is complete, you’ll receive a confirmation message. Your USB flash drive or DVD is now ready with the Windows 10 installation files. Safely remove the media from your computer and keep it in a secure place, as you will need it to perform the upgrade.
Creating an installation media is an essential step before proceeding with the Windows 10 upgrade. It allows you to have a physical copy of the installation files and grants you the flexibility to install Windows 10 on multiple computers if needed.
With the installation media in hand, you are now ready to run the setup and begin the actual installation of Windows 10 on your computer.
Run the Setup
Now that you have created the installation media for Windows 10, it’s time to run the setup and initiate the installation process. By following these steps, you’ll be on your way to upgrading your operating system from Windows 7 to Windows 10.
Insert the USB flash drive or DVD containing the Windows 10 installation files into your computer. Make sure your computer is powered on, and if necessary, adjust the BIOS settings to boot from the installation media. Consult your computer’s manufacturer or check the documentation for instructions on how to access the BIOS settings.
Restart your computer, and during the boot process, look for a prompt that says “Press any key to boot from CD/DVD” or something similar. Quickly press any key on your keyboard to boot from the installation media. If you miss the prompt, you may need to restart your computer and try again.
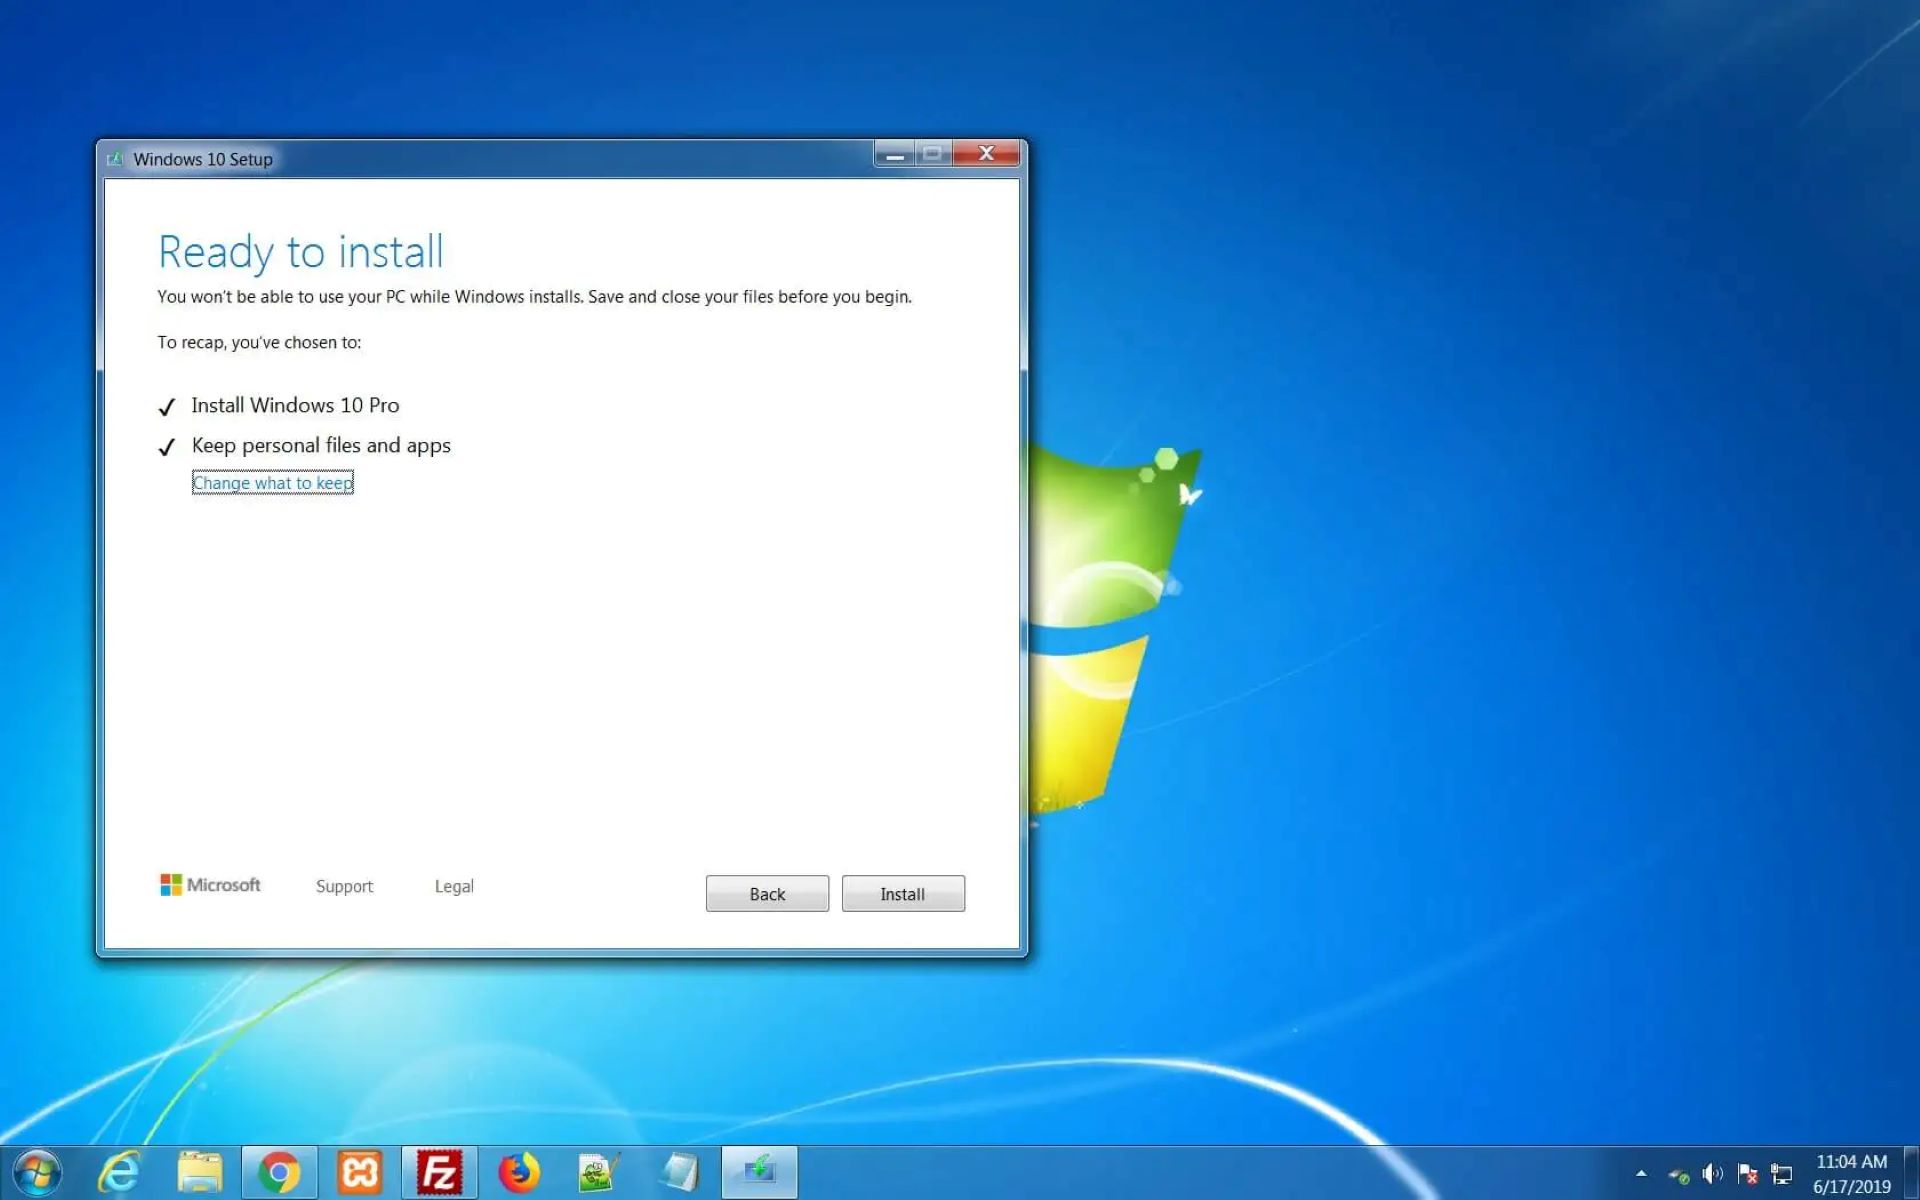
The Windows 10 setup will now launch. The setup process consists of a series of screens and prompts that guide you through the installation process. Follow the on-screen instructions to select your language preferences, accept the license terms, and choose an installation type.
You will typically have the option to either upgrade your existing installation of Windows 7 or perform a clean installation. It’s usually recommended to choose the upgrade option to keep your files, settings, and applications intact. However, if you prefer a fresh start with Windows 10, you can select the clean installation option, but keep in mind that this will remove all of your data and applications.
Once you’ve made your selection, the setup process will begin. It may take some time for the installation to complete, so be patient and avoid interrupting the process. Your computer may restart multiple times, and you may see various progress screens as the installation progresses.
During the setup process, you may be prompted to make additional choices, such as selecting the installation location, customizing settings, and creating a user account. Follow the prompts and choose the options that best suit your preferences.
Once the installation is complete, your computer will restart, and you’ll be greeted with the Windows 10 login screen. Enter your credentials and log in to your new Windows 10 environment.
Congratulations! You have successfully run the setup and installed Windows 10 on your computer. Now it’s time to proceed with the next steps, such as choosing the installation options and customizing your Windows 10 experience.
Choose the Installation Options
After successfully running the Windows 10 setup, you’ll be presented with various installation options that allow you to customize your experience and choose the settings that best suit your needs. Taking the time to go through these options will ensure that Windows 10 is tailored to your preferences and requirements.
During the installation process, you may encounter screens that prompt you to choose various options. Let’s take a closer look at some of the key installation options you’ll come across:
- Express Settings: This option allows Microsoft to configure your system settings based on their recommended settings. While this may be convenient for some, if you prefer more control over your privacy and system settings, it is recommended to choose “Customize settings” and tailor the options to your preferences.
- Microsoft Account: Windows 10 offers the option to sign in using a Microsoft account, which gives you access to additional features and services such as OneDrive and the Windows Store. However, if you prefer not to use a Microsoft account, you can choose to create a local account or sign in with an existing one. This decision depends on your personal preference and the services you intend to use.
- Privacy Settings: Windows 10 provides improved privacy controls compared to previous versions. During the installation, you’ll be prompted to choose your privacy settings, such as location services, diagnostic data, and tailored experiences. Take the time to review each of these options and adjust them according to your comfort level and privacy preferences.
- Cortana: Cortana is Microsoft’s virtual assistant and can be a helpful tool for managing your computer and performing various tasks. During the installation process, you’ll have the option to enable or disable Cortana. Consider your personal preferences and whether you find virtual assistants useful in your daily activities.
- Updates: Windows 10 frequently releases updates to improve security, fix bugs, and add new features. You’ll have the option to choose how updates are installed, such as automatically or manually. It is generally recommended to keep your system up to date by allowing automatic updates, as this helps ensure the best performance and security for your computer.
Choosing the installation options that align with your preferences and requirements is an important step in the process of upgrading to Windows 10. Take the time to review each option and make the selections that suit you best.
Once you’ve chosen your installation options, the setup process will continue, and you’ll be one step closer to fully experiencing the capabilities and features of Windows 10. Next, we’ll delve into the final stages of the installation process and how to complete the upgrade successfully.
Complete the Installation
After selecting the installation options, the Windows 10 installation process will proceed, and you’ll be one step away from completing the upgrade. In this section, we’ll cover the final stages of the installation and the necessary steps to ensure a successful completion.
As the installation progresses, your computer may restart multiple times. These restarts are normal and part of the installation process. Make sure not to interrupt the process and let it continue until it reaches the final stage.
Once the installation is complete, Windows 10 will finalize the setup process and prepare your computer for first-time use. You may see a “Welcome” screen, followed by a series of screens where you’ll be asked to make final adjustments and decisions.
During these screens, you’ll have the opportunity to customize various settings, such as choosing a computer name, setting up automatic sign-in, and selecting whether to use Cortana. Take the time to go through these options and make the choices that suit your preferences.
After making these final adjustments, Windows 10 will prepare your desktop environment. You’ll see a series of progress screens as the system configures your settings and prepares the operating system for use.
Once this process is complete, you’ll be taken to your Windows 10 desktop, and the upgrade process will officially be finished. Congratulations on successfully completing the installation!
Take a few moments to explore your new Windows 10 environment. You’ll notice various visual improvements and updated features compared to Windows 7. Spend some time familiarizing yourself with the new layout and getting comfortable with the new operating system.
After the installation, it’s important to ensure that all of your hardware components are functioning correctly. Check to see if any drivers need to be updated or installed to ensure optimal performance. Visit the manufacturers’ websites or use Windows Update to obtain the latest drivers for your devices.
Lastly, don’t forget to reinstall any necessary software applications that you used in Windows 7. Check their compatibility with Windows 10 and download the latest versions from the developers’ websites if needed.
By completing the installation and performing the necessary post-installation tasks, you’re now fully equipped to enjoy the benefits of Windows 10. Take the time to explore the new features, personalize your settings, and make the most out of your upgraded operating system.
Set Up Windows 10
Now that you have completed the installation of Windows 10, it’s time to set up your new operating system to ensure optimal performance and personalized user experience. In this section, we’ll guide you through the essential steps to set up Windows 10 effectively.
1. Activate Windows: If you haven’t already done so during the installation process, you’ll need to activate your copy of Windows 10. Go to the “Settings” menu, select “Update & Security,” and click on “Activation.” Follow the prompts to activate your copy of Windows 10 using a valid product key.
2. Update Windows: Keeping your operating system up to date is crucial for security and performance. Go to the “Settings” menu, select “Update & Security,” and click on “Windows Update.” Check for any available updates and install them to ensure you have the latest security patches and bug fixes.
3. Customize System Preferences: Go to the “Settings” menu and explore the different options available to customize your Windows 10 experience. Adjust personalization settings such as desktop background, theme, colors, and lock screen to make your computer reflect your preferences and style.
4. Set Up User Accounts: If you created a Microsoft account during the installation process, you can sign in using that account. This will allow you to sync your settings and files across multiple devices. If you prefer to use a local account, go to the “Settings” menu and select “Accounts” to create a new user account.
5. Install Essential Software: Install any necessary software and applications that you regularly use. Visit the developers’ websites or use the Windows Store to download and install the latest versions that are compatible with Windows 10. Don’t forget to transfer any data or settings from your previous applications if required.
6. Set Up Security Measures: Protect your computer by enabling Windows Defender, the built-in antivirus and security program for Windows 10. Go to the “Settings” menu, select “Update & Security,” and click on “Windows Security.” From there, you can manage your antivirus settings, perform scans, and ensure that your computer is protected against malware and other threats.
7. Set Up Backup and Recovery: It’s essential to have a backup plan for your important files and data. Use the Windows Backup feature or third-party backup software to create regular backups of your files and set up a system restore point for easy recovery in case of any unforeseen issues.
8. Explore New Features: Windows 10 introduces several new features and enhancements compared to Windows 7. Take the time to familiarize yourself with these features and explore what Windows 10 has to offer. Features such as the improved Start Menu, virtual desktops, and Cortana can enhance your productivity and efficiency.
By following these steps and customizing your Windows 10 settings to your preferences, you’ll be able to fully enjoy the benefits of the upgraded operating system. Personalize your experience, stay secure, and make the most out of the new features available with Windows 10.
Transfer Data and Settings
Transferring your data and settings from your previous Windows 7 installation to Windows 10 is an important step in the upgrade process. By migrating your files, documents, settings, and preferences, you can seamlessly continue working on your new operating system without missing a beat. In this section, we’ll guide you through the process of transferring your data and settings to Windows 10.
1. Windows Easy Transfer: Windows 10 does not include the built-in Windows Easy Transfer tool that was available in previous versions. However, you can still manually transfer your files using external storage devices such as USB flash drives or external hard drives. Simply copy and paste your important files to the desired location on your Windows 10 computer.
2. Cloud Storage: Utilize cloud storage services such as Microsoft OneDrive, Google Drive, or Dropbox to transfer your files seamlessly between devices. Upload your important files to the cloud storage provider of your choice from your Windows 7 computer and access them on your Windows 10 computer by installing the respective cloud storage app or accessing the service through a web browser.
3. Migration Assistant: If you have multiple computers or are switching from a Mac to Windows, consider using migration assistant tools. Certain third-party software, such as EaseUS Todo PCTrans, can assist with transferring data and settings between computers. Follow the instructions provided by the software to migrate your files and settings smoothly.
4. Application Settings: Although applications cannot be transferred between operating systems, you can manually configure the settings for your applications on your Windows 10 computer. Take note of the applications you rely on and ensure that you customize the settings to match your preferences. Additionally, you may need to reinstall the applications on your Windows 10 computer and import any necessary files or data associated with them.
5. Email and Contacts: If you use an email client such as Microsoft Outlook, you’ll need to configure your email account on your Windows 10 computer and import your old emails and contacts. Microsoft Outlook allows you to export your email messages and contacts as a .pst file, which you can then import into your Windows 10 installation.
6. Browser Settings: If you use web browsers, such as Chrome or Firefox, you can sync your bookmarks, history, and settings across devices by signing in with the same account. Ensure that you are signed in to your browser account on your Windows 7 computer and sign in with the same account on your Windows 10 computer to have your settings transferred.
By following these steps, you can transfer your essential files, settings, and preferences to your new Windows 10 installation. Take your time to ensure that all your important data has been safely migrated and double-check if any additional steps are needed for specific applications. With your data and settings seamlessly transferred, you can enjoy a smooth transition to Windows 10 and continue your work without interruption.
Install and Update Drivers
One crucial step after upgrading to Windows 10 is to ensure that all drivers for your computer’s hardware components are installed and up to date. Drivers are essential software that enables communication between your operating system and the hardware devices in your computer. In this section, we’ll guide you through the process of installing and updating drivers in Windows 10.
1. Windows Update: Windows Update is an excellent place to start when it comes to driver updates. Microsoft regularly releases driver updates through Windows Update. Go to the “Settings” menu, select “Update & Security,” and click on “Windows Update.” Check for updates, including optional updates, as they might include drivers for your hardware devices. Install any available driver updates and restart your computer if prompted.
2. Manufacturer’s Website: If Windows Update doesn’t provide the necessary drivers, you can visit the manufacturer’s website for each hardware component to download the latest drivers. Identify your hardware devices, such as graphics card, sound card, network adapter, and visit the respective manufacturer’s website. Look for their support or downloads section, locate the appropriate drivers for Windows 10, and download them. Follow the instructions provided by the manufacturer to install the drivers.
3. Device Manager: Windows 10 comes with a built-in tool called Device Manager that allows you to manage and update device drivers. Right-click on the “Start” button and select “Device Manager” from the menu. In the Device Manager window, locate the hardware device you want to update, right-click on it, and select “Update driver.” Choose to search automatically for updated driver software. If Windows finds a compatible driver, it will install it for you.
4. Automatic Driver Update Tools: Another option is to use third-party tools designed to automatically detect and update drivers. Examples of such tools include Driver Booster, DriverEasy, and Snappy Driver Installer. These tools scan your computer for outdated or missing drivers and provide you with the latest versions to install. However, exercise caution when using these tools and ensure you download them from reputable sources.
5. Windows Compatibility Center: If you encounter any compatibility issues with specific hardware devices, you can visit the Windows Compatibility Center website. This website provides information on whether a particular hardware device is compatible with Windows 10 and if there are any known issues. It can help you identify potential driver conflicts or find alternative hardware devices that offer better compatibility.
By installing and updating drivers, you ensure that your hardware components work seamlessly with Windows 10. Having the latest drivers installed not only improves performance but also resolves compatibility issues and enhances the stability of your system.
After updating the drivers, you’ll have a more reliable computing experience on Windows 10, with all your hardware devices functioning optimally. With the drivers up to date, you’re one step closer to customizing your Windows 10 experience and making it your own.
Customize Windows 10
Windows 10 offers a wide range of customization options that allow you to personalize your operating system and make it uniquely yours. Whether it’s changing the appearance, adjusting settings, or adding useful features, customizing Windows 10 can enhance your overall computing experience. In this section, we’ll explore some of the key customization options available in Windows 10.
1. Start Menu: The Start Menu in Windows 10 is highly customizable. You can resize and rearrange the tiles to your liking, pin your favorite apps for easy access, and remove unnecessary tiles. Right-click on any tile to resize, unpin, or even create folders to organize your apps efficiently. Additionally, you can customize the Start Menu’s appearance and choose to display live tiles or opt for a more traditional look.
2. Taskbar: The Taskbar is another feature that can be customized to suit your preferences. Right-click on the Taskbar to access its settings and choose to auto-hide it, change its location, add or remove system icons, and customize the notification area.
3. Themes: Windows 10 offers a variety of themes to change the overall look and feel of your desktop. You can access the Themes settings by right-clicking on the desktop and selecting “Personalize.” Choose from a range of pre-installed themes or download custom themes from the Microsoft Store or third-party websites to give your desktop a fresh and unique appearance.
4. Wallpapers: Personalize your desktop background by selecting your favorite wallpapers. Right-click on the desktop and choose “Personalize” to access the background settings. You can choose from a collection of pre-installed wallpapers or use your own images. Windows 10 also offers the option to set a slideshow of images as your background, which will automatically change at specified intervals.
5. File Explorer: Customize the File Explorer view to suit your needs. In File Explorer, click on the “View” tab and customize the layout, enable or disable the preview pane, and choose how files and folders are displayed.
6. Taskbar and File Explorer: Right-click on the desktop and select “Taskbar settings” to access additional customization options. You can choose to show or hide taskbar buttons, control how the taskbar appears when using multiple displays, and customize the size and appearance of icons on the taskbar. In the same settings window, you can also access options to customize File Explorer, such as setting a default folder for File Explorer to open or showing Libraries in the navigation pane.
7. Privacy and Security: Take control of your privacy and security settings in Windows 10. Go to the “Settings” menu and select “Privacy” to customize which apps have access to your personal information, location, camera, microphone, and other privacy-related settings. You can also review and adjust your security settings in the “Windows Security” section of the settings menu to ensure your computer is protected.
8. Microsoft Store: Explore the Microsoft Store to find apps, games, and extensions that can enhance your Windows 10 experience. From productivity tools to entertainment apps, the Microsoft Store offers a wide selection of apps that you can download and customize to meet your specific needs.
By customizing Windows 10 to your preferences, you’ll create an operating system that not only looks visually appealing but is also tailored to your workflow and personal style. Take the time to explore the various customization options and make Windows 10 the perfect platform for your computing needs.
Conclusion
Congratulations on successfully upgrading from Windows 7 to Windows 10! You’ve navigated through each step of the upgrade process, from backing up your data and checking compatibility to running the setup and customizing Windows 10 to your preferences. By following this comprehensive guide, you’ve ensured a smooth transition to the latest operating system while preserving your important files and settings.
Windows 10 offers a host of new features, improved security, and enhanced performance compared to Windows 7. By taking advantage of its customization options, you can tailor your Windows 10 experience to your personal preferences and optimize your workflow.
Remember to regularly update your drivers and keep Windows 10 up to date to benefit from the latest features, security updates, and improvements. Additionally, keep an eye on the Microsoft Store for new apps and extensions that can further enhance your productivity and entertainment on Windows 10.
If you encounter any issues or have questions along the way, don’t hesitate to reach out to Microsoft’s support or consult the vast array of online resources available for Windows 10 users. With a supportive community and extensive documentation, you can find the answers and assistance you need to make the most out of your Windows 10 experience.
Enjoy exploring your new operating system and discovering all the exciting features Windows 10 has to offer. Whether you’re using it for work, entertainment, or both, Windows 10 provides a robust and user-friendly platform to help you achieve your goals.
Thank you for choosing Windows 10, and we hope you have a fantastic experience with your new operating system!


