Why it’s important to have antivirus software on Windows
When it comes to using a computer, especially one running on the Windows operating system, having antivirus software is of utmost importance. With the rapid growth of cyber threats and the increasing sophistication of malware, having a robust antivirus program is not just a luxury but a necessity.
Here are a few reasons why having antivirus software on your Windows system is crucial:
- Protection against malware: Malicious software, like viruses, worms, trojans, and ransomware, can harm your computer and compromise your sensitive data. Antivirus software acts as a shield, continuously monitoring your system for any suspicious activity and blocking or removing malware.
- Real-time scanning: Antivirus software offers real-time scanning to detect and eliminate any threats as they occur. This ensures that your system is protected at all times, even when you are connected to the internet and downloading files.
- Web browsing safety: Many antivirus programs provide web protection features that warn you about malicious websites and block potentially harmful downloads. This safeguard helps prevent accidental clicks on phishing links or visiting infected sites, reducing the risk of malware infections.
- Email security: Antivirus software scans your incoming and outgoing email attachments, preventing the spread of malware through email-based attacks. This is particularly crucial as email is a common vector for transmitting malicious files or links.
- System performance optimization: Some antivirus software includes system optimization features that help improve the performance of your Windows computer. These features can clean up temporary files, optimize system resources, and remove unnecessary startup programs, resulting in faster and more efficient operation.
Given the constant evolution of malware and the ever-present cyber threats, relying on the built-in Windows Defender may not be sufficient. While it provides basic protection, a dedicated third-party antivirus program offers a more comprehensive security solution.
Having antivirus software installed on your Windows system ensures that you have an extra layer of defense against various forms of malware, providing peace of mind as you browse the internet, download files, and use your computer for various tasks.
Step-by-step guide to turning on Windows antivirus
Windows comes with a built-in antivirus program called Windows Defender, which provides protection against a wide range of threats. If you want to ensure that Windows Defender is enabled and running on your system, follow these step-by-step instructions:
- Open Windows Security: Click on the Start button in the bottom-left corner of your screen, and type “Windows Security”. Select the Windows Security app from the search results.
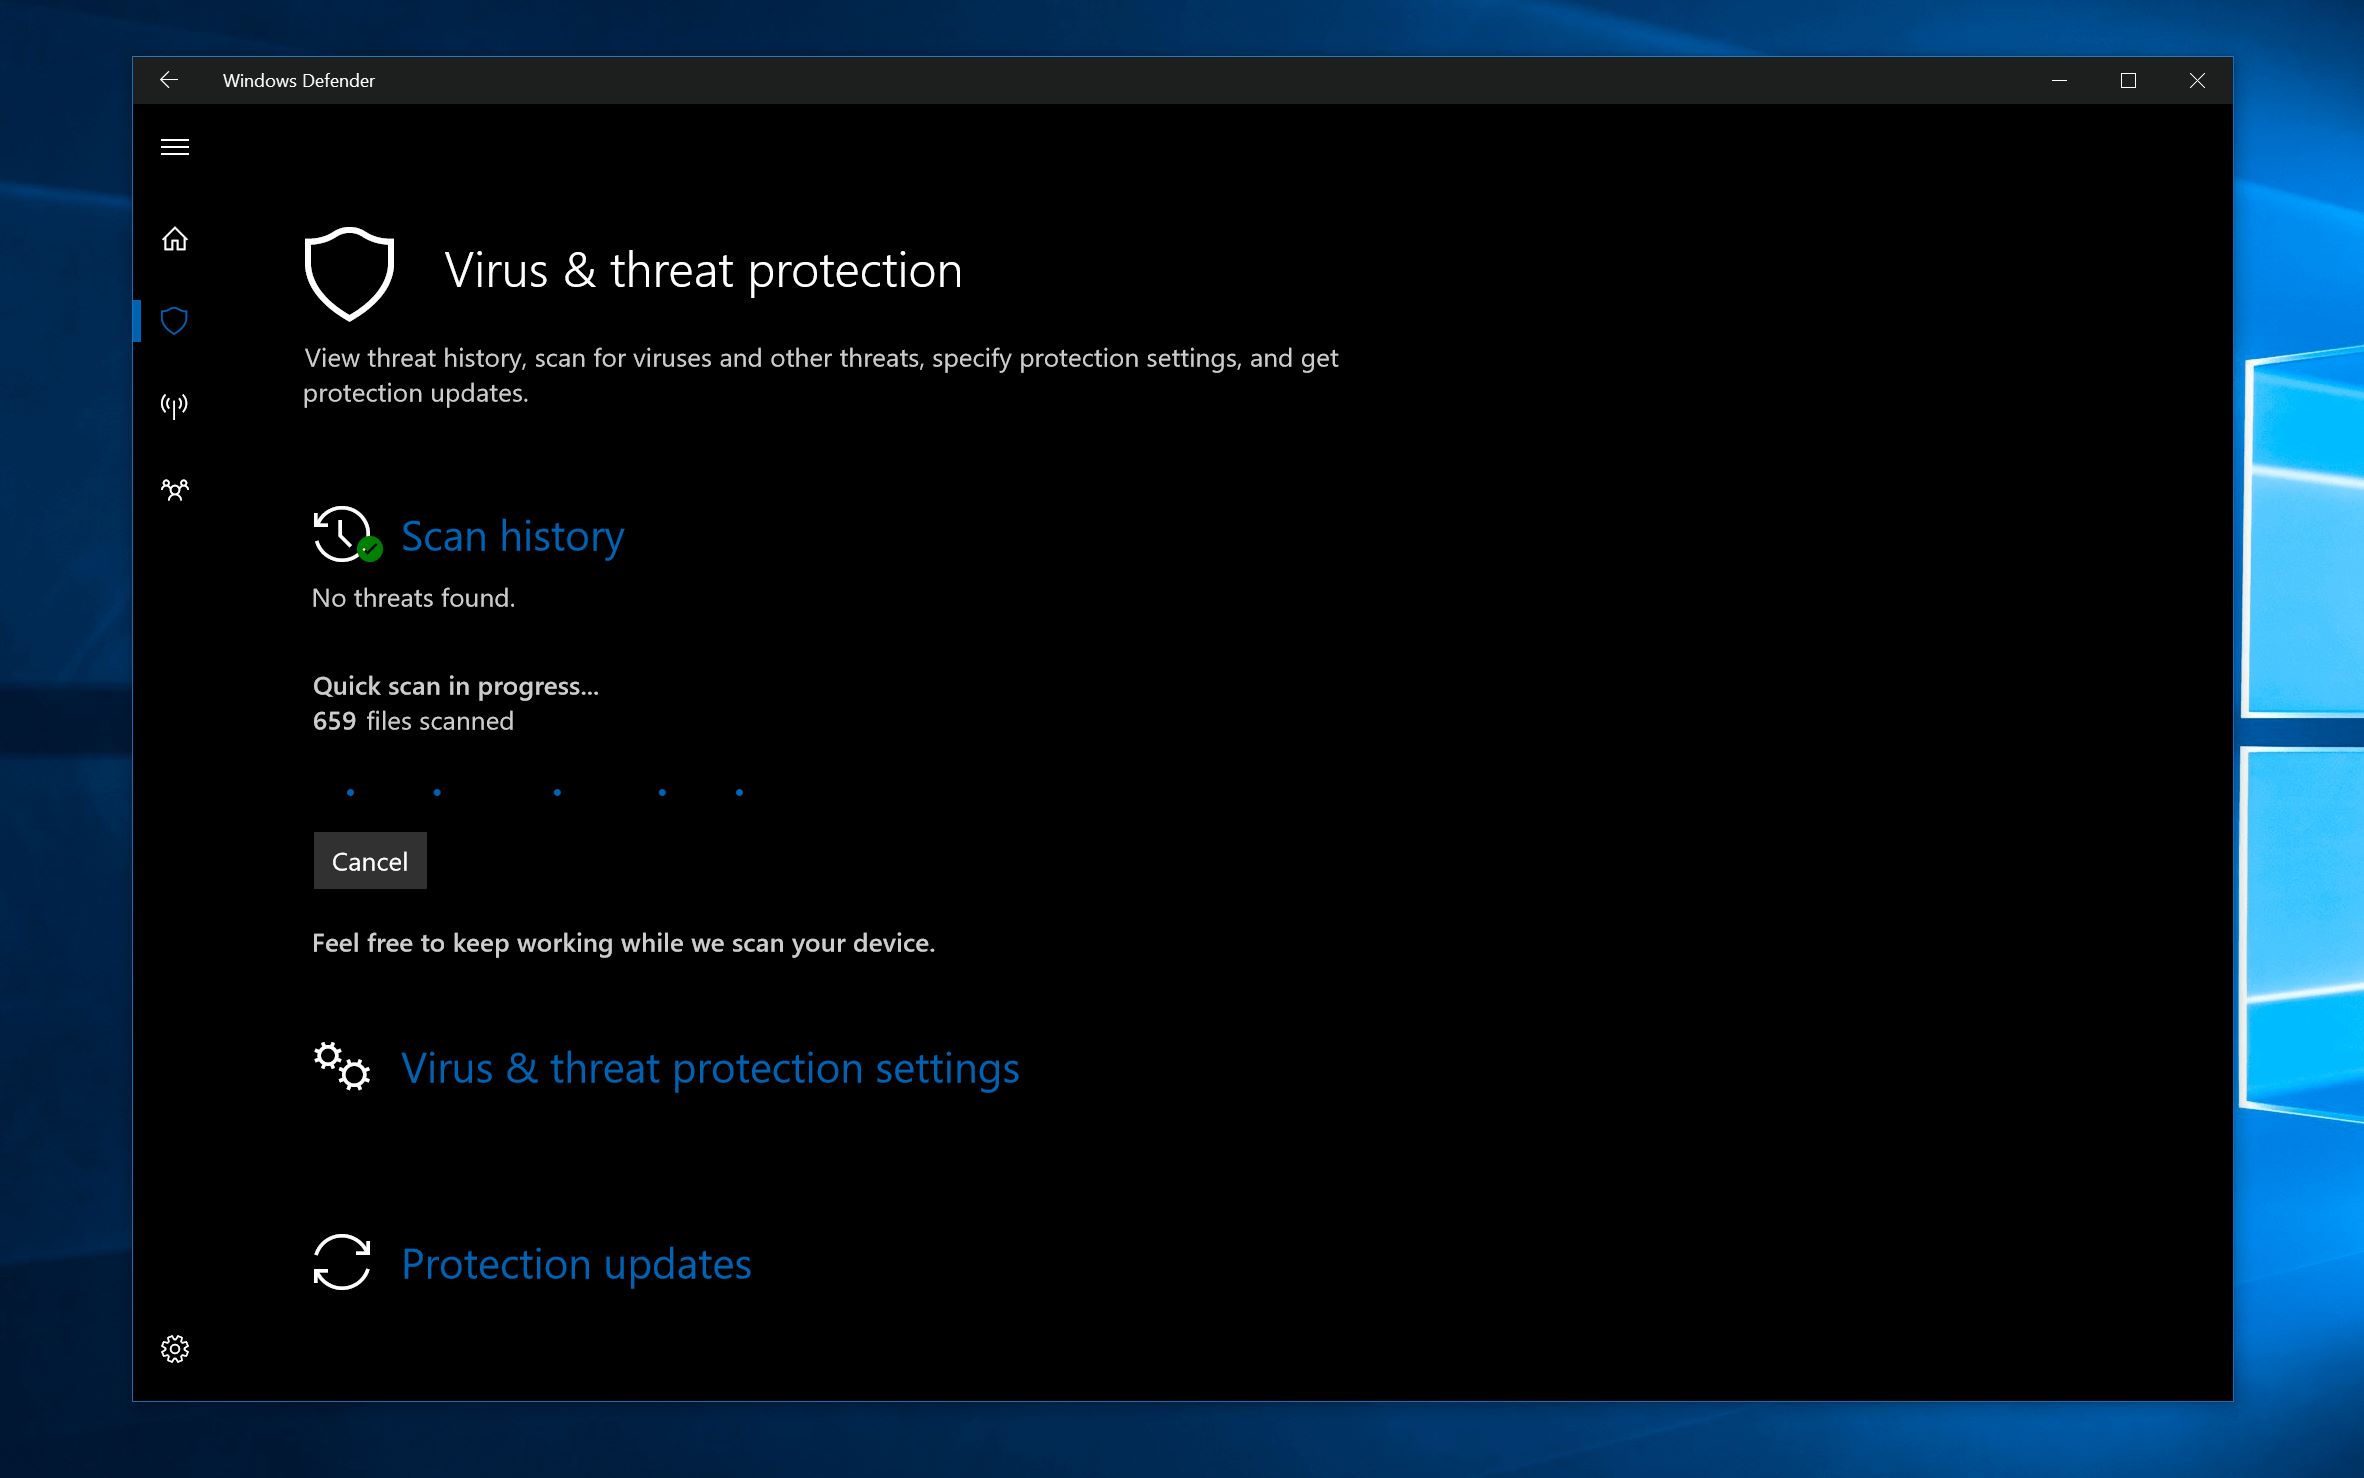
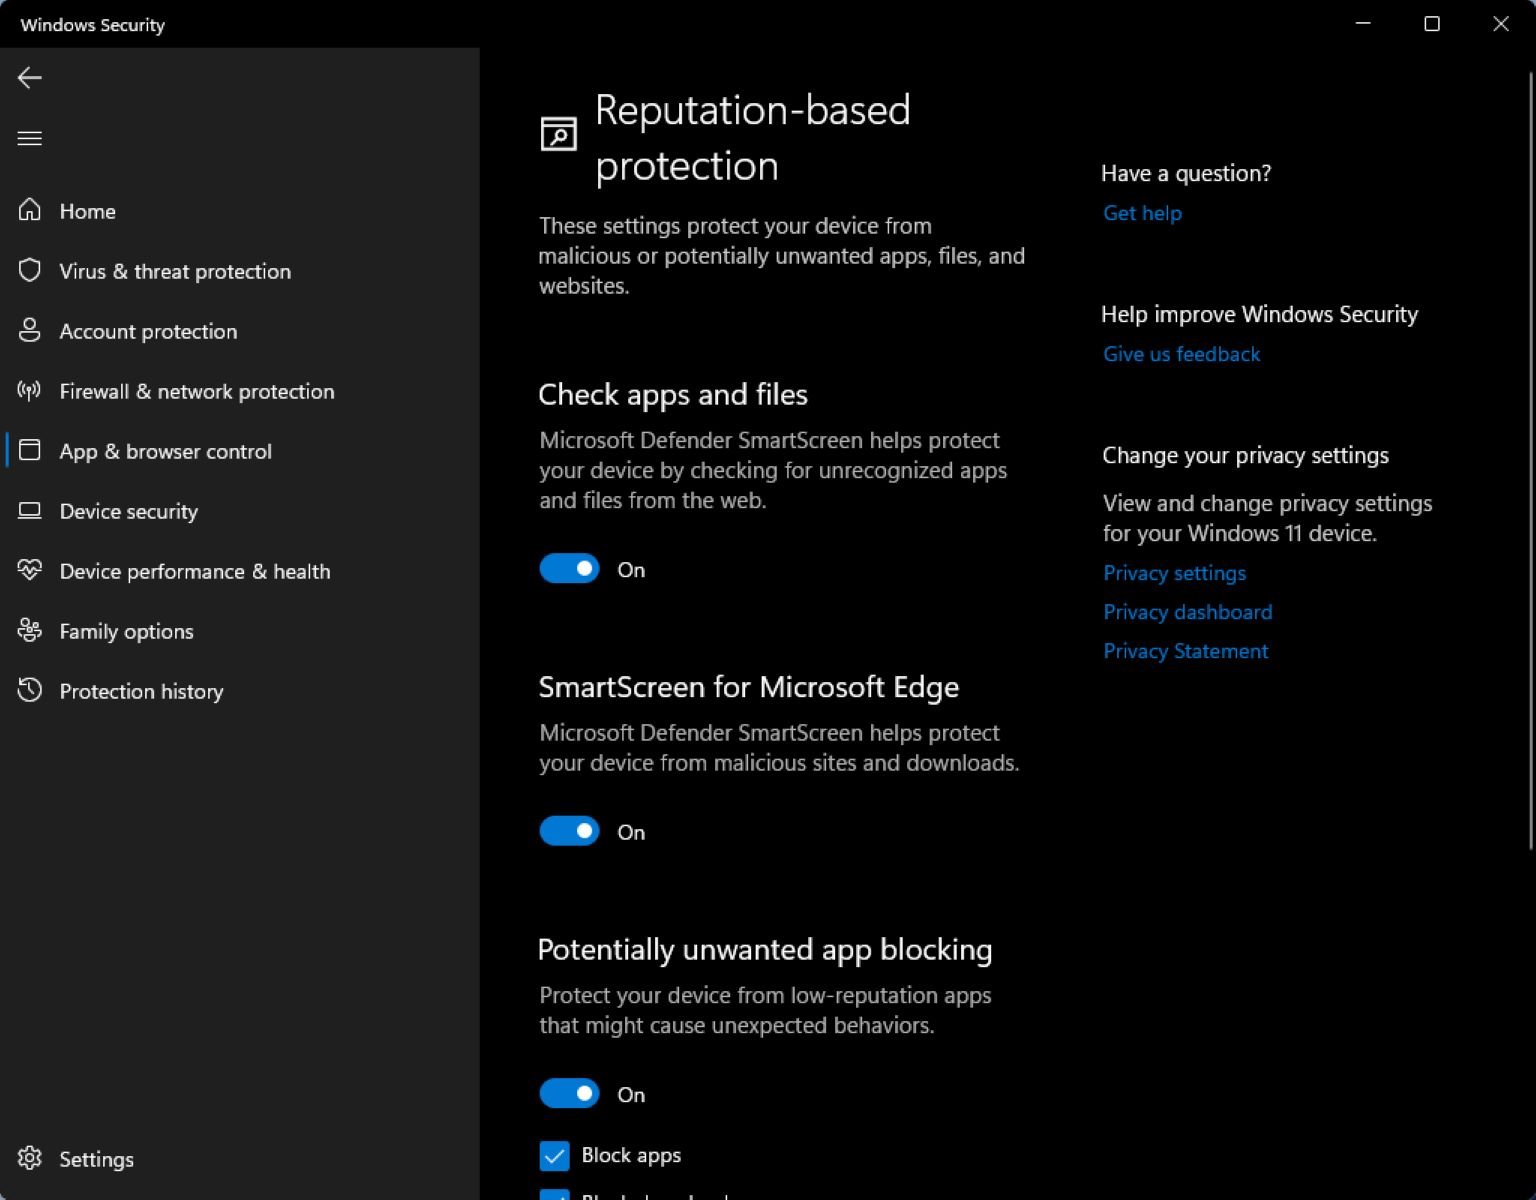
- Check Windows Defender status: In the Windows Security app, click on the “Virus & threat protection” tab in the sidebar. It will show you the current status of Windows Defender on your system.
- Enable Windows Defender: If Windows Defender is disabled, click on the “Virus & threat protection settings” link. On the next page, toggle the “Real-time protection” switch to the ON position. This will enable Windows Defender and activate its real-time scanning feature.
- Update Windows Defender: After enabling real-time protection, it is essential to ensure that Windows Defender has the latest virus definitions. Click on the “Check for updates” button on the same page to perform an update check. If any updates are available, Windows Defender will download and install them automatically.
- Scan your system: Once Windows Defender is enabled and up to date, it is a good practice to run a full system scan to check for any existing malware. Click on the “Quick scan” or “Full scan” option under the “Current threats” section to initiate the scan. Follow the on-screen instructions to complete the scanning process.
That’s it! You have successfully turned on Windows antivirus and ensured that Windows Defender is protecting your system. It is recommended to keep Windows Defender enabled at all times to keep your Windows computer secure.
Note: Some advanced users or organizations may have Windows Group Policy or Registry Editor restrictions that prevent them from enabling or modifying Windows Defender settings. In such cases, it is advisable to consult your system administrator or IT department for assistance.
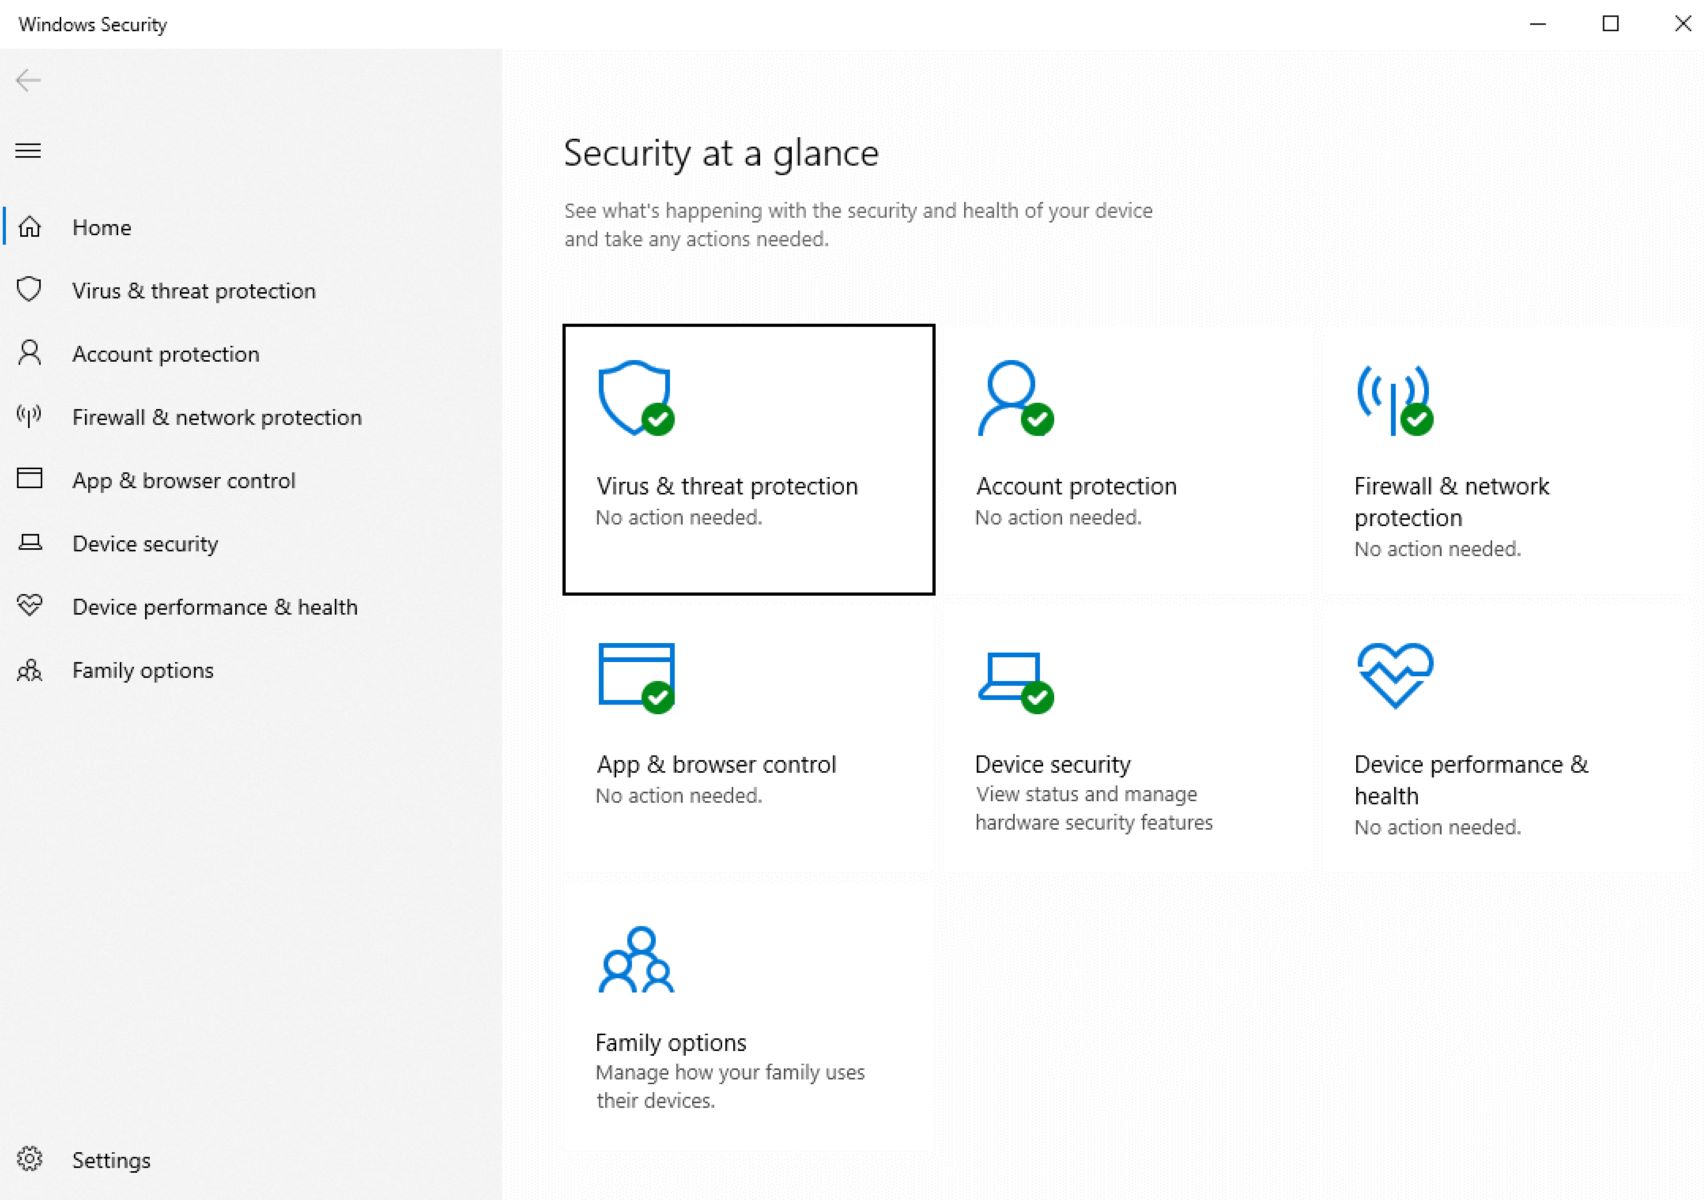
Checking if Windows Defender is enabled
Before proceeding with any actions related to Windows Defender, it is crucial to determine whether it is already enabled on your Windows system. Fortunately, checking the status of Windows Defender is a straightforward process. Here are the steps:
- Open Windows Security: Click on the Start button in the bottom-left corner of your screen, and type “Windows Security.” Select the Windows Security app from the search results.
- Check Windows Defender status: In the Windows Security app, click on the “Virus & threat protection” tab in the sidebar. It will display the current status of Windows Defender on your system.
- Review protection status: Under the “Virus & threat protection” section, you will find information about the current state of Windows Defender. If Windows Defender is enabled, it will show “Your device is being protected.”
- Additional information: Windows Security also provides additional details about the last scan, the current protection updates, and the next scheduled scan. You can review this information to ensure that Windows Defender is up to date and functioning correctly.
If, after following these steps, you find that Windows Defender is not enabled on your system, you should consider enabling it immediately to ensure the security of your Windows computer.
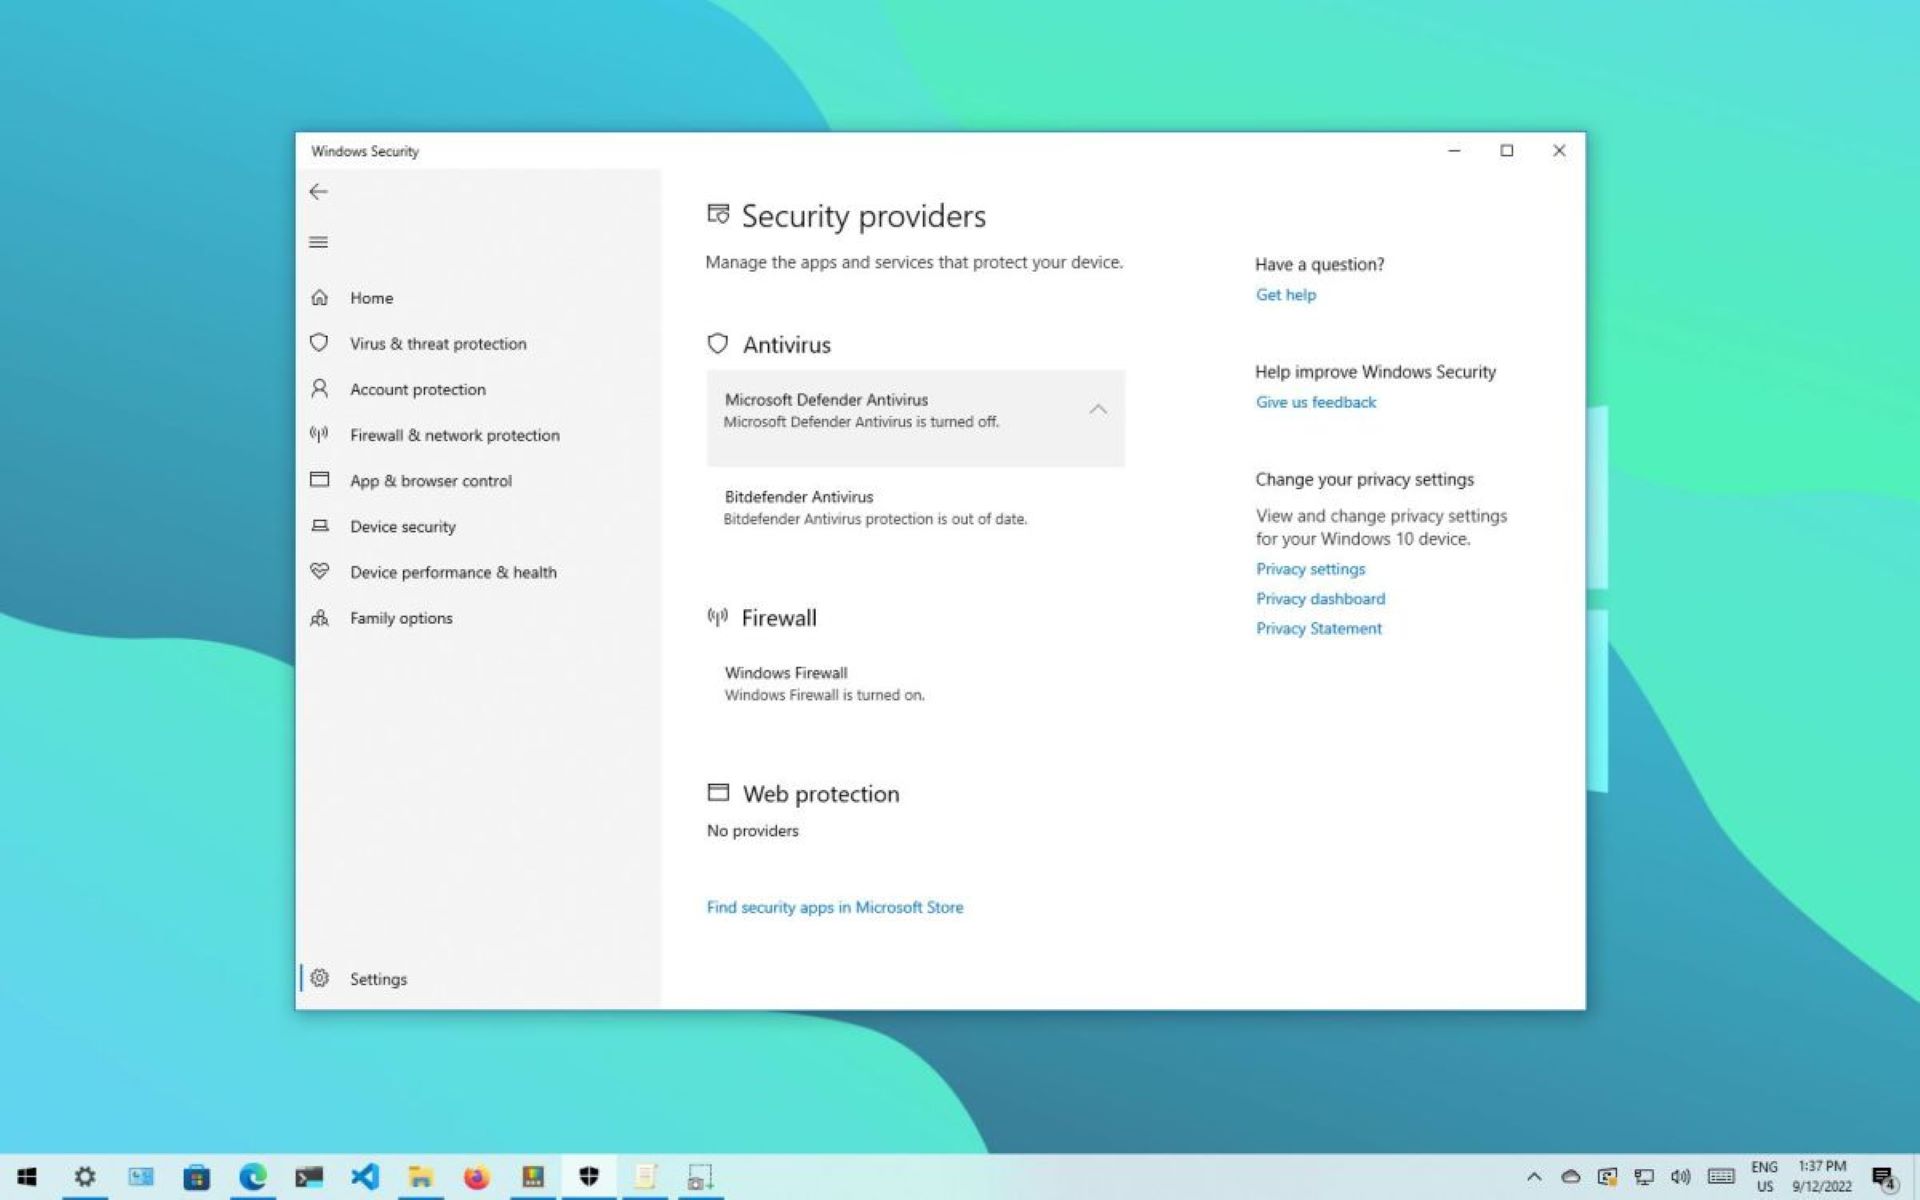
Note: In some cases, Windows Defender might be disabled due to other installed antivirus software conflicting with it. It is important to uninstall any third-party antivirus programs that you no longer need or switch off their real-time protection to avoid conflicts with Windows Defender.
By regularly checking the status of Windows Defender, you can ensure that your Windows system is protected against a wide range of threats. Remember to keep Windows Defender enabled and up to date for the best security experience.
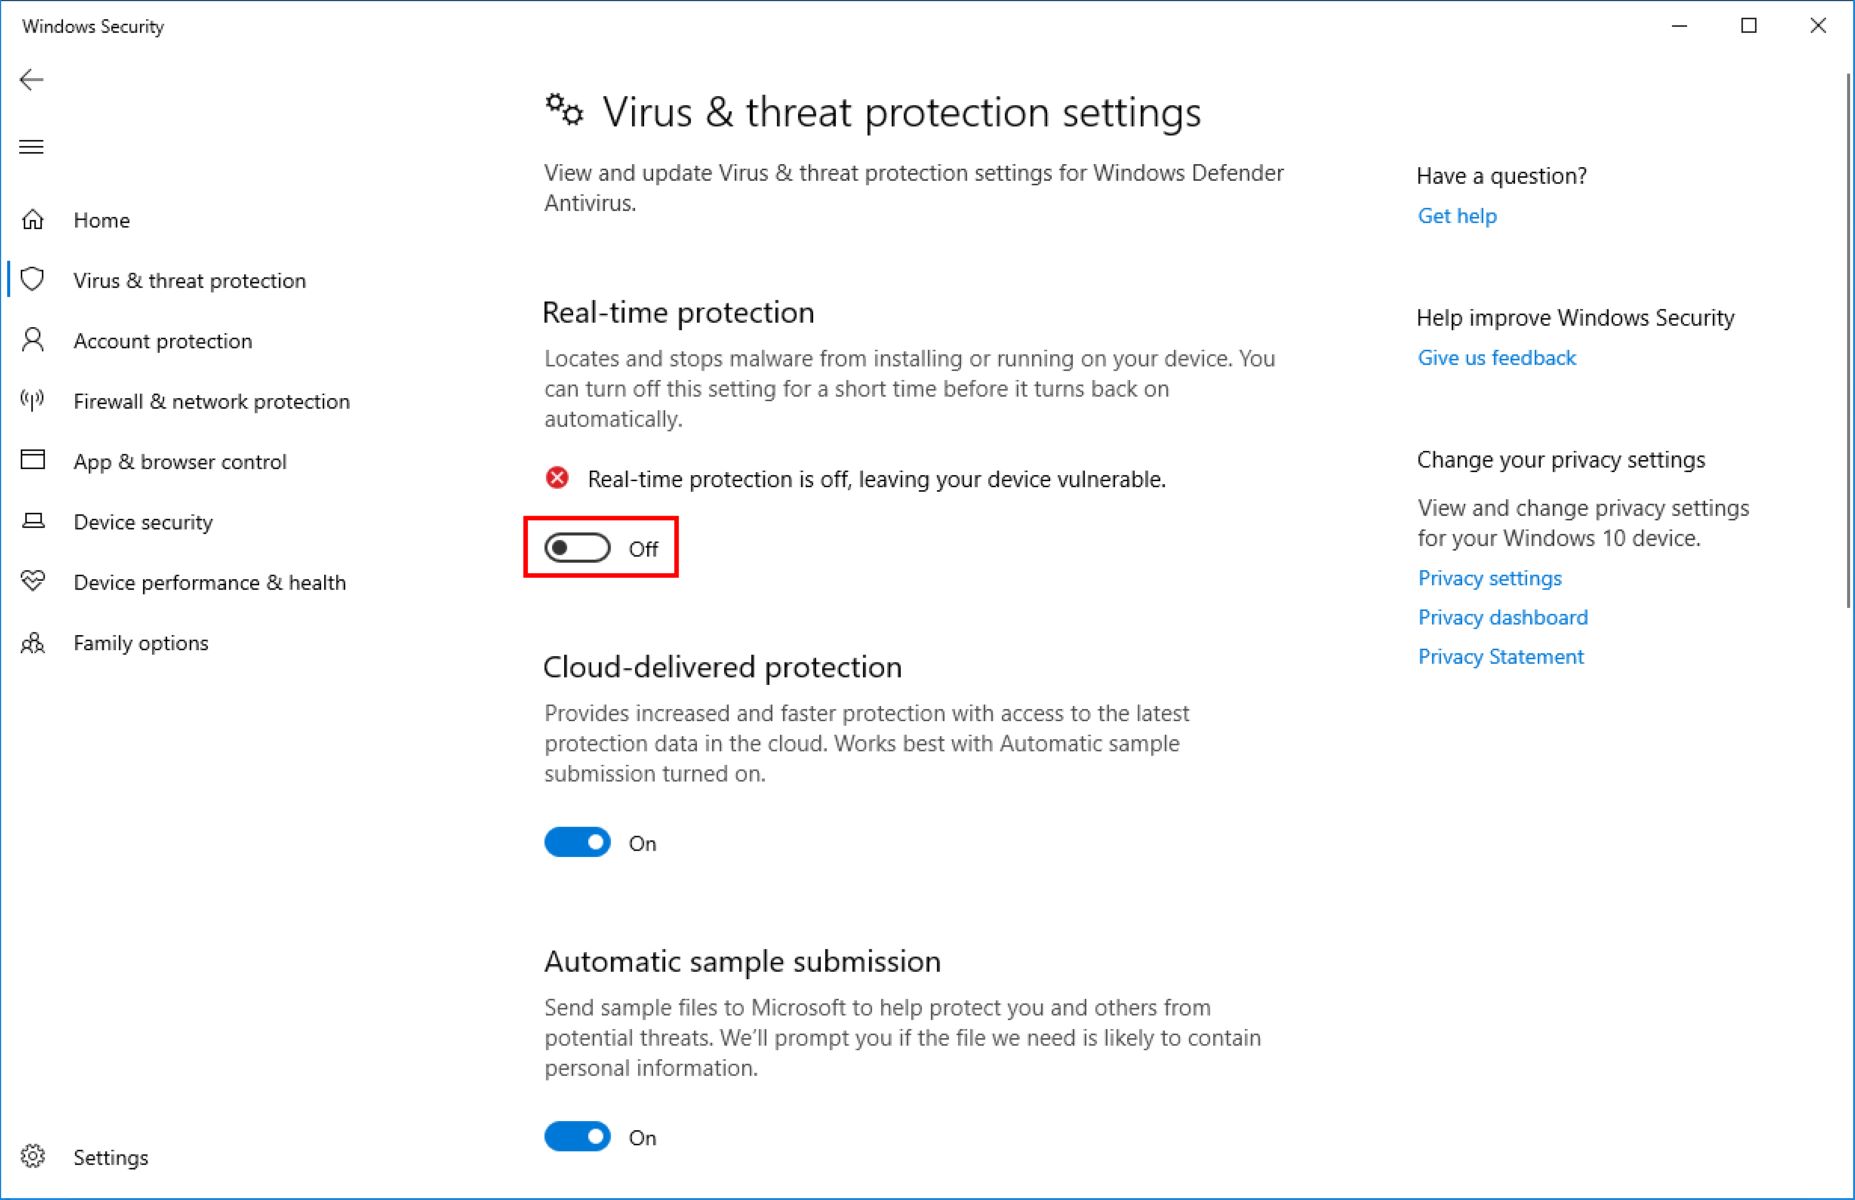
Enabling Windows Defender through Windows Security
If Windows Defender is currently disabled on your Windows system, you can easily enable it through the Windows Security app. Here are the steps to follow:
- Open Windows Security: Click on the Start button in the bottom-left corner of your screen, and type “Windows Security.” Select the Windows Security app from the search results.
- Access Virus & threat protection settings: In the Windows Security app, click on the “Virus & threat protection” tab in the sidebar. Under the “Virus & threat protection settings” section, click on the “Manage settings” link.
- Enable real-time protection: On the Virus & threat protection settings page, you will find a toggle switch labeled “Real-time protection.” Click on the switch to turn it ON. This action will enable real-time scanning and activate Windows Defender.
- Optional: Customize additional settings: If you wish to customize additional settings, such as cloud-delivered protection, automatic sample submission, or tamper protection, you can do so on this page. Simply toggle the respective switches to enable or disable these features according to your preferences.
Once you have enabled real-time protection and customized the settings (if desired), Windows Defender will be activated and begin protecting your computer against various threats.
It is worth mentioning that Windows Security also provides options to perform quick scans, full scans, and custom scans. These scan options allow you to manually scan specific files or folders or perform a comprehensive scan of your entire system.
By using the Windows Security app to enable Windows Defender, you can ensure that your Windows computer benefits from the built-in antivirus protection provided by Microsoft.
Keep in mind that some IT administrators or organizations may have imposed Group Policy or other restrictions that prevent users from enabling or modifying Windows Defender settings. If you encounter any issues or have questions about enabling Windows Defender, it is recommended to reach out to your system administrator or IT support team for assistance.
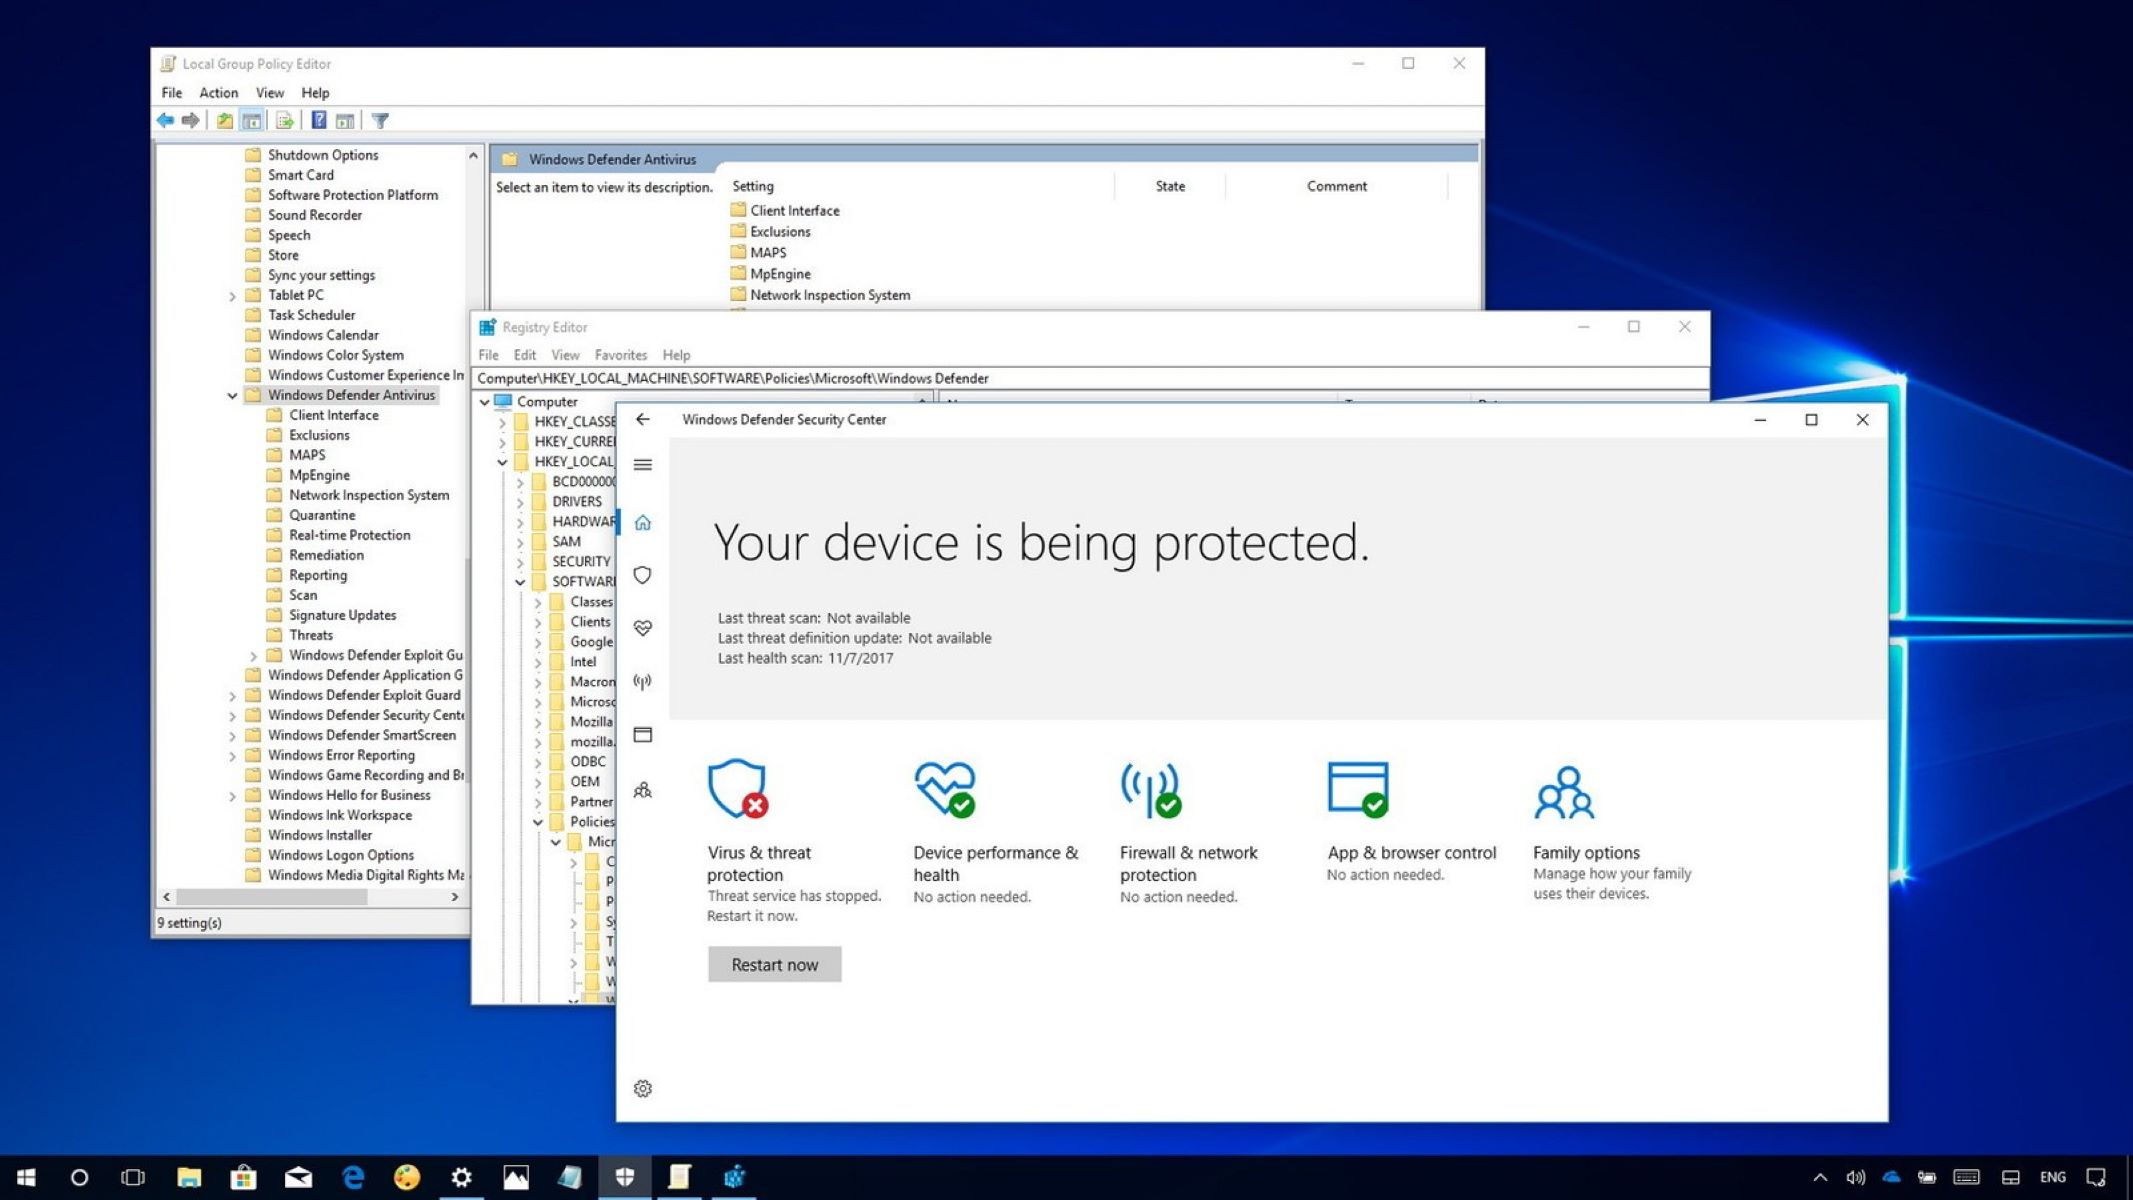
Enabling Windows Defender through Group Policy
If you have access to the Group Policy Editor on your Windows system, you can enable Windows Defender through this powerful administrative tool. Follow these steps to enable Windows Defender via Group Policy:
- Open the Group Policy Editor: Press the Windows key + R on your keyboard to open the Run dialog box. Type “gpedit.msc” and hit Enter. This will launch the Group Policy Editor.
- Navigate to Windows Defender policies: In the Group Policy Editor window, navigate to “Computer Configuration” > “Administrative Templates” > “Windows Components” > “Windows Defender Antivirus” on the left-hand side.
- Enable Windows Defender: In the right-hand pane, locate the policy option named “Turn off Windows Defender Antivirus” and double-click on it. In the policy settings window that appears, select the “Enabled” option to disable the policy. This action effectively enables Windows Defender.
- Apply the changes: Click on the “OK” button to save the changes. Note that it may take some time for the changes to take effect on your system.
Once you have completed these steps and enabled Windows Defender through the Group Policy Editor, the built-in antivirus software will be active on your Windows system. It will provide protection against various forms of malware and help keep your computer secure.
Please note that accessing the Group Policy Editor requires administrative privileges. If you are using a managed device or in an environment that restricts access to Group Policy settings, you may need to contact your system administrator for assistance or permission to make these changes.
It is important to regularly update Windows Defender to ensure that your system is protected against the latest threats. Enable automatic updates through Windows Security or manually check for updates to keep Windows Defender up to date.
By leveraging the power of Group Policy, you can efficiently enable Windows Defender on your Windows system, bolstering its security and safeguarding your data.
Enabling Windows Defender through Registry Editor
If you prefer to use the Registry Editor to enable Windows Defender on your Windows system, you can do so by following these steps:
- Open the Registry Editor: Press the Windows key + R on your keyboard to open the Run dialog box. Type “regedit” and hit Enter. This will open the Registry Editor.
- Navigate to the Windows Defender key: In the Registry Editor window, navigate to the following registry key:
HKEY_LOCAL_MACHINE\SOFTWARE\Policies\Microsoft\Windows Defender. If the “Windows Defender” key does not exist, you will need to create it. - Create or modify the registry value: Right-click on the “Windows Defender” key, select “New,” and then click “DWORD (32-bit) Value” to create a new registry value. Give it the name
DisableAntiSpyware. Double-click on the newly created value and set the value data to0to enable Windows Defender. - Apply the changes: Click on the “OK” button to save the changes you made to the registry. Close the Registry Editor.
After following these steps and making the necessary changes in the Registry Editor, Windows Defender will be enabled on your Windows system. It will actively protect your computer against malware and provide you with a secure computing experience.
Please exercise caution when making changes to the Windows Registry, as incorrect modifications can potentially cause system instability or other issues. It is always recommended to back up your registry or create a system restore point before making any changes.
Keep in mind that modifying the Windows Registry requires administrative privileges. If you are using a managed device or in an environment that restricts access to the Registry Editor, you may need to contact your system administrator for assistance or permission to make these changes.
Regularly updating Windows Defender is crucial to ensure that your system remains protected against the latest threats. Enable automatic updates through Windows Security or manually check for updates to keep Windows Defender up to date.
By utilizing the functionality of the Registry Editor, you can conveniently enable Windows Defender on your Windows system and enjoy the enhanced security it provides.
Troubleshooting common issues with enabling Windows antivirus
While enabling Windows antivirus, such as Windows Defender, is usually a straightforward process, you may encounter certain issues or errors. Here are some common problems and their possible solutions:
- Conflicting third-party antivirus software: If you have another antivirus program installed on your system, it may conflict with Windows Defender and prevent it from enabling. To resolve this issue, uninstall any third-party antivirus software or disable their real-time protection to give Windows Defender full control.
- Group Policy restrictions: In some cases, Group Policy settings applied to your system may prevent you from enabling Windows antivirus. To address this, consult your system administrator to modify the Group Policy settings or allocate the necessary privileges to enable Windows Defender.
- Registry errors or misconfigurations: Incorrect registry settings or misconfigurations can interfere with the proper functioning of Windows Defender. To resolve this, you can try restoring the default registry settings related to Windows Defender or perform a system scan with the built-in System File Checker tool (sfc /scannow) to repair any corrupted system files.
- Outdated Windows version: Windows Defender may not enable or function correctly if you are using an outdated version of Windows. Ensure that your system is up to date by installing the latest Windows updates and patches. This can resolve compatibility issues and enable Windows Defender to work optimally.
- Insufficient system resources: If your system has low available memory or processing power, Windows Defender may not be able to enable or run effectively. Ensure that your system meets the minimum hardware requirements, close unnecessary applications, and consider upgrading hardware if needed.
If you encounter any issues while attempting to enable Windows antivirus, it is advisable to consult Microsoft’s official documentation or their support resources for further assistance. They provide detailed troubleshooting steps, community forums, and dedicated support channels to help resolve any issues you may encounter.
Remember that the security of your Windows system is crucial, so it is important to address any issues with enabling Windows antivirus promptly. By troubleshooting and resolving these common issues, you can ensure that your system remains protected against emerging threats.