Introduction
Windows Defender is a built-in antivirus program that comes with Windows 10. It provides real-time protection against various types of malware, such as viruses, ransomware, and spyware. While Windows Defender offers solid protection for your computer, there may be instances where you need to disable it temporarily or permanently. This could be because you prefer to use a different antivirus program or because you want to troubleshoot compatibility issues.
In this article, we will explore different methods to disable Windows Defender on Windows 10. Whether you want to disable it temporarily or permanently, we have you covered. Please note that disabling Windows Defender means you are potentially leaving your computer more vulnerable to malware. Therefore, it is crucial to have an alternative antivirus program installed and running on your system before disabling Windows Defender.
Keep in mind that the step-by-step instructions in this article are specific to Windows 10. The methods may vary slightly for different versions of Windows. It is also important to ensure that you have administrative privileges on your computer to make changes to Windows Defender settings.
Please note that disabling Windows Defender is not recommended unless you have a valid reason and have an alternative antivirus solution in place. Windows Defender is a reliable and effective antivirus program that continuously receives updates to protect against the latest threats. If you decide to disable it, do so at your own risk and take necessary precautions to protect your computer with another antivirus program.
In the following sections, we will explain various methods to disable Windows Defender temporarily or permanently, depending on your needs and preferences.
Method 1: Disabling Windows Defender temporarily
If you only need to disable Windows Defender temporarily, perhaps for running a specific application or troubleshooting purposes, you can follow these steps:
- Open the Windows Security app by clicking on the Windows Start menu and selecting the Settings gear icon. In the Settings window, click on “Update & Security” and then choose “Windows Security” from the left-hand sidebar.
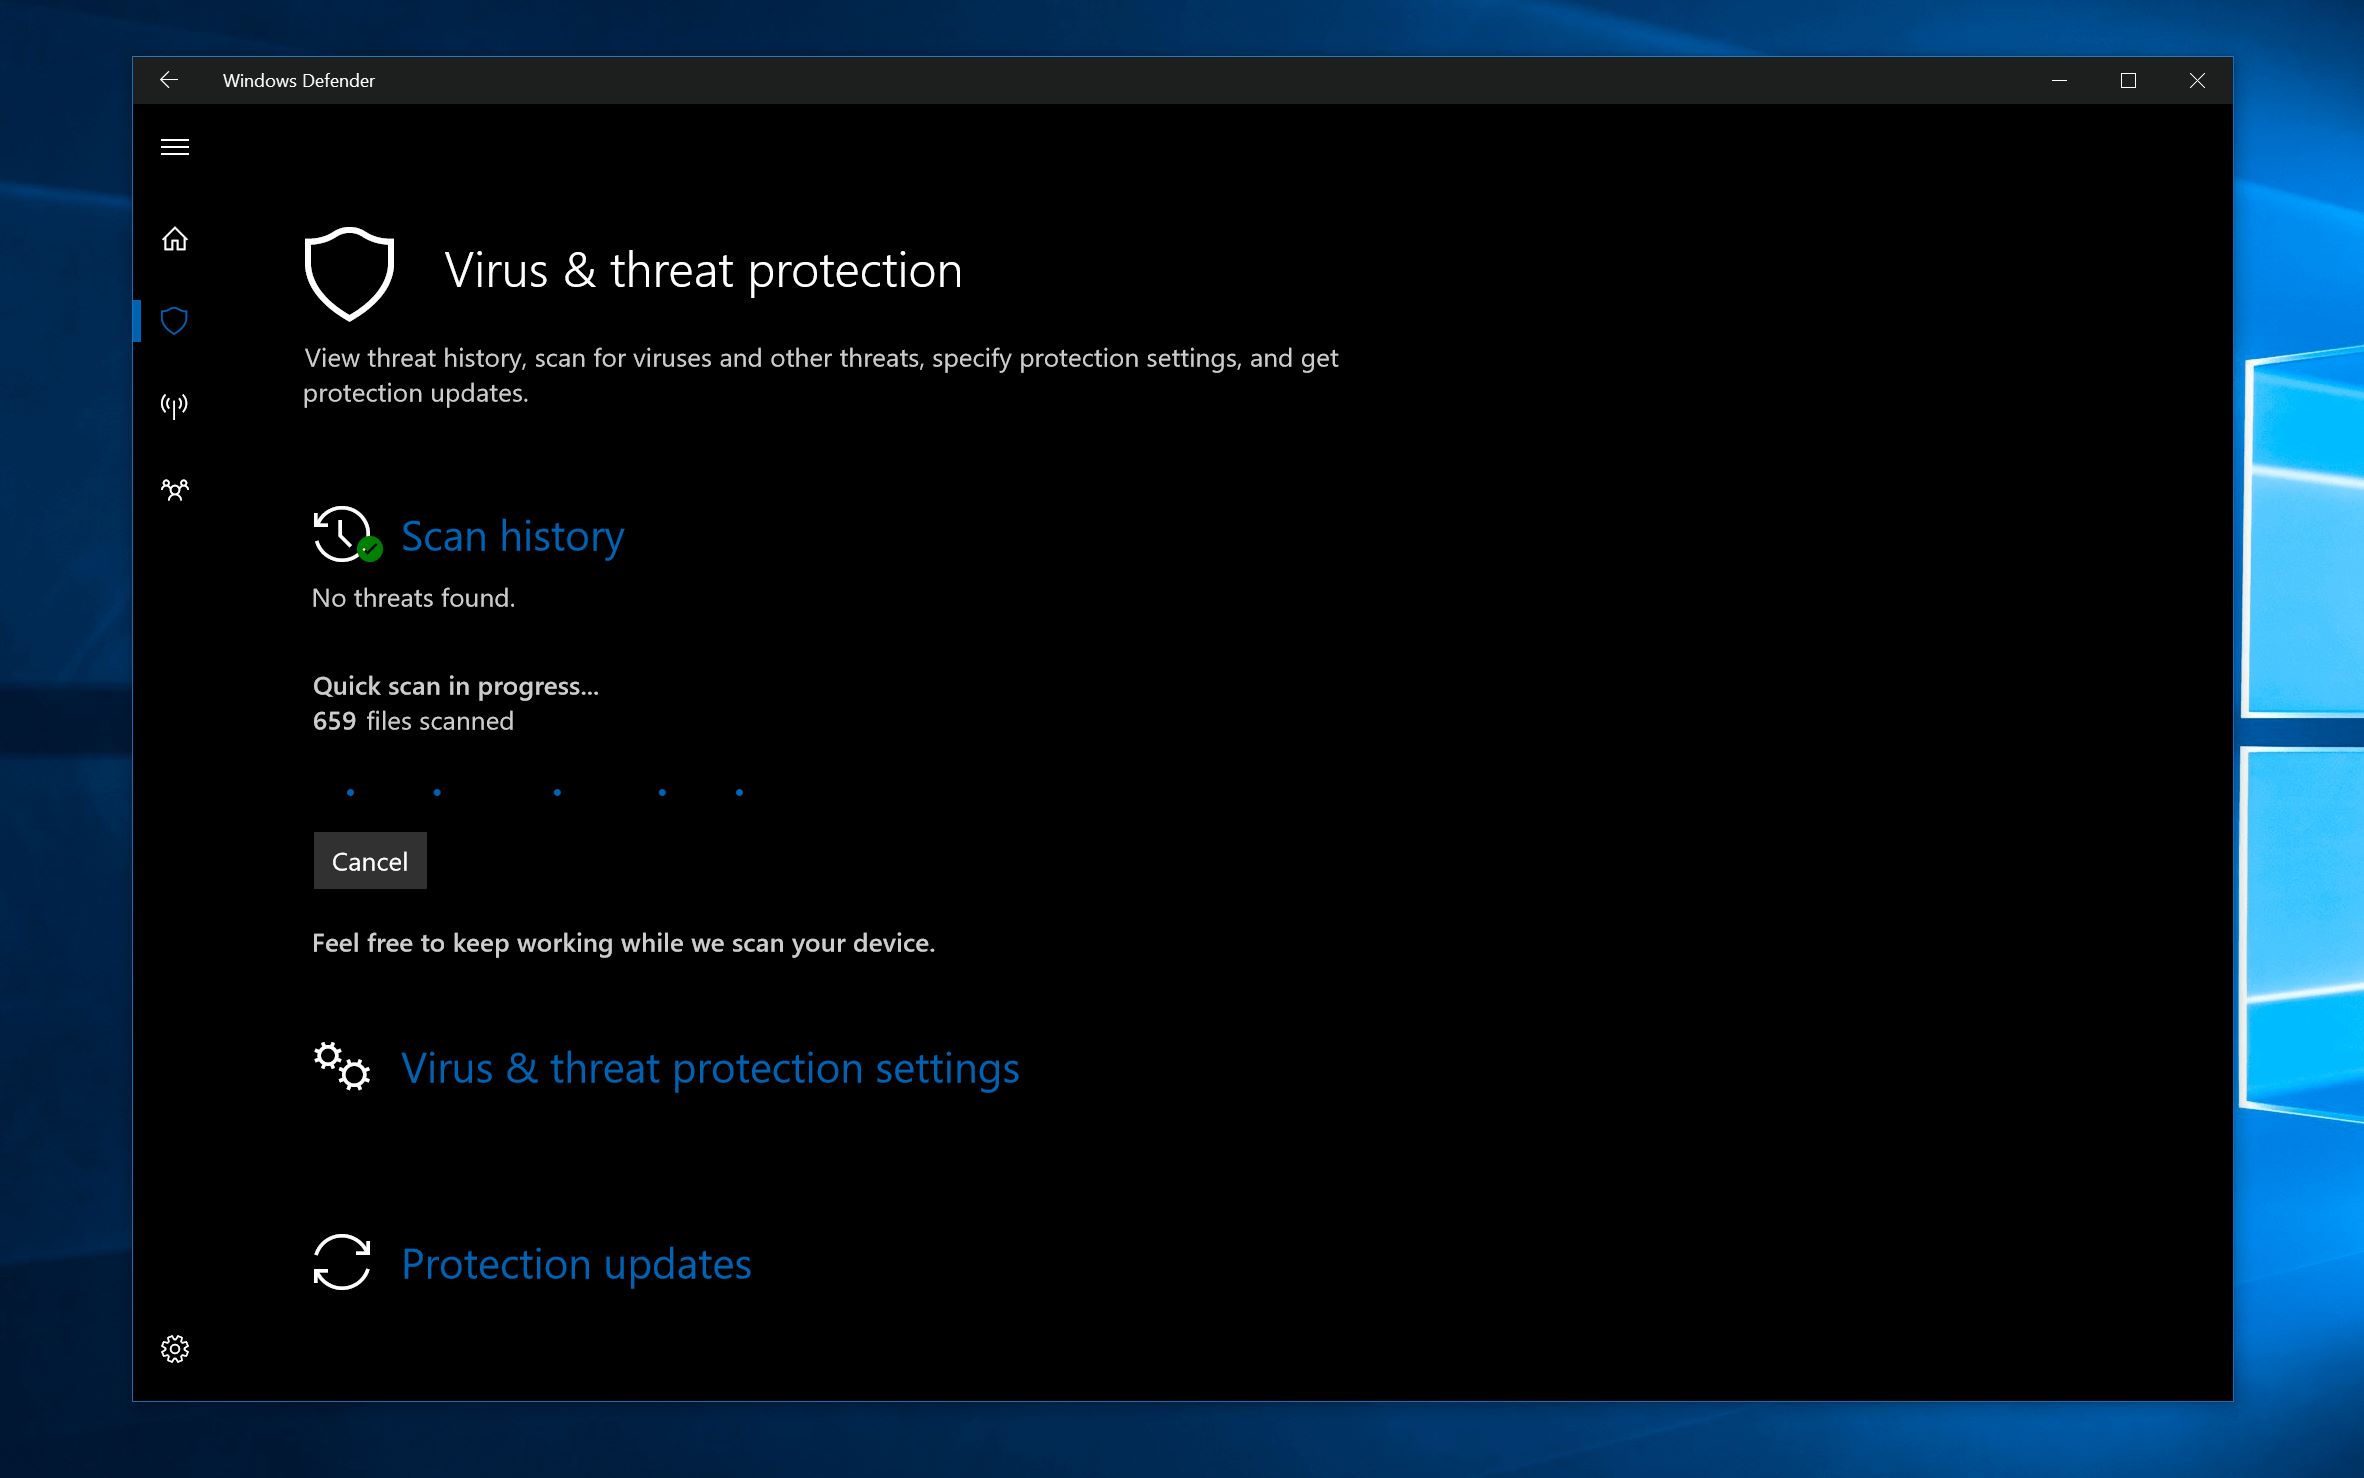
- In the Windows Security window, click on “Virus & threat protection” in the left-hand sidebar.
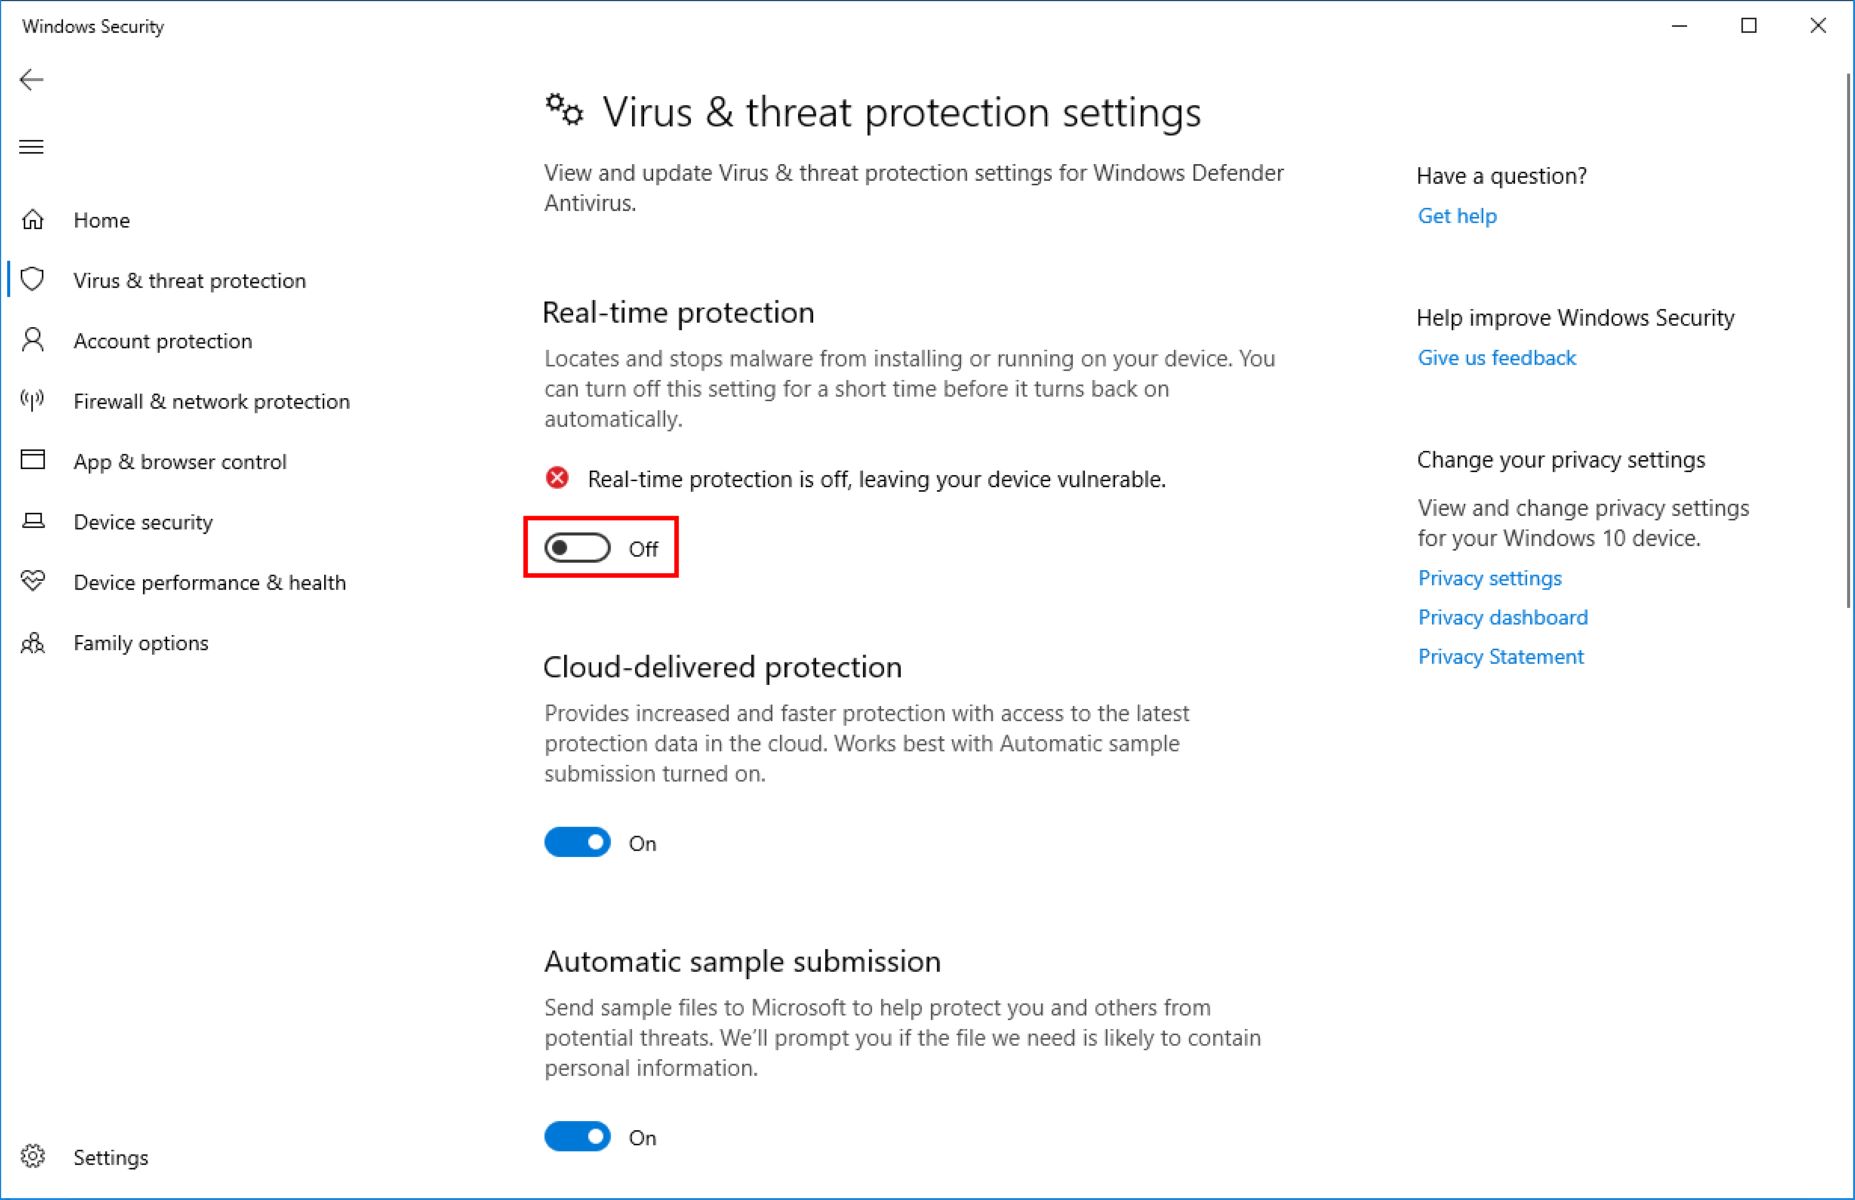
- Under the “Virus & threat protection settings” section, click on “Manage settings”.
- In the “Real-time protection” section, toggle the switch to the Off position. This will temporarily disable Windows Defender.
Once Windows Defender is disabled, you can proceed with the task that required its temporary deactivation. It is crucial to note that Windows Defender will automatically turn back on after a certain period of inactivity or when you restart your computer. If you want to permanently disable Windows Defender, you may need to follow one of the methods outlined in the subsequent sections.
Disabling Windows Defender temporarily can be useful for troubleshooting purposes or running specific applications that may conflict with the antivirus program. However, it is important to keep your computer protected from malware and viruses, so make sure to enable Windows Defender again once you have completed the required task.
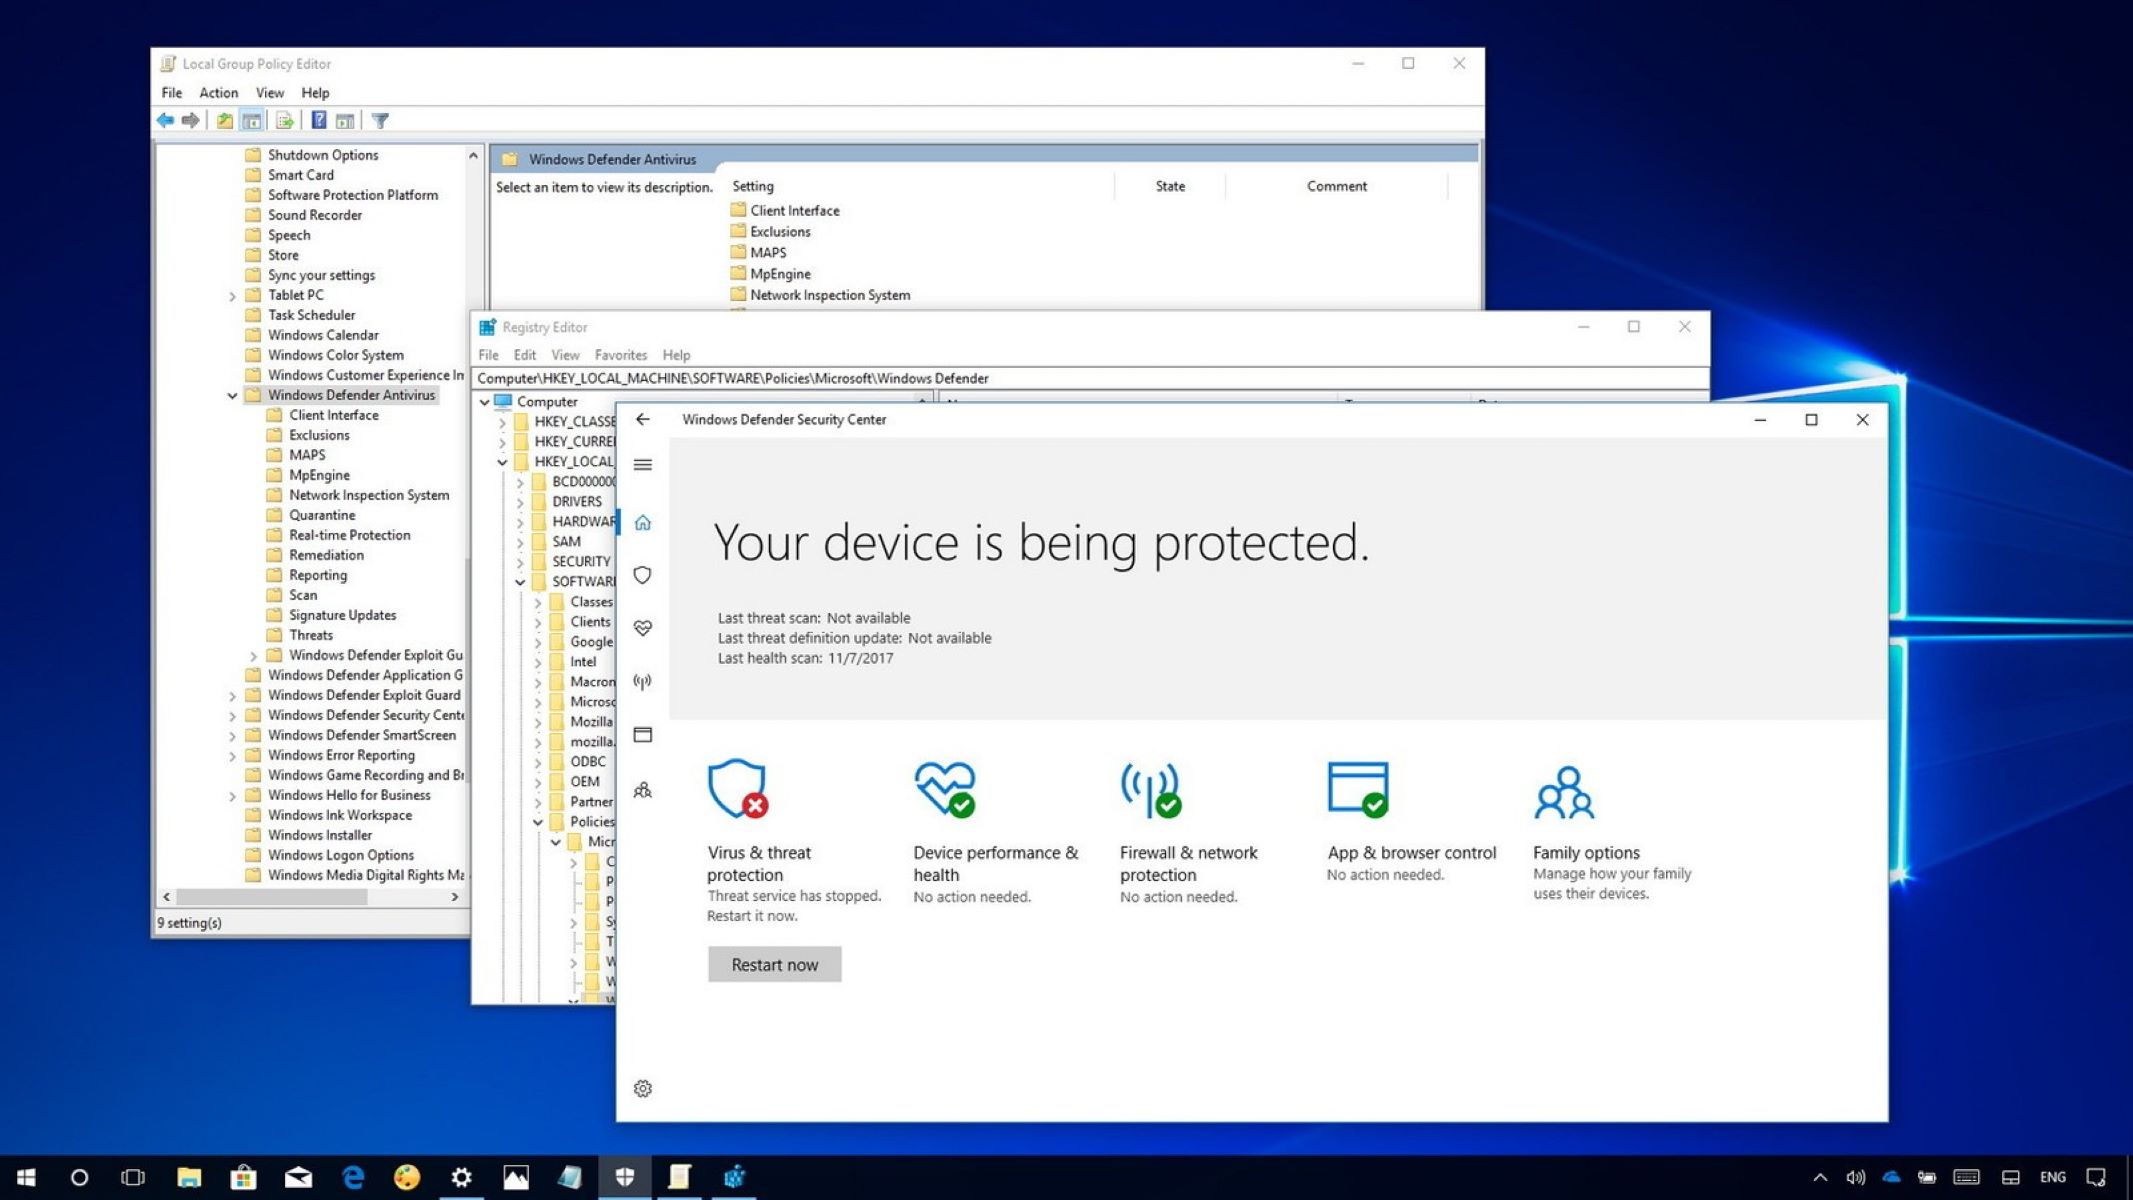
Method 2: Using Group Policy Editor to disable Windows Defender
If you want to permanently disable Windows Defender on your Windows 10 system, you can utilize the Group Policy Editor to achieve this. Please note that this method requires administrative access. Follow these steps:
- Press the Windows Key + R on your keyboard to open the Run dialog box.
- Type “gpedit.msc” in the Run dialog box and press Enter. This will open the Group Policy Editor.
- In the Group Policy Editor window, navigate to the following location: Computer Configuration -> Administrative Templates -> Windows Components -> Windows Defender Antivirus.
- Double-click on the “Turn off Windows Defender Antivirus” policy setting to open its properties.
- Set the policy to “Enabled” to disable Windows Defender. If you later want to enable Windows Defender, you can change the policy to “Not Configured” or “Disabled”.
- Click on “Apply” and then “OK” to save the changes.
After applying this setting, Windows Defender will be disabled permanently on your system. However, keep in mind that this method only works on Windows 10 Pro, Enterprise, and Education editions, as the Group Policy Editor is not available on Windows 10 Home.
Using the Group Policy Editor provides a straightforward way to disable Windows Defender permanently. This method is especially useful if you have multiple computers within a network and want to ensure that Windows Defender is disabled uniformly across all devices.
Remember that disabling Windows Defender permanently leaves your computer more susceptible to malware and other security threats. It is crucial to have a reliable alternative antivirus program installed and regularly updated to protect your system from potential threats.
Method 3: Disabling Windows Defender through the Registry Editor
Another method to permanently disable Windows Defender on your Windows 10 system is by making changes in the Registry Editor. However, be cautious when modifying the registry as any incorrect changes can cause system instability. Follow these steps to disable Windows Defender through the Registry Editor:
- Press the Windows Key + R on your keyboard to open the Run dialog box.
- Type “regedit” in the Run dialog box and press Enter. This will open the Registry Editor.
- Navigate to the following registry key: HKEY_LOCAL_MACHINE\SOFTWARE\Policies\Microsoft\Windows Defender.
- If the “Windows Defender” key does not exist, you will need to create it. Right-click on the “Microsoft” key, select New, and then Key. Name the new key as “Windows Defender”.
- Inside the “Windows Defender” key, right-click on an empty space in the right-hand pane, select New, and then DWORD (32-bit) Value. Name the new DWORD value as “DisableAntiSpyware”.
- Double-click on the “DisableAntiSpyware” value and set its data to “1” to disable Windows Defender. If you later want to enable Windows Defender, set the value data to “0”.
- Click on “OK” to save the changes.
After making these changes in the Registry Editor, Windows Defender will be disabled permanently on your system. It is important to note that modifying the registry carries some risks, so it is recommended to create a backup of your registry before proceeding.
This method is applicable to all editions of Windows 10, including Home, Pro, Enterprise, and Education. However, exercise caution when working with the registry editor and ensuring that you make the correct changes to the specified registry keys.
Remember to have a reliable alternative antivirus program installed and regularly updated to ensure the security and protection of your system.
Method 4: Using Windows PowerShell to turn off Windows Defender
If you prefer using command-line tools, you can disable Windows Defender on your Windows 10 system using Windows PowerShell. Follow these steps:
- Open the Start menu, search for “Windows PowerShell,” right-click on the top result, and select “Run as administrator.”
- In the Windows PowerShell window, type the following command and press Enter:
Set-MpPreference -DisableRealtimeMonitoring $true
This PowerShell command will disable real-time monitoring of Windows Defender, effectively turning it off. However, keep in mind that it is important to have another antivirus solution installed to ensure the ongoing security of your system.
To enable Windows Defender again, follow the same steps as above, but use the following command in Step 2: Set-MpPreference -DisableRealtimeMonitoring $false
Using Windows PowerShell provides a quick and efficient way to disable Windows Defender without the need for navigating through multiple settings or using third-party tools.
Please note that administrative privileges are required to run Windows PowerShell as an administrator. Ensure that you have the necessary permissions before making changes using PowerShell.
Remember that disabling Windows Defender means potentially leaving your computer more vulnerable to malware and other security threats. Make sure that you have a reliable and up-to-date alternative antivirus program installed to protect your system.
Method 5: Disabling Windows Defender from the Security Center
If you prefer a graphical interface to manage Windows Defender, you can disable it directly from the Windows Security Center. Follow these steps:
- Open the Windows Security app by clicking on the Windows Start menu and selecting the Settings gear icon. In the Settings window, click on “Update & Security” and then choose “Windows Security” from the left-hand sidebar.
- In the Windows Security window, click on “Virus & threat protection” in the left-hand sidebar.
- Under the “Virus & threat protection settings” section, click on “Manage settings”.
- Scroll down to the “Real-time protection” section and click on the toggle switch to turn it off. This will disable Windows Defender on your system.
Disabling Windows Defender through the Security Center provides a user-friendly interface to manage the antivirus program. However, keep in mind that it is important to have another antivirus solution installed and regularly updated to ensure the ongoing security and protection of your system.
To enable Windows Defender again, simply follow the same steps, but toggle the switch in Step 4 to turn on real-time protection.
This method is suitable for all editions of Windows 10, including Home, Pro, Enterprise, and Education. It offers a simple and straightforward way to disable and enable Windows Defender without the need for complicated settings or command-line tools.
Remember that disabling Windows Defender means potentially leaving your computer more vulnerable to malware and other security threats. Make sure to have another reliable antivirus program installed before disabling Windows Defender.
Method 6: Using a third-party antivirus program to disable Windows Defender
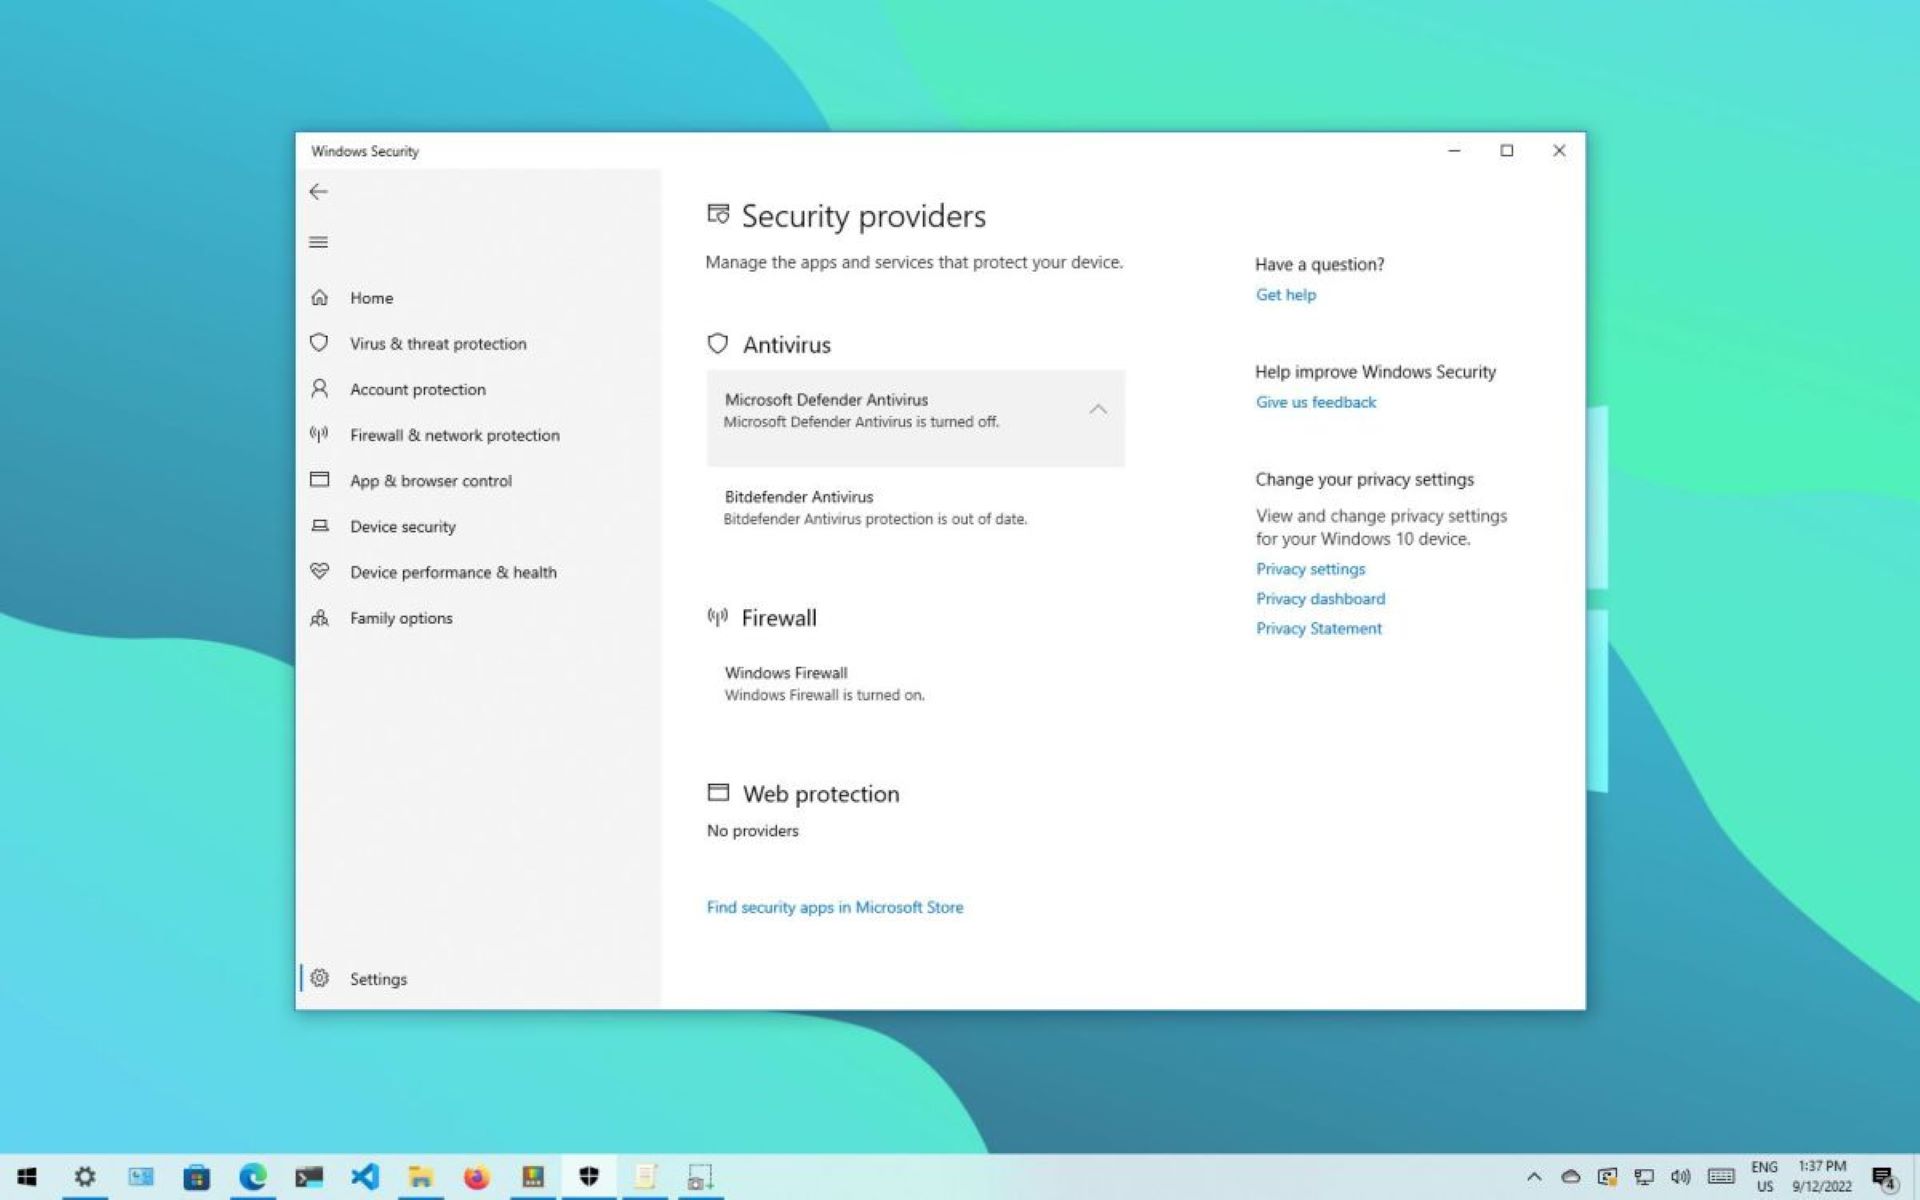
If you prefer to use a different antivirus program for your Windows 10 system, you can install and enable that program, which will automatically disable Windows Defender. Most third-party antivirus programs have built-in features that turn off Windows Defender to prevent conflicts and ensure proper functionality. Follow these steps:
- Choose a reputable third-party antivirus program that you want to install on your Windows 10 system. There are many options available, such as Norton, McAfee, Avast, or Bitdefender.
- Visit the official website of the antivirus program you have chosen and download the installer.
- Run the installer and follow the on-screen instructions to install the antivirus program on your computer.
- During the installation process, the third-party antivirus program will usually prompt you to disable Windows Defender. Choose the option to disable it when prompted.
- Once the installation is complete, ensure that your third-party antivirus program is up-to-date, and perform a full system scan to ensure that your computer is protected.
Using a third-party antivirus program not only disables Windows Defender, but it also provides an additional layer of protection to safeguard your system against malware and other security threats. However, it is important to choose a reputable and reliable antivirus program and keep it updated to ensure the ongoing security of your computer.
Keep in mind that if you decide to switch back to using Windows Defender in the future, you may need to uninstall the third-party antivirus program first, as having multiple antivirus programs active simultaneously can cause conflicts and performance issues.
This method is suitable for all editions of Windows 10, including Home, Pro, Enterprise, and Education.
Remember to regularly update and maintain your chosen third-party antivirus program to ensure optimal protection for your computer.
Conclusion
Disabling Windows Defender on your Windows 10 system can be done temporarily or permanently, depending on your needs and preferences. While it is recommended to keep Windows Defender enabled for its robust real-time protection against malware and other security threats, there may be valid reasons to disable it, such as using a different antivirus program or troubleshooting compatibility issues.
In this article, we have explored several methods to disable Windows Defender. You can temporarily disable it through the Windows Security app or permanently disable it through various methods such as using the Group Policy Editor, Registry Editor, Windows PowerShell, or a third-party antivirus program.
It is important to note that disabling Windows Defender leaves your computer more vulnerable to malware and other security threats. Therefore, it is crucial to have a reliable alternative antivirus program installed and regularly updated to ensure the ongoing protection of your system.
Please remember that if you decide to disable Windows Defender permanently, you should take the necessary precautions to safeguard your computer with another robust antivirus solution.
Keep in mind that the step-by-step instructions provided in this article are specific to Windows 10 and may vary slightly for different versions of Windows. Also, ensure that you have administrative privileges on your computer before making changes to Windows Defender settings.
Ultimately, the choice to disable Windows Defender is a personal one. Weigh the advantages and disadvantages, consider your specific needs, and make an informed decision to protect your computer while ensuring optimal performance.