Introduction
Setting up your Gmail account on your Android tablet is a simple and essential step in optimizing your email experience. With Gmail’s powerful features and user-friendly interface, you can easily stay connected and organized on-the-go.
In this guide, we will walk you through the step-by-step process of setting up Gmail on your Android tablet. Whether you are a tech-savvy user or a beginner, you will find these instructions easy to follow and implement.
Gmail is a free email service provided by Google. It offers a wide range of features, including a generous storage capacity, efficient spam filtering, and seamless integration with other Google services like Google Drive and Google Calendar. By setting up Gmail on your Android tablet, you can enjoy all these benefits and make the most of your email communication.
With the Gmail app installed on your Android tablet, you can access your emails anytime, anywhere. Whether you are on a business trip, out with friends, or relaxing at home, you can stay connected to your personal and professional contacts effortlessly.
Not only does Gmail on Android provide a user-friendly experience, but it also offers robust security features to protect your emails and sensitive information. From two-step verification to encrypted connections, Gmail ensures that your data remains safe and secure.
So, let’s get started with the step-by-step guide to setting up Gmail on your Android tablet. By following these instructions, you will be able to access your Gmail account with ease and enjoy all the features and convenience that Gmail has to offer.
Step 1: Accessing the Settings
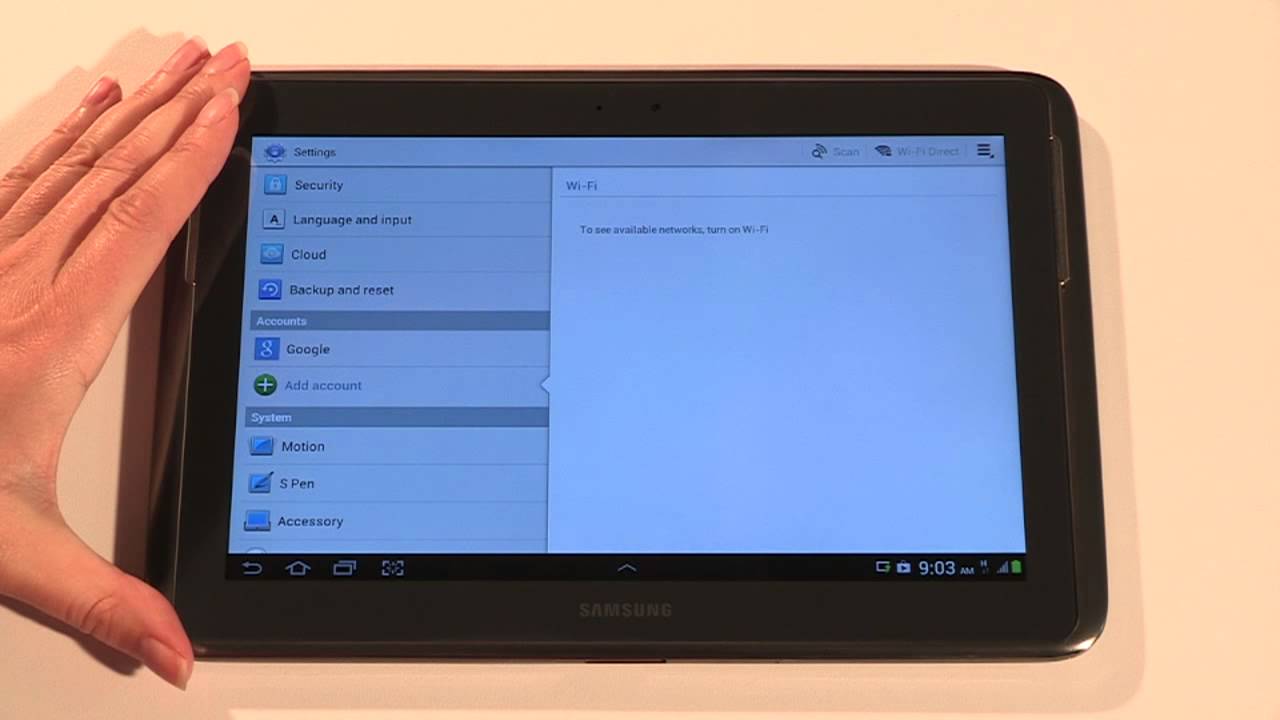
The first step to setting up Gmail on your Android tablet is to access the device settings. The settings menu allows you to customize various aspects of your tablet, including email accounts.
Here’s how you can access the settings on your Android tablet:
- Unlock your Android tablet by entering your PIN, password, or using the fingerprint scanner if available.
- Locate the “Settings” app on your home screen or in the app drawer. It is usually represented by a gear icon.
- Tap on the “Settings” app to open it.
- Scroll through the list of options and locate the “Accounts” or “Accounts and Sync” option. This may vary slightly depending on the version of Android you have.
- Tap on “Accounts” to access the account settings.
Once you have successfully accessed the settings, you are now ready to move on to the next step of adding a new email account.
It’s important to note that the layout and organization of settings may differ slightly across different Android devices and versions. If you are unable to find the exact options mentioned above, try looking for similar options or refer to the user manual specific to your device.
Now that you have accessed the settings menu, you are one step closer to setting up your Gmail account on your Android tablet. Let’s proceed to the next step and add a new email account.
Step 2: Adding a New Email Account
Now that you have accessed the account settings on your Android tablet, it’s time to add a new email account, specifically your Gmail account.
Follow these simple steps to add a new email account:
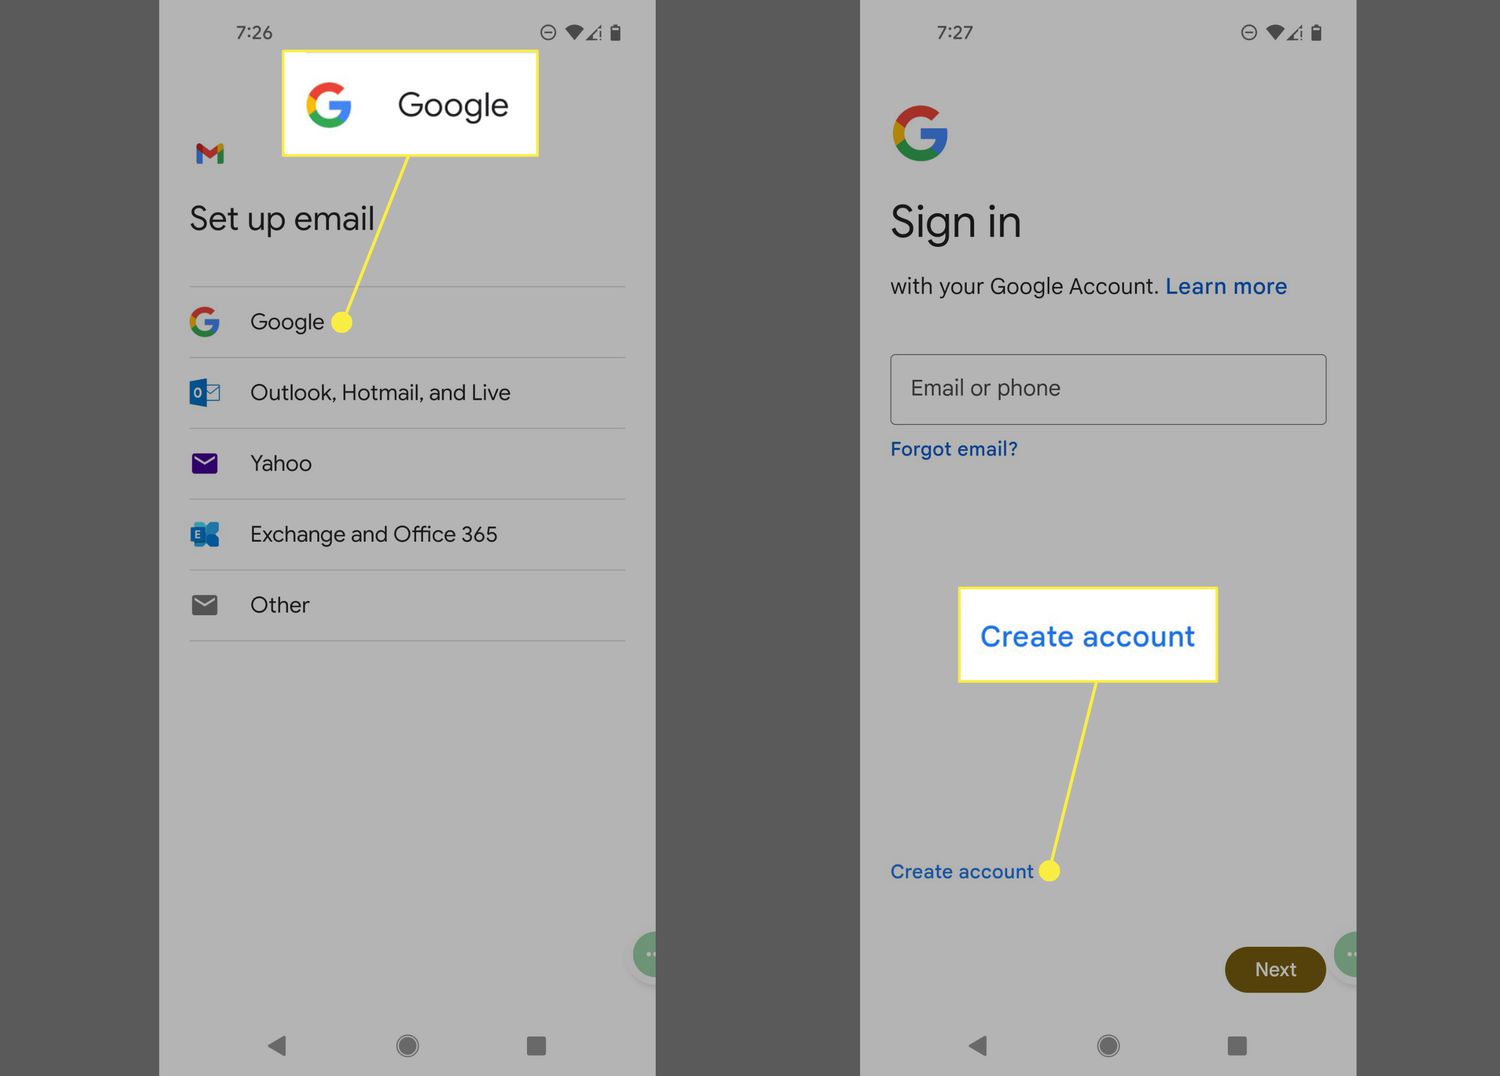
- In the account settings menu, tap on the “Add Account” option. This will open a list of available email providers.
- Look for the “Google” or “Gmail” option in the list and tap on it. This will prompt you to enter your Gmail account details.
- On the next screen, enter your Gmail email address in the provided field. Make sure to type it correctly to avoid any issues.
- Tap on the “Next” button to proceed.
- Now, enter your Gmail account password in the specified field. Take care to enter the correct password to ensure successful setup.
- Tap on the “Next” button to continue.
Once you have entered the correct email address and password, your Android tablet will attempt to verify the Gmail account details. This process may take a few seconds, so be patient.
If the verification is successful, you will be taken to the next screen, where you can customize the account settings for your Gmail account. Here, you can choose the sync settings, language preferences, and more.
After customizing the account settings according to your preferences, tap on the “Next” button to proceed. Your Gmail account will now be added to your Android tablet.
Congratulations! You have successfully added your Gmail account to your Android tablet. Now, you can easily access and manage your emails using the Gmail app on your device.
It’s important to note that if the email address or password you entered is incorrect, the setup process will not be successful. Double-check your details to ensure accuracy. If you encounter any issues, make sure to troubleshoot or seek assistance to complete the setup successfully.
Now that you have added your Gmail account, let’s move on to the next step and learn how to adjust account settings for a seamless email experience on your Android tablet.
Step 3: Selecting Gmail as the Email Provider
After adding a new email account in the previous step, it’s time to select Gmail as the email provider for your Android tablet. By choosing Gmail, you ensure that all your emails will be synced seamlessly and you can enjoy the full range of features and benefits offered by Gmail.
Follow these instructions to select Gmail as your email provider:
- In the account settings menu, locate your newly added Gmail account. It should be listed under the “Accounts” section.
- Tap on your Gmail account to access the account settings.
- Scroll down the account settings page and look for the option “Select Email Provider” or “Choose Email Provider”. Tap on it to proceed.
- A list of available email providers will be displayed. Look for “Gmail” in the list.
- Tap on “Gmail” to select it as your email provider.
Once you have selected Gmail as your email provider, your Android tablet will automatically synchronize your Gmail account and update your inbox with new emails and other changes.
By choosing Gmail as your email provider, you can take advantage of various Gmail-specific features, including labels, filters, and powerful search capabilities. You can also benefit from the enhanced security measures implemented by Gmail to protect your emails and personal information.
It’s worth mentioning that if you already have a Gmail account associated with your Android tablet, you may not need to go through the process of selecting Gmail as the email provider. In such cases, your Gmail account will automatically be recognized by the system, and you can proceed to adjust account settings and start using Gmail without any additional steps.
Now that you have selected Gmail as your email provider, let’s move on to the next step and learn how to enter your Gmail account information to complete the setup process.
Step 4: Entering Your Gmail Account Information
In this step, you will need to enter your Gmail account information to complete the setup process on your Android tablet. By providing the correct account details, you will be able to access your emails, contacts, and other Gmail features seamlessly.
Follow these simple steps to enter your Gmail account information:
- In the account settings menu, locate your newly added Gmail account. It should be listed under the “Accounts” section.
- Tap on your Gmail account to access the account settings.
- Scroll down and look for the “Account Information” or “Account Details” section. Tap on it to proceed.
- On the account information page, you will see fields for “Email” and “Password”. Make sure the email address field displays your Gmail email address correctly.
- If you need to change the email address, tap on the field and enter the correct Gmail email address.
- In the password field, enter your Gmail account password accurately. Take care to enter the correct password to ensure successful authentication.
- After entering your Gmail account information correctly, tap on the “Next” or “Continue” button to proceed.
Your Android tablet will then attempt to authenticate your Gmail account information. If the entered details are correct, your Gmail account will be successfully authenticated, and you will have access to your emails and other Gmail features on your device.
It’s important to note that if you enter incorrect account information, the authentication process will fail. Make sure to double-check your email address and password before proceeding. If you are encountering any issues with authentication, ensure that you have a stable internet connection and consider resetting your Gmail account password if necessary.
Once your Gmail account information has been successfully authenticated, congratulations! You are now one step closer to enjoying the full functionality of Gmail on your Android tablet.
Now that you have entered your Gmail account information correctly, let’s move on to the next step and learn how to adjust the account settings for a personalized Gmail experience on your device.
Step 5: Adjusting Account Settings
After entering your Gmail account information, it’s time to adjust the account settings according to your preferences. This step allows you to customize how your Gmail account behaves on your Android tablet, ensuring a personalized and seamless email experience.
Follow these instructions to adjust your Gmail account settings:
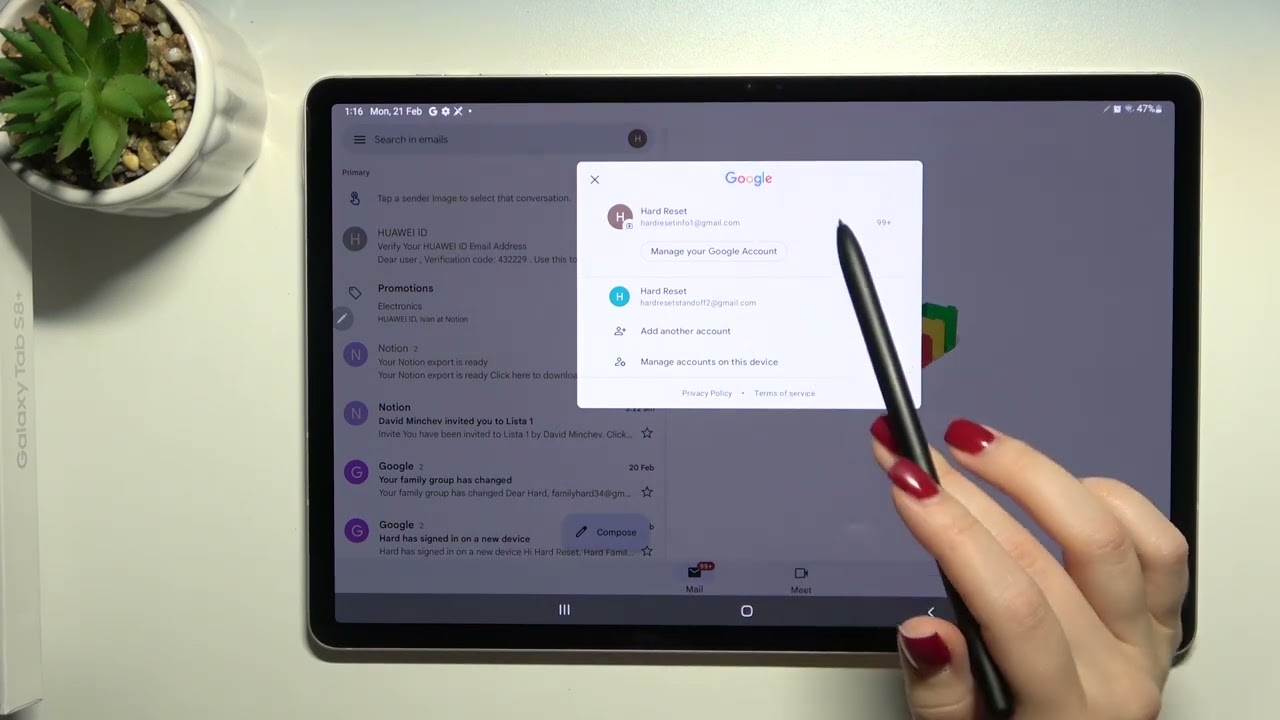
- In the account settings menu, locate your Gmail account. It should be listed under the “Accounts” section.
- Tap on your Gmail account to access the account settings.
- Scroll through the account settings page to explore various options and features available.
- Here are some key settings you may want to consider adjusting:
- Sync Frequency: Choose how often you want your Android tablet to check for new emails in your Gmail account. You can opt for manual sync, regular intervals, or real-time sync.
- Language and Input: Customize the language and input settings for your Gmail account. This includes changing the language of the Gmail user interface and selecting your preferred keyboard.
- Notification Settings: Adjust the notification settings to receive alerts for new emails, calendar events, and other important Gmail notifications. You can choose to receive notifications for all emails or customize notifications for specific labels or contacts.
- Signature: Create a personalized email signature that will be automatically appended to the end of every email you send from your Android tablet.
- Storage and Sync: Manage your storage and sync options to control how Gmail handles attachments and syncs your emails, contacts, and calendar events across your devices.
- Tap on each setting option to make the necessary adjustments according to your preferences.
- Once you have customized the account settings to your satisfaction, you can either navigate back to the main settings menu or tap on the “Done” or “Save” button to apply the changes.
By adjusting the account settings, you can tailor your Gmail experience to meet your specific needs and preferences. Whether you want to receive instant notifications or prefer a more manual approach to syncing, Gmail allows you to customize the settings to suit your workflow.
Take some time to explore the various account settings options and make adjustments as necessary. Remember, you can always revisit the account settings later to make further changes or fine-tune your Gmail experience on your Android tablet.
Now that you have adjusted the account settings for your Gmail account, you are ready to proceed to the next step and learn how to sync your Gmail account to access your emails and other data on your Android tablet.
Step 6: Syncing Your Gmail Account
After adjusting the account settings, it’s time to sync your Gmail account on your Android tablet. Syncing ensures that all your emails, contacts, and other data are up to date and readily accessible on your device.
Follow these steps to sync your Gmail account:
- In the account settings menu, locate your Gmail account. It should be listed under the “Accounts” section.
- Tap on your Gmail account to access the account settings.
- Scroll through the account settings page until you find the “Sync Account” or “Sync Now” option. Tap on it to initiate the sync process.
- Your Android tablet will now sync your Gmail account, downloading new emails, contacts, and other data while also uploading any changes you’ve made on the device.
- The syncing process may take a few moments, depending on the amount of data to be synced and the speed of your internet connection. Be patient and ensure that you have a stable internet connection during this process.
- Once the sync is complete, you will receive a notification confirming that your Gmail account is up to date.
Syncing your Gmail account is crucial to ensuring that you have access to the latest information and emails on your Android tablet. Whenever you make changes on your tablet, such as sending or deleting emails, adding or modifying contacts, or creating events in your calendar, the sync process will update these changes across all your devices connected to the same Gmail account.
Keep in mind that you can manually initiate a sync at any time by following the above steps. Additionally, by adjusting the sync settings in the account settings page, you can control how often your Android tablet automatically syncs with your Gmail account.
Now that your Gmail account has been successfully synced, you can enjoy seamless access to your emails, contacts, and other data on your Android tablet. Let’s move on to the next step and learn how to customize the notification settings to ensure you stay informed about important emails and events.
Step 7: Customizing Notifications
Customizing the notification settings for your Gmail account on your Android tablet allows you to stay informed about important emails, calendar events, and other notifications. By adjusting the notification preferences, you can ensure that you receive timely alerts and stay on top of your communication.
Follow these steps to customize your Gmail notification settings:
- In the account settings menu, locate your Gmail account. It should be listed under the “Accounts” section.
- Tap on your Gmail account to access the account settings.
- Scroll through the account settings page until you find the “Notifications” or “Notification Settings” option. Tap on it to proceed.
- Here, you have the option to customize various notification settings, including:
- Email Notifications: Choose whether you want to receive notifications for new emails. You can select options such as “All new emails,” “Only important emails,” or “None” to disable email notifications.
- Calendar Notifications: Customize the notification settings for calendar events, such as meeting reminders or event invitations. You can choose to receive notifications for all events, events you’ve responded to, or disable calendar notifications altogether.
- Label Notifications: If you use labels to organize your emails, you can select specific labels for which you want to receive notifications. This allows you to stay informed about important emails while muting less critical ones.
- Sound, Vibration, and LED: Adjust the sound, vibration, and LED settings for your Gmail notifications. You can choose different notification sounds and vibration patterns to differentiate between emails, calendar events, and other notifications.
- Tap on each notification option to customize the settings according to your preferences.
- Once you have customized the notification settings, tap on the “Done” or “Save” button to apply the changes.
By customizing the notification settings, you can streamline your email management and ensure you are aware of important emails and events without being overwhelmed by unnecessary notifications.
Keep in mind that your Android tablet may have additional notification settings that are not specific to Gmail. These settings can usually be accessed through the main device settings menu, under the “Notifications” or “Sounds & Notifications” section. Make sure to explore these options to customize notifications on a broader scale.
Now that you have customized the notification settings for your Gmail account, you can stay informed about important emails and events on your Android tablet. Let’s proceed to the final step and learn how to add multiple Gmail accounts on your device for increased productivity and versatility.
Step 8: Adding Multiple Gmail Accounts
If you have multiple Gmail accounts, you can easily add and manage them on your Android tablet. Adding multiple Gmail accounts allows you to access and switch between different email addresses, ensuring maximum productivity and versatility.
Follow these steps to add multiple Gmail accounts:
- In the account settings menu, locate the option to add a new account. This is usually represented by a “+” sign or an “Add Account” button.
- Tap on the “Add Account” option to bring up a list of available email providers.
- Look for the “Google” or “Gmail” option in the list and tap on it.
- On the next screen, enter the email address and password for the Gmail account you want to add.
- Tap on the “Next” button and follow the subsequent prompts to complete the setup process for the additional Gmail account.
- Repeat the above steps to add as many Gmail accounts as you’d like.
- Once added, you can access and manage your multiple Gmail accounts by simply tapping on the account switcher icon or using the account switcher dropdown menu.
- To switch between accounts, tap on the desired account in the account switcher and the Gmail app will seamlessly transition to that account.
By adding multiple Gmail accounts, you can keep your personal and professional emails separate while still having convenient access to all your accounts on one device.
Managing multiple Gmail accounts on your Android tablet is simple and efficient. Each account will have its own inbox, contacts, and settings, allowing you to stay organized and focused, no matter how many Gmail accounts you have.
To further enhance your productivity, consider customizing the notification settings for each account individually. This will ensure that you receive notifications only for the relevant account, helping you stay on top of your emails without confusion.
Now that you have successfully added multiple Gmail accounts, you are ready to make the most of your Android tablet’s email capabilities. Take advantage of the seamless switching between accounts and enjoy a streamlined email experience.
Conclusion
Setting up Gmail on your Android tablet is a simple process that allows you to access and manage your emails seamlessly. By following the step-by-step guide outlined in this article, you can enjoy the full range of features and benefits offered by Gmail, enhancing your productivity and communication.
We started by accessing the settings on your Android tablet and then proceeded to add a new email account, specifically your Gmail account. We also selected Gmail as the email provider and entered your Gmail account information accurately.
Next, we adjusted the account settings to personalize your Gmail experience and customized the notification settings to ensure you stay informed about important emails and events.
We then synced your Gmail account to ensure that all your emails, contacts, and other data are up to date and readily accessible on your Android tablet.
Lastly, we explored adding multiple Gmail accounts, enabling you to manage multiple email addresses efficiently and keep your personal and professional emails separate.
Now that you have completed the setup process, you can enjoy the convenience and power of Gmail on your Android tablet. Stay connected, organized, and productive with Gmail’s robust features and user-friendly interface.
Remember, you can always revisit the account settings to make further adjustments or explore additional features within the Gmail app to enhance your email experience even more.
So go ahead, make the most of your Android tablet and the Gmail app, and streamline your email communication like never before.