Introduction
Having a Gmail account on your tablet can be very convenient for accessing your emails and staying connected. However, there may come a time when you need to remove a Gmail account from your tablet. Whether you are switching to a different email provider, selling your tablet, or simply want to declutter your device, removing a Gmail account is a straightforward process.
In this article, we will guide you through the step-by-step process of removing a Gmail account from your tablet. Whether you are using an Android or iOS tablet, the steps are relatively similar. By following the instructions below, you can easily remove your Gmail account and ensure that your personal information remains secure.
Before proceeding, it is important to note that removing a Gmail account from your tablet will also remove any associated data, including emails, contacts, and other synchronized information. Therefore, it is crucial to back up any important data before starting the removal process.
Now, let’s get started and learn how to remove a Gmail account from your tablet.
Step 1: Open the Settings app
The first step in removing a Gmail account from your tablet is to open the Settings app. The Settings app allows you to customize various aspects of your device, including accounts and synchronization settings.
To open the Settings app, locate the gear or cog icon on your tablet’s home screen or app drawer. The icon may vary depending on the make and model of your tablet or the operating system it runs on.
Once you have located the Settings app icon, tap on it to launch the app. This will open the main settings menu, where you can access and modify different settings on your tablet.
Alternatively, you can swipe down from the top of the screen to reveal the notification panel and tap on the gear or cog icon to directly access the Settings app.
On some tablet models, you may need to navigate through multiple screens or tabs to find the Settings app. Look for a section labeled “Device” or “System” and tap on it to proceed.
Once you have successfully opened the Settings app, you are ready to move on to the next step in the process of removing your Gmail account from your tablet.
Step 2: Tap on Accounts
After opening the Settings app on your tablet, the next step is to navigate to the “Accounts” section. This section allows you to manage and view all the accounts that are associated with your tablet, including email, social media, and cloud storage accounts.
Scroll down the settings menu until you find the “Accounts” option. Depending on the layout of your tablet’s settings, you may need to look under the “Personal” or “Accounts & Sync” category.
Tap on the “Accounts” option to access the account management screen. Here, you will see a list of all the accounts that are currently linked to your tablet.
If you have multiple accounts on your tablet, you can tap on each account to view its individual settings and synchronization options.
In some cases, the “Accounts” option may be located within another sub-menu. If you are unable to find it in the main settings menu, try exploring other categories or sections within the settings app to locate the “Accounts” option.
Once you have tapped on the “Accounts” option, you are ready to proceed to the next step and select the Gmail account that you want to remove from your tablet.
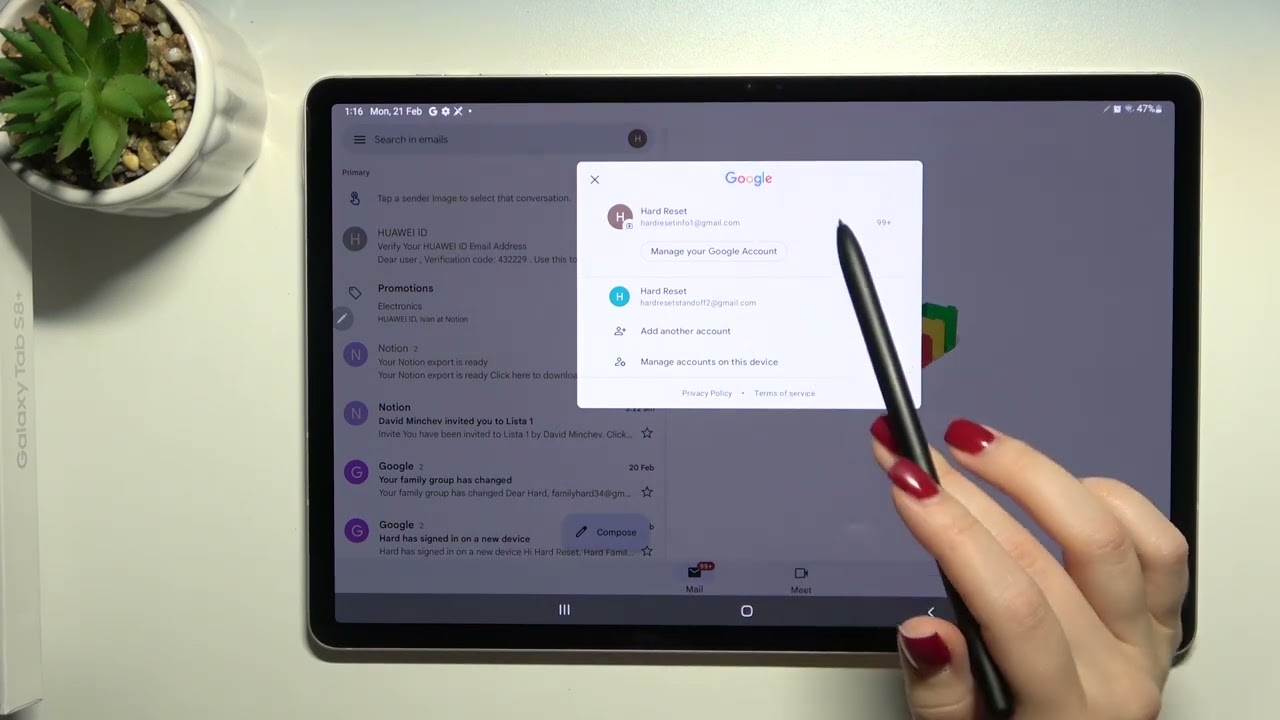
Step 3: Select Google
After accessing the “Accounts” section in your tablet’s settings, the next step is to select the “Google” option. This section specifically manages all the Google-related accounts and services linked to your tablet.
Scroll through the list of accounts until you find the “Google” option. It may be labeled as “Google Account” or simply “Google.”
Tap on the “Google” option to proceed to the Google account settings. This section allows you to modify the settings and permissions associated with your Google account, including Gmail, Google Drive, and Google Photos.
In some cases, depending on the make and model of your tablet, you may have a separate section for each individual Google service. In this situation, you will need to locate the specific section related to Gmail.
Once you have selected the “Google” option, you will be presented with various settings and options for your Google account. These settings may include account information, security options, and sync settings.
Take a moment to review the settings and ensure that you have selected the correct Google account that you want to remove. This is particularly important if you have multiple Google accounts linked to your tablet.
After selecting the Google option, you are now ready to proceed to the next step and choose the specific Gmail account that you wish to remove from your tablet.
Step 4: Choose the Gmail account to remove
Once you have accessed the Google account settings in your tablet’s settings app, the next step is to choose the specific Gmail account that you want to remove from your tablet.
In the Google account settings, you will see a list of all the accounts associated with your Google services. Look for the section labeled “Accounts” or “Account Services.”
Tap on the Gmail account that you wish to remove from your tablet. This will open the account settings page for that specific Gmail account.
On this page, you will see various options and settings related to the selected Gmail account. Take a moment to review the account information to ensure that you have selected the correct account that you want to remove.
It is important to note that removing a Gmail account from your tablet will also remove any associated data, including emails, contacts, and app data. Therefore, it is crucial to back up any important data from the account before proceeding.
If you have multiple Gmail accounts linked to your tablet, you will need to repeat this step for each account that you wish to remove.
After selecting the Gmail account that you want to remove, you are now ready to move on to the next step and proceed with the removal process.
Step 5: Tap on the More options icon
Once you have chosen the specific Gmail account that you want to remove from your tablet, the next step is to tap on the More options icon. This icon provides additional actions and settings related to the selected account.
The More options icon is usually represented by three vertical dots or three horizontal lines, and it is commonly found in the top-right corner of the account settings page.
Tap on the More options icon to open a dropdown menu or a list of additional actions and settings for the selected Gmail account.
In this menu, you may see various options such as “Sync now,” “Remove account,” or “Account settings.” The available options may vary depending on the operating system and the version of the settings app on your tablet.
Locate and tap on the option that says “Remove account” or similar. This option will initiate the removal process for the selected Gmail account.
If you do not see the “Remove account” option directly in the More options menu, you may need to navigate to a different section or sub-menu within the account settings to find it. Look for options such as “Account details” or “Account preferences.”
Once you have tapped on the More options icon and accessed the appropriate option for removing the account, you are now prepared to proceed to the next step and confirm the removal of the Gmail account from your tablet.
Step 6: Select Remove Account
After tapping on the More options icon and accessing the additional actions and settings for the selected Gmail account, the next step is to select the “Remove Account” option. This will initiate the process of removing the Gmail account from your tablet.
In the dropdown menu or list of options, locate and tap on the “Remove Account” option. This option is typically found towards the bottom of the menu and is usually labeled clearly.
By selecting the “Remove Account” option, you are confirming your choice to remove the Gmail account from your tablet. It is important to note that this action cannot be undone, and all associated data, such as emails, contacts, and app data, will be permanently deleted from the device.
Before proceeding with the removal, you may be prompted to enter your device’s security PIN, pattern, or password as a security measure. This is to ensure that only authorized users can remove accounts from the tablet.
Take a moment to review the confirmation message or prompt that appears on the screen. It may provide additional details or warnings regarding the removal process.
If you are certain that you want to proceed with removing the Gmail account, tap on the “Remove Account” button or similar option to confirm the action.
Once the account removal process is initiated, it may take a few moments for the tablet to complete the process and remove the Gmail account. The time required can vary depending on the amount of data associated with the account and the speed of your tablet.
After selecting the “Remove Account” option and confirming the action, you are now ready to proceed to the final step and complete the removal process.
Step 7: Confirm the removal
After selecting the “Remove Account” option to initiate the removal process, the next step is to confirm the removal of the Gmail account from your tablet.
A confirmation message or prompt will appear on the screen, asking you to confirm the removal. This message typically reiterates the consequences of removing the account, such as the permanent deletion of associated data and the disabling of synchronization between the account and your tablet.
Review the confirmation message carefully to ensure that you understand the implications of removing the Gmail account. Take note of any important information or instructions mentioned in the message.
If you are certain that you want to proceed with the removal, tap on the “Confirm,” “OK,” or similar button to finalize the action.
At this point, the tablet will begin the process of removing the Gmail account. The duration of this process can vary depending on the amount of data associated with the account and the speed of your tablet.
During the removal process, you may see a progress indicator or a message indicating that the account is being removed. Do not interrupt or power off the tablet while the removal is in progress.
Once the removal process is complete, a notification or confirmation message will appear, indicating that the Gmail account has been successfully removed from your tablet.
After confirming the removal and receiving the confirmation message, you can safely close the settings app and continue using your tablet without the Gmail account linked to it.
Remember to adjust any necessary settings or account preferences to ensure that your tablet functions as desired without the removed Gmail account.
Congratulations! You have successfully completed the process of removing a Gmail account from your tablet.
Conclusion
Removing a Gmail account from your tablet can be a simple yet important task, whether you’re switching to a different email provider, selling your tablet, or simply wanting to declutter your device. Following the step-by-step process outlined in this article, you can remove your Gmail account and ensure that your personal information remains secure.
Starting with opening the Settings app and navigating to the “Accounts” section, you can then select the “Google” option and choose the specific Gmail account that you wish to remove. By tapping on the More options icon, you can access the option to remove the account, and then proceed to confirm the removal.
It’s important to note that removing a Gmail account from your tablet will also remove any associated data, such as emails, contacts, and app data. Therefore, it’s crucial to backup any important data before starting the removal process.
By carefully following each step and confirming the removal, you can successfully remove the Gmail account from your tablet. Finally, be sure to adjust any necessary settings or account preferences to ensure that your tablet functions as desired without the removed Gmail account.
We hope that this guide has been helpful in guiding you through the process of removing a Gmail account from your tablet. With these instructions, you can confidently manage your accounts and keep your tablet organized according to your preferences.
Remember, should you ever need to re-add a Gmail account to your tablet or encounter any difficulties during the removal process, consult the manufacturer’s documentation or reach out to their support for further assistance.
Thank you for reading, and we wish you all the best in managing your accounts on your tablet!