Introduction
Gmail is widely recognized as one of the most popular and reliable email platforms available today. With its user-friendly interface and powerful features, it has become an essential tool for managing personal and professional communication. If you’re an Android user, you might be wondering how to find archived emails in Gmail on your device. Archiving emails can help you declutter your inbox while still keeping them easily accessible when needed. In this guide, we will walk you through the steps to find archived emails in Gmail on your Android phone or tablet.
Archiving emails in Gmail is different from deleting them. When you archive an email, it is removed from your main inbox but is still stored in your account, allowing you to retrieve it later if necessary. This feature is particularly useful for those who receive a large volume of emails and want to keep their inbox organized.
Finding archived emails in Gmail on Android is a straightforward process. The Gmail app for Android provides you with quick access to your archived emails, allowing you to browse through your archived messages with ease. Whether you need to find a specific email or want to review past conversations, the steps outlined below will guide you through the process.
Step 1: Open the Gmail app on your Android device
The first step in finding archived emails in Gmail on your Android device is to open the Gmail app. Look for the Gmail icon on your home screen or in your app drawer, and tap on it to launch the application. If you haven’t already set up your Gmail account on your Android device, you will need to do so before proceeding.
Once the app is opened, you will be prompted to sign in to your Gmail account. Enter your login credentials – your email address and password – and tap on the “Sign in” button. If you have multiple Gmail accounts linked to your device, make sure to select the account that contains the archived emails you want to find.
If you are already signed in to your Gmail account, the app will open directly to your inbox. You will see a list of your most recent emails along with any labels or folders you have set up. To proceed with finding archived emails, move on to the next step.
Note: Make sure you have a stable internet connection on your Android device. This is necessary to access your Gmail account and retrieve archived emails.
Step 2: Access the sidebar menu
Once you have opened the Gmail app on your Android device and signed in to your account, the next step is to access the sidebar menu. This sidebar menu provides quick access to various folders and settings within the app.
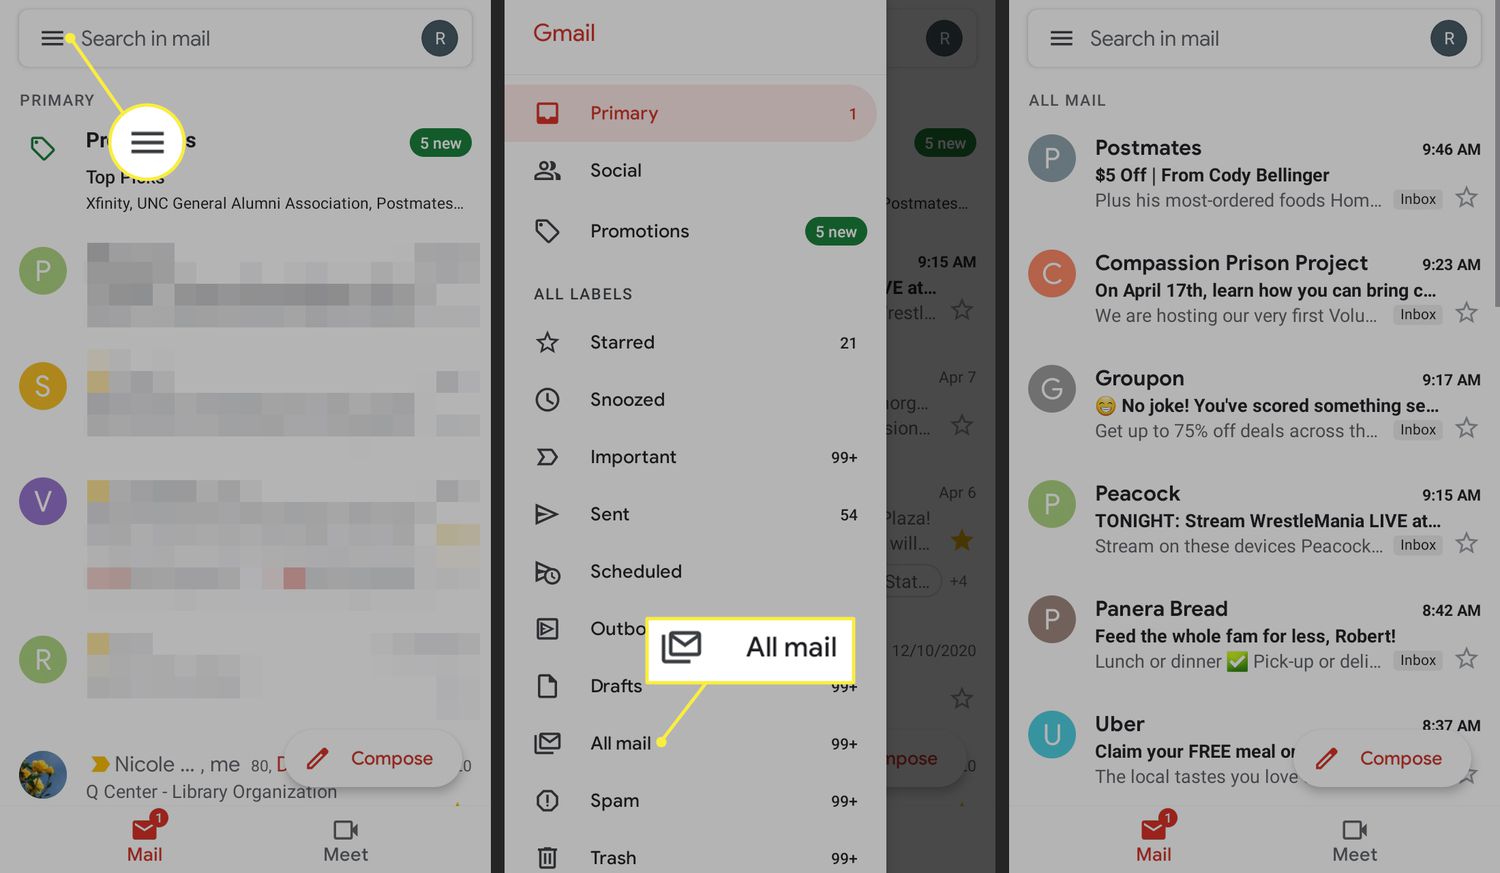
To access the sidebar, look for the three horizontal lines, also known as the “hamburger” icon, located in the top-left corner of the app. Tap on this icon, and it will open the sidebar menu.
Alternatively, some Android devices have a dedicated button for accessing the sidebar. If your device has this button, look for it either on the left side or at the bottom of the screen. The icon typically consists of three horizontal lines stacked on top of each other.
When you tap on the hamburger icon or use the dedicated button, the sidebar menu will slide in from the left side of the screen, revealing several options and folders.
Take a moment to familiarize yourself with the various options available in the sidebar. You will see folders such as “Inbox,” “Sent,” “Drafts,” “Important,” and more. These folders contain specific types of emails or messages. To find your archived emails, proceed to the next step.
Step 3: Navigate to the “All Mail” section
After accessing the sidebar menu in the Gmail app on your Android device, the next step is to navigate to the “All Mail” section. This section contains all the emails in your Gmail account, including archived emails.
Scroll through the options in the sidebar until you find the label or folder named “All Mail.” It is typically located towards the bottom of the list.
Tap on the “All Mail” option to navigate to this section. Once selected, the app will display all the emails stored in your Gmail account, irrespective of their labeling or archiving status.
In the “All Mail” section, you will find a comprehensive list of emails, including both archived and unarchived messages. By default, the emails are sorted in chronological order, with the most recent ones appearing at the top. You can scroll through the list to find the specific archived emails you are looking for.
Note: If you have a large number of emails in your account, it may take some time for the app to load all the messages in the “All Mail” section. Be patient while the app retrieves the information, especially if you have a slower internet connection.
Step 4: Search for archived emails
Now that you have navigated to the “All Mail” section in the Gmail app on your Android device, you can begin searching for specific archived emails. The search feature in Gmail allows you to quickly locate emails based on various criteria, such as keywords, sender, recipient, or date.
To search for archived emails, tap on the search bar at the top of the screen. It is typically labeled with the phrase “Search mail” or a magnifying glass icon.
Once you tap on the search bar, a keyboard will appear, allowing you to enter your search terms. Start typing relevant keywords or any other information that can help narrow down your search. For example, you can enter the name of the sender, a specific subject line, or a keyword related to the content of the email.
As you type, Gmail will automatically start displaying matching results below the search bar. You can tap on any of these suggestions to refine your search further. Alternatively, you can complete typing your search query and tap the “Search” or “Enter” button on your keyboard to begin the search.
After initiating the search, the app will display a list of emails that match your search criteria. Scroll through the search results to find the archived emails you are looking for. If you can’t find the email you’re searching for, try using different keywords or narrowing down your search by adding more specific information.
Note: The search feature in Gmail is powerful and can help you find archived emails quickly. It also allows you to filter results based on various parameters, such as date, attachments, or starred status. Experiment with different search options to make your search more precise and efficient.
Step 5: View and manage archived emails
After finding the archived emails in the Gmail app on your Android device, you can now view and manage them according to your needs. Whether you want to read a specific email, reply to it, or take any other action, the Gmail app provides you with several options.
To view an archived email, simply tap on it in the list of search results or scroll through the list until you find the desired email. Tapping on an email will open it in full view, allowing you to read the contents, view any attachments, or access any embedded links.
If you want to reply to an archived email, tap on the “Reply” button located at the bottom of the email. You can compose your response and send it just like you would with any other email in your Gmail account.
Furthermore, Gmail offers various options for managing your emails. For example, you can mark an archived email as “unread” by tapping on the envelope icon with a blue dot located next to the email. This can help you remember to revisit the email later or mark it as important.
If you want to move an archived email back to your inbox or another folder, tap on the folder icon or the “Move to” option. This will allow you to choose a different label or folder where the email will be moved to.
Additionally, you can select multiple archived emails by tapping and holding on one email until it is highlighted. Then, you can select additional emails by tapping on them. Once you have selected the desired emails, you can apply actions such as deleting, marking as read, or moving them to a different folder using the options available at the top or bottom of the screen.
Remember to save any changes or actions you make to the archived emails by tapping on the appropriate buttons or options provided in the app. This ensures that the changes are reflected in your Gmail account and are synchronized across all your devices.
By following these steps, you can easily view and manage your archived emails in the Gmail app on your Android device. Enjoy the convenience of having your archived emails accessible whenever you need them, without cluttering your inbox.
Conclusion
Managing archived emails in Gmail on your Android device is a simple process that can help you maintain an organized inbox while still having easy access to important past conversations. By following the steps outlined in this guide, you can quickly find and retrieve your archived emails in the Gmail app.
Remember, archiving emails in Gmail is different from deleting them. Archiving allows you to keep emails stored in your account, while removing them from your main inbox. This can help reduce clutter and improve your email organization.
To find archived emails, start by opening the Gmail app on your Android device and signing in to your account. Access the sidebar menu and navigate to the “All Mail” section. From there, utilize the search feature to locate specific archived emails by using keywords or other relevant information.
Once you have found the archived emails, you can view and manage them according to your needs. Whether you want to read, reply to, or move these emails to different folders, the Gmail app provides you with intuitive options for efficient email management.
Remember to save any changes you make to the archived emails to ensure they are synchronized across all your devices and reflect in your Gmail account.
By following these steps, you can effectively manage your archived emails in Gmail on your Android device, making it easier to keep track of important correspondence while maintaining a clutter-free inbox.