Why Add a Folder in Gmail on a Tablet?
Managing your emails efficiently is crucial, especially when using Gmail on a tablet. With a plethora of messages flooding your inbox on a daily basis, it can be challenging to stay organized and find important emails when needed. This is where the option to add folders in Gmail proves to be invaluable.
By creating folders in Gmail on a tablet, you can categorize your emails, making it easier to locate specific messages. Whether you want to create folders for work, personal, or any other specific category, having a well-organized inbox helps you save time and stay on top of your communication. Moreover, the ability to add folders provides a more streamlined and personalized Gmail experience that enhances productivity.
When using Gmail on a tablet, the screen size can be limited compared to a desktop or laptop computer. By adding folders, you can declutter your inbox and prioritize important emails without constantly scrolling through a long list of messages. This ensures that you have quick access to relevant information, improving your email management efficiency on your tablet.
Another advantage of adding folders in Gmail on a tablet is the ease of navigation. Instead of searching for specific emails within a cluttered inbox, having folders allows you to simply click on the relevant folder to find the desired email. This eliminates the frustration of endlessly scrolling and searching, allowing you to find important messages with ease and speed.
Moreover, having well-organized folders provides peace of mind and reduces the risk of missing critical emails. You can create separate folders for important projects, clients, or any other specific categories, ensuring that you never overlook crucial information. This level of organization and attention to detail helps you maintain a professional image, both in your personal and work-related communications.
Overall, adding folders in Gmail on a tablet is a practical and essential step to improve your email management. It allows you to categorize your messages, locate important emails quickly, and reduce clutter in your inbox. With a well-organized system in place, you can stay on top of your communication, increase productivity, and focus on what matters most.
Step 1: Open the Gmail App
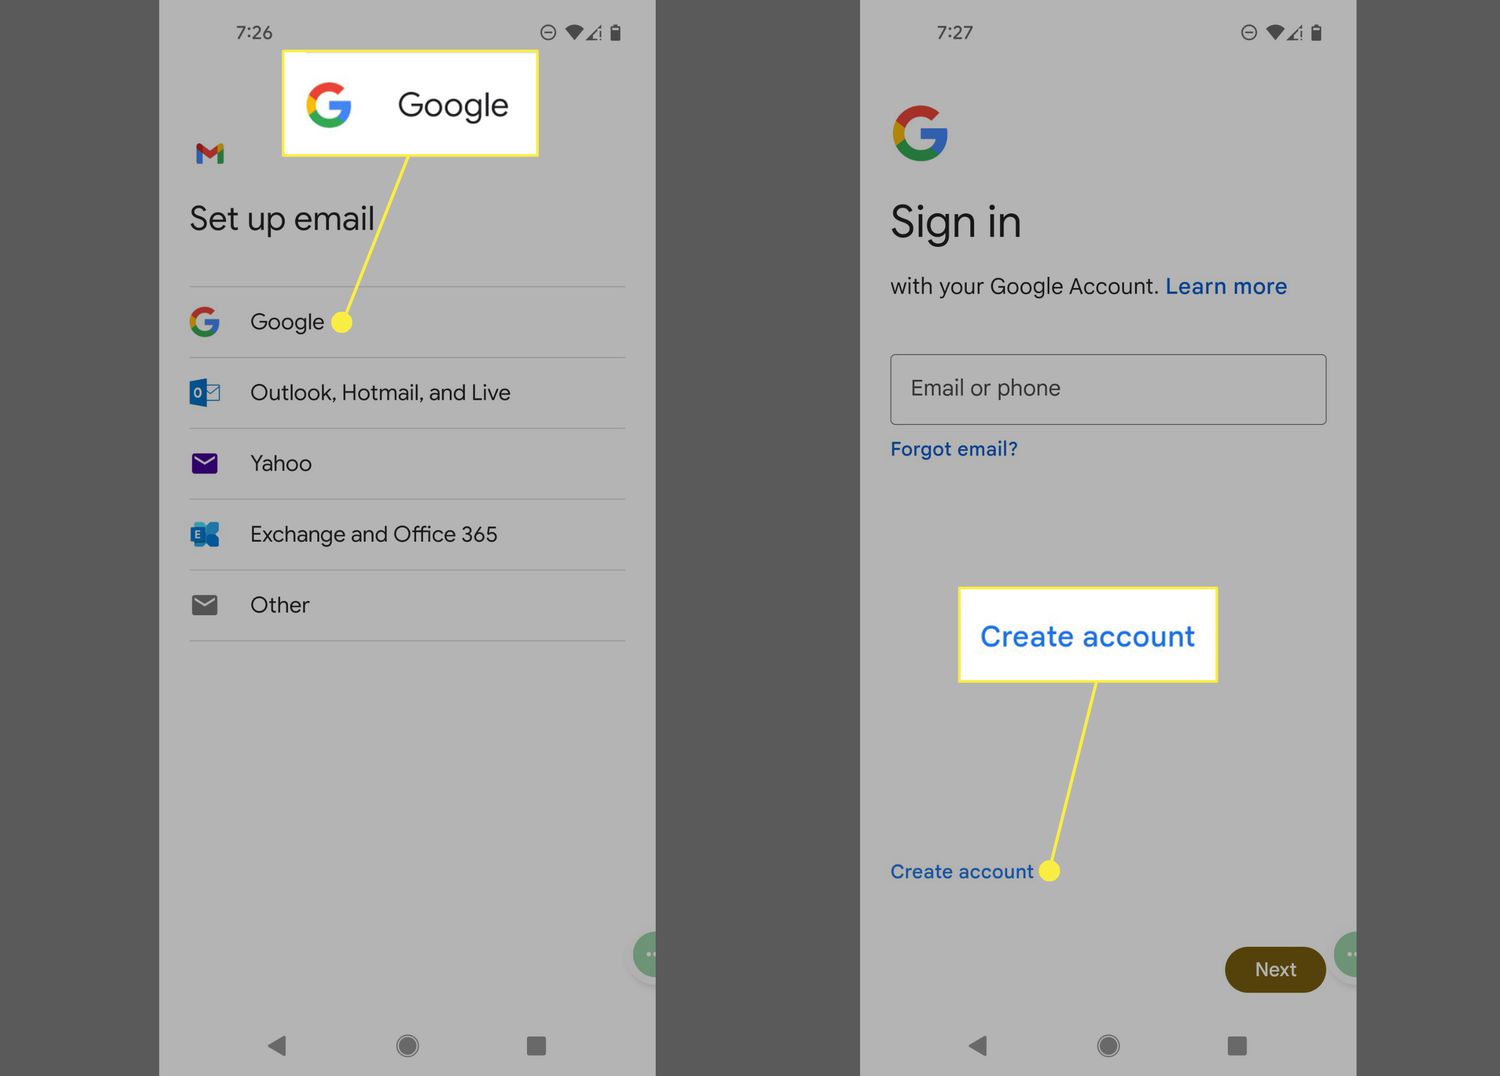
The first step to adding a folder in Gmail on your tablet is to open the Gmail app. Locate the Gmail app icon on your tablet’s home screen or app drawer and tap on it to launch the application. If you haven’t already set up your Gmail account on your tablet, you will need to do so before proceeding. Simply follow the prompts to sign in or create a new account.
Once you have opened the Gmail app and signed in to your account, you will be directed to your inbox. Here, you will see a list of your received emails, sorted by date and time.
It’s important to note that the steps provided in this article are based on the latest version of the Gmail app at the time of writing. The precise steps and options may vary slightly depending on the version of the app and the tablet’s operating system.
If you encounter any difficulties in finding or opening the Gmail app on your tablet, you can try using the search function on your device. Swipe down from the top of the screen or access the search bar on your home screen and type in “Gmail”. The search results should display the Gmail app, allowing you to open it easily.
Once you have successfully opened the Gmail app and accessed your inbox, you are ready to proceed to the next step.
Step 2: Access the Sidebar Menu
After opening the Gmail app and accessing your inbox on your tablet, the next step is to access the sidebar menu. The sidebar menu provides quick access to various features and settings within the Gmail app, including the option to create new folders.
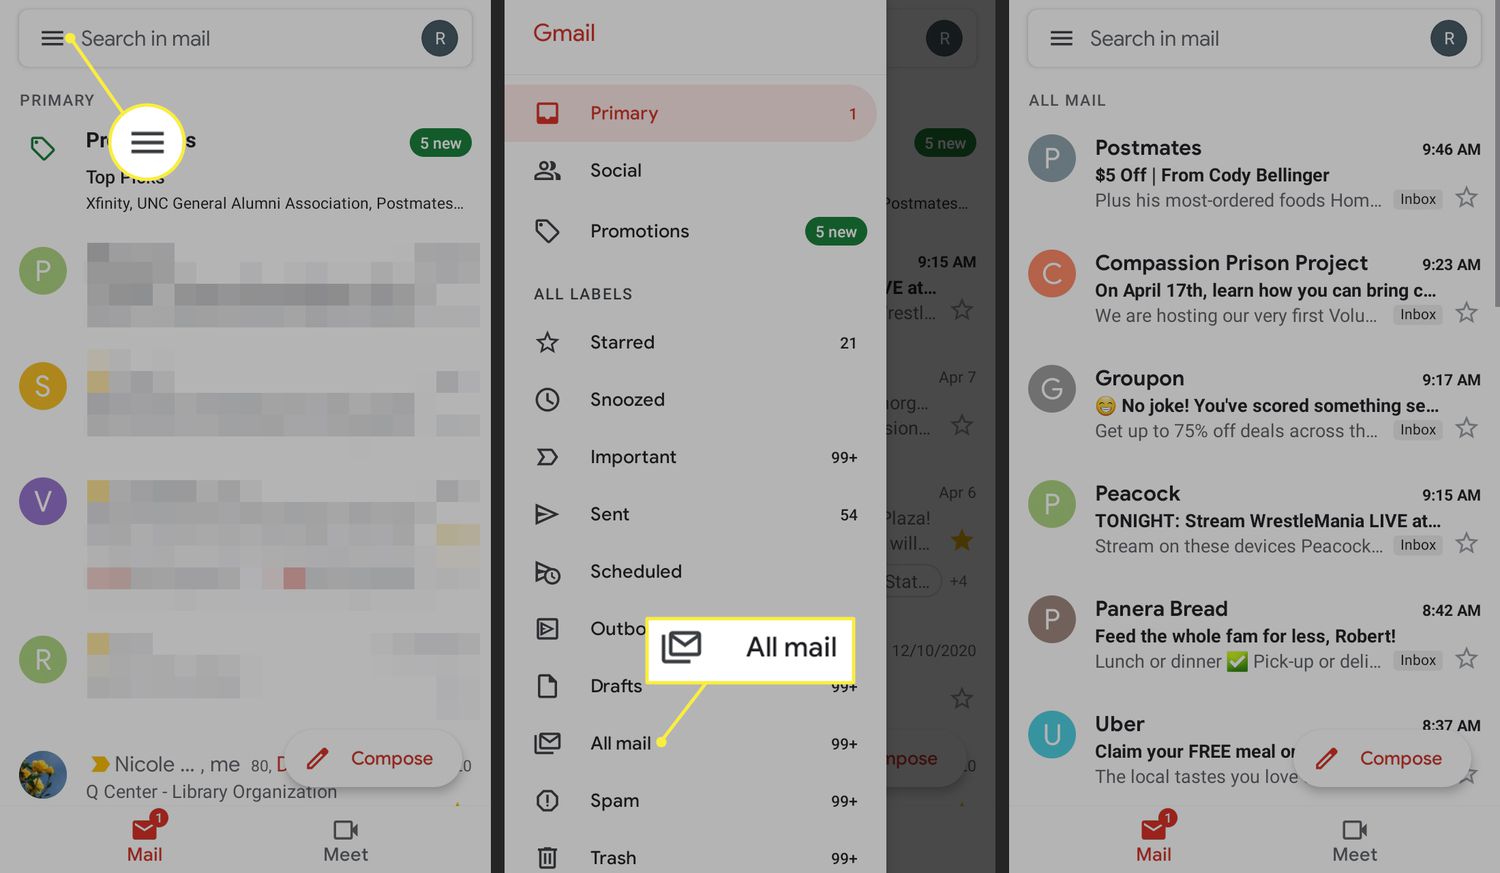
To access the sidebar menu, locate the three horizontal lines icon, often referred to as the “hamburger” icon, located in the top left or top right corner of the Gmail app interface. This icon is a common design element used to represent a menu or navigation drawer in many mobile applications.
Tap on the hamburger icon, and the sidebar menu will slide into view, revealing a list of options. The exact placement and appearance of the sidebar menu may vary slightly depending on the version of the Gmail app and the device you are using, but it is typically accessible through the hamburger icon.
In the sidebar menu, you will find various options such as Inbox, Sent, Drafts, and more. Scroll through the list to familiarize yourself with the available options. Toward the bottom of the menu, you should see a section labeled “Labels” or “Folders”. This is where you can manage and create new folders to better organize your emails.
By tapping on the “Labels” or “Folders” section, you will be able to expand the submenu and see additional options related to folders. These options may include viewing your existing folders, editing folder settings, and creating a new folder.
In the next step, we will explore how to create a new folder within the Gmail app on your tablet.
Step 3: Tap on “Create New”
Once you have accessed the sidebar menu in the Gmail app on your tablet, the next step is to tap on the option to create a new folder. This will allow you to set up a customized folder for organizing your emails in a way that makes sense to you.
Look for the “Create New” or “Add New” option within the Labels or Folders section of the sidebar menu. It is typically represented by a plus sign (+) icon or a button labeled “New”. Tap on this option to proceed.
By tapping on “Create New” or its equivalent, you will be presented with a prompt or dialog box where you can provide the necessary details for your new folder.
It’s important to choose a descriptive and meaningful name for your new folder. Consider the purpose or category that the folder will represent, such as “Work”, “Personal”, “Travel”, or any other relevant label. This will make it easier to locate specific emails within the folder later on.
Once you have entered the desired name for your new folder, proceed to the next step to choose a location for the folder within your Gmail account.
Creating a new folder in the Gmail app on your tablet is an essential step in organizing and categorizing your emails to improve your overall email management experience. With this new folder, you’ll be able to keep track of important emails more efficiently and locate them when needed.
Step 4: Name Your New Folder
After tapping on “Create New” in the Gmail app on your tablet, you will be prompted to name your new folder. This step is crucial as it allows you to identify and distinguish the folder from others in your email account.
Choose a descriptive and meaningful name for your new folder that reflects its purpose or the type of emails it will contain. For example, if you are creating a folder to store work-related emails, you may want to name it “Work” or “Business”. If you are organizing personal emails, consider using names like “Personal” or “Family”. The key is to select a name that resonates with you and helps you easily associate it with the content you plan to store in the folder.
Take a moment to think about the categories that will be most beneficial to your email organization. By naming your folder appropriately, you will enhance your ability to locate specific emails in the future without much effort.
The Gmail app on your tablet allows for flexibility in naming folders, so feel free to get creative. You can use spaces, capitalization, and even special characters to customize the name to your liking. However, it’s important to keep the name concise and easy to understand, as overly long or complex folder names may become cumbersome to work with.
Once you have decided on the name for your new folder, proceed to the next step to select a location for the folder within your Gmail account.
Naming your new folder not only adds a personal touch to your email organization but also helps you quickly identify its contents and access them with ease. With a well-named folder, you’ll be able to navigate through your emails more efficiently, saving time and energy in the process.
Step 5: Choose a Location for the Folder
Once you have named your new folder in the Gmail app on your tablet, the next step is to select a location for the folder within your Gmail account. This determines where the folder will be positioned in your email hierarchy and how it will be displayed within your inbox.
Gmail provides two main options for the location of your folder: it can be a top-level label or nested under an existing label.
If you want your folder to be a top-level label, meaning it will appear directly in your sidebar menu, you can select your main inbox or any other top-level labels as the parent label for your new folder. This allows for quick and easy access to the folder from the main navigation menu.
On the other hand, if you choose to nest your folder under an existing label, it will be located within that label’s hierarchy. This is useful if you want to group related folders together, making it easier to manage and locate specific categories of emails.
To choose a location for your folder, tap on the option that allows you to select the parent label. This action will present you with a list of available labels or folders within your Gmail account. Simply select the desired label under which you want your new folder to reside.
Keep in mind that the available labels or folders may differ based on your existing label structure and organization. You can select a label at any level in the hierarchy, including top-level labels, sublabels, or even nested subfolders.
Consider the nature of the emails you plan to store in your new folder and how it fits into your overall organization system. Choose a location that aligns with your workflow and makes the most sense to ensure easy access and efficient email management.
Once you have selected the appropriate parent label, proceed to the next step to save your new folder and finalize its creation.
Choosing the right location for your folder is an important aspect of optimizing your email organization. By placing your folder in a strategic position within your hierarchy, you will enhance your ability to navigate and manage your emails effectively.
Step 6: Save the New Folder
After naming your new folder and selecting its location within the Gmail app on your tablet, the next step is to save the folder. Saving the folder ensures that all the changes you have made are applied and that the folder is successfully created in your Gmail account.
To save the new folder, look for a button or option that indicates “Save” or “Create”. This button is typically located at the bottom or top right corner of the dialog box or prompt where you entered the folder name and selected its location.
Tap on the “Save” or “Create” button to confirm your choices and finalize the creation of the new folder. Depending on the speed of your tablet or the size of your Gmail account, it may take a few moments for the folder to be saved successfully.
During the saving process, avoid navigating away from the page or closing the Gmail app to ensure that the new folder is created and saved properly.
Once the folder has been saved, you will receive a confirmation message or see a visual indication that the folder has been successfully added. This may include a pop-up notification, a brief screen update, or the appearance of the new folder within your label or folder hierarchy.
Take a moment to review the location of the new folder within your Gmail account to ensure it is in the desired position. If needed, you can always make changes to the folder’s name, location, or other settings by accessing the folder management options within the Gmail app.
With the new folder saved, you are now ready to start using it to organize and manage your emails effectively on your tablet.
Saving the new folder is the final step in the process of creating a folder in the Gmail app on your tablet. By completing this step, you have successfully added a new folder to your Gmail account and can now take advantage of its benefits for better email organization.
Step 7: Access Your New Folder
Now that you have successfully saved the new folder in the Gmail app on your tablet, it’s time to learn how to access and utilize it for efficient email management.
To access your new folder, return to the main inbox screen of the Gmail app. Look for the sidebar menu, usually accessible through the three horizontal lines or “hamburger” icon located in the top left or top right corner of the app interface.
Tap on the sidebar menu icon to expand the menu and display the list of available options. Scroll through the menu until you find the “Labels” or “Folders” section.
In this section, you will see a list of labels and folders associated with your Gmail account. Locate the parent label or folder that you selected for your new folder during the creation process.
Tap on the parent label or folder to expand it. You should now see your newly created folder listed as a subfolder or sublabel within the parent category.
Simply tap on the name of your new folder to access its contents. This will open the folder, displaying the emails that you have moved or tagged with the folder label.
Within your new folder, you can perform various actions such as reading, replying, forwarding, or archiving emails, just like you would in the main inbox. You can also move emails to the new folder by selecting them and using the “Move To” or “Label” option available in the email menu.
By accessing your new folder, you will have a convenient and organized space to manage specific categories of emails, streamlining your email workflow on your tablet.
To navigate back to your main inbox or switch to other folders or labels within the Gmail app, simply use the back button or tap on the hamburger icon to access the sidebar menu again.
Remember to regularly check and manage the emails within your new folder to stay on top of your communication and maintain a clutter-free inbox.
By following these steps, you can easily access and utilize the new folder that you created in the Gmail app on your tablet, enabling you to manage your emails with ease and efficiency.
Conclusion
Adding folders in Gmail on a tablet is a simple yet powerful way to enhance your email management experience. By categorizing and organizing your messages, you can effectively streamline your inbox and locate important emails with ease.
In this guide, we have walked through the step-by-step process of adding a folder in the Gmail app on your tablet. We started by opening the Gmail app and accessing the sidebar menu. Then, we tapped on “Create New” to begin creating the folder. Next, we named the folder and chose a location for it within our Gmail account. We saved the folder, ensuring that all our changes were successfully applied. Finally, we learned how to access the new folder and utilize it for efficient email management.
By following these steps, you can create and utilize folders to better organize your emails on your tablet. This will help you stay on top of your communication, save time, and reduce the risk of missing important messages.
Remember to customize your folder names and choose locations that align with your unique needs and organization system. Regularly check and manage your folders to keep your email workflow productive and clutter-free.
Whether you use Gmail for personal or professional purposes, utilizing folders on your tablet can transform the way you manage your emails. Take advantage of this feature to stay organized, boost your productivity, and maintain a seamless email experience on your tablet.
So, start adding folders in Gmail on your tablet and enjoy the benefits of a well-organized and easy-to-navigate email system.