Introduction
Welcome to the world of email on Android devices! Setting up your email on your Android phone or tablet is a simple process that allows you to stay connected and access your emails on the go. Whether you’re using a personal email account or a work account, this guide will walk you through the steps to set up your email on your Android device.
In this article, we will cover the basic steps to set up email on Android. From opening the email application to customizing additional settings, we’ll provide you with the necessary information to get your email up and running.
Setting up your email on Android is essential if you want to check your emails conveniently and receive notifications when new messages arrive. With the built-in email application on your Android device, you can manage multiple email accounts, including popular providers like Gmail, Yahoo, Outlook, and more.
Whether you’re a tech-savvy individual or new to Android devices, this guide is designed to help you set up your email quickly and easily. So, let’s get started with the first step!
Step 1: Open the Email Application
The first step in setting up your email on Android is to open the Email application. On most Android devices, you can find the Email app by locating the envelope icon in your app drawer or on your home screen. Tap on the icon to open the Email app.
If you don’t see the Email app on your home screen or app drawer, don’t worry! It may vary depending on the device and the version of Android you’re using. In that case, you can try searching for “Email” in your device’s app drawer or check the “Google” or “Google Apps” folder, as it is commonly located there.
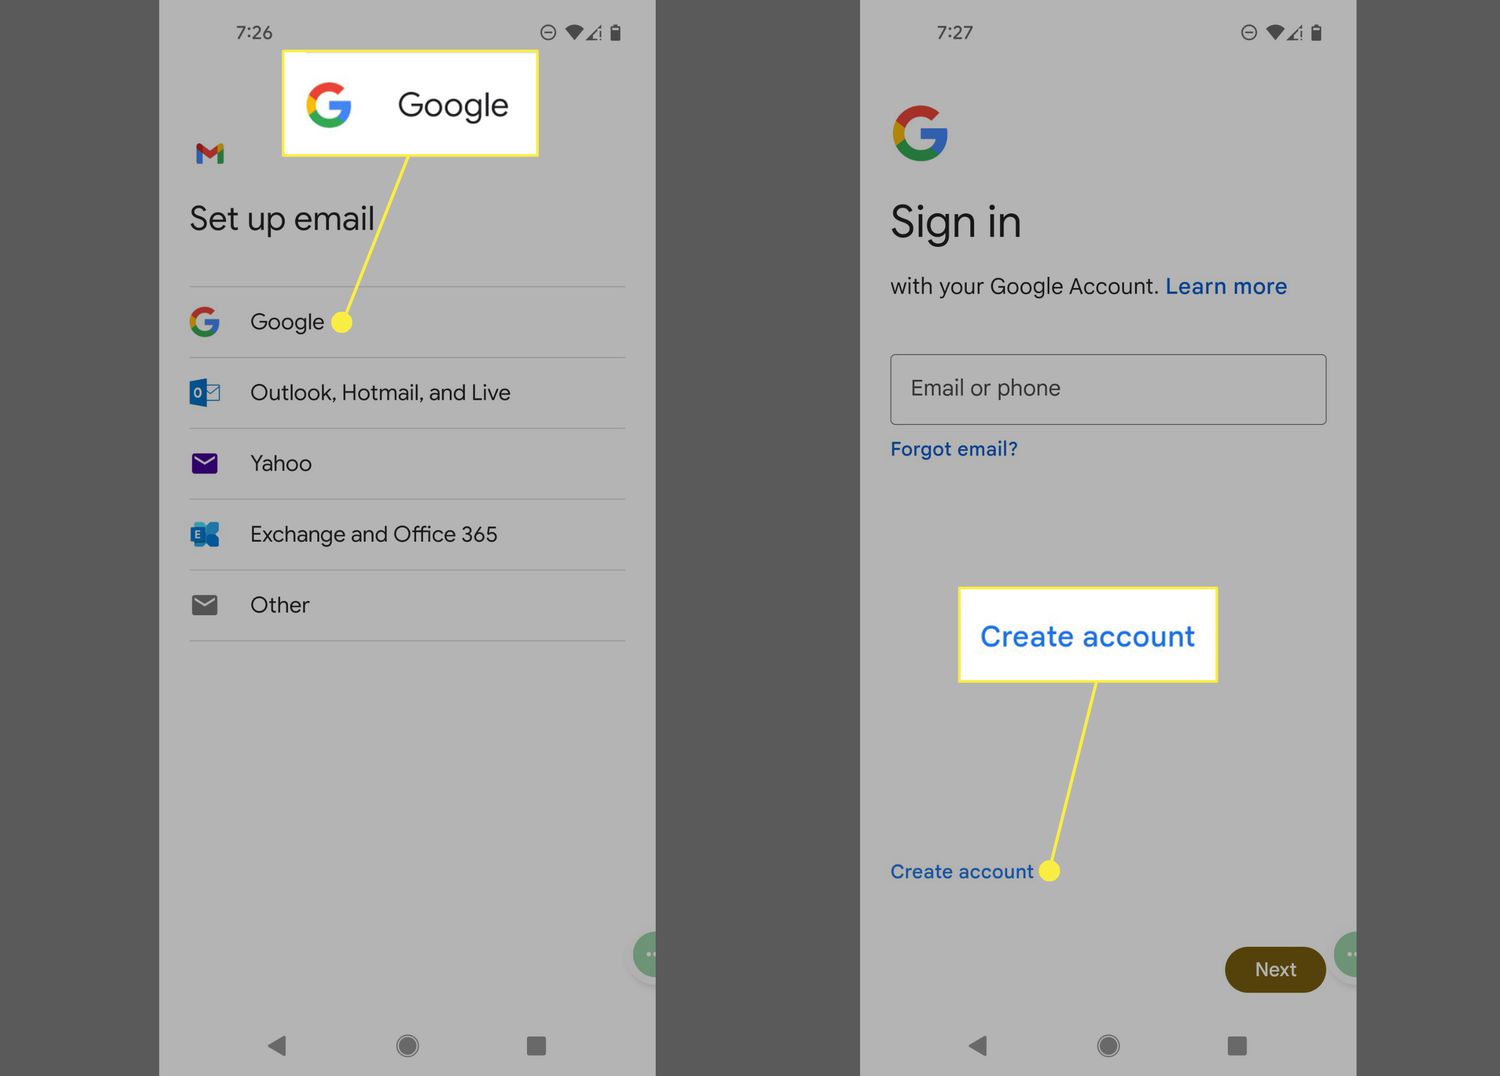
Once you’ve located and opened the Email app, you’ll be prompted to sign in to your email account. If you have multiple accounts, you may see a list of email providers to choose from. Select the email provider that corresponds to your email address, such as Gmail, Yahoo, Outlook, or any other email service you use.
If your email provider is not listed, you can choose “Other” or “Manual Setup” to enter the server settings manually. However, it’s recommended to select your email provider from the list whenever possible, as it will automatically configure the server settings for you.
Once you’ve selected your email provider, you’ll be prompted to enter your email address and password. Make sure to double-check the information you enter to avoid any login issues. After entering your email address and password, tap on the “Next” or “Sign In” button to proceed to the next step.
Congratulations! You’ve completed the first step in setting up your email on Android. In the next step, we’ll guide you through selecting the appropriate server settings for your email account. Let’s move on to step 2!
Step 2: Enter Your Email Address
After opening the Email app and selecting your email provider in step 1, the next step is to enter your email address. This is the address that you want to set up on your Android device to receive and send emails.
On the screen where you are prompted to enter your email address, you’ll see a text field labeled “Email address”. Tap on the text field to bring up the on-screen keyboard, and then type in your complete email address. Make sure to enter your email address correctly, including the domain name (e.g., “@gmail.com”, “@yahoo.com”).
If you have multiple email accounts, you can set up each account individually by repeating these steps for each address.
Once you have entered your email address, double-check it to ensure there are no typos or errors. It is important to accurately input your email address to ensure smooth functionality and proper synchronization with your email provider’s servers.
After entering your email address, tap on the “Next” or “Continue” button to proceed to the next step. The Email app will verify the email address and prepare to request the necessary server settings.
Great job! You’ve successfully entered your email address and are ready to move on to the next step. In the next section, we will guide you through selecting between IMAP or POP server settings for your email account. Let’s move on to step 3!
Step 3: Select IMAP or POP
Now that you have entered your email address, the next step is to select the server settings for your email account. The two most common options are IMAP (Internet Message Access Protocol) and POP (Post Office Protocol). These protocols determine how your emails are retrieved and stored on your Android device.
IMAP is the recommended option for most users as it provides a synchronized experience across multiple devices. With IMAP, your emails are stored on the server, and any changes you make on one device, such as deleting or moving emails, will be reflected on all devices connected to the same email account. This ensures that your emails are accessible from any device, making it easier to manage and organize your inbox.
POP, on the other hand, is an older protocol that downloads emails from the server to your device. Unlike IMAP, POP does not synchronize changes across devices. When you access your email from another device, the emails will not be marked as read or moved/deleted as they are on the original device. POP is generally suitable when you want to download and store emails locally on a specific device.
To select between IMAP and POP, you will be presented with a choice on the screen after entering your email address. Review the options provided and select the appropriate option based on your preferences and email usage.
If you’re unsure which option to choose, it’s recommended to go with IMAP for a more seamless email experience. However, if you prefer to have emails downloaded and stored locally on your Android device, POP may be more suitable for you.
Once you have made your selection, tap on the “Next” or “Continue” button to proceed to the next step. The Email app will gather the necessary server settings based on your chosen option.
Well done! You’ve successfully selected either IMAP or POP for your email account. In the next step, we will guide you through entering the incoming server settings. Let’s move on to step 4!
Step 4: Enter Incoming Server Settings
Now that you have selected your preferred server protocol (IMAP or POP), it’s time to enter the incoming server settings for your email account. These settings will allow your Android device to connect to your email provider’s server and retrieve incoming emails.
In the Email app setup process, you will be prompted to enter the incoming server hostname, port number, and security type. These settings can vary depending on your email provider, so it’s important to consult your email provider’s documentation or support resources to obtain the correct information.
Typically, the incoming server hostname is a combination of the email provider’s domain and a specific server name (e.g., imap.gmail.com, pop3.yahoo.com). The port number represents the specific communication channel used to connect to the server (common ports include 993 for IMAP and 995 for POP). The security type refers to the encryption protocol used for secure communication with the server (common options include SSL/TLS or STARTTLS).
You may also need to provide your email address and password again during this step to authenticate your account. Ensure that you enter this information accurately to avoid any login issues.
Once you have gathered the necessary server settings, carefully enter them into the corresponding fields in the Email app setup. Double-check the information to ensure it is correct. In order to validate your settings, the Email app may attempt to connect to the server to verify the connection. This authentication process may take a few moments.
If the settings are correct and the Email app is able to connect to the server, you will proceed to the next step. However, if there is an issue with the settings, such as an incorrect hostname or an unsupported security type, you may receive an error message. In that case, review your server settings and try again.
Great progress! You have successfully entered the incoming server settings for your email account. In the next step, we will guide you through entering the outgoing server settings. Let’s move on to step 5!
Step 5: Enter Outgoing Server Settings
After entering the incoming server settings in the previous step, it’s time to configure the outgoing server settings for your email account. These settings are necessary for sending emails from your Android device, ensuring that your outgoing messages are properly routed to the recipient’s mailbox.
Similar to the incoming server settings, you will need to enter the outgoing server hostname, port number, and security type. These settings, again, can vary based on your email provider’s requirements. It’s important to consult your provider’s documentation or support resources to obtain the correct information.
The outgoing server hostname typically follows a similar convention to the incoming server, such as smtp.gmail.com or smtp.mail.yahoo.com. The port number for outgoing mail is usually 587 or 465, but it’s important to verify the specific port recommended by your email provider. The security type selection may include options like SSL/TLS or STARTTLS.
Just like in the previous step, you may need to enter your email address and password to authenticate the account during the outgoing server setup. This ensures that you have permission to send emails on behalf of your email address.
Once you have gathered the correct server settings, carefully enter them into the corresponding fields in the Email app setup. Double-check the information for accuracy. The Email app will attempt to connect to the outgoing server to verify the settings and establish a connection.
If the settings are correct, the Email app will proceed to the next step. However, if there is an issue with the settings or authentication, you may receive an error message. In that case, review your server settings and try again.
Great job! You have successfully entered the outgoing server settings for your email account. In the next step, we will guide you through setting up the sync frequency for your email. Let’s move on to step 6!
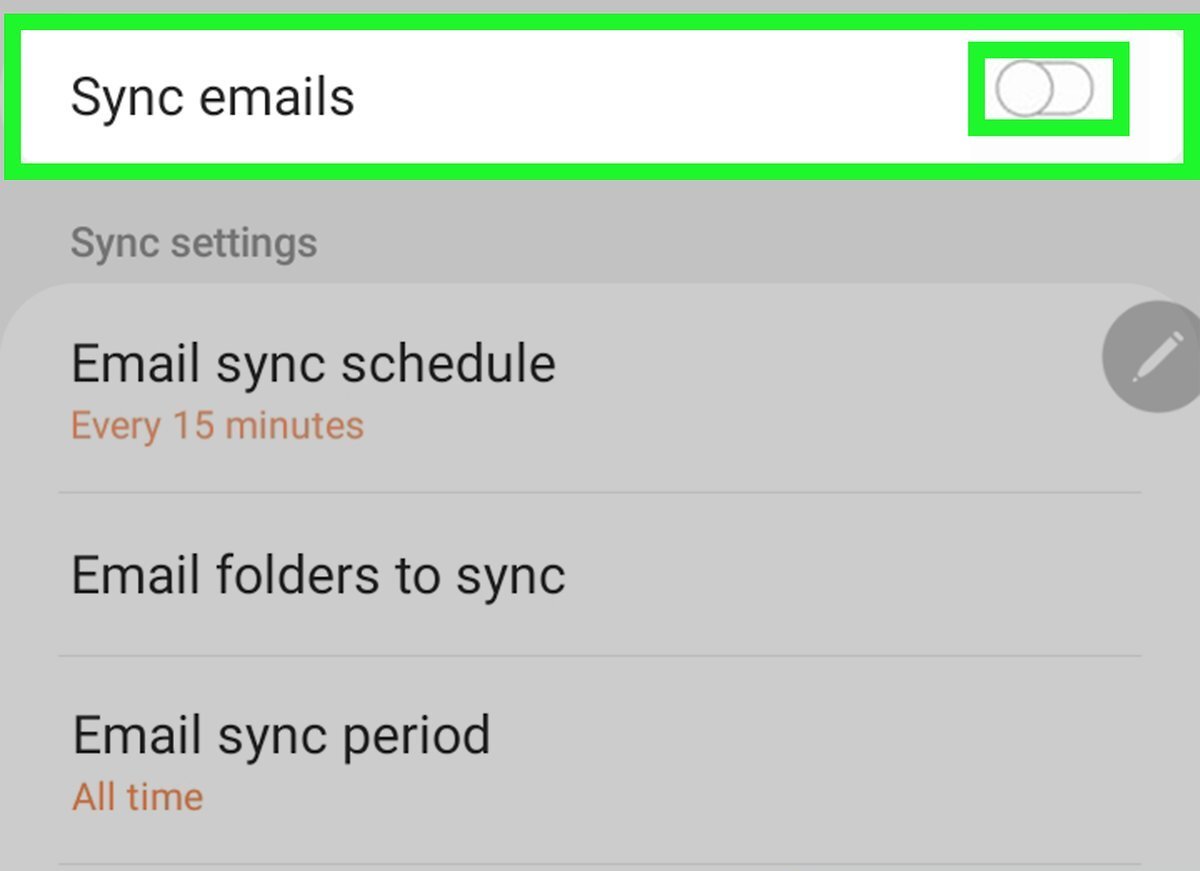
Step 6: Set Sync Frequency
Now that you have entered the incoming and outgoing server settings, it’s time to determine the sync frequency for your email account. Sync frequency refers to how often your Android device checks for new emails and updates your inbox.
The sync frequency options may vary depending on the Email app you are using and the version of Android on your device. Common options include “Every 15 minutes,” “Every hour,” “Every 6 hours,” or “Manual sync.” The default setting is usually set to check for new emails every 15 minutes.
Consider your email usage and preferences when selecting the sync frequency. If you want to receive emails as soon as they arrive, you can choose a shorter interval, such as every 15 minutes or every hour. However, keep in mind that more frequent syncing can consume more battery and data, especially if you receive a large volume of emails.
If you prefer to manually sync your emails, you can choose the “Manual sync” option. This means that your Android device will not automatically check for new emails, and you will need to manually refresh the inbox by opening the Email app and pulling down on the screen.
Once you have selected the desired sync frequency, tap on the “Next” or “Continue” button to proceed to the next step. The Email app will apply the sync frequency settings to your email account.
Well done! You have successfully set the sync frequency for your email account. In the next step, we will guide you through customizing additional settings to personalize your email experience. Let’s move on to step 7!
Step 7: Customize Additional Settings
Now that you have set up the basic functionality of your email account, it’s time to customize additional settings to personalize your email experience on your Android device. These additional settings allow you to tailor the Email app to meet your specific preferences and needs.
Some of the common additional settings you can customize include:
- Notification Preferences: You can adjust how the Email app notifies you about new emails. You can choose to receive sound alerts, vibration alerts, or even customize specific notification tones for different email accounts. You may also have the option to control whether the notifications appear on the lock screen or in the status bar. Explore the Email app settings to customize your notification preferences.
- Signature: You can create a personalized signature that will be appended to the end of your outgoing emails. This can include your name, contact information, or any other message you would like to include. This signature will be automatically added to every email you send from your Android device. Look for the option to edit your signature in the Email app settings.
- Sync Options: Besides setting the sync frequency, you may have additional sync options available. These options allow you to choose what content is synced from your email account. For example, you can choose to sync only the past week’s emails, or you can choose to sync all emails from a specified time period. These options can help you manage your device’s storage space or limit the amount of content downloaded. Check the Email app settings to explore the available sync options.
- Auto-reply: Some Email apps offer the option to set up an auto-reply message. Auto-reply allows you to automatically respond to incoming emails with a predefined message. This can be useful when you’re on vacation, out of the office, or simply unable to respond immediately. If this feature is available in your Email app, you can find it in the settings under “Auto-reply” or “Vacation responder.”
Take some time to explore the additional settings in the Email app to customize it according to your preferences. Remember that these settings may vary depending on your device’s operating system and the specific Email app you are using.
Awesome job! You have successfully customized additional settings for your email account. In the next step, we will guide you through the final steps to complete the email setup. Let’s move on to step 8!
Step 8: Complete Email Setup
You’re almost there! In this final step, you will complete the email setup process on your Android device. This involves reviewing and confirming the settings you have entered and making any necessary adjustments before finalizing the setup.
After customizing the additional settings in the previous step, you will be presented with an overview of your email account settings. Take a moment to carefully review the information displayed, including your email address, server settings, sync frequency, and any customizations you have made.
If everything appears to be correct, tap on the “Finish”, “Done”, or “Save” button to complete the email setup. The Email app will save your settings and attempt to connect to the servers using the specified configurations.
If there are any errors or issues with the setup, you may receive an error message indicating what went wrong. In that case, review the settings you have entered to ensure they are accurate and make any necessary adjustments. If you are unsure about the settings, consult your email provider’s support documentation or contact their customer support for assistance.
Once the email setup is successful, you should see your inbox populated with any existing emails and start receiving new emails as they arrive. Congratulations, you have successfully set up your email on your Android device!
Now, you can start using the Email app to manage and organize your emails, compose new messages, and reply to incoming emails. The app may offer additional features like categorizing emails, creating folders, or flagging important messages. Take some time to explore the Email app’s features and menus to fully utilize its capabilities.
Don’t forget to regularly check for app updates and ensure that your device’s operating system is up to date to benefit from the latest features and security enhancements in the Email app.
Well done! You have completed the email setup process on your Android device. You’re all set to stay connected and manage your emails conveniently from the palm of your hand. Enjoy the seamless email experience on your Android device!
Conclusion
Setting up your email on an Android device doesn’t have to be complicated. With the step-by-step guide provided in this article, you can easily configure your email account and stay connected while on the go. By following the instructions for each step, you can ensure that your email settings are correctly entered, allowing you to conveniently send, receive, and manage your emails right from your Android device.
Remember to double-check the server settings, including the incoming and outgoing server information, to ensure that your email app can successfully connect to your email provider’s servers. This will ensure a smooth and seamless email experience without any disruptions in sending or receiving messages.
Customizing additional settings, such as notification preferences, signatures, and sync options, allows you to tailor the email app to your specific needs and preferences. Take advantage of these features to further enhance your email management and make it more efficient and personalized.
Once the email setup is complete, you can start utilizing the email app to its fullest potential. Stay organized by creating folders, flagging important messages, and utilizing search functionalities to find specific emails easily. Regularly check for updates to the email app and keep your device’s operating system up to date to benefit from the latest features and security enhancements.
Now that you know how to set up email on your Android device, you can enjoy the convenience of staying connected to your email wherever you are. Whether you use your email for personal or professional purposes, having it easily accessible and synchronized on your Android device will make your life more efficient and productive.
If you encounter any issues or have any questions during the email setup process, don’t hesitate to consult the documentation or support resources provided by your email provider. They will be able to assist you in resolving any setup or configuration issues.
Now, go ahead and set up your email on your Android device and experience the convenience of staying connected on the go. Happy emailing!