Introduction
With the increasing prevalence of digital communication, email has become an essential tool for both personal and professional communication. While plain text emails have long been the norm, adding visual elements can greatly enhance the impact and engagement of your messages. One popular way to make your emails more dynamic and eye-catching is by incorporating GIFs.
GIFs, short for Graphics Interchange Format, are lightweight animations that can inject humor, convey emotions, or illustrate ideas in a concise and entertaining manner. They have gained immense popularity across various online platforms, including social media, messaging apps, and now, email.
In this article, we will explore the benefits of including GIFs in Outlook emails and provide step-by-step instructions on how to effectively add them to your messages. Whether you’re looking to add a touch of personality to your personal emails or create impactful marketing campaigns, using GIFs in Outlook emails can help you achieve your desired communication goals.
Why Add GIFs to Outlook Emails?
Adding GIFs to your Outlook emails can have numerous benefits that can help you stand out in crowded inboxes and make a lasting impression on your recipients. Here are some reasons why you should consider incorporating GIFs into your email communication:
- Enhanced Visual Appeal: GIFs are visually engaging and can capture the attention of your audience immediately. By using a well-placed and relevant GIF, you can make your emails more visually appealing and increase the chance of your message being read and remembered.
- Increased Engagement: GIFs have the power to evoke emotions, convey ideas, and entertain recipients. By including a GIF that aligns with your message or showcases your brand’s personality, you can create a more interactive and engaging experience for your email recipients.
- Expressive Communication: Traditional plain text emails can sometimes fail to properly convey tone and emotions. GIFs, on the other hand, can effectively communicate humor, excitement, gratitude, or any other emotion you want to express. Adding GIFs to your Outlook emails allows you to break the monotony of text and inject personality into your messages.
- Increased Message Recall: Studies have shown that people remember visual content better than plain text. By using GIFs, you can make your message more memorable, increasing the likelihood that your recipients will remember and act upon the information you’ve shared in your email.
- Building Brand Identity: Consistently including GIFs in your email communications can help solidify your brand’s identity and make it more recognizable. By choosing GIFs that reflect your brand’s style, values, and message, you can reinforce your brand identity and create a cohesive visual experience across all your communications.
By leveraging the power of GIFs in your Outlook emails, you can create visually appealing, engaging, and memorable messages that effectively convey your intended message. Whether you’re looking to spice up personal emails, deliver marketing promotions, or simply add some fun to your professional communications, incorporating GIFs into your Outlook emails can take your email game to a whole new level.
How to Find GIFs for Outlook Emails
Before you can add GIFs to your Outlook emails, you need to find the perfect ones that suit your message and audience. Here are two popular methods for finding GIFs:
Method 1: Using an Online GIF Database
There are several online platforms that provide an extensive collection of GIFs for you to choose from. These platforms allow you to search for specific keywords, browse different categories, and even discover trending GIFs. Some popular online GIF databases include Giphy, Tenor, and Imgur.
To find GIFs using this method, follow these steps:
- Visit an online GIF database like Giphy (giphy.com) or Tenor (tenor.com).
- Use the search bar to type in keywords related to the GIF you’re looking for. For example, if you’re looking for a GIF that represents excitement, you can search for “excited.”
- Browse through the search results and click on the GIFs that catch your eye to preview them.
- Once you’ve found the perfect GIF, click on it to view its details and options for sharing or downloading.
- Download the GIF to your computer or use the provided sharing options to copy the GIF’s URL.
Method 2: Creating Your Own GIFs
If you have a specific idea in mind or want to personalize your GIFs, you can create your own using various tools and software. Some popular options for creating GIFs include Adobe Photoshop, Giphy’s GIF Maker, and EZGif.com.
To create your own GIF using this method, follow these steps:
- Choose the tool or software you want to use for creating GIFs.
- Follow the instructions provided by the tool or software to create your desired animation or sequence of images.
- Modify any settings or add effects to enhance your GIF’s appearance.
- Save the GIF to your computer or use the provided options to store or share the GIF.
By using these methods, you can find or create GIFs that perfectly complement your Outlook emails. Whether you’re looking for a funny reaction GIF or a branded animation, exploring online GIF databases or creating your own GIFs opens up a world of possibilities for enhancing your email communications.
Method 1: Using an Online GIF Database
One of the easiest and most convenient ways to find GIFs for your Outlook emails is by using an online GIF database. These platforms offer a vast collection of GIFs that cover a wide range of categories, themes, and emotions. Here’s how you can use an online GIF database to find the perfect GIF for your email:
- Choose a Reliable Online GIF Database: Start by selecting a reputable and user-friendly online GIF database. Popular options include Giphy, Tenor, and Imgur. Visit the website of your preferred database to get started.
- Use Keywords or Explore Categories: Once you’re on the GIF database website, you can begin searching for GIFs. You can either enter specific keywords related to the GIF you have in mind or explore different categories to find inspiration. For example, if you’re looking for a GIF that expresses excitement, you could enter the keyword “excited” or browse the “Emotions” or “Celebrations” categories.
- Browse the Results: After entering your search query or selecting a category, the GIF database will display a list of relevant GIFs. Take your time to browse through the results, ensuring that the style and content of the GIF align with your email’s purpose and audience.
- Preview and Select a GIF: To get a better idea of how the GIF will look in your email, most GIF databases allow you to preview the GIF by clicking on it. This will play the animation and give you a sense of its movement and visual impact. Once you’ve found the perfect GIF, click on it to select it for your email.
- Download or Copy the GIF: Depending on the GIF database, you may have options to download the GIF directly to your computer or copy the GIF’s URL. Choose the option that suits your needs and preferences.
Remember to consider the context and audience of your email when selecting a GIF. Ensure that the GIF is appropriate for the tone of your message and aligns with your recipient’s preferences.
Using an online GIF database is a straightforward and effective way to find the ideal GIF for your Outlook emails. These platforms provide a diverse selection of GIFs, allowing you to engage your recipients, convey emotions, and add a touch of creativity to your email communications.
Method 2: Creating Your Own GIFs
If you want to add a personal touch to your Outlook emails and have complete control over the content of your GIFs, creating your own GIFs is a great option. By using various tools and software, you can bring your ideas to life and customize GIFs to suit your specific needs. Here’s how you can create your own GIFs:
- Select a GIF Creation Tool: Choose a tool or software that allows you to create GIFs. Some popular options include Adobe Photoshop, Giphy’s GIF Maker, and EZGif.com. Explore these tools and find one that best fits your skill level and requirements.
- Create the Animation: Once you’ve selected a GIF creation tool, you can start creating your animation. This typically involves selecting or creating a series of images or frames to form the animated sequence. You can use existing photos or illustrations, or create your own using graphic design software.
- Customize the GIF: After bringing together your frames or images, you may have the option to customize your GIF. Consider adding effects, text overlays, or resizing the GIF to optimize its appearance and convey your desired message effectively.
- Preview and Adjust: Before finalizing your GIF, preview it to see how the animation flows and to ensure it meets your expectations. Make any necessary adjustments or tweaks to achieve the desired animation and visual effects.
- Save or Share the GIF: Once you’re satisfied with your GIF, save it to your computer using the appropriate file format (typically GIF). Some GIF creation tools also provide options to share the GIF directly to social media platforms or provide a shareable link.
Creating your own GIFs gives you the flexibility to tailor the animations to your exact specifications. You can incorporate your brand elements, specific messages, or unique visual styles. However, keep in mind that it may require some basic graphic design skills or familiarity with the chosen GIF creation tool.
Experiment with different tools and techniques to unlock your creativity and produce GIFs that resonate with your email recipients. Creating your own GIFs allows you to unleash your imagination and add a personal touch to your Outlook emails, ensuring that they stand out from the crowd and leave a lasting impression.
Adding GIFs to Outlook Emails
Once you’ve found or created the perfect GIF for your Outlook email, it’s time to incorporate it into your message. Adding GIFs to Outlook emails is a straightforward process that can be done using the following steps:
Step 1: Composing a New Email
Launch Microsoft Outlook and click on the “New Email” button to start composing a new email. Enter the recipient’s email address, subject line, and the main body of your message. Ensure that your email is in HTML mode, as GIFs can only be inserted into HTML-formatted emails.
Step 2: Inserting the GIF into the Email Body
To insert the GIF, place your cursor in the desired location within the email body where you want the GIF to appear. Then, navigate to the “Insert” tab on the Outlook ribbon and click on the “Pictures” or “Online Pictures” option, depending on your version of Outlook.
A file browser will open, allowing you to browse your computer for the GIF file or search for an online GIF using a URL. If the GIF is stored on your computer, navigate to the location where the GIF is saved and select it. If you have the URL of the GIF, paste it into the file browser’s address bar, and the GIF will be added to your email.
Step 3: Adjusting the GIF Size and Placement
After inserting the GIF into your email, you can resize it or adjust its placement as needed. Simply click on the GIF to select it, and small handles or markers will appear around the edges of the GIF. Use these markers to resize the GIF by dragging them inward or outward.
You can also click and drag the GIF to reposition it within the email body. Experiment with different sizes and placements to find the best arrangement that enhances your email’s visual appeal and reinforces its message.
Step 4: Sending the Email with the GIF
Once you’re satisfied with the GIF’s placement and size, it’s time to send your email. Double-check the email content, subject line, and recipient’s email address for accuracy. If everything looks good, click on the “Send” button to send the email with the embedded GIF.
It’s important to note that not all email clients support animated GIFs, so there’s a chance that some recipients may only see a static image instead of the animation. To mitigate this, ensure that the GIF you choose is visually appealing even as a static image, and consider providing alternative text or a brief description to convey the intended message in case the animation does not play.
By following these steps, you can successfully add GIFs to your Outlook emails, making them more engaging, visually appealing, and memorable for your recipients. Experiment with different types of GIFs and placements to find the best approach that suits your email’s purpose and resonates with your audience.
Step 1: Composing a New Email
Before you can add a GIF to your Outlook email, you need to start by composing a new email. This step is essential for creating the space where you can insert the GIF. Here’s how you can begin composing a new email in Outlook:
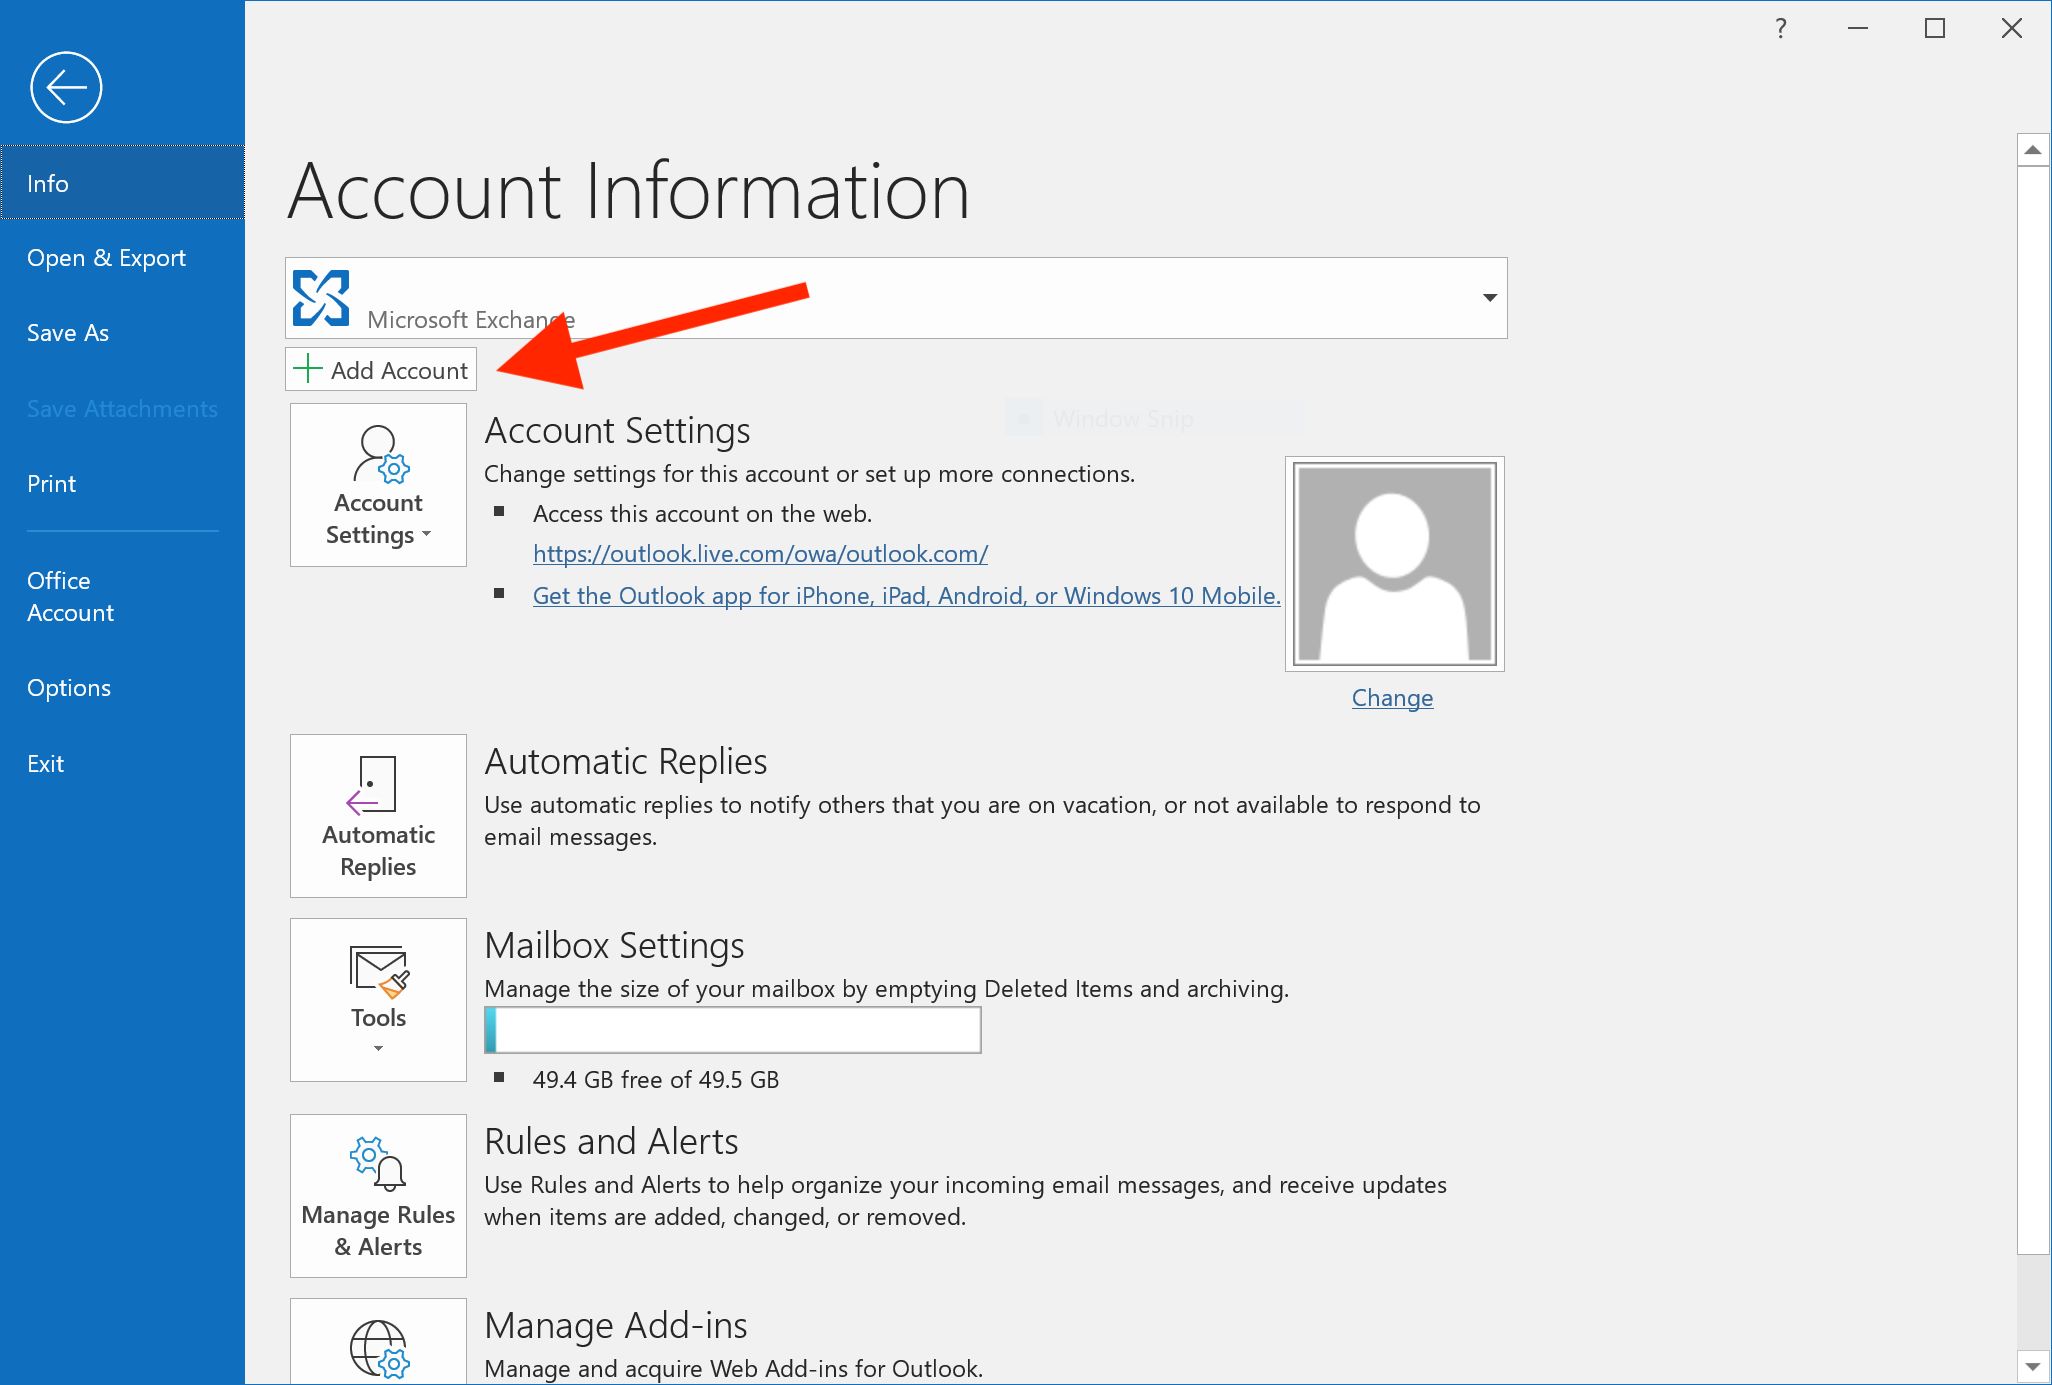
- Launch Microsoft Outlook: Start by opening the Microsoft Outlook application on your computer.
- Click on “New Email”: Look for the “New Email” button, usually located on the top left or within the toolbar of the Outlook interface. Click on it to start composing a new email.
- Fill in the Recipient’s Email Address: In the “To” field, enter the email address of the recipient or recipients you intend to send the email to. You can type the email address manually or select recipients from your address book or contact list by clicking on the “To” button.
- Add a Subject Line: In the “Subject” field, enter a concise and descriptive subject line that summarizes the content or purpose of your email. This will help your recipients understand the main topic or action required from them.
- Compose the Email Body: In the main body section of the email, you can start typing your message. You have the flexibility to use plain text or format your email using HTML elements to add formatting, images, and, of course, GIFs.
- Choose HTML Format: Ensure that your email is in HTML format, as GIFs can only be inserted into HTML-formatted emails. Most modern email clients, including Outlook, offer HTML formatting options by default. If you’re not sure, check the formatting options or preferences settings in your Outlook application.
Composing a new email in Outlook provides you with the foundation for adding the GIF later in the process. Make sure to include all the necessary components, such as the recipient’s email address, a subject line, and the main body of your email. Once you’ve completed this step, you are ready to proceed to the next step of inserting the GIF into your email.
Step 2: Inserting the GIF into the Email Body
Once you have composed a new email in Outlook, the next step is to insert the GIF into the email body. This allows you to add visual interest and engage your recipients with animated content. Follow these steps to seamlessly insert the GIF:
- Place the Cursor: Position your cursor at the spot within the email body where you want the GIF to appear. This ensures that the GIF is inserted in the desired location within your message.
- Access the Insert Tab: In the Outlook ribbon at the top of the screen, find and click on the “Insert” tab. This tab contains various options for adding different elements to your email.
- Choose the Picture or Online Pictures Option: Within the Insert tab, look for the “Pictures” or “Online Pictures” option, depending on the version of Outlook you are using. Clicking on this option will open a file browser or an online image search interface.
- Select the GIF: Use the file browser to navigate to the location where the GIF is saved on your computer. Alternatively, if you are using the online image search interface, you can enter the URL of the GIF or browse through available images to find the desired GIF.
- Insert the GIF: Once you have located the GIF, select it and click on the “Insert” button. This action will embed the GIF into the email body at the location where you placed your cursor.
After following these steps, the GIF will be successfully inserted into your Outlook email. You can proceed to further customize its size and placement or include any accompanying text or additional visuals to enhance the overall email layout. Adding GIFs to your emails adds a dynamic and eye-catching element to your messages, helping you to create a more engaging and memorable experience for your recipients.
Step 3: Adjusting the GIF Size and Placement
Once you have inserted the GIF into your Outlook email, you may want to fine-tune its size and placement to ensure that it fits perfectly within the email body. Adjusting the size and placement allows you to create an aesthetically pleasing and visually balanced email. Follow these steps to customize the GIF to your preferences:
- Select the GIF: To adjust the size or placement of the GIF, click on it once to select it. The selected GIF will be outlined or highlighted, indicating that it can now be modified.
- Resize the GIF: To resize the GIF, click and drag one of the small squares or circles located on the edges or corners of the selection. Dragging these handles inward will decrease the size of the GIF, while dragging them outward will increase its size. Resize the GIF to the desired dimensions that complement the email and ensure it retains its visual impact.
- Reposition the GIF: To change the placement of the GIF within the email body, click and drag the selected GIF to a new location. Move it to a position that works harmoniously with the surrounding text and other visual elements in the email.
- Align the GIF: If you have multiple elements in your email, such as text or images, you can align the GIF to ensure it aligns properly with the other elements. Use the alignment options available in the Outlook toolbar to align the GIF as needed. This will help create a visually cohesive layout.
Take your time to experiment with different sizes and placements to find the optimal position and proportions for the GIF in your email. Aim for a visually appealing composition that strikes a balance between highlighting the GIF and maintaining readability and coherence within the overall email design.
Remember that resizing or repositioning the GIF should be done in a way that does not distort the animation or compromise its clarity. Pay attention to the quality and legibility of the GIF as you make adjustments. Once you are satisfied with the size and placement, you can proceed to the final step of sending the email with the embedded GIF.
Step 4: Sending the Email with the GIF
After you have inserted and adjusted the GIF within your Outlook email, the final step is to send the email with the embedded GIF to your intended recipient(s). Following this step ensures that your recipients will be able to enjoy the animated content you included. Here’s what you need to do:
- Review the Email Content: Before sending the email, take a moment to review the content, including the text, subject line, and any other visual elements. Make sure there are no spelling or grammar errors and that the message is clear and effectively communicates your intent.
- Double-Check the Recipient’s Email Address: Verify that you have entered the correct email address(es) of your intended recipient(s). Double-checking this information helps ensure that the email reaches the desired individuals or groups.
- Test the GIF Animation: To ensure that the GIF appears as intended, you can perform a quick test by sending a preview of the email to yourself or a trusted colleague. This allows you to confirm that the GIF animates smoothly and is visually appealing. Pay attention to any resizing or formatting issues that may have occurred during the sending process.
- Click on “Send”: Once you are confident that everything is in order, click on the “Send” button to send the email with the embedded GIF to your recipient(s).
- Keep in Mind GIF Compatibility: It is important to note that not all email clients may support animated GIFs. While most modern email clients can display GIFs, there is a possibility that some recipients may receive a static version of the GIF. To ensure maximum compatibility, choose widely supported formats such as GIF and keep the file size of the GIF as small as possible to reduce the risk of delivery issues.
By following these steps, you can confidently send your Outlook email with the embedded GIF to your recipients. As they open the email, the GIF will come to life, adding a visually engaging and dynamic element to your message. Remember to always test the email before sending to ensure the GIF displays properly and achieves the desired impact on the recipient’s end.
Adding a GIF to your Outlook emails allows you to enhance your communication, make it more engaging, and leave a memorable impression on your recipients. Get creative, have fun with it, and embrace the power of visual storytelling through animated images!
Conclusion
Adding GIFs to your Outlook emails can be a game-changer when it comes to capturing attention, conveying emotions, and making your messages more engaging. Throughout this article, we have explored the benefits of incorporating GIFs into your email communication, as well as the methods for finding GIFs and adding them to your Outlook emails.
By using online GIF databases, you can easily search for and select the perfect GIF that aligns with your message and audience. These platforms offer a wide range of options, allowing you to convey humor, emotions, or support your brand identity effectively.
If you’re feeling creative, creating your own GIFs gives you full control over the content and allows you to personalize your email communication even further. Through various tools and software, you can bring your ideas to life and craft GIFs that are tailored to your unique message and brand image.
Once you have selected or created the ideal GIF, adding it to your Outlook email is a simple process. Compose a new email, insert the GIF into the email body, adjust its size and placement for optimal visual impact, and then send it to your recipients. Keep in mind the compatibility of animated GIFs across different email clients to ensure that your recipients can fully enjoy the animated experience.
Adding GIFs to your Outlook emails can help you stand out in crowded inboxes, increase engagement, and leave a lasting impression on your recipients. However, it’s important to use GIFs strategically and considerately. Be mindful of your audience and choose GIFs that are relevant to your message and recipient’s preferences.
So why wait? Start experimenting with GIFs in your Outlook emails and discover how these animated visuals can transform your communication. From personal emails to marketing campaigns, GIFs can inject personality, convey emotions, and make your messages more memorable.