Introduction
Welcome to this step-by-step guide on how to add an email account to Outlook. Whether you’re setting up a new account or adding an additional one, Outlook makes it easy to access all your emails in one place. With its user-friendly interface and powerful features, Outlook has become a popular choice for managing emails.
Having your email account integrated with Outlook allows you to enjoy several benefits. First and foremost, it provides a centralized location to manage your emails, contacts, and calendar events. With Outlook’s robust features, you can easily organize, search, and categorize your emails for efficient workflow.
Another advantage of using Outlook is its offline availability. Once your email account is set up, you can access your emails even without an internet connection. This feature is particularly useful for travelers or those working in areas with unreliable or limited internet access.
In addition to these features, Outlook also offers advanced email security options, such as spam filtering and encryption, to help protect your sensitive information. With its seamless integration with other Microsoft products like Word, Excel, and OneDrive, you can further enhance productivity by easily sharing files and collaborating with others.
Now, let’s get started and learn how to add your email account to Outlook. Whether you’re using a personal email account or a business account, this guide will walk you through the necessary steps to set up your email account and start using Outlook to its full potential.
Step 1: Open Outlook
The first step in adding an email account to Outlook is to open the application. If you already have Outlook installed on your computer, you can find it in your list of programs or search for it in the Start menu. Once you locate it, simply click on the Outlook icon to launch the application.
If you don’t have Outlook installed, you can download it from the Microsoft website or use the web version of Outlook through your internet browser. The web version provides similar functionality and allows you to access your email account without installing any software.
Upon opening Outlook, you will be prompted to sign in with your Microsoft account. If you already have a Microsoft account, enter your email address and password. If you don’t have one, you can create a new account by clicking on the “Create one” option.
If you prefer to use Outlook for work or school, you may have an Office 365 account provided by your employer or educational institution. In this case, choose the “Sign in with a different account” option and enter your work or school email address along with the corresponding password.
Once you’ve successfully signed in, Outlook will open, and you will be greeted with your mailbox. Now, you’re ready to proceed to the next step and start adding your email account!
Step 2: Click on File
After launching Outlook and signing in to your Microsoft account, the next step is to click on the File tab located in the top-left corner of the Outlook application. The File tab is where you can access various options and settings to manage your email account.
When you click on the File tab, a dropdown menu will appear with several options. This menu provides access to important functions like adding and managing email accounts, setting up automatic replies, managing rules and alerts, and much more.
One of the most commonly used options under the File tab is the Account Information page, where you can view and modify your email account settings. From this page, you can add or remove email accounts, change the account password, update the display name, and set the default email account.
In addition to the Account Information page, the File tab also provides options to manage your mailbox, including checking for new emails, archiving old emails, importing or exporting email data, and emptying the deleted items folder. These options help you keep your mailbox organized and ensure smooth email management.
Furthermore, the File tab is where you can access the Outlook Options menu. This menu allows you to customize various settings and preferences according to your needs. From here, you can adjust the email notification sound, change the mailbox layout, set up signature, specify delivery options, and configure other advanced settings.
By clicking on the File tab, you gain access to a wide range of features and settings to personalize your Outlook experience and manage your email account efficiently. Now that you know how to navigate to the File tab, let’s move on to the next step and explore the option to add an email account to Outlook.
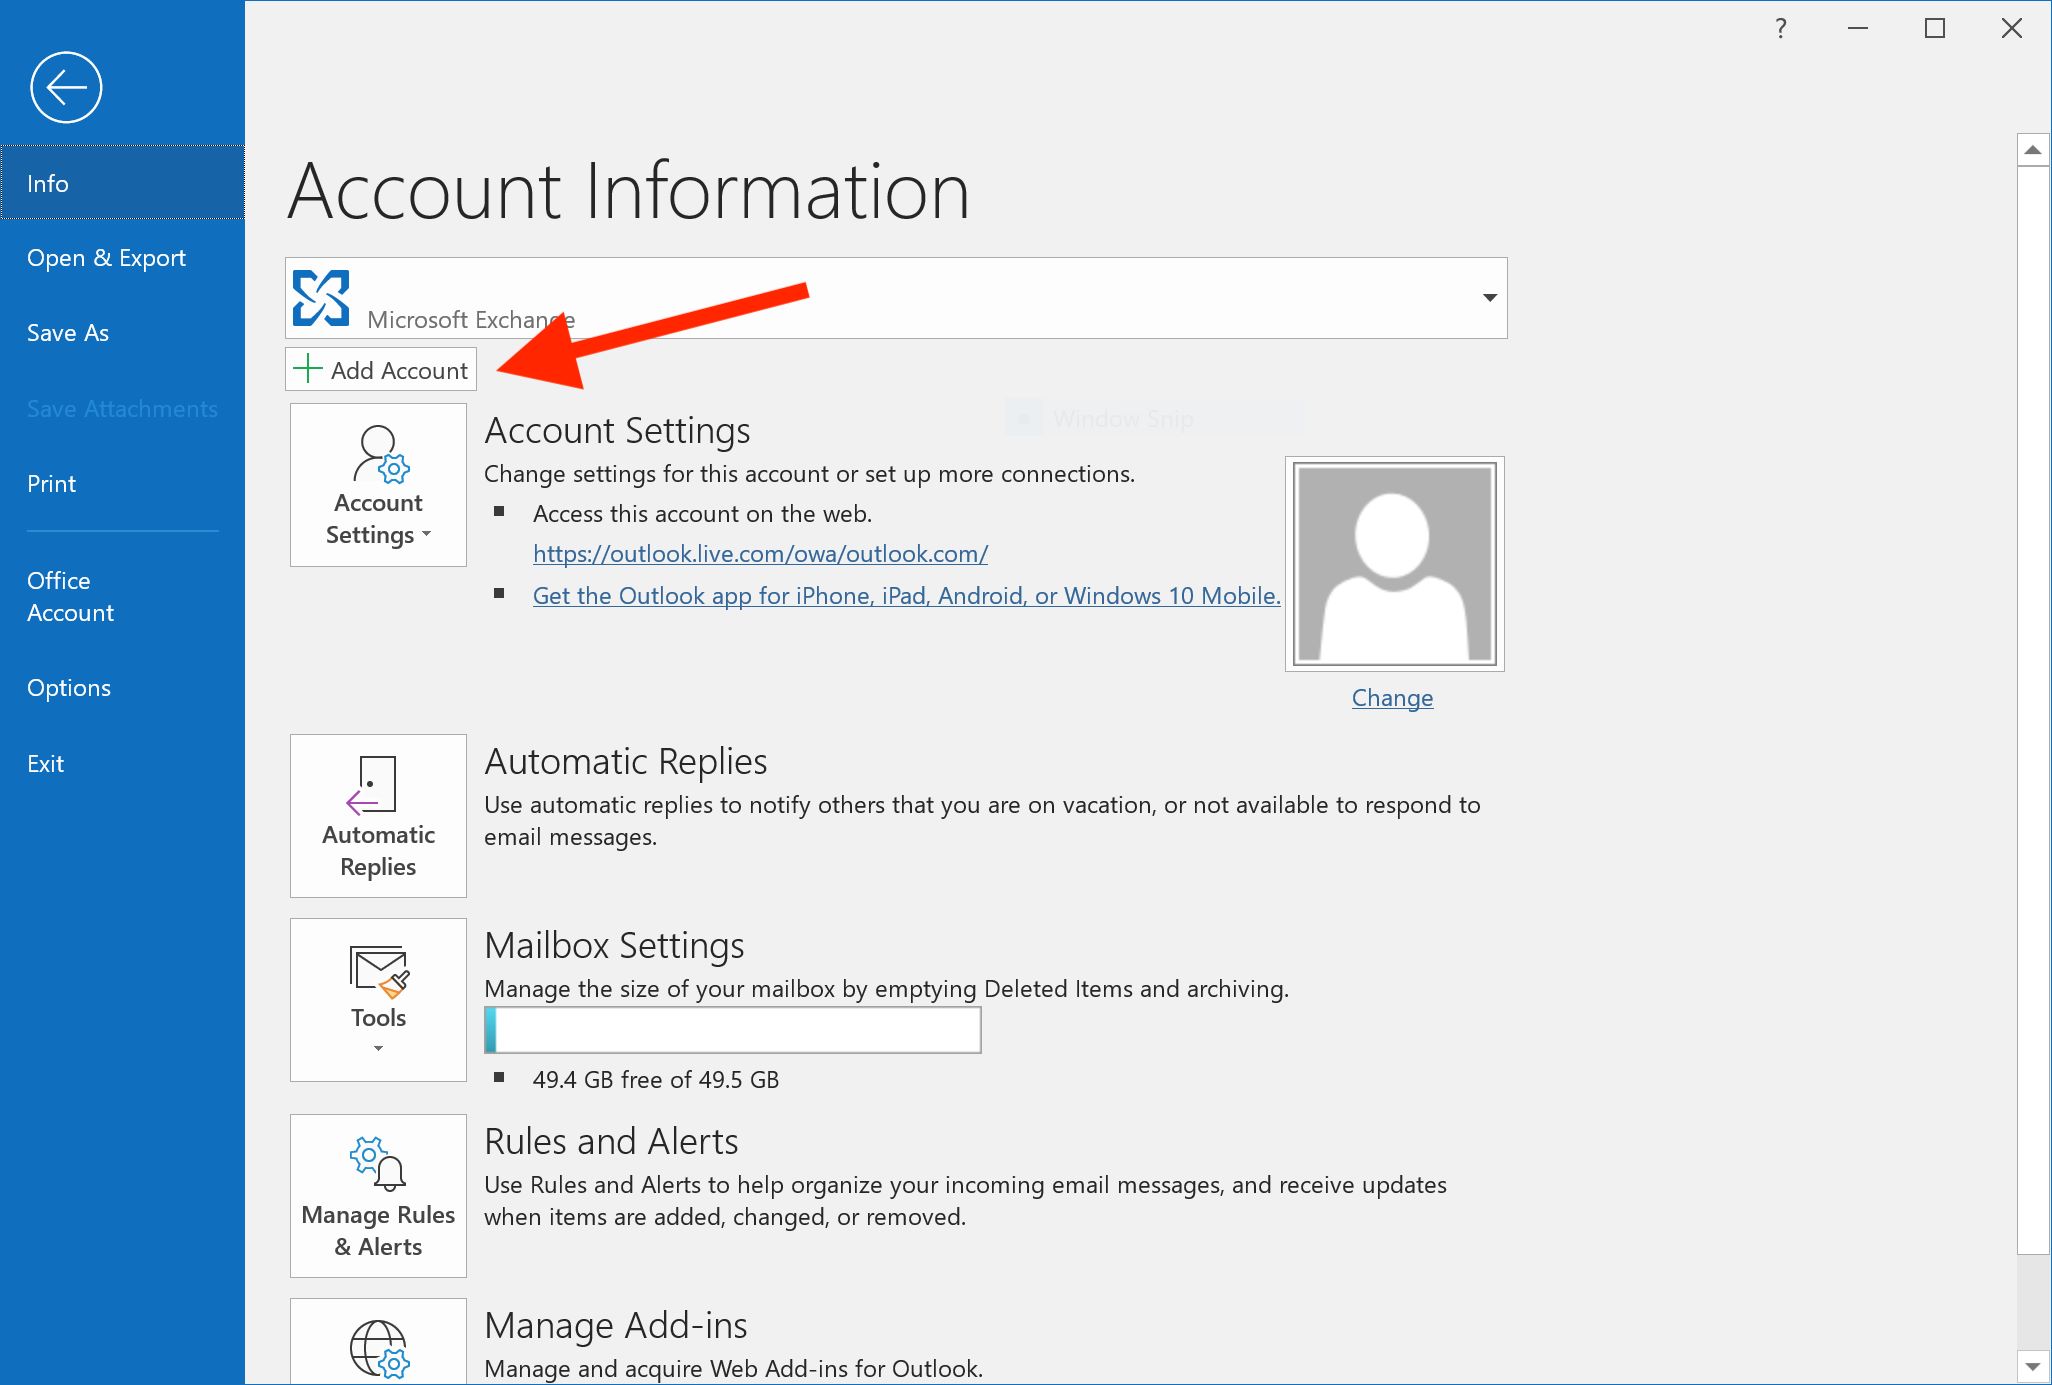
Step 3: Click on Add Account
After clicking on the File tab in Outlook, a dropdown menu will appear with several options. To add a new email account, you will need to locate and click on the “Add Account” option. This will open the account setup wizard, which will guide you through the process of adding your email account to Outlook.
When you click on the “Add Account” option, a new window will open with two choices: “Add an email account” and “Connect to a Microsoft account.” For the purpose of this guide, we will focus on the “Add an email account” option as it covers most types of email accounts.
Clicking on the “Add an email account” option will take you to the account setup page. Here, you will be prompted to enter the email address for the account you wish to add. Type in your complete email address and click on the “Connect” button.
Outlook will then attempt to automatically detect the settings for your email account. If successful, you will see a notification that your account has been added. In some cases, Outlook may not be able to automatically detect the settings, especially for custom or less common email providers. In such instances, you will need to manually enter the server settings, which we will cover in the subsequent steps.
Once the account setup process is complete, Outlook will start synchronizing your email account, and you will be able to access your emails and other related information directly within the Outlook application.
By clicking on the “Add Account” option, you initiate the account setup wizard in Outlook, and it brings you one step closer to enjoying the convenience of accessing all your email accounts in one place. Now, let’s move on to the next step and explore the options within the account setup wizard to configure your email account settings.
Step 4: Select Manual Setup or Additional Server Types
Once you have clicked on the “Add Account” option in Outlook, you will be presented with the account setup page. Here, you will have two choices: “Manual setup or additional server types” and “Outlook.com or Exchange ActiveSync compatible service.”
If you are setting up a custom or less common email account, or if you prefer to manually enter the server settings, you should select the “Manual setup or additional server types” option. This selection allows you to have full control over the configuration of your email account settings.
On the other hand, if you are setting up a commonly used email service such as Outlook.com, Office 365, or Exchange, you can select the “Outlook.com or Exchange ActiveSync compatible service” option. This choice simplifies the setup process as it automatically detects the server settings for these services.
For the purpose of this guide, we will focus on the manual setup option. To proceed, click on the “Manual setup or additional server types” option and then click on the “Next” button.
In the next step, you will be presented with different account types: “POP or IMAP” and “Microsoft Exchange or compatible service.” The POP and IMAP options are used for non-Microsoft email accounts, while the Microsoft Exchange option is used for Microsoft email services.
If you are unsure which account type to choose, check with your email service provider or IT department to determine the appropriate option for your email account. Most commonly, you will select either POP or IMAP for personal or non-Microsoft email accounts.
After selecting the appropriate account type, click on the “Next” button to proceed to the next step, where you will enter your name and email address.
By selecting the manual setup option, you have the flexibility to configure your email account settings according to your specific requirements. Now that you have chosen the manual setup option and selected the account type, let’s move on to the next step and enter your name and email address.
Step 5: Choose POP or IMAP
After selecting the “Manual setup or additional server types” option in Outlook, you will be prompted to choose between two account types: POP or IMAP. This step is crucial as it determines how your emails will be downloaded and stored on your computer or device.
POP (Post Office Protocol) and IMAP (Internet Message Access Protocol) are two different protocols used for retrieving emails from a mail server to your email client, in this case, Outlook. Each protocol has its own benefits and considerations, so it’s important to understand their differences before making a selection.
POP is commonly used for personal email accounts. When you choose the POP account type, Outlook will download your emails from the server to your computer or device. By default, the emails are usually deleted from the server after being downloaded, but you can choose to keep a copy of the emails on the server if desired. This setup is suitable if you primarily access your emails from a single device or prefer to have your emails stored locally.
On the other hand, IMAP is recommended for those who access their emails from multiple devices or want to keep their emails synchronized across all devices. When you choose the IMAP account type, Outlook will sync your emails with the server, allowing you to access and manage your emails from any device connected to the same email account. In this setup, your emails will remain stored on the server, while local copies are cached on your device for offline access.
Consider your email usage and device preferences when choosing between POP and IMAP. If you want to keep your emails better organized and easily accessible from multiple devices, IMAP is the recommended option. However, if you prefer to have your emails downloaded to a specific device and offline access is not a priority, POP may be more suitable.
Once you have made a decision, select either the POP or IMAP option and click on the “Next” button to proceed to the next step, where you will enter the required server settings for your chosen account type.
By choosing the appropriate account type, whether POP or IMAP, you can ensure that your email account is set up according to your specific needs and preferences. Now that you have selected an account type, let’s move on to the next step and enter the necessary server settings.
Step 6: Enter Your Name and Email Address
After selecting the account type (POP or IMAP) in the previous step, you will now need to enter your name and email address. This information will be used to personalize your outgoing emails and identify your email account in Outlook.
In the account setup wizard, you will see fields labeled “Your Name” and “Email Address.” Begin by entering your full name as you would like it to appear in the “From” field of your outgoing emails. This can be your actual name or a name that you commonly use for sending emails.
Next, enter the email address associated with the account you are adding to Outlook. Make sure to double-check the email address for accuracy, as any errors may prevent Outlook from successfully setting up your account.
If you are adding multiple email accounts to Outlook, you will need to repeat this step for each account, ensuring that you enter the correct name and email address for each one.
Remember that the name entered in the “Your Name” field will be visible to the recipients of your emails, so choose a name that reflects your professional or personal identity, depending on the nature of your email communications.
Once you have entered your name and email address, click on the “Next” button to proceed to the next step, where you will need to enter the server settings for your email account.
By providing your name and email address, you are personalizing your email account in Outlook and ensuring that your outgoing emails appear professional and recognizable to the recipients. Now that you have entered this information, let’s move on to the next step and configure the server settings for your account.
Step 7: Choose Account Type (IMAP or POP)
After entering your name and email address in the previous step, you will now need to choose the account type for your email account. In this step, you can select either IMAP or POP, depending on your preferences and email usage.
IMAP (Internet Message Access Protocol) and POP (Post Office Protocol) are two different protocols used for retrieving emails from a mail server to your email client, like Outlook. Each protocol has its own advantages and considerations, so it’s important to understand their differences before making a decision.
If you choose the IMAP account type, Outlook will synchronize your email account with the mail server. This means that any actions taken on one device (such as reading, deleting, or moving emails) will be reflected on all connected devices. IMAP is ideal if you access your email account from multiple devices or prefer to have your emails stored on the server for backup purposes.
On the other hand, if you select the POP account type, Outlook will download your emails from the server to your local device, and the emails will no longer be available on the server. This setup is suitable if you primarily access your emails from a single device and prefer to have your emails stored locally. However, keep in mind that if you use POP, your emails may not be accessible from other devices.
To help you choose the account type that best suits your needs, consider how you use your email account and whether you require synchronization across multiple devices. If you want flexibility and the ability to access your emails from different devices, IMAP is the recommended choice. If you prefer a more traditional setup and want your emails stored locally, POP may be the better option.
Once you have decided on the account type, select either IMAP or POP in the account setup wizard and proceed to the next step, where you will enter the incoming and outgoing mail server settings for your email account.
By choosing the appropriate account type for your email account, you can ensure that Outlook is set up in a way that aligns with your email usage and preferences. Now that you have chosen the account type, let’s move on to the next step and configure the server settings for your account.
Step 8: Enter Incoming and Outgoing Mail Server Settings
After selecting the account type (IMAP or POP) in the previous step, you will now be prompted to enter the incoming and outgoing mail server settings for your email account. These settings are essential for Outlook to connect to your email server and retrieve or send your emails.
The mail server settings typically consist of two components: the incoming mail server and the outgoing mail server, also known as the SMTP (Simple Mail Transfer Protocol) server.
To determine the correct server settings for your email account, you will need to refer to the documentation or support resources provided by your email service provider. They will typically provide the necessary details such as the server address, port number, and the type of encryption to be used.
Start by entering the incoming mail server information. This includes the server address (such as imap.yourdomain.com or mail.provider.com) and the port number. Common port numbers for IMAP are 143 for non-encrypted connections and 993 for SSL/TLS encrypted connections.
Next, proceed to enter the outgoing mail server information. This includes the server address (such as smtp.yourdomain.com or mail.provider.com) and the port number. Common port numbers for SMTP are 25 for non-encrypted connections, 465 for SSL/TLS encrypted connections, and 587 for STARTTLS encrypted connections.
Additionally, you may need to specify the type of encryption or authentication required by your email server. Common options include SSL (Secure Sockets Layer) or TLS (Transport Layer Security) encryption and authentication methods such as password or OAuth (Open Authorization).
Once you have entered the incoming and outgoing mail server settings, double-check the accuracy of the information before proceeding to the next step. Any errors in the server settings may prevent Outlook from connecting to your email account successfully.
Keep in mind that the exact server settings may vary depending on your email service provider. If you are unsure about any of the settings, it’s recommended to consult the support resources provided by your email service provider or contact their customer support for assistance.
By correctly entering the incoming and outgoing mail server settings, you enable Outlook to establish a secure connection to your email account and effectively retrieve and send your emails. Now that you have entered the server settings, let’s move on to the next step and enter your login credentials to complete the account setup process.
Step 9: Enter Login Credentials and Test Account Settings
After entering the incoming and outgoing mail server settings for your email account in the previous step, you will now need to enter your login credentials to authenticate and connect to your email server. This step ensures that Outlook can access your emails securely and allows you to test the account settings for successful configuration.
In the account setup wizard, you will be prompted to enter your email address and password. Make sure to enter the email address associated with the account you are setting up in Outlook, and double-check the accuracy of the email address to avoid any errors.
In the password field, enter the password associated with your email account. Ensure that you enter your password correctly, taking note of any capitalization or special characters that may be included. If you are unsure of your password, refer to the documentation or support resources provided by your email service provider to retrieve or reset your password.
Once you have entered your email address and password, proceed to the next step where you will have the option to test the account settings. Click on the “Test Account Settings” or “Next” button to initiate the testing process.
During the testing process, Outlook will verify the entered server settings, establish a connection with your email server, and test various email functionalities such as sending and receiving test emails. This step is crucial as it confirms whether the account settings are configured correctly and if Outlook can successfully connect to your email account.
If all the tests are completed successfully, you will see a confirmation message indicating that your email account has been configured successfully. However, if any errors or issues arise during the testing process, Outlook will display an error message with details on the failed tests. In such cases, you may need to review the entered settings, particularly the email address, password, and server settings, and make any necessary corrections.
Take note of any error messages or troubleshooting suggestions provided by Outlook during the testing process. These can help you identify and resolve any issues preventing successful configuration of your email account in Outlook. If you are unable to resolve the issue, consider reaching out to your email service provider’s support team for further assistance.
By entering your login credentials and testing the account settings, you ensure that Outlook can securely connect to your email server and perform essential email functions. Now that you have entered your login credentials and tested the account settings, let’s move on to the final step and complete the setup process.
Step 10: Finish Setup and Start Using Your Email Account in Outlook
After successfully entering your login credentials and testing the account settings in the previous step, you are now ready to finish the setup process and start using your email account in Outlook.
In the final step of the account setup wizard, you will be presented with an option to configure additional settings for your email account. These settings may include options for specifying the folder where your emails will be delivered, setting up an email signature, and customizing the synchronization settings for your email folders.
Review these additional settings and adjust them according to your preferences. You can always revisit these settings later through the Outlook Options menu if you need to make changes.
Once you have configured the additional settings, click on the “Finish” button to complete the account setup process. Outlook will finalize the configuration of your email account and will be ready for use.
Upon finishing the setup, Outlook will start synchronizing your email account and will begin retrieving your emails. Depending on the size of your mailbox and the speed of your internet connection, this initial synchronization process may take some time. Allow Outlook to complete the synchronization before accessing and managing your emails.
After the synchronization is complete, you can start using your email account in Outlook. Navigate through the various folders and features of Outlook to explore and take advantage of its powerful email organization and management capabilities.
From now on, whenever you open Outlook, your email account will be automatically connected, and your new incoming emails will be downloaded. You can compose, reply to, and forward emails directly from Outlook and take advantage of its rich set of features such as email categorization, flagging, and filtering.
Remember to regularly check for updates and manage your email account settings within Outlook to ensure optimal performance and security. Keep track of any notifications or alerts provided by Outlook regarding software updates or changes to your email service.
Congratulations! You have successfully completed the setup process and can now enjoy the convenience and efficiency of accessing and managing your email account directly through Outlook. Take some time to explore its features and make the most of this powerful email client.
Conclusion
Adding an email account to Outlook is a straightforward process that allows you to conveniently manage all your emails in one place. Whether you’re setting up a personal account or adding a professional one, Outlook offers a user-friendly interface and powerful features to enhance your email experience.
In this step-by-step guide, we covered the entire process of adding an email account to Outlook, from opening the application to configuring account settings and completing the setup. By following these steps, you can seamlessly integrate your email account with Outlook and take advantage of its robust features for efficient email organization and management.
Remember to select the appropriate account type, either IMAP or POP, based on your email usage and preferences. Consider factors such as multi-device access, synchronization, and offline availability before making a decision.
Additionally, make sure to enter the correct server settings and login credentials during the setup process. Double-check the accuracy of the information to avoid any connection errors or issues with your email account. If you encounter any problems, consult the documentation and support resources provided by your email service provider or contact their customer support for assistance.
Once your email account is successfully added to Outlook, you can take advantage of its features such as email organization, advanced search capabilities, and integration with other Microsoft products. Customize additional settings according to your preferences and regularly check for updates to ensure optimal performance and security.
Now that you have completed the setup process, you can start enjoying the convenience of accessing and managing your email account directly through Outlook. Stay organized, stay productive, and make the most of this powerful email client for all your email communication needs.