Introduction
Attaching a photo to an email is a simple and convenient way to share images with friends, family members, or colleagues. Whether you’re sending vacation pictures, work-related documents, or memorable moments captured on camera, the process is fairly straightforward. In this article, we’ll guide you through the steps of attaching a photo to your email, making sure that your message reaches its recipient with the desired visual content.
With the rise of digital communication, emails have become a primary means of exchanging information and files. Adding a photo to your email allows you to personalize your message and convey your thoughts and emotions visually. Whether you’re sharing a snapshot of a beautiful sunset, the latest family gathering, or an important document, attaching a photo adds an extra layer of meaning to your message.
Regardless of the email client or service you use, the process of attaching a photo is widely applicable. Whether you’re using Gmail, Outlook, Yahoo Mail, or any other email platform, the steps remain similar across the board. By following the instructions provided in this guide, you’ll be able to attach photos to your emails with ease and confidence.
In the following sections, we’ll outline each step of the process, from opening your email client to sending your message with the attached photo. We’ll provide detailed instructions and essential tips to ensure a seamless experience. So, let’s dive in and learn how to effortlessly attach a photo to your email!
Step 1: Open your email client
The first step in attaching a photo to an email is to open your email client or email service provider. This can be done by launching the application on your computer or accessing the website of the email service you’re using. Ensure that you have a stable internet connection before proceeding.
If you’re using a desktop email client like Microsoft Outlook or Mozilla Thunderbird, locate the application in your computer’s program list or taskbar and open it. If you’re using a web-based email service such as Gmail, Yahoo Mail, or Outlook.com, open your preferred web browser and navigate to the appropriate website.
Once you’ve opened your email client, you’ll need to log in to your email account using your credentials. Enter your email address and password in the provided fields, and click the “Sign In” or “Log In” button to access your email account.
Keep in mind that some email clients may have additional security measures, such as two-factor authentication, which require you to provide additional verification before accessing your account. Follow the prompts and provide the required information to proceed.
After successfully logging in to your email account, you will be directed to your inbox, where you can view your received messages and compose new ones. Now that you have your email client open and ready, you’re one step closer to attaching a photo to your email.
Step 2: Compose a new email
Once you have opened your email client and logged into your email account, the next step is to compose a new email. Look for a button or option that allows you to create a new message. In most email clients, this button is prominently displayed and labeled as “Compose” or “New Message”.
Clicking on the “Compose” or “New Message” button will open a blank email template where you can enter the details of your message, including the recipient’s email address, subject line, and the body of the email.
At this stage, it’s important to decide who you want to send the email to. Enter the email address of the recipient in the “To” field. If you are sending the email to multiple recipients, you can separate the email addresses with commas or use the “CC” (Carbon Copy) or “BCC” (Blind Carbon Copy) fields for additional recipients.
Next, provide a concise and descriptive subject line that summarizes the content of your email. A well-crafted subject line can help the recipient understand the purpose of your email and increase the chances of your message being opened and read.
Once you have filled in the recipient(s) and subject, you can move on to the body of the email. Here, you can write your message, providing any necessary context or information related to the attached photo. Feel free to express yourself and make the email more personal by using a friendly tone or including relevant details about the photo.
Some email clients have additional features that allow you to format your text, including options to bold or italicize words, create bulleted or numbered lists, or change the font size or color. Use these formatting options as needed to enhance the readability and visual appeal of your email.
Once you have finished composing your email, you’re ready to proceed to the next step, where we’ll guide you on how to attach a photo to your email.
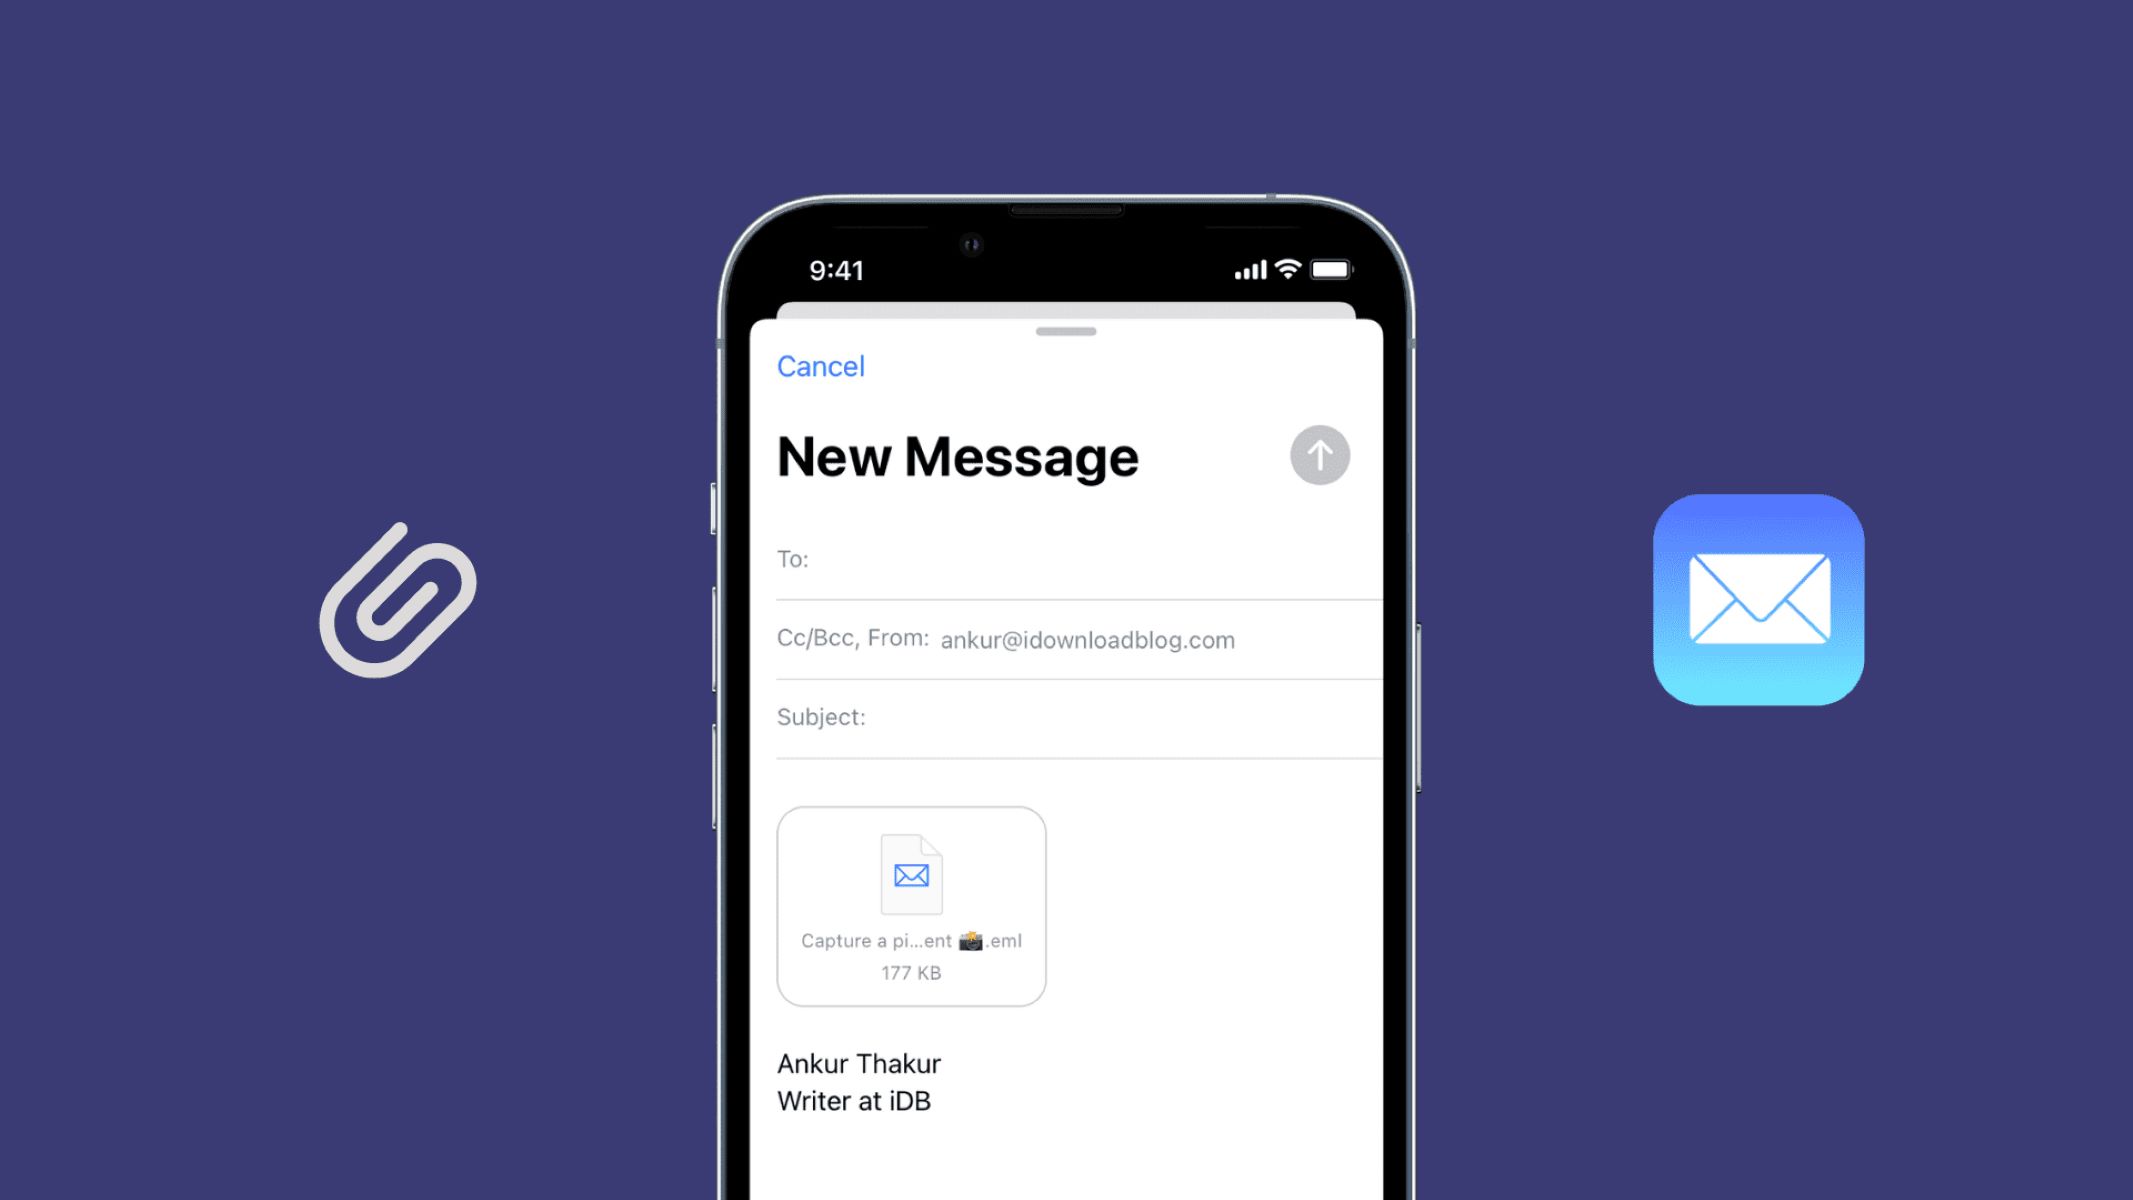
Step 3: Locate the “Attach File” button
After composing your email, the next step is to locate the “Attach File” button or option within your email client. This button allows you to select and attach the photo you want to include in your email. The exact location and appearance of the “Attach File” button may vary depending on the email client or service you are using, but it is typically found in the toolbar or menu options of the email composition window.
In most email clients, the “Attach File” button is represented by a paperclip icon or labeled with the text “Attach” or “Insert”. Look for this icon or text, and click on it to proceed.
Upon clicking the “Attach File” button, a file browser or dialog box will appear, allowing you to navigate through your computer’s files and folders to locate the photo you wish to attach. This dialog box may vary in appearance depending on your operating system, but the functionality is generally the same.
Take a moment to browse through your computer’s files and locate the folder where the desired photo is stored. Once you have located the photo, click on it to select it. You can attach multiple photos by holding down the “Ctrl” key (Windows) or “Command” key (Mac) while selecting multiple files.
After selecting the photo(s), click the “Open” or “Attach” button within the file browser dialog box. This will initiate the attachment process, and the selected photo(s) will be uploaded and attached to your email.
Depending on the size of the photo(s) and your internet connection speed, the attachment process may take a few moments. Stay patient and avoid navigating away from the page or closing the email composition window until the attachment process is complete.
Once the photo has been successfully attached to your email, you can move on to the next step to ensure that it is properly included and ready to be sent to the recipient.
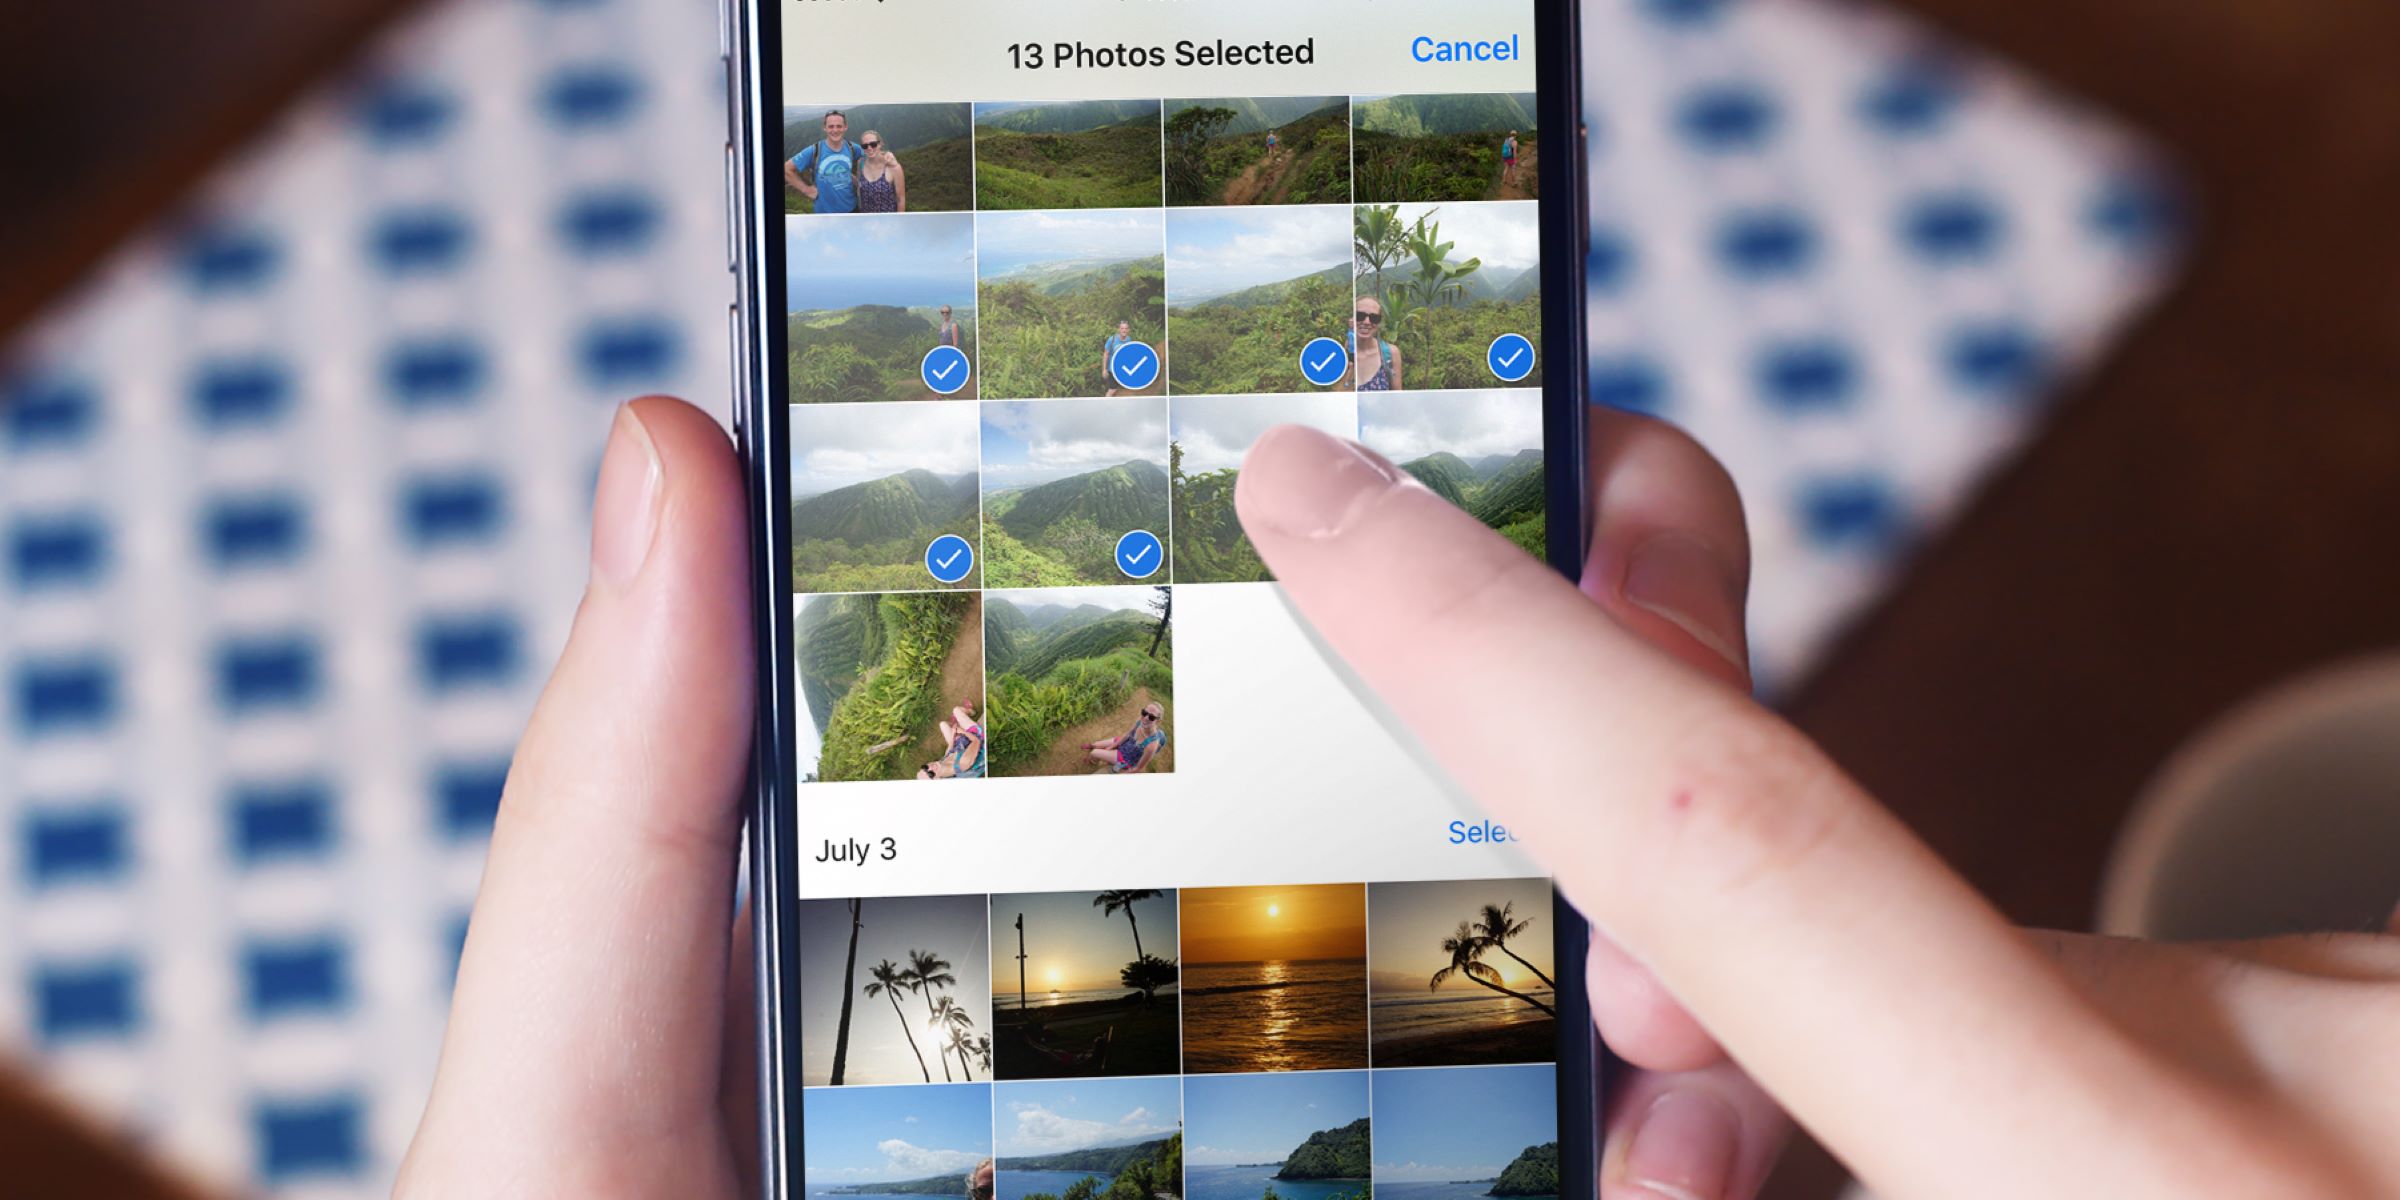
Step 4: Choose the photo you want to attach
Now that you have located the “Attach File” button and initiated the attachment process, it’s time to choose the photo you want to attach to your email. This step involves selecting the desired photo from your computer’s files and folders, ensuring that it meets the requirements and preferences for the email.
When the file browser dialog box appears after clicking the “Attach File” button, take a moment to navigate through your computer’s files and folders. Locate the folder or directory where the photo you want to attach is stored. Keep in mind that the photo file should be in a format that is compatible with email attachments, such as JPEG, PNG, or GIF.
Browse through the files in the folder and click on the photo you want to attach. You can select multiple photos by holding down the “Ctrl” key (Windows) or “Command” key (Mac) while clicking on the desired photos. This allows you to attach multiple photos to your email at once, if needed.
Once you have selected the photo(s), click the “Open” or “Attach” button within the file browser dialog box. This will start the attachment process, and the photo(s) will be uploaded and attached to your email.
It’s important to note that some email clients or services may have restrictions on the size or number of attachments you can include in a single email. This is usually indicated by a maximum attachment size specified by the email provider. If your photo exceeds this limit, you may need to resize or compress the image before attaching it to the email.
Additionally, keep in mind that attaching large files may take longer to upload, depending on your internet connection speed. If you’re working with limited bandwidth, consider reducing the file size or using a cloud storage service to share the photo instead.
Once the photo is successfully attached to your email, you can proceed to the next step to confirm the attachment and continue writing your email.
Step 5: Confirm attachment and continue writing your email
After selecting the photo you want to attach, the next step is to confirm that the attachment was successful and continue writing your email. This step ensures that the photo is properly included in your email and allows you to add any additional text or content before sending it.
Once you have selected the photo(s) and clicked the “Open” or “Attach” button, the attachment process will begin. Depending on the size of the photo(s) and your internet connection speed, it may take a few moments for the attachment to be uploaded and attached to your email.
While the attachment process is ongoing, it’s important to avoid navigating away from the page or closing the email composition window. Doing so prematurely may result in the loss of the attached photo(s) and require you to repeat the attachment process.
Once the attachment is successfully completed, you will typically see the name or thumbnail of the attached photo(s) displayed within the email composition window. This confirms that the photo(s) has been attached and is ready to be sent.
At this stage, you can proceed to continue writing your email. If you need to add any additional text, context, or information related to the attached photo, you can do so in the body of the email. This is your opportunity to provide any necessary details, captions, or explanations that enhance the recipient’s understanding or appreciation of the photo.
Some email clients offer options to resize or reposition the attached photo within the email body. If you wish to make any adjustments to the photo’s appearance or placement, consult the formatting tools provided by your email client and make the necessary changes.
Additionally, you may want to include a closing remark, such as expressing your well wishes or signing off with a personal touch before the closing salutation. Use this opportunity to make your email more personal and engaging for the recipient.
Once you have confirmed that the attachment is correct and have finished writing your email, it’s time to move on to the next step where we’ll cover adding recipient(s) and a subject to your email.
Step 6: Add recipient(s) and subject
As you continue composing your email with the attached photo, the next step is to add the recipient(s) and a subject to your message. These elements are essential to ensure that your email reaches the intended recipient and that they understand the purpose or content of your message.
In the email composition window, you will find fields labeled “To” and “Subject”. These fields are where you enter the recipient’s email address and provide a concise and descriptive subject line for your email, respectively.
In the “To” field, enter the email address of the recipient or recipients to whom you want to send the email. If you are sending the email to multiple recipients, you can separate their email addresses with commas or use the “CC” (Carbon Copy) or “BCC” (Blind Carbon Copy) fields to add additional recipients.
The “CC” field allows you to include recipients who will receive a copy of the email, while the “BCC” field allows you to include recipients whose email addresses will remain hidden from other recipients of the email.
Next, move on to the “Subject” field and provide a clear and concise subject line that summarizes the content or purpose of your email. A well-crafted subject line helps the recipient understand the importance and relevance of your email, increasing the likelihood that they will open and read it.
For emails with attached photos, consider including a brief description or an intriguing phrase related to the photo in the subject line. This can pique the recipient’s curiosity and make them eager to open the email and view the photo.
As you enter the recipient(s) and subject, double-check the spelling of the email addresses to ensure accuracy. Mistyped or incorrect email addresses may result in the email not reaching the intended recipient.
Once you have entered the recipient(s) and subject, review the fields to confirm that all information is correct. Take a moment to proofread the email address, subject line, and any other relevant details to avoid any mistakes.
With the recipient(s) and subject added, you are almost ready to send your email. However, before doing so, it’s important to review your email’s content and ensure that everything is in order. In the next step, we will guide you on reviewing and sending your email with the attached photo.
Step 7: Review and send your email with the attached photo
Before sending your email with the attached photo, it’s crucial to review the content and ensure that everything is in order. This step helps you catch any errors, confirm the attachment, and ensure that your message communicates effectively.
Start by reading through the body of your email. Look for any typos, grammatical errors, or formatting issues. Make sure that your message is clear, concise, and conveys the intended information. Pay attention to the context provided for the attached photo, ensuring that it aligns with your intended message.
Take a moment to confirm that the attached photo is properly displayed within the body of the email. Verify that the photo is positioned correctly, and that any resizing or formatting adjustments you made earlier appear as desired.
If you attached multiple photos, double-check that all the intended photos are present and accurately attached. Make sure that the order of the photos reflects your intended sequence if there is a specific sequence you want to convey.
Additionally, give your subject line a final check to ensure that it accurately represents the content of your email and entices the recipient to open it.
Next, carefully review the recipient(s) field to ensure that you have entered the correct email addresses. It’s crucial to verify the accuracy of the addresses, especially if you have multiple recipients or if you copied the addresses from another source.
Once you have reviewed and confirmed all the necessary elements, it’s time to send your email. Look for a “Send” or “Send Email” button within your email client or service, usually located near the top or bottom of the email composition window.
Click the “Send” button to initiate the sending process. Depending on your email client or service, you may receive a confirmation message, indicating that your email has been successfully sent. Some email clients also provide an option to save the email as a draft or schedule it for future sending if needed.
After sending your email, it’s a good practice to double-check your “Sent” or “Outbox” folder to verify that the email with the attached photo has been successfully sent. This allows you to ensure that your message has been delivered to the recipient(s) as intended.
Congratulations! You have successfully sent your email with the attached photo. Now, you can wait for the recipient(s) to open and view your email, enjoying the visual content you have shared.
Conclusion
Attaching a photo to an email is a simple and effective way to share visual content with others. Whether you’re sending personal memories, professional documents, or anything in between, following the steps outlined in this guide will ensure that your photo is properly attached and ready to be shared.
We started by opening our email client and logging into our email account, ensuring that we were ready to compose a new email. We then located the “Attach File” button and chose the photo we wanted to include by navigating through our computer’s files and folders.
After confirming the attachment and continuing to write our email, we added the recipient(s) and a subject to our message. Double-checking these details is important for ensuring that our email reaches the intended recipient and that they understand the purpose of our message.
Lastly, we reviewed our email’s content, verifying that the attachment was correctly displayed and the message communicated effectively. With everything in order, we hit the “Send” button and successfully shared our email with the attached photo.
Remember to consider any size limitations or compression needs for your attachments, and be mindful of the email client or service you are using, as the precise steps may vary slightly. However, the overall process remains consistent across most platforms.
By following the steps outlined in this guide, you can confidently attach photos to your emails and share your visual content with friends, family, or colleagues. Enjoy the power of visual communication and make your emails more engaging and memorable with the addition of photos.
So go ahead, open your email client, choose the perfect photo, and share your moments and messages with the world!