Introduction
Welcome to the world of enhanced security and peace of mind with Google Authenticator. In an era where online threats and hacks are on the rise, it’s essential to take steps to secure your accounts and protect your sensitive information. One powerful tool that can help you achieve this is Google Authenticator. In this article, we will guide you through the process of setting up Google Authenticator and show you how to leverage its benefits.
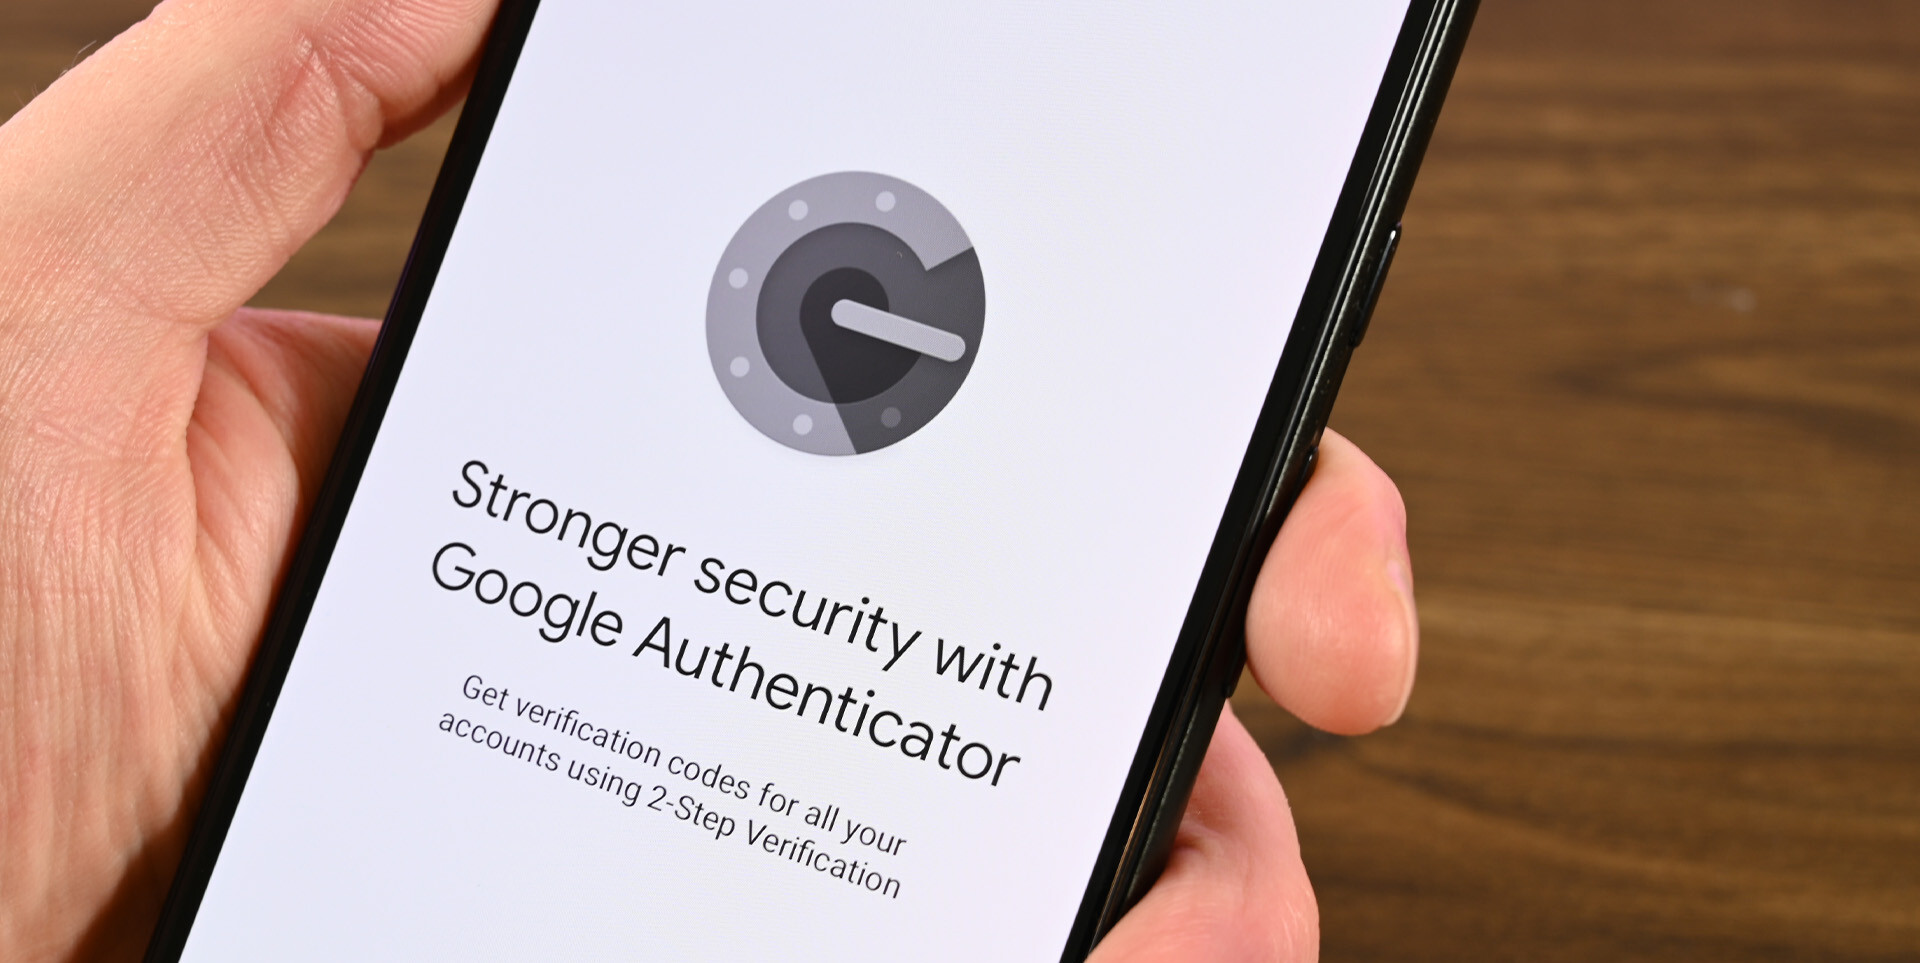
Google Authenticator is a free mobile app that provides an additional layer of security for your online accounts. It uses two-factor authentication (2FA), a method that combines a password with a unique verification code to verify your identity. This means that even if someone manages to steal your password, they won’t be able to gain access to your account without the verification code generated by Google Authenticator.
To get started with Google Authenticator, you will first need to download and install the app on your mobile device. Once installed, you can set it up for your Google account and enable two-factor authentication. You can also add accounts from other services, such as social media platforms or online banking, to Google Authenticator for added security.
Setting up Google Authenticator is a simple and straightforward process. All you need is a smartphone or tablet with the app installed, and a few minutes to spare. Once set up, you can enjoy the peace of mind knowing that your online accounts are protected by an additional layer of security.
In the following sections, we will provide a step-by-step guide on how to set up Google Authenticator and show you the key steps to enable two-factor authentication for your Google account. We will also cover how to add accounts to Google Authenticator and verify its functionality. So, let’s dive in and get started with securing your online accounts with Google Authenticator!
What is Google Authenticator?
Google Authenticator is a mobile app developed by Google that provides an extra layer of security for your online accounts. It uses two-factor authentication (2FA) to verify your identity when you log in to various services, such as Google, social media platforms, and online banking.
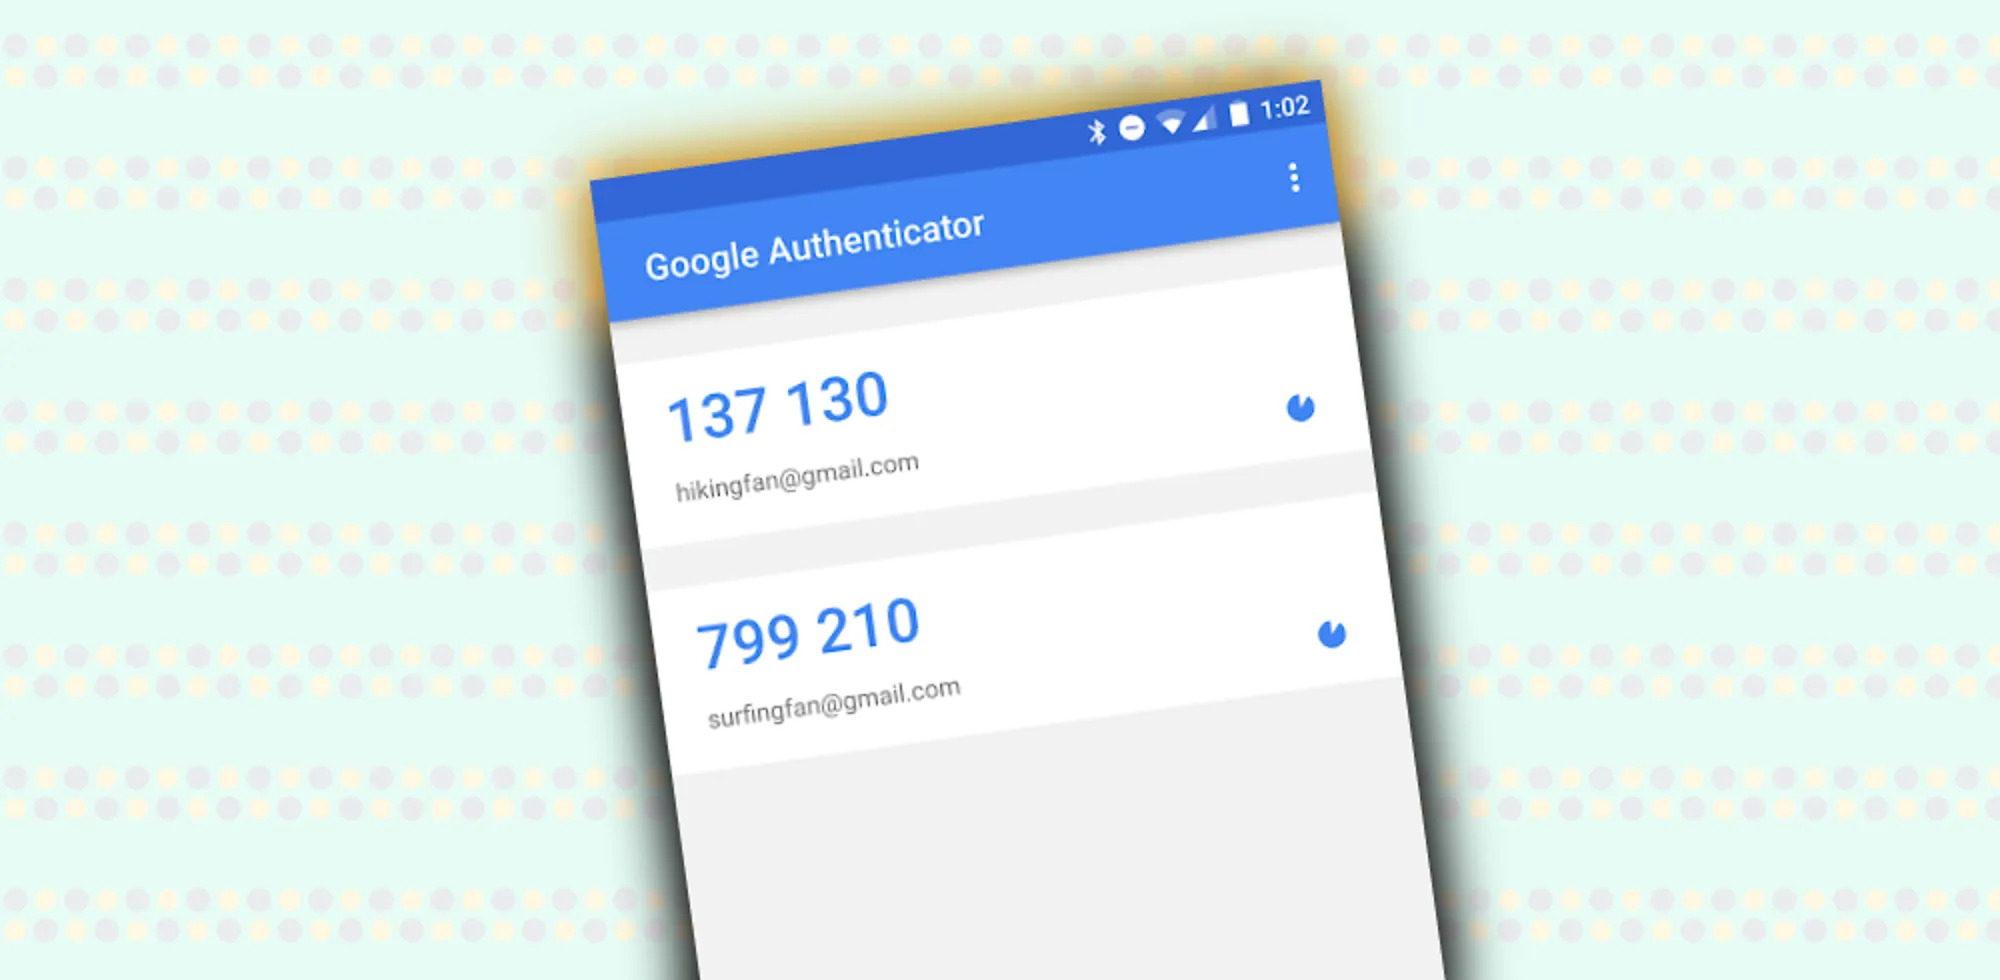
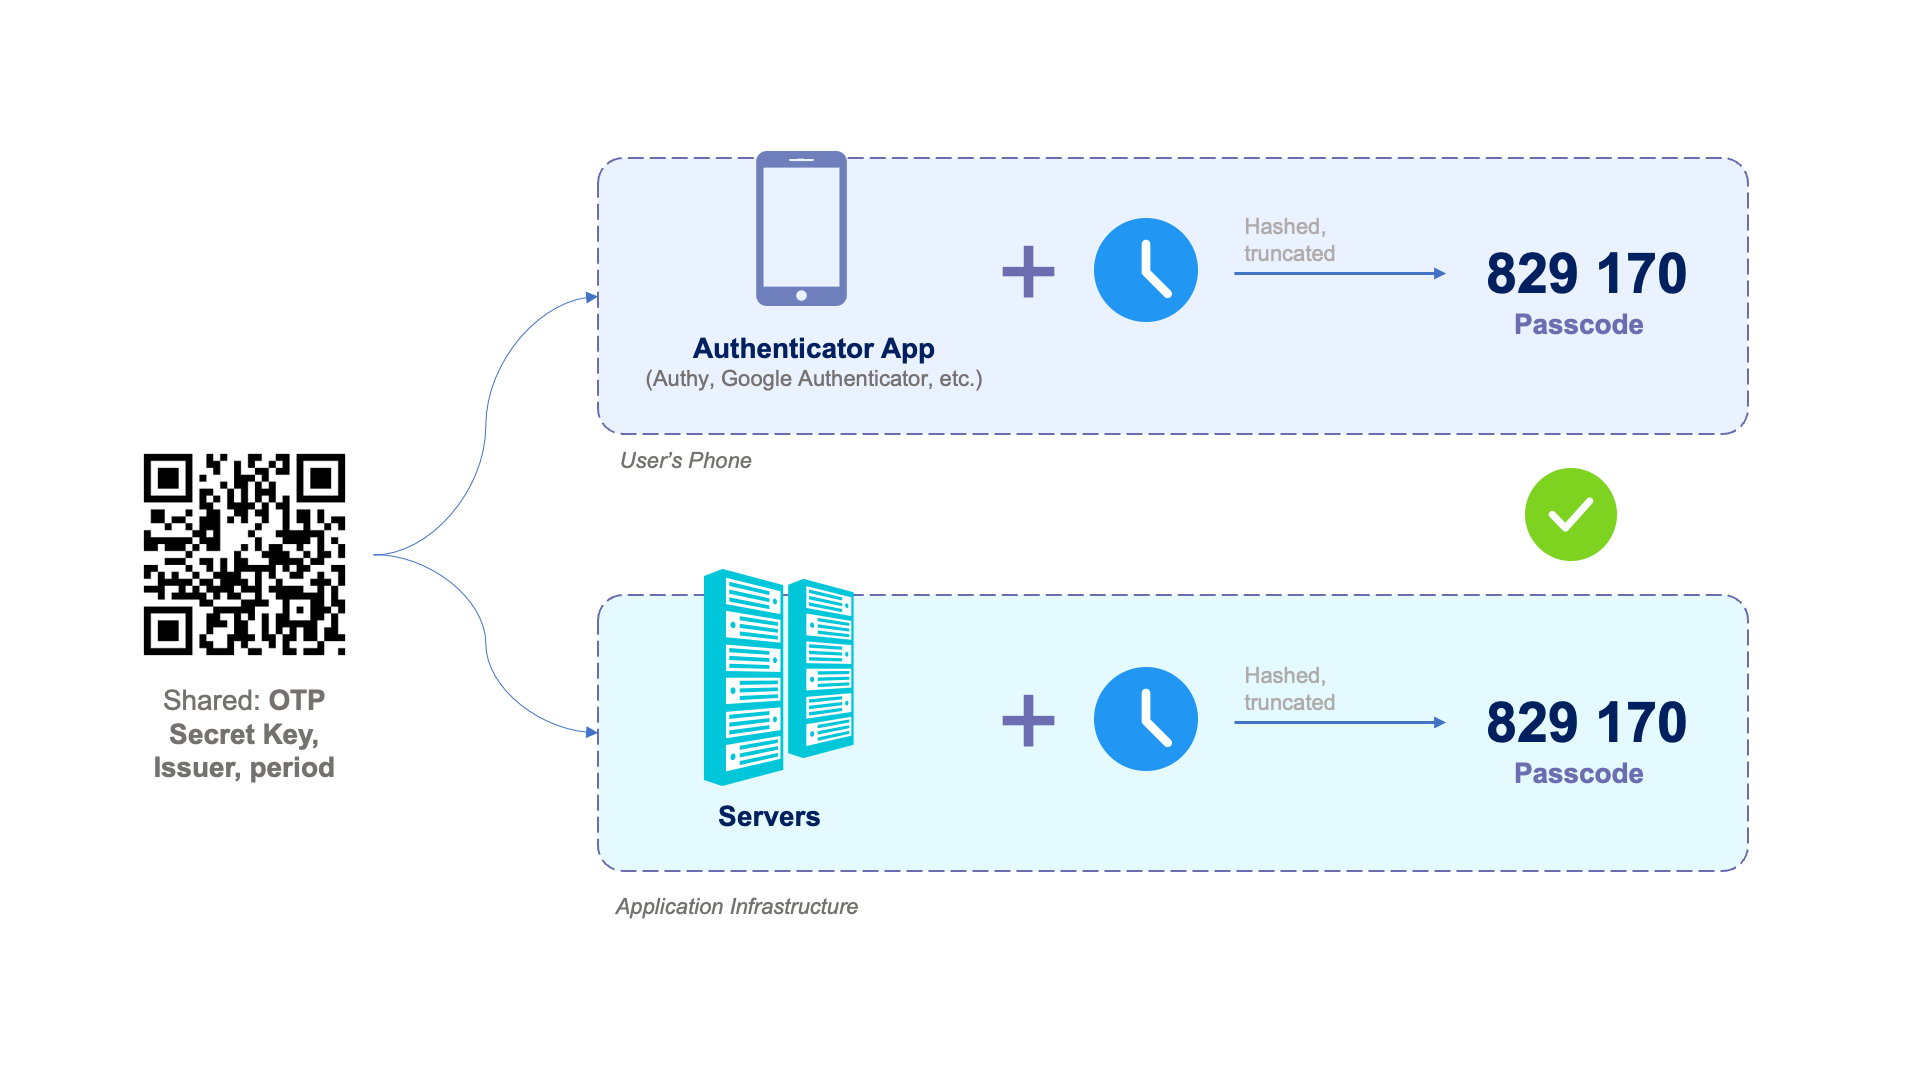
The way Google Authenticator works is quite simple yet effective. Once you enable two-factor authentication for a specific account, such as your Google account, every time you log in, in addition to your regular password, a unique verification code will be required. This code is generated by Google Authenticator and changes every 30 seconds, making it nearly impossible for hackers to gain access to your account even if they manage to uncover your password.
The beauty of using Google Authenticator is that it doesn’t rely on an internet connection or a text message to deliver the verification code. Instead, the code is generated directly on your mobile device, ensuring a secure and reliable method of authentication. This also means that you can use Google Authenticator even when you’re offline or traveling in areas with limited connectivity.
The security of Google Authenticator lies in the use of Time-based One-Time Password Algorithm (TOTP) or HMAC-based One-Time Password Algorithm (HOTP) mechanisms. These algorithms ensure that the verification codes generated by the app are unique, time-sensitive, and can only be used once.
Google Authenticator is available on both Android and iOS devices and can be easily downloaded from their respective app stores. The app supports multiple accounts, meaning you can add and manage authentication for various online services in one convenient place.
One of the advantages of using Google Authenticator is that it eliminates the need to rely on traditional SMS-based authentication, which can be vulnerable to SIM swaps or phishing attacks. By having the app installed on your device, you have full control over the generation and access to your verification codes, enhancing the overall security of your accounts.
In summary, Google Authenticator is a powerful tool that adds an extra layer of protection to your online accounts by implementing two-factor authentication. With its reliable code generation and offline capabilities, you can enjoy heightened security and peace of mind when accessing your accounts on various platforms.
Step 1: Download and Install Google Authenticator
The first step to setting up Google Authenticator is to download and install the app on your mobile device. Follow these simple instructions to get started:
- Open the app store on your Android or iOS device.
- Search for “Google Authenticator” and select the official app developed by Google.
- Tap on the “Install” or “Get” button to download and install the app.
- Once the installation is complete, locate the Google Authenticator app icon on your home screen and tap to open it.
It’s important to note that Google Authenticator is available for free on both Android and iOS devices. Ensure that you download the official app developed by Google to guarantee its authenticity and security.
After successfully installing Google Authenticator, you’re now ready to move on to the next step of the setup process. Keep in mind that you can also install Google Authenticator on multiple devices, such as your smartphone and tablet, to have access to your verification codes wherever you go.
Now that you have Google Authenticator installed on your device, it’s time to proceed to the next step and set it up for your Google account. This will enable you to enjoy the added security and convenience that two-factor authentication provides.
Step 2: Set Up Google Authenticator for Your Google Account
Now that you have Google Authenticator installed on your mobile device, it’s time to set it up for your Google account. Follow these steps to get started:
- Open a web browser on your computer or mobile device and go to the Google Account Security page.
- Sign in to your Google account using your username and password.
- Under the “Signing in to Google” section, click on “2-Step Verification”.
- Enter your Google account password again to proceed.
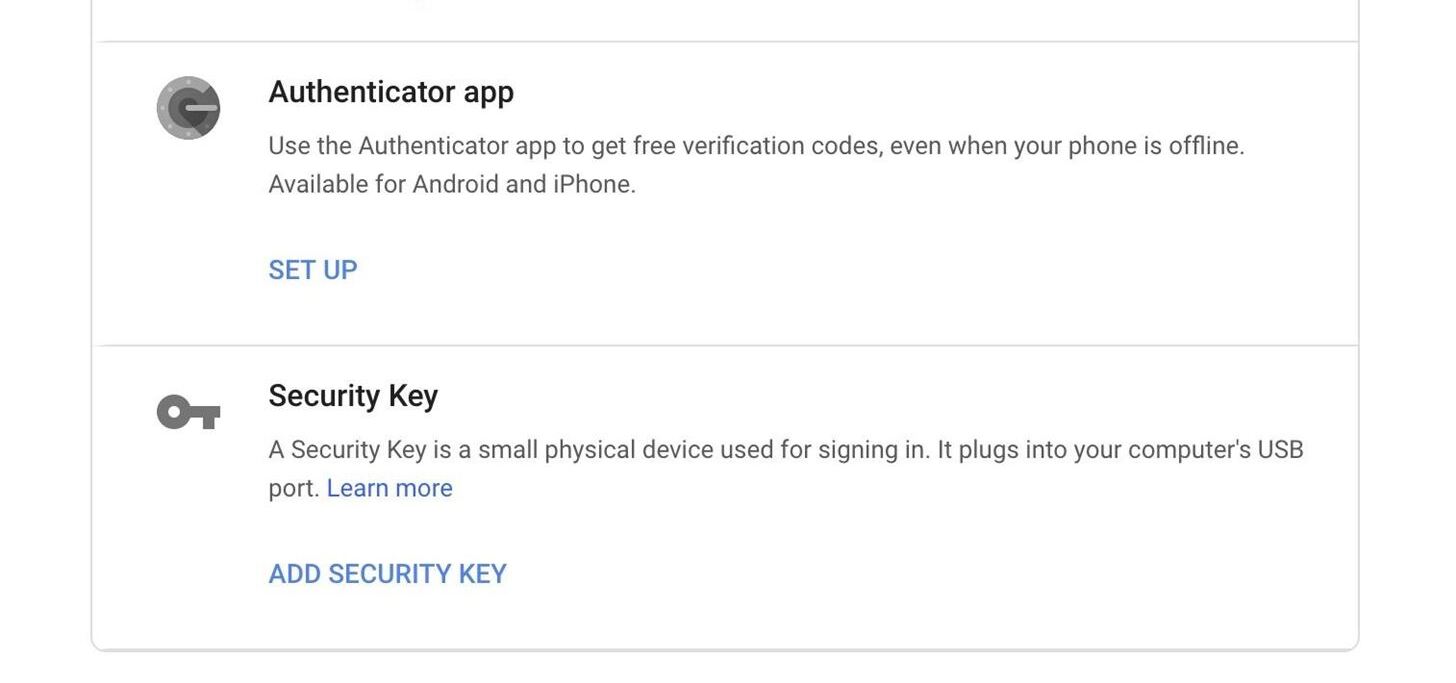
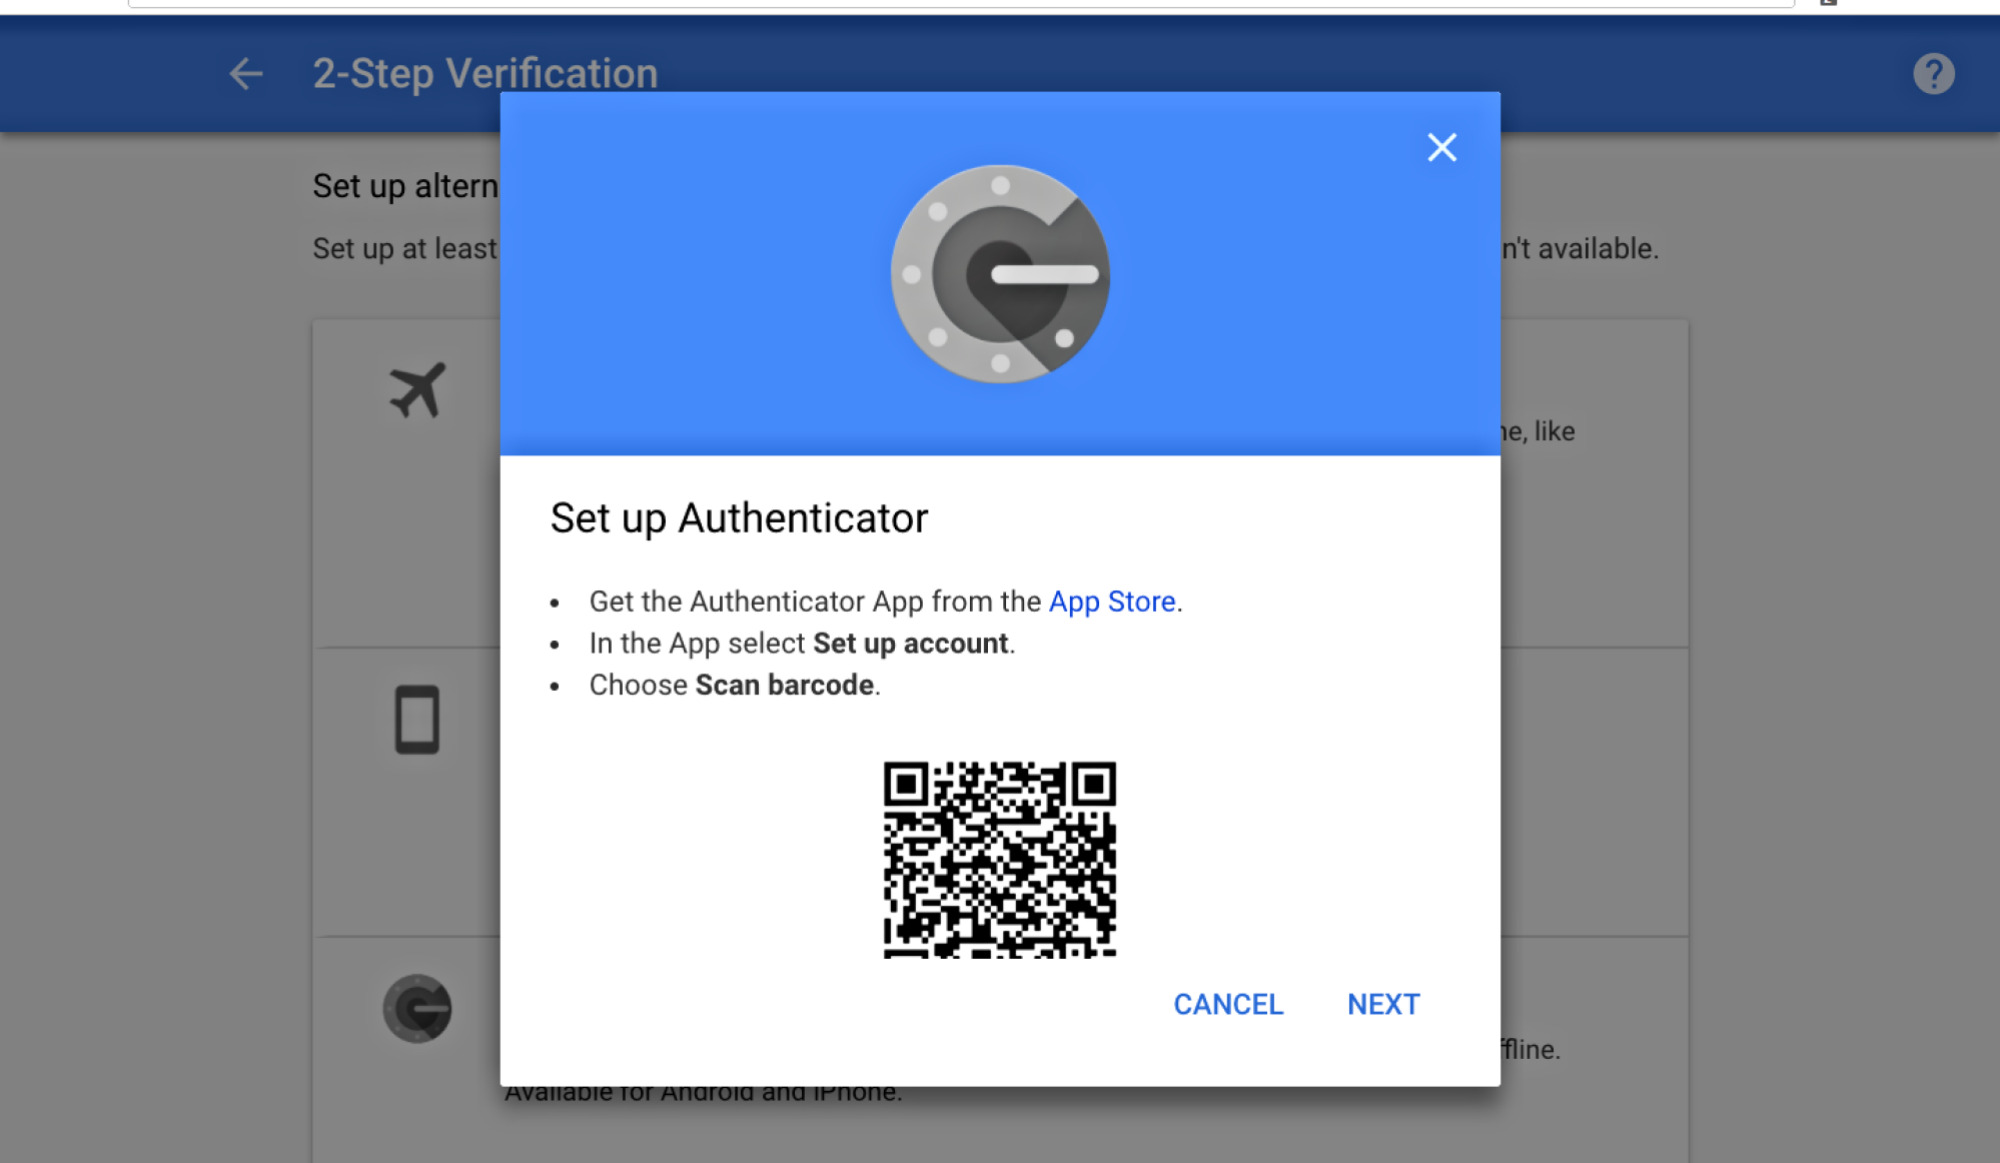
- On the 2-Step Verification settings page, under the Authenticator app section, click on “Set up”.
- Choose your device type – Android or iPhone – and click “Next”.
- Open the Google Authenticator app on your mobile device.
- Tap on the “+” or “Add” button to add a new account.
- Choose the option to “Scan a barcode” or “Enter a provided key”.
- If you choose to scan a barcode, point your device’s camera at the barcode displayed on the computer screen. If you choose to enter a key, manually enter the provided key into the Google Authenticator app.
- Once the barcode or key is recognized, a new entry will be added to the Google Authenticator app with a verification code.
- Enter the verification code displayed in the app into the verification field on the Google Account Security page.
- Click “Verify” to confirm the setup.
That’s it! You have now successfully set up Google Authenticator for your Google account. The app will now generate a unique verification code every 30 seconds for your Google account, adding an extra layer of security to your login process.
It’s important to note that once you enable Google Authenticator for your Google account, you will need to use it every time you sign in to your account from a new device or browser. This ensures that only you, with access to the Google Authenticator app on your mobile device, can successfully log in to your account.
In the next step, we will show you how to enable two-factor authentication for your Google account, further enhancing the security of your account and protecting your personal information.
Step 3: Enable Two-Factor Authentication
Now that you have set up Google Authenticator for your Google account, it’s time to enable two-factor authentication. This will provide an additional layer of security and ensure that only you can access your account. Follow these steps to enable two-factor authentication:
- Go back to the Google Account Security page in your web browser.
- Under the “Signing in to Google” section, click on “2-Step Verification”.
- Enter your Google account password if prompted.
- Click on the “Get Started” button to begin the setup.
- Choose a second step verification method. Since we have already set up Google Authenticator, select the “Authentication app” option.
- Select your device type – Android or iPhone – and click “Next”.
- Click on the “Next” button to confirm your selection.
- Enter the verification code generated by the Google Authenticator app in the provided field.
- Click on the “Verify” button to confirm the setup.
- After verifying the setup, you may be prompted to add a backup phone number to your Google account as an additional security measure. It’s recommended to provide a backup phone number for account recovery.
- Review the settings and click on the “Turn On” button to enable two-factor authentication for your Google account.
Congratulations! You have successfully enabled two-factor authentication for your Google account using Google Authenticator. From now on, whenever you log in to your Google account, you will need to enter both your password and the verification code generated by the Google Authenticator app on your mobile device.
This additional layer of security greatly reduces the risk of unauthorized access to your account, even if someone has obtained your password. It’s important to note that you should always keep your device with the Google Authenticator app secure and avoid sharing your verification codes with anyone.
In the next step, we will explore how to add accounts to Google Authenticator, allowing you to secure multiple online services with two-factor authentication.
Step 4: Add Accounts to Google Authenticator
Now that you have set up Google Authenticator for your Google account and enabled two-factor authentication, you can further enhance your online security by adding accounts from other services to Google Authenticator. This will allow you to manage multiple accounts in one convenient app. Here’s how you can add accounts:
- Open the Google Authenticator app on your mobile device.
- Tap on the “+” or “Add” button.
- Choose the option to either “Scan a barcode” or “Enter a provided key”.
- If you choose to scan a barcode, point your device’s camera at the barcode provided by the service you want to add. If you choose to enter a key, manually enter the provided key into the Google Authenticator app.
- Once the barcode or key is recognized, a new entry will be added to the Google Authenticator app with a verification code.
- Repeat these steps for each additional account you want to add.
By adding accounts to Google Authenticator, you ensure that these accounts are also protected by two-factor authentication. This means that whenever you log in to these services, in addition to your regular password, you will need to enter the verification code generated by the Google Authenticator app.
It’s worth noting that each account added to Google Authenticator will have its own unique verification codes generated by the app. These codes are time-sensitive and change every 30 seconds, providing an added layer of security to your accounts.
With the ability to manage multiple accounts in one app, Google Authenticator simplifies the process of utilizing two-factor authentication across various platforms. It eliminates the need to juggle multiple authentication methods and allows for a streamlined and secure login experience.
In the next step, we will cover how to verify and test Google Authenticator to ensure its functionality and reliability.
Step 5: Verify and Test Google Authenticator
After setting up and adding accounts to Google Authenticator, it’s important to verify and test the functionality of the app. This ensures that you have successfully configured it and that it is generating the correct verification codes. Follow these steps to verify and test Google Authenticator:
- Open the Google Authenticator app on your mobile device.
- Look for the account entry that you want to verify and test.
- Make sure that the verification code displayed in the app is synchronized with the current time.
- Open a web browser on your computer or another device.
- Log out of the account you want to test with.
- Attempt to log in to the account you want to test.
- Enter your username and password as usual.
- When prompted for the verification code, switch back to the Google Authenticator app on your mobile device.
- Enter the current verification code displayed in the app into the verification field on the login page.
- Complete the login process and ensure that you have successfully accessed your account.
By following these steps, you can ensure that Google Authenticator is functioning correctly and providing the necessary verification codes for your accounts. It’s crucial to regularly test the app to confirm its reliability and accuracy.
If you encounter any issues during the verification or testing process, ensure that the time on your mobile device is synced correctly and that you are entering the most current verification code. You can also consider removing and re-adding the account in Google Authenticator to resolve any potential synchronization issues.
Remember, the verification codes generated by Google Authenticator are time-sensitive and valid only for a short period of time. It’s essential to enter the code promptly to avoid expiration and potential login failures.
By verifying and testing Google Authenticator, you can have confidence in its functionality and rely on it for secure access to your accounts. With this final step completed, you can enjoy the peace of mind that comes with the added security provided by two-factor authentication.
Conclusion
Congratulations on successfully setting up Google Authenticator and enabling two-factor authentication for your online accounts! By following the step-by-step guide outlined in this article, you have taken a significant stride towards enhancing the security of your digital presence.
Google Authenticator provides an additional layer of protection by generating time-based verification codes that are required alongside your passwords during login. This ensures that even if an attacker gains access to your password, they won’t be able to log in without the verification code generated by the app on your mobile device.
Throughout the setup process, you have learned how to download and install Google Authenticator, set it up for your Google account, and enable two-factor authentication. You have also discovered how easy it is to add accounts to the app and verify its functionality by testing the generated verification codes.
Remember to keep your mobile device secure and avoid sharing your verification codes with anyone. Regularly update the Google Authenticator app and ensure that its time settings are accurate to prevent any synchronization issues.
By leveraging Google Authenticator and implementing two-factor authentication, you have significantly bolstered the security of your online accounts. This extra layer of protection not only safeguards your personal information but also reduces the risk of unauthorized access and potential security breaches.
Now that you understand the benefits and steps involved in using Google Authenticator, take the initiative to secure your other online accounts, such as social media platforms, email services, and financial institutions. The more accounts you add to Google Authenticator, the more comprehensive your protection becomes.
So, keep your online presence secure and stay one step ahead of potential cyber threats by utilizing Google Authenticator. By incorporating this powerful tool into your digital security routine, you can enjoy peace of mind, knowing that your accounts are fortified against unauthorized access.