Introduction
In today’s digital age, security is of utmost importance, especially when it comes to protecting our online accounts. Google Authenticator is a popular two-factor authentication (2FA) app that provides an added layer of security to our Google accounts, making it more challenging for unauthorized individuals to gain access.
However, there may be situations where you need to bypass Google Authenticator temporarily or permanently. Whether you’ve lost your device, are experiencing issues with the app, or simply want to disable it temporarily, there are a few methods you can try to bypass Google Authenticator and regain access to your account.
In this article, we will explore several methods that can help you bypass Google Authenticator. It is essential to note that bypassing Google Authenticator should be done with caution, as it compromises the security of your account. It is always recommended to have this security feature enabled whenever possible to protect your personal information.
What is Google Authenticator?
Google Authenticator is a mobile app developed by Google that provides an extra layer of security for your online accounts. It uses two-factor authentication (2FA) to verify your identity when logging into a Google account or other supported websites and applications.
Two-factor authentication adds an additional step to the login process, requiring users to provide not only their password but also a unique authentication code generated by the Google Authenticator app. This code is time-based and changes every few seconds, ensuring that only the rightful account owner can access the account.
The Google Authenticator app is available for both iOS and Android devices and can be downloaded from the respective app stores. Once installed, you can set up the app by scanning a barcode or manually entering a secret key provided by the website or service you wish to secure.
When logging in, you will be prompted to enter the verification code generated by the app. This helps protect your account from unauthorized access, even if someone manages to obtain your password.
Google Authenticator supports a wide range of online services, including Google accounts, social media platforms, and popular cryptocurrency exchanges. It allows you to secure multiple accounts within the same app, eliminating the need for multiple authentication methods.
Using Google Authenticator gives you peace of mind that your online accounts are better protected against hacking attempts and unauthorized access. However, there may be situations where you need to bypass this security feature temporarily or permanently, which we will explore in the following sections.
Why would you want to bypass Google Authenticator?
While Google Authenticator is a crucial tool for enhancing account security, there are certain situations where you may need to bypass it temporarily or permanently. Understanding why you might want to bypass Google Authenticator can help determine the most appropriate method to use. Here are a few common scenarios:
- Lost or inaccessible device: If your mobile device, where you have the Google Authenticator app installed, gets lost, stolen, or damaged, you may find yourself unable to generate the required authentication codes. In such cases, bypassing Google Authenticator allows you to regain access to your account until you can set it up on a new device.
- App malfunction or update failure: Occasionally, the Google Authenticator app may experience technical issues, preventing it from generating the correct authentication codes. It could be due to a glitch in the app or a failed update. In these situations, bypassing Google Authenticator temporarily can help you access your account while troubleshooting the app or waiting for an app update.
- Moving to a new device: If you upgrade to a new mobile device, you will need to transfer your Google Authenticator settings from the old device to the new one. This can be a bit tricky, and if not done properly, you may be locked out of your accounts. Bypassing Google Authenticator during this transition period is essential to prevent any disruption in accessing your accounts.
- Temporary disablement: In certain cases, you might need to temporarily disable two-factor authentication for convenience or compatibility reasons. For example, if you’re traveling to a location with limited mobile network coverage, you may want to bypass Google Authenticator temporarily until you have reliable connectivity.
It is important to keep in mind that bypassing Google Authenticator should only be done when absolutely necessary. Two-factor authentication adds an extra layer of security to your accounts, reducing the risk of unauthorized access. Always prioritize the security of your accounts and only bypass Google Authenticator when no other alternative is available or as a temporary measure.
Method 1: Using Backup Codes
When setting up two-factor authentication with Google Authenticator, you are usually provided with a set of backup codes. These codes serve as an alternative method to verify your identity and bypass Google Authenticator in case you are unable to generate the authentication codes through the app. Here’s how you can use backup codes to bypass Google Authenticator:
- Locate your backup codes: If you still have access to your Google account, go to the two-factor authentication settings and look for the section where backup codes are provided. If you cannot find them, you may need to contact Google support for assistance.
- Enter a backup code: When prompted for the authentication code while logging in, click on the “Use backup code” or similar option. Enter one of the backup codes you have previously obtained.
- Follow the instructions: Depending on the website or service you are trying to access, you may be prompted to enter additional information or complete other verification steps. Follow the on-screen instructions to complete the login process.
It’s worth noting that backup codes are typically one-time use only, so once you have used a code, it becomes invalid for future logins. It is essential to keep your backup codes safe and accessible in case you ever need to bypass Google Authenticator. If you have exhausted all your backup codes or cannot locate them, proceed to the next method for bypassing Google Authenticator.
Method 2: Resetting Google Authenticator
If you are unable to access your Google Authenticator app or have lost your device, you may need to reset Google Authenticator to regain access to your accounts. Resetting Google Authenticator will disable it on your account, allowing you to set it up again on a new device. Here’s how you can reset Google Authenticator:
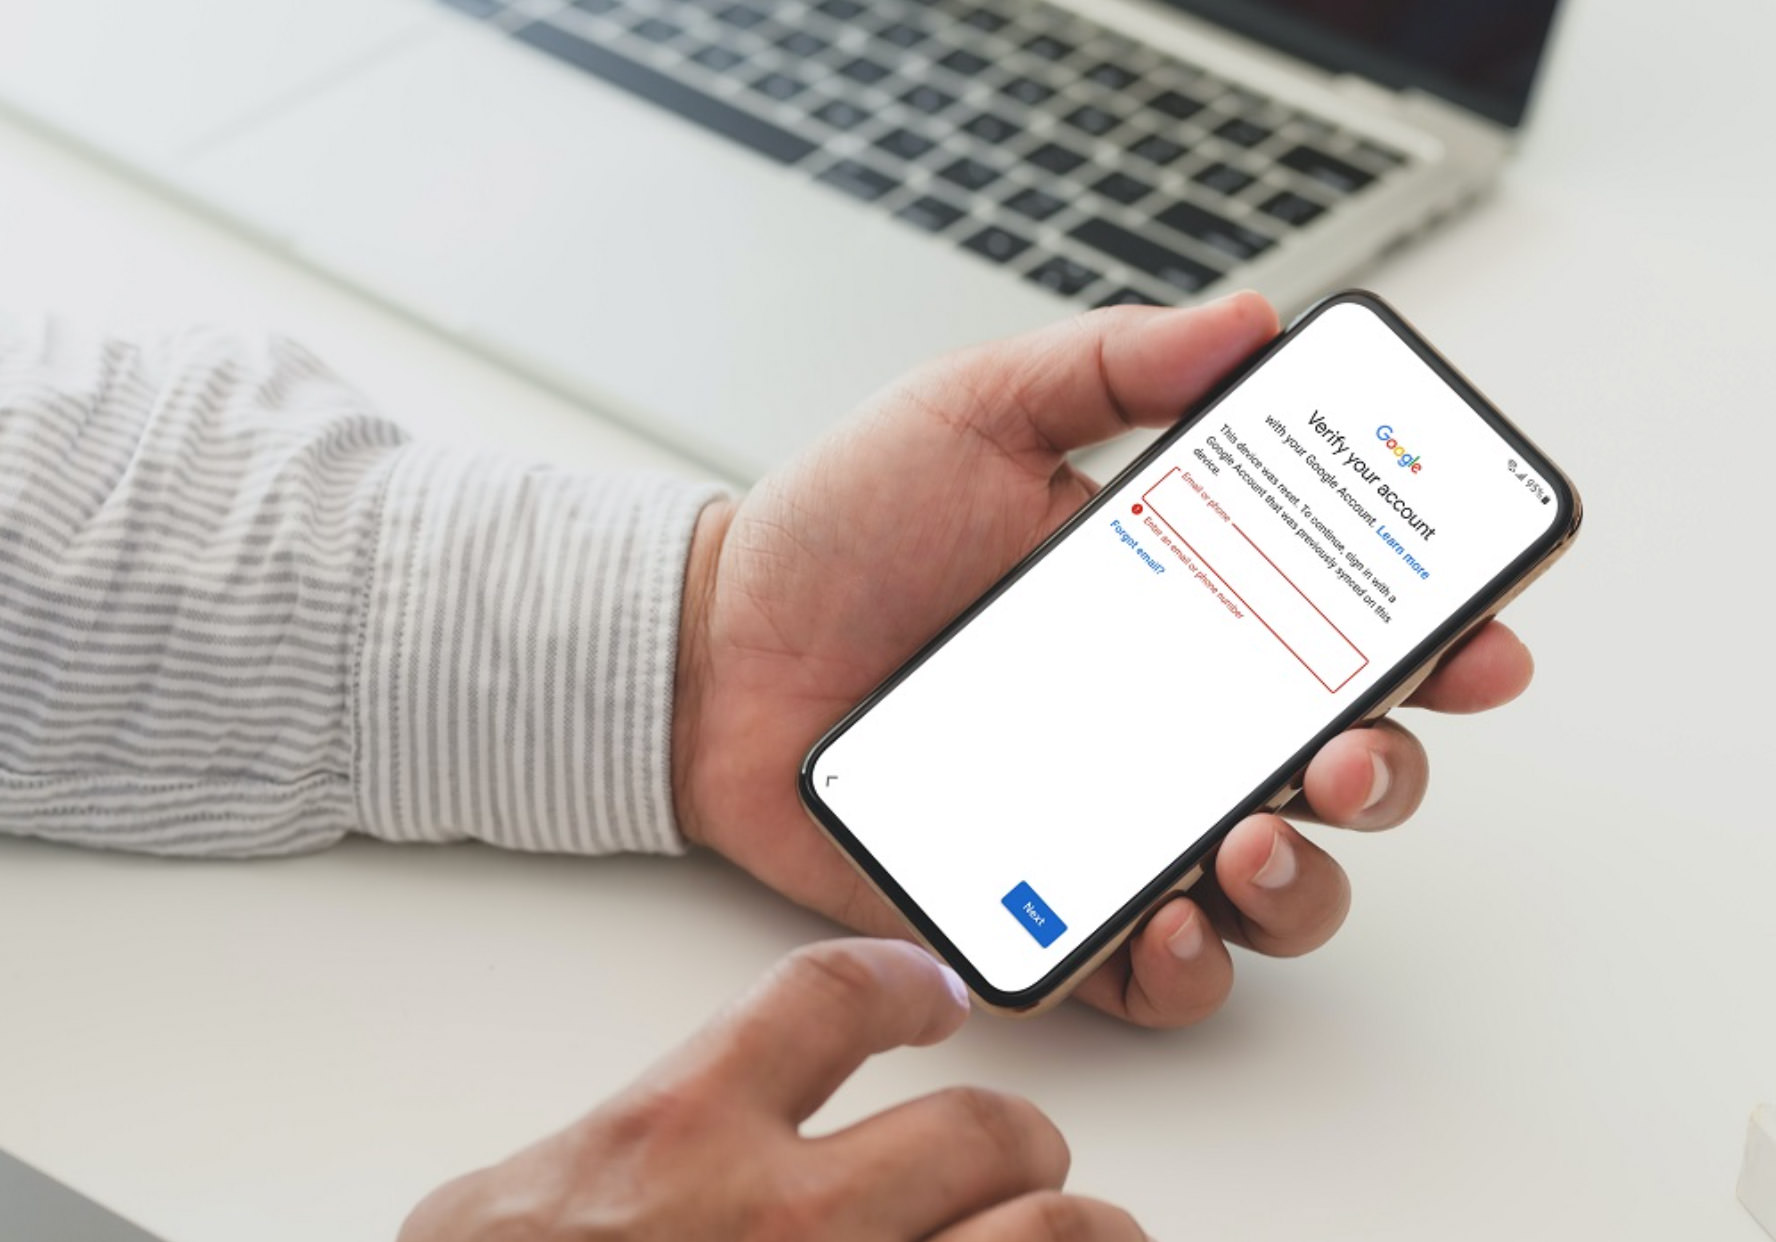
- Go to your Google account settings: Visit the Google Account Recovery page on a computer or mobile browser and sign in with your Google account credentials.
- Verify your identity: Google will prompt you to verify your identity using various methods, such as providing your account password or answering security questions. Follow the instructions to complete the verification process.
- Disable two-factor authentication: Once you have verified your identity, navigate to the two-step verification settings in your Google account. Locate the Google Authenticator section and select “Turn off” or similar option to disable two-factor authentication.
- Set up Google Authenticator afresh: After disabling Google Authenticator, you can set it up again on your new device by visiting the two-step verification settings and following the instructions provided. Make sure to scan the barcode or enter the secret key correctly to synchronize your account with the new Google Authenticator app.
Keep in mind that resetting Google Authenticator will disable it for all your accounts linked to the app, so you will need to set it up again for each account individually. Make sure to take note of your backup codes and other account recovery options to avoid any future issues. Resetting Google Authenticator should only be done when necessary and as a last resort when other methods are not applicable.
Method 3: Contacting Google Support
If you are unable to bypass Google Authenticator using the previous methods or encounter any difficulties during the process, contacting Google Support can be a helpful solution. Google’s support team is available to assist with account-related issues, including problems with Google Authenticator. Here’s what you can do:
- Visit the Google Help Center: Go to the Google Help Center website on your computer or mobile browser.
- Select the appropriate category: Look for the section related to account security or two-step verification. Click on it to access more information and available support options.
- Contact Google Support: In the support section, you will find different contact methods, such as live chat, email, or phone support. Choose the contact method that best suits your needs and explain your issue with Google Authenticator.
- Provide necessary information: When contacting Google Support, be prepared to provide details about your account, the specific problem you are facing with Google Authenticator, and any relevant information that can help them assist you more effectively.
- Follow instructions from Google Support: Once you have initiated contact with Google Support, they will guide you through the process of resolving the issue with Google Authenticator. They may ask for additional information or provide specific instructions tailored to your situation.
It’s important to be patient when contacting Google Support, as it may take some time to receive a response or find a resolution. Make sure to provide accurate and detailed information to help expedite the support process. Remember that Google Support is there to assist you, so don’t hesitate to reach out if you are unable to bypass Google Authenticator on your own.
Method 4: Using Time Correction
Sometimes, the issue with Google Authenticator lies in a time synchronization problem between your mobile device and the servers. If the time on your device is not accurate, it can cause authentication codes to become invalid. In such cases, using time correction can help resolve the issue and bypass Google Authenticator. Here’s how you can do it:
- Check your device’s time settings: Go to the settings of your device and ensure that the date and time are set correctly. If your device’s time is significantly different from the actual time, it may cause synchronization issues with Google Authenticator.
- Enable automatic date and time: Make sure the “Automatic date and time” or “Set time automatically” option is turned on in your device’s settings. This allows your device to sync its time with the network time provided by your mobile service provider.
- Disable time sync in Google Authenticator: Open the Google Authenticator app and go to its settings. Look for an option to disable time synchronization, as this can sometimes interfere with the correct time synchronization process.
- Restart your device: After making these changes, restart your device to ensure that the new time settings take effect. This will refresh the connection and update the time synchronization.
- Generate authentication codes: Open the Google Authenticator app after restarting your device and try generating authentication codes again. They should now be synchronized with the correct time, allowing you to bypass Google Authenticator and access your accounts.
By correcting the time settings on your mobile device and ensuring accurate time synchronization, you can overcome authentication code discrepancies caused by time differences. This method is simple to implement and may resolve issues with Google Authenticator. However, if the problem persists, consider trying the other methods mentioned in this article or reaching out to Google Support for further assistance.
Method 5: Disable Two-Factor Authentication temporarily
If none of the previous methods work for you, or if you need to quickly bypass Google Authenticator for a specific reason, disabling two-factor authentication temporarily can provide a solution. Keep in mind that this method involves temporarily compromising the security of your account, so exercise caution and enable two-factor authentication as soon as you no longer need to bypass it. Here’s how you can temporarily disable two-factor authentication:
- Visit the Google Account settings: Go to the Google Account page on a computer or mobile browser and sign in with your Google account credentials.
- Navigate to the security settings: Look for the option related to account security or two-factor authentication settings. It may be under the “Security” or “Privacy & security” section.
- Disable two-factor authentication: Locate the two-factor authentication settings and select the option to turn it off temporarily. This will usually require you to verify your identity through other means, such as entering a verification code sent to your registered email or phone number.
- Access your account without two-factor authentication: Once two-factor authentication is disabled, you can access your account without the need for authentication codes generated by Google Authenticator.
It is crucial to remember that disabling two-factor authentication temporarily reduces the security of your account and leaves it more vulnerable to unauthorized access. Therefore, it is recommended to only disable it for a brief period and re-enable it as soon as possible. Remember to take appropriate measures to secure your account during this time, such as using strong passwords and monitoring for any suspicious activity.
Additionally, make sure to enable two-factor authentication again once you no longer need to bypass it. Restoring this important security feature will help protect your account from potential security breaches and unauthorized access in the future.
Conclusion
Google Authenticator is a valuable tool for enhancing the security of your online accounts. However, there may be situations where you need to bypass Google Authenticator temporarily or permanently. By understanding the various methods available, you can regain access to your accounts while ensuring the necessary security measures are in place.
In this article, we explored several methods for bypassing Google Authenticator. Using backup codes, resetting Google Authenticator, contacting Google Support, correcting time synchronization, and temporarily disabling two-factor authentication are all viable solutions, depending on your specific circumstances.
It is important to remember that bypassing Google Authenticator should only be done when absolutely necessary. Two-factor authentication adds an extra layer of security to your accounts and helps protect your personal information. Always prioritize the security of your accounts and use these methods responsibly.
If you encounter any issues or have concerns about bypassing Google Authenticator, it is recommended to contact Google Support for further assistance. They have the expertise to help you resolve any issues and can guide you through the process effectively.
Remember, while bypassing Google Authenticator may be necessary in some cases, it is crucial to re-enable it once the issue is resolved or the temporary need has passed. By doing so, you will ensure that your accounts remain secure and protected against unauthorized access.