Introduction
Welcome to the world of Google Authenticator! Keeping your online accounts secure is more important than ever, and Google Authenticator is a powerful tool designed to add an extra layer of protection to your Google account. By generating unique verification codes that change every few seconds, it ensures that only you can access your account, even if someone else has your password.
However, what happens if you lose access to your Google Authenticator account? It can be a stressful situation, but fear not! In this guide, we will walk you through the steps on how to recover a Google Authenticator account, so you can regain access and continue safeguarding your online presence.
There could be various reasons why you need to recover a Google Authenticator account. Perhaps you got a new phone and need to transfer your Google Authenticator settings, or maybe you accidentally deleted the app and now can’t log in. Whatever the reason, the process of recovering your account is straightforward, although it does require some verification steps to ensure security.
In this article, we will explain the step-by-step process of recovering your Google Authenticator account. So, let’s dive in and learn how to reclaim access to your account and regain control over your digital security!
What is Google Authenticator?
Google Authenticator is a free app provided by Google that adds an extra layer of security to your online accounts. It is primarily used for two-factor authentication (2FA), a method of verifying your identity by combining something you know (your password) with something you have (your phone).
Once you have set up Google Authenticator on your phone, it generates one-time verification codes that you use alongside your regular password when logging in to your Google account or other supported services. These codes are time-sensitive and refresh every few seconds, ensuring that they cannot be reused or intercepted by hackers.
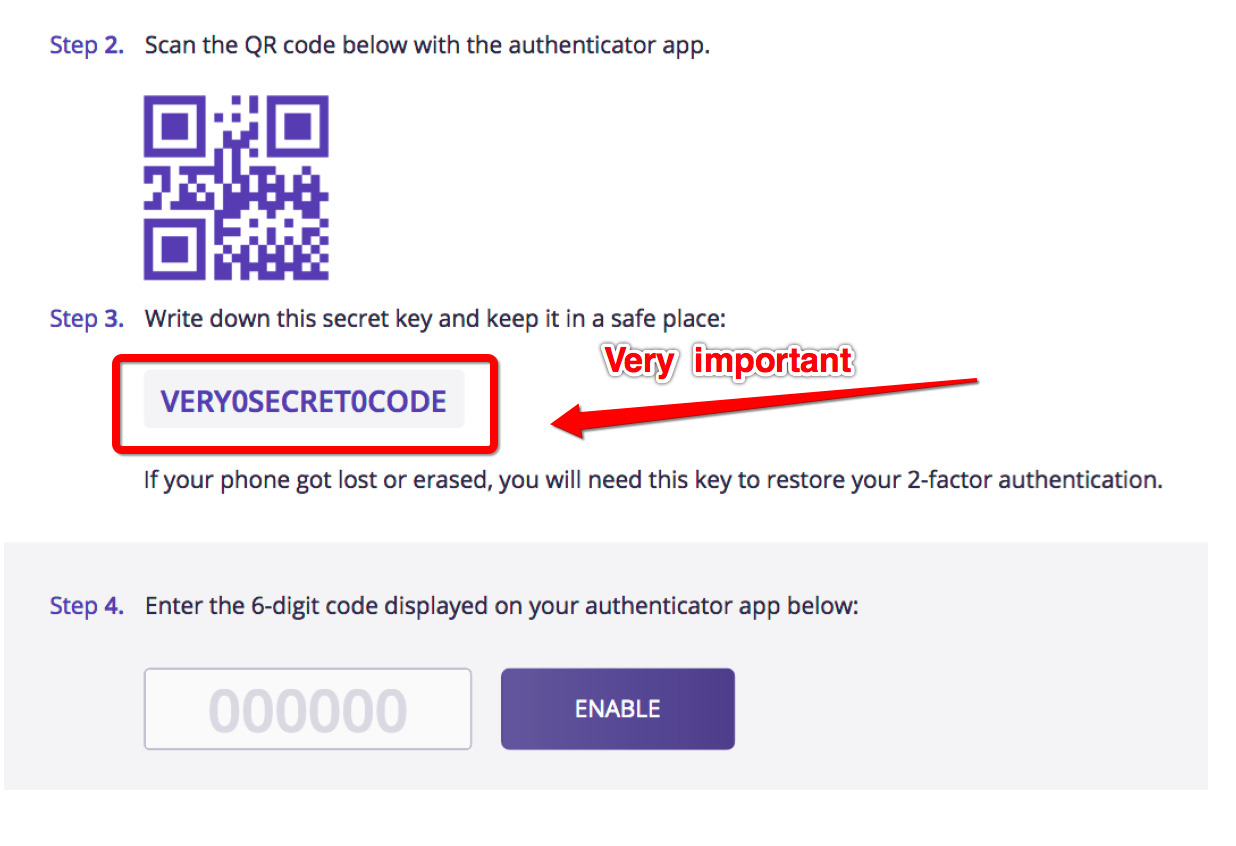
The way Google Authenticator works is through the use of a shared secret key. When you first enable 2FA on your Google account, a unique secret key is generated and displayed as a QR code. You scan this QR code using the Google Authenticator app, which then adds your Google account to the app and starts generating verification codes.
One of the key advantages of Google Authenticator is its offline functionality. Once you have set up the app and added an account, it can generate verification codes even when your phone is not connected to the internet. This makes it highly reliable and convenient, especially when traveling or in areas with poor network connectivity.
It’s important to note that Google Authenticator is not the only 2FA method available. There are other apps, such as Authy and LastPass Authenticator, that offer similar functionality. Additionally, some services support using SMS text messages or security keys as the second factor. However, Google Authenticator remains a popular choice due to its simplicity, reliability, and wide adoption across various platforms and services.
Overall, Google Authenticator is a powerful tool that enhances the security of your online accounts by adding an additional layer of verification. With its time-sensitive codes and offline functionality, it provides peace of mind knowing that your accounts are protected from unauthorized access.
Reasons to Recover a Google Authenticator Account
There can be several reasons why you might need to recover a Google Authenticator account. While the main purpose of Google Authenticator is to enhance the security of your online accounts, situations may arise that require you to regain access to your account. Below are a few common scenarios where account recovery becomes necessary.
1. Lost or Stolen Phone: If your phone that was previously set up with Google Authenticator is lost or stolen, you will need to recover your account to regain access. Without the verification codes generated by Google Authenticator, you won’t be able to log in to your account until you set up the app on a new device.
2. Accidental Deletion: It’s not uncommon for apps to be accidentally deleted from our devices. If you have unintentionally removed Google Authenticator from your phone, you will need to go through the recovery process to restore your account access.
3. Upgrading to a New Phone: When getting a new phone, transferring your Google Authenticator settings is necessary to ensure a seamless transition. Without transferring the codes and settings, you won’t be able to log in to your accounts using the new device.
4. App Malfunction: In some cases, the Google Authenticator app may malfunction or stop generating the verification codes. This can be a frustrating situation, as you won’t be able to access your accounts until the issue is resolved. Recovering your account can help resolve this problem.
5. Changing Mobile Platforms: If you switch from one mobile platform to another (e.g., from Android to iOS), you will need to recover your Google Authenticator account to set it up again on the new platform. This ensures that you can continue to secure your accounts with the 2FA codes.
6. Forgotten or Reset Password: If you forget your Google account password or reset it, you may need to recover your Google Authenticator account as well. This is because Google Authenticator relies on your password to generate the codes, so if the password changes, the app needs to be reconfigured.
Recovering a Google Authenticator account is essential in these situations to regain access to your accounts and restore the added layer of security. By following the appropriate recovery process, you can ensure that your accounts remain protected while resolving any issues that prevent access to Google Authenticator.
Step 1: Access the Google Account Recovery Page
To begin the process of recovering your Google Authenticator account, the first step is to access the Google Account Recovery page. This page allows you to initiate the account recovery process and regain access to your Google account.
To access the Google Account Recovery page, follow these steps:
- Open a web browser on your computer or mobile device.
- Navigate to the Google Account Recovery page by entering the URL: https://accounts.google.com/signin/recovery.
- If you are not already signed out of your Google account, sign out by clicking on your profile picture or initial in the top right corner of the page and selecting “Sign out” from the dropdown menu.
- On the Google Account Recovery page, you will be prompted to enter your email address associated with the account you want to recover. Enter the email address and click “Next”.
- If you have multiple Google accounts, ensure that you are entering the email address associated with the account you want to recover. If you’re unsure, you can check any past emails or other documents for the correct email address.
Once you have completed these steps, you will be ready to proceed to the next step in the account recovery process. It is important to ensure that you are accessing the official Google Account Recovery page and not any suspicious or fraudulent websites.
Remember, the Google Account Recovery page is the starting point for recovering your Google Authenticator account. It provides the necessary platform to verify your identity and initiate the recovery process. Follow the subsequent steps diligently to regain access to your account and secure your digital presence.
Step 2: Select the “I don’t know my password” option
After accessing the Google Account Recovery page, the next step in recovering your Google Authenticator account is to select the “I don’t know my password” option. This option allows you to initiate the password recovery process and regain access to your Google account.
To select the “I don’t know my password” option, follow these steps:
- On the Google Account Recovery page, enter your email address associated with the account you want to recover if you haven’t already done so, and click “Next”.
- On the password entry screen, you may be prompted to enter your password. Since you are recovering your account and don’t know your password, click on the “Forgot password?” link below the password field.
- You will be directed to a new page where you will be asked to provide your last-known password. If you remember your previous password, enter it. Otherwise, click on the “Don’t remember your password?” link below the password field.
- At this point, you will be presented with several password recovery options. Select the “Try another way” option to proceed with the recovery process without using your previous password.
By selecting the “I don’t know my password” option and moving forward with the password recovery process, you are taking the necessary steps to regain access to your Google account and ultimately recover your Google Authenticator settings.
It’s important to note that Google employs various security measures to ensure that only the rightful owner of the account can recover it. As you progress through the recovery process, you may be prompted to provide additional information or undergo different verification methods to confirm your identity. This is necessary to protect your account from unauthorized access and maintain the security of your personal information.
Once you have successfully selected the “I don’t know my password” option, you will be ready to proceed to the next step in the account recovery process. Stay tuned for the upcoming steps to reclaim access to your Google Authenticator account!
Step 3: Enter your Google Account email address
After selecting the “I don’t know my password” option in the account recovery process, the next step is to enter your Google Account email address. This step allows Google to identify the account you want to recover and proceed with the necessary verification and authentication steps.
To enter your Google Account email address, follow these steps:
- If you haven’t done so already, navigate to the Google Account Recovery page using a web browser on your computer or mobile device.
- On the Google Account Recovery page, you will see a field where you can enter your email address. Carefully type in the email address associated with the account you want to recover.
- Double-check the email address you entered to ensure its accuracy. It’s important to enter the correct email address to proceed with the account recovery process successfully.
- Once you have entered your email address, click on the “Next” button to proceed to the next step.
By entering your Google Account email address, you are providing the crucial information needed to initiate the account recovery process. Google will use this email address to verify your identity and ensure that you are the rightful owner of the account.
It’s important to note that if you have multiple Google accounts, you need to enter the email address associated with the specific account you want to recover. If you’re unsure about the email address, you can check any past emails or other documents for the correct email associated with the account.
Once you have successfully entered your Google Account email address, you are ready to proceed to the next step in the account recovery process. Be prepared for the additional verification and authentication steps that Google may request to confirm your identity and regain access to your Google Authenticator account.
Step 4: Select the recovery option (phone number or email)
After entering your Google Account email address in the account recovery process, the next step is to select the recovery option. Google provides two primary options for account recovery: using your phone number or using your email address. These options allow you to verify your identity and regain access to your Google account.
To select the recovery option, follow these steps:
- On the Google Account Recovery page, you will be prompted to select a recovery method. You will typically see two options: “Get a verification code on your phone” or “Get a link to your email”. Choose the option that suits you best based on the available options and your access to them.
- If you select “Get a verification code on your phone”, Google will send a verification code to your registered phone number via text message or voice call. This option is useful if you can access your phone or if you have configured your Google account to use your phone number as the recovery option.
- If you select “Get a link to your email”, Google will send a recovery link to your registered email address. You can click on the link provided in the email to proceed with the account recovery process. This option is suitable if you can access your email account or if you have set it up as the recovery option for your Google account.
- Choose the recovery option that is most convenient and accessible to you. It’s important to select the option that you have access to in order to receive the necessary verification code or recovery link.
By selecting the appropriate recovery option, you are one step closer to recovering your Google Authenticator account. The recovery option you choose will determine the next steps in the account recovery process, as Google will send you the necessary code or recovery link to verify your identity and proceed with the recovery process.
Remember, it’s important to choose the recovery option that you have access to. If you have changed your phone number or email address and no longer have access to them, you may need to explore alternative recovery methods or contact Google support for further assistance.
Once you have successfully selected the recovery option, be prepared to verify your identity using the provided code or recovery link in the subsequent steps of the account recovery process. Stay focused and follow the instructions carefully to regain access to your Google Authenticator account.
Step 5: Verify your identity
After selecting the recovery option in the account recovery process, the next step is to verify your identity. This step ensures that you are the rightful owner of the Google account and adds an additional layer of security to the recovery process.
To verify your identity, follow these steps:
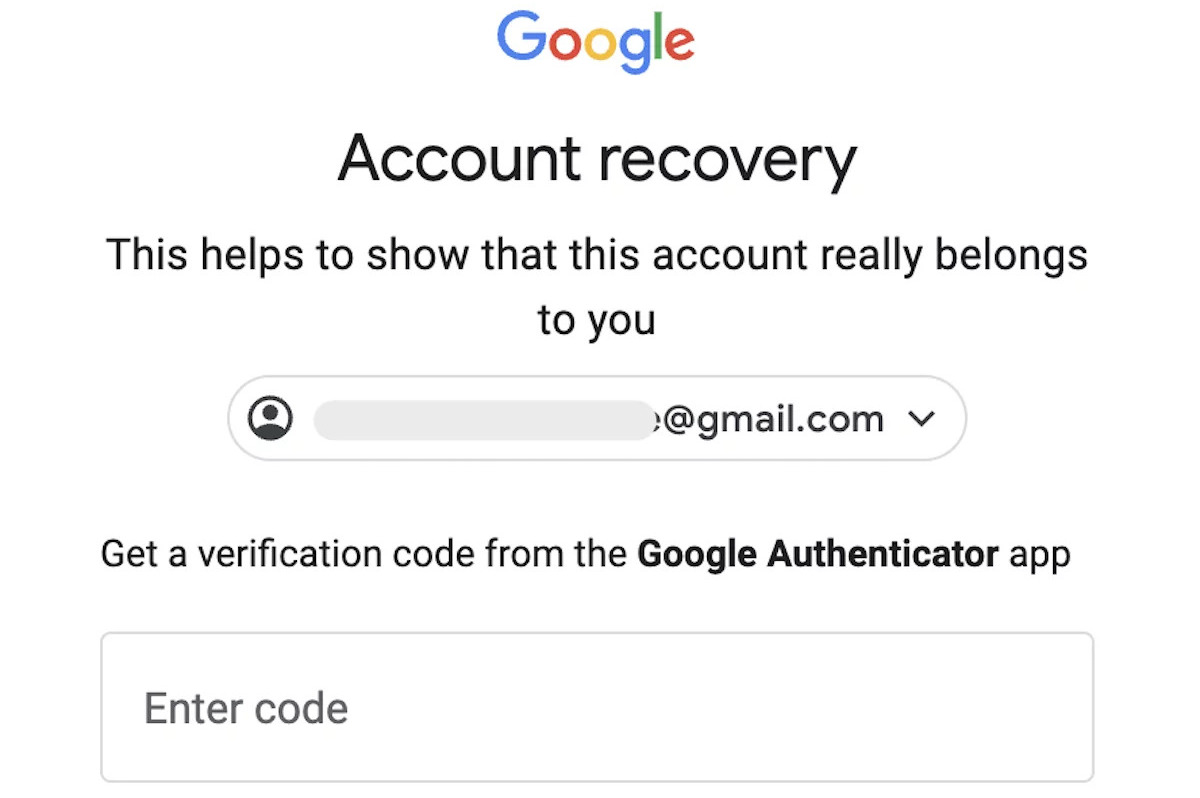
- If you selected the option to receive a verification code on your phone, wait for the code to arrive via text message or voice call. If you chose the option to receive a link to your email, check your email inbox for the recovery email from Google.
- Once you receive the verification code or email, enter the code in the designated field on the Google Account Recovery page. If you received a recovery link in your email, click on the link to proceed.
- If the code or link is entered correctly, Google will verify your identity and allow you to proceed to the next step of the account recovery process.
It’s important to note that the verification process may include additional steps and prompts depending on the specific account recovery scenario. Google may ask you to provide additional information, such as backup email addresses, previous passwords, or answers to security questions, to further confirm your identity and protect your account from unauthorized access.
During this step, it’s crucial to provide accurate and truthful information to successfully verify your identity. Google’s robust security measures are in place to ensure that only the rightful owner can regain access to the account.
If you encounter any difficulties during the identity verification step, follow the instructions provided by Google and provide the requested information to the best of your ability. If you are unable to verify your identity using the available options, you may need to explore additional account recovery methods or contact Google support for further assistance.
Once you have successfully completed the identity verification step, you are ready to move on to the next phase of the account recovery process. Stay patient and persistent as you work through the necessary steps to regain access to your Google Authenticator account.
Step 6: Set a new password
After successfully verifying your identity in the account recovery process, the next important step is to set a new password for your Google account. This will replace your old password and ensure that your account remains secure moving forward.
To set a new password, follow these steps:
- On the Google Account Recovery page, you will be prompted to enter a new password. Create a strong and unique password that you haven’t used before, combining a mix of uppercase and lowercase letters, numbers, and special characters.
- Avoid using easily guessable information such as your name, birthdate, or common words. Remember, a strong password is key to maintaining the security of your Google account.
- Enter your new password in the designated field, ensuring that it meets the requirements outlined by Google.
- Once you have entered your new password, click on the “Next” button to proceed. Your new password will be saved and associated with your Google account.
It’s important to note that setting a strong password is crucial for the security of your Google account. A weak password can make your account vulnerable to unauthorized access and compromise the safety of your personal information and online activities.
As a best practice, consider using a password manager to generate and store unique passwords for all your online accounts. This will help you maintain strong, complex passwords without the need to remember them all.
Once you have successfully set a new password for your Google account, you have taken an important step in securing your account and regaining control over your Google Authenticator settings.
Remember to store your new password in a safe and secure location, and avoid sharing it with anyone. Regularly updating your password and practicing good password hygiene will help keep your Google account and all associated services protected from potential threats.
With a new password in place, you are ready to proceed to the next step in the account recovery process and reconfigure your Google Authenticator.
Step 7: Reconfigure Google Authenticator
After setting a new password for your Google account, the next step in the account recovery process is to reconfigure Google Authenticator. This entails setting up the app again on your device and linking it to your Google account to generate the necessary verification codes.
To reconfigure Google Authenticator, follow these steps:
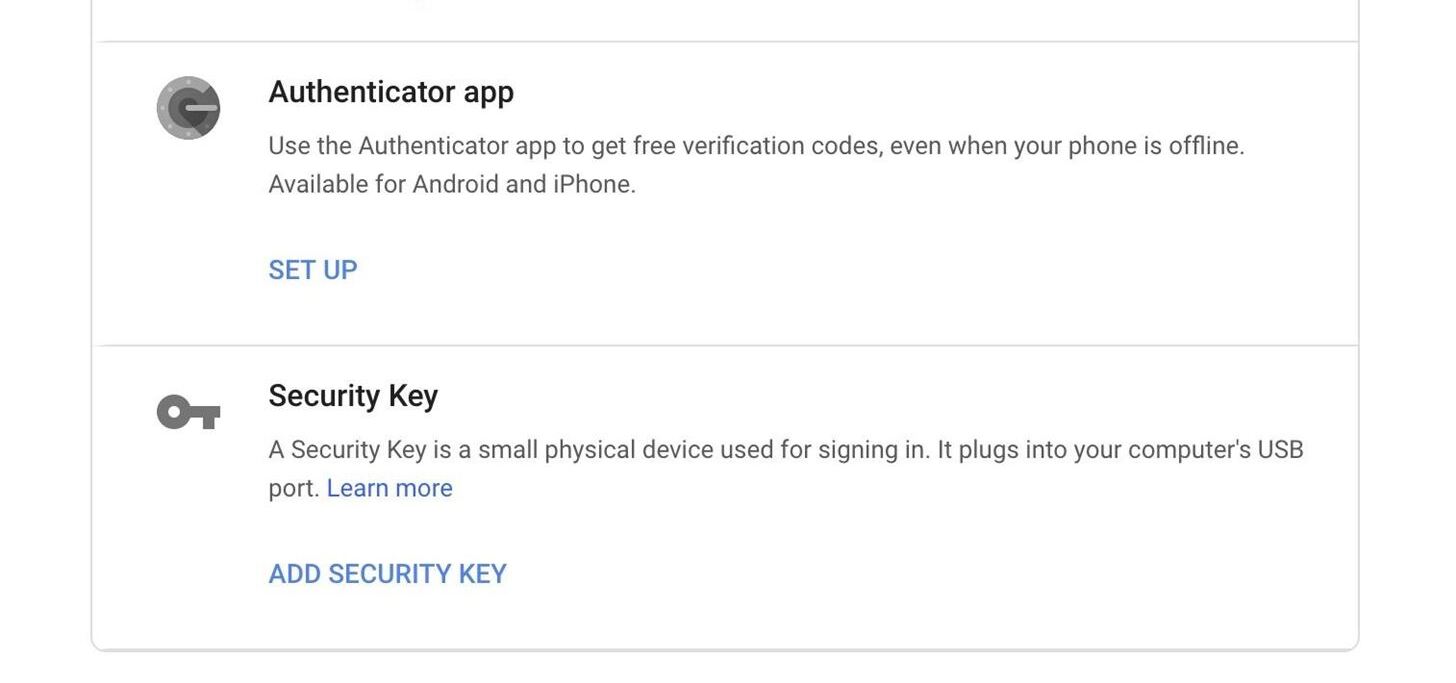
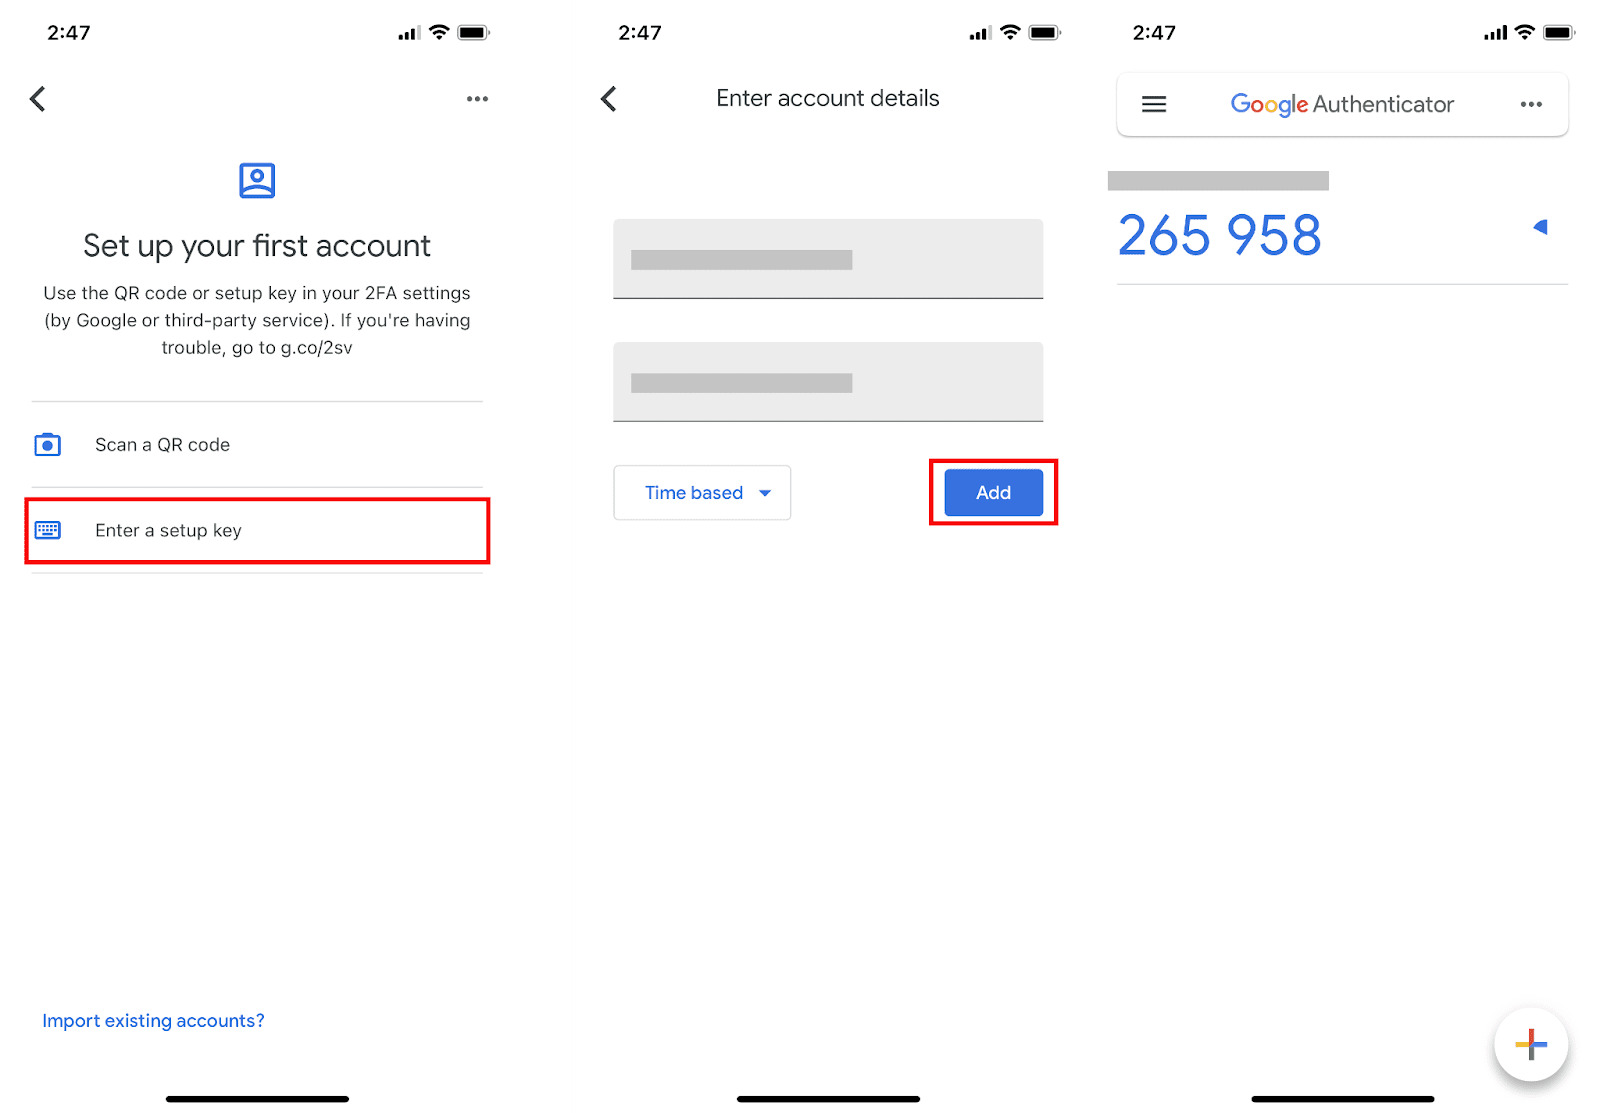
- Open the Google Authenticator app on your device.
- If you haven’t installed the app, download it from the App Store or Google Play Store.
- Once the app is open, you will need to add your Google account to the app. There are a couple of ways to do this:
- If you have previously set up a backup feature like a recovery email or phone number, you can use it to restore your Google Authenticator settings automatically. Select the option to restore Authenticator codes and follow the instructions provided.
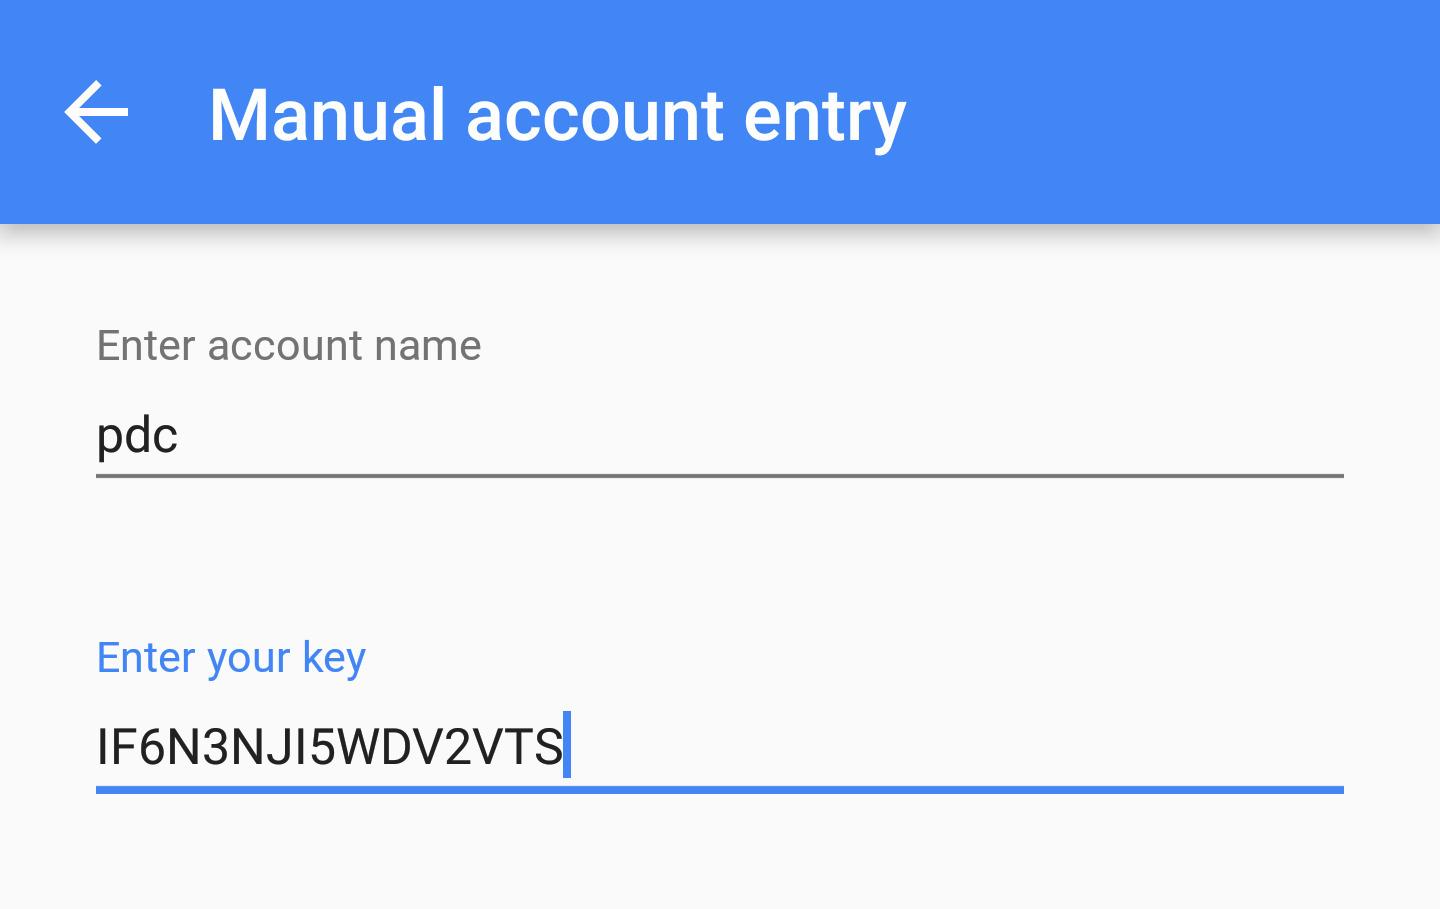
- If you don’t have a backup feature set up, you will need to manually set up Google Authenticator by adding your Google account. To do this, follow the instructions provided in the app to scan a QR code or enter a secret key provided by Google.
- Once you have successfully added your Google account to Google Authenticator, the app will start generating verification codes for your account.
- Make sure to synchronize the time on your device with a reliable time source. Google Authenticator relies on accurate time synchronization to generate valid verification codes.
Reconfiguring Google Authenticator ensures that you can securely access your Google account and enjoy the added protection of two-factor authentication.
Remember to keep your device secure and ensure that only authorized individuals have access to your Google Authenticator app. Treat your device as a valuable possession since it grants access to your Google account and other associated services.
By successfully reconfiguring Google Authenticator, you have restored the ability to generate verification codes for your Google account. This allows you to proceed to the next step and generate new codes using recovery codes or backup codes.
Step 8: Generate new codes using recovery codes or backup codes
In the final step of the account recovery process, you will generate new codes using recovery codes or backup codes. These codes will replace the previous codes generated by Google Authenticator, ensuring that you have valid and up-to-date verification codes for accessing your Google account.
To generate new codes using recovery codes or backup codes, follow these steps:
- Access your Google Account Recovery page through a web browser.
- Sign in to your Google account using your new password that you set during the account recovery process.
- If prompted, you may need to verify your identity using the recovery option you selected earlier (phone number or email).
- After successfully signing in, you will be directed to the account recovery confirmation page.
- On this page, you will have the option to generate new codes using recovery codes or backup codes.
- If you have recovery codes saved from when you initially set up 2FA, you can enter one of the codes to generate new verification codes for your Google Authenticator.
- If you don’t have recovery codes, but have previously saved backup codes, you can enter one of the backup codes to generate new verification codes.
- Once you have entered a valid recovery code or backup code, click on the “Generate Codes” button.
- Google will generate new verification codes and associate them with your Google account, allowing you to use them when logging in or accessing protected services.
It is crucial to generate new codes using the provided recovery codes or backup codes in order to regain access to your Google account. These codes act as a backup to the Google Authenticator app, ensuring that you have valid and functioning verification codes at your disposal.
Remember to save your recovery or backup codes in a secure place to avoid losing them. These codes are valuable for future account recovery situations or when reconfiguring Google Authenticator on a new device.
By successfully generating new codes using recovery codes or backup codes, you have completed the account recovery process. Congratulations! Your Google Authenticator account is now fully recovered, and you can enjoy the enhanced protection and security offered by two-factor authentication.
Make sure to regularly update your recovery or backup codes and review your account security settings to maintain a secure online presence and protect your valuable personal information.
Conclusion
Recovering a Google Authenticator account can be a daunting task, but with the right steps and perseverance, you can regain access and restore the added layer of security to your Google account. This guide has walked you through the step-by-step process of recovering your Google Authenticator account, ensuring that you can continue safeguarding your online presence.
Throughout the recovery process, we explored various crucial steps, including accessing the Google Account Recovery page, selecting the “I don’t know my password” option, entering your Google Account email address, selecting the recovery option (phone number or email), verifying your identity, setting a new password, reconfiguring Google Authenticator, and generating new codes using recovery codes or backup codes.
By following these steps diligently, you have successfully recovered your Google Authenticator account and regained control over your digital security. From recovering a lost or stolen phone to upgrading to a new device, these steps can be applied in various scenarios to ensure a seamless recovery experience.
Remember to keep your new password secure and avoid sharing it with anyone. Regularly updating your password and practicing good password hygiene will help maintain the security of your Google account. Additionally, setting up recovery or backup codes and storing them in a safe place is vital for future account recovery situations.
With your Google Authenticator account fully recovered, you can rest assured knowing that you have taken the necessary steps to protect your online accounts. Remember to keep your mobile device secure, update your Google Authenticator app when required, and enable two-factor authentication on other services whenever possible to enhance your overall digital security.
By staying vigilant and proactive, you can continue to safeguard your personal information and enjoy a secure digital experience. Don’t let the fear of account recovery hold you back—follow these steps and regain control over your Google Authenticator account today!