Introduction
Welcome to the world of Google Authenticator, a powerful tool that adds an extra layer of security to your online accounts. In this digital age, protecting your personal information is of utmost importance, and Google Authenticator offers a reliable solution to safeguard your accounts from unauthorized access.
But what exactly is Google Authenticator, and how does it work? If you’re new to this technology or simply curious about its features, you’ve come to the right place. In this article, we will explore the key aspects of Google Authenticator, including its setup process, the concept of the key, and how it enhances the security of your online presence.
Google Authenticator is a two-factor authentication (2FA) app developed by Google. It adds an extra layer of security by requiring not just your username and password, but also a unique, time-sensitive code for account verification. This means that even if an attacker manages to obtain your login credentials, they will still need the additional code generated by Google Authenticator to gain access to your account.
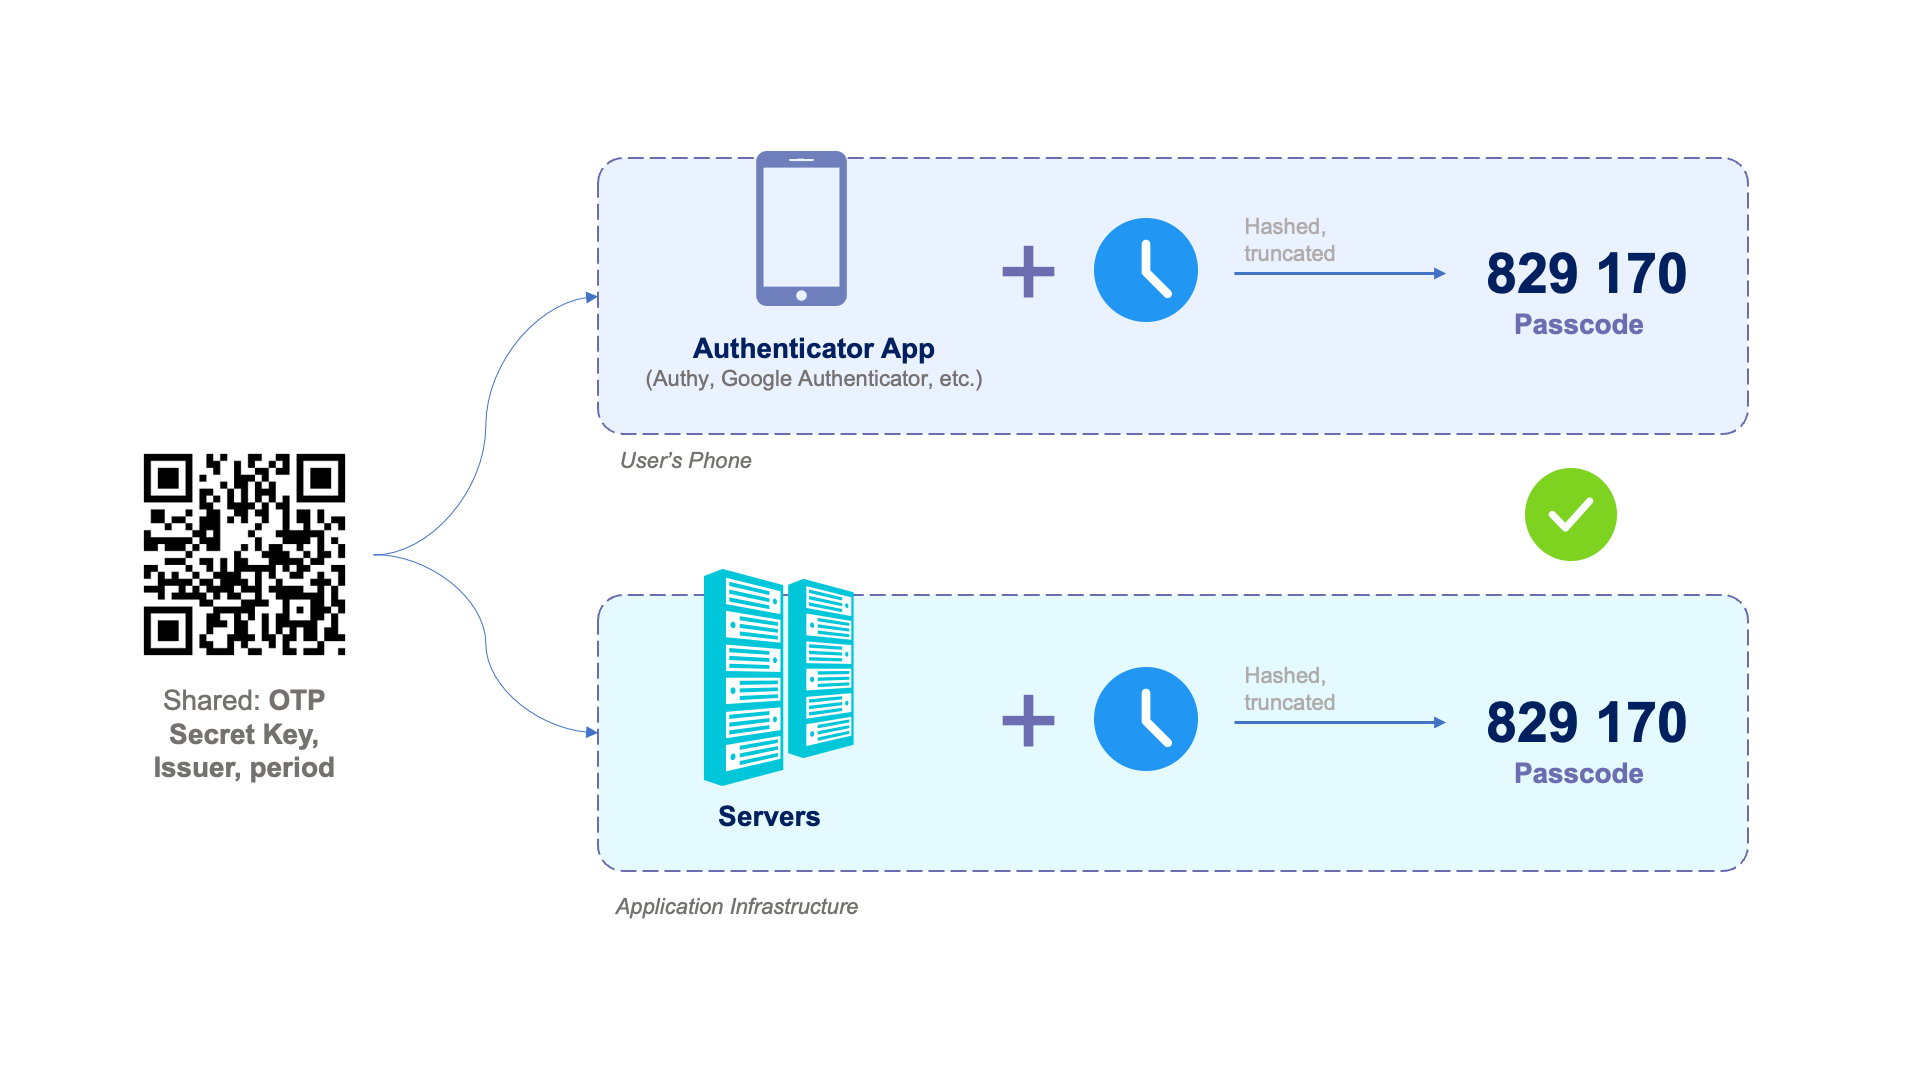
Google Authenticator works based on the Time-Based One-Time Password (TOTP) algorithm, which uses a shared secret key between your app and the service provider. This key is used to generate a new six-digit code every 30 seconds. By entering this code during the login process, you prove that you physically possess the device where the code is being generated, adding an extra layer of security.
Implementing Google Authenticator is straightforward. First, you need to set it up for each online service or account you want to secure. Once enabled, instead of relying solely on your password, you will need to enter the six-digit code generated by the app. This means that even if someone gets hold of your password, they won’t be able to access your account without the unique code provided by Google Authenticator.
Now that we have a basic understanding of Google Authenticator, let’s dive deeper into the concept of the key and how it factors into the authentication process. Understanding the key will help us better comprehend the setup, recovery, and security aspects of using Google Authenticator.
How Does Google Authenticator Work?
Google Authenticator provides an additional layer of security to your online accounts by implementing a two-step verification process. This process involves generating a unique six-digit code, also known as a one-time password (OTP), that you will need to enter along with your regular login credentials.
The app generates these codes using the Time-Based One-Time Password (TOTP) algorithm. This algorithm relies on a shared secret key, which is unique to each account and stored securely on your device. The key is used to generate the OTP every 30 seconds, ensuring that each code is valid for a limited time.
When you enable Google Authenticator for an online service or account, you will typically need to perform a one-time setup process. This involves scanning a QR code or entering a secret key provided by the service. This step establishes a secure connection between your device and the service, ensuring that both parties have the same secret key.
Once the setup is complete, Google Authenticator will display a constantly changing six-digit code for that specific account. This code refreshes every 30 seconds, ensuring that even if it is intercepted, it will be useless after a short period of time.
During the login process for the protected account, you will be prompted to enter your regular username and password as usual. Once that is done, you will need to open the Google Authenticator app on your device to obtain the currently valid OTP. You then enter this code on the login page to complete the authentication process.
What makes Google Authenticator so effective is that the code is generated solely on your device and is not transmitted through any network. This greatly reduces the risk of interception, as the code is only valid for a short period and can only be obtained from your specific device.
It is worth noting that Google Authenticator works even if you are offline or have limited connectivity. Since the app generates the codes locally, you do not need an internet connection to use it. This is especially valuable when traveling or in areas with poor network coverage.
Overall, Google Authenticator adds an extra layer of security to your online accounts by implementing two-step verification. By generating unique one-time passwords every 30 seconds, it significantly reduces the risk of unauthorized access and ensures that only individuals with physical access to the device can complete the authentication process.
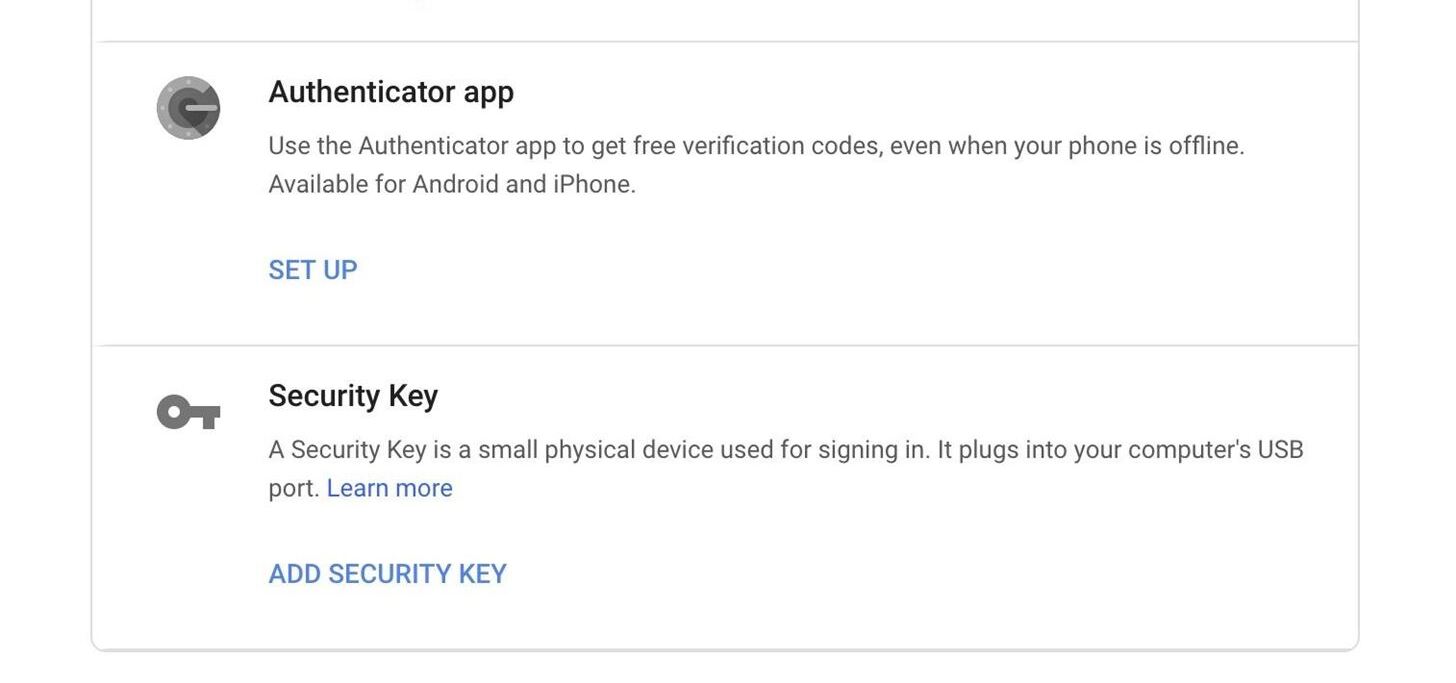
How to Set Up Google Authenticator
Setting up Google Authenticator is a straightforward process that varies slightly depending on the service or account you want to secure. In general, the steps to set up Google Authenticator are as follows:
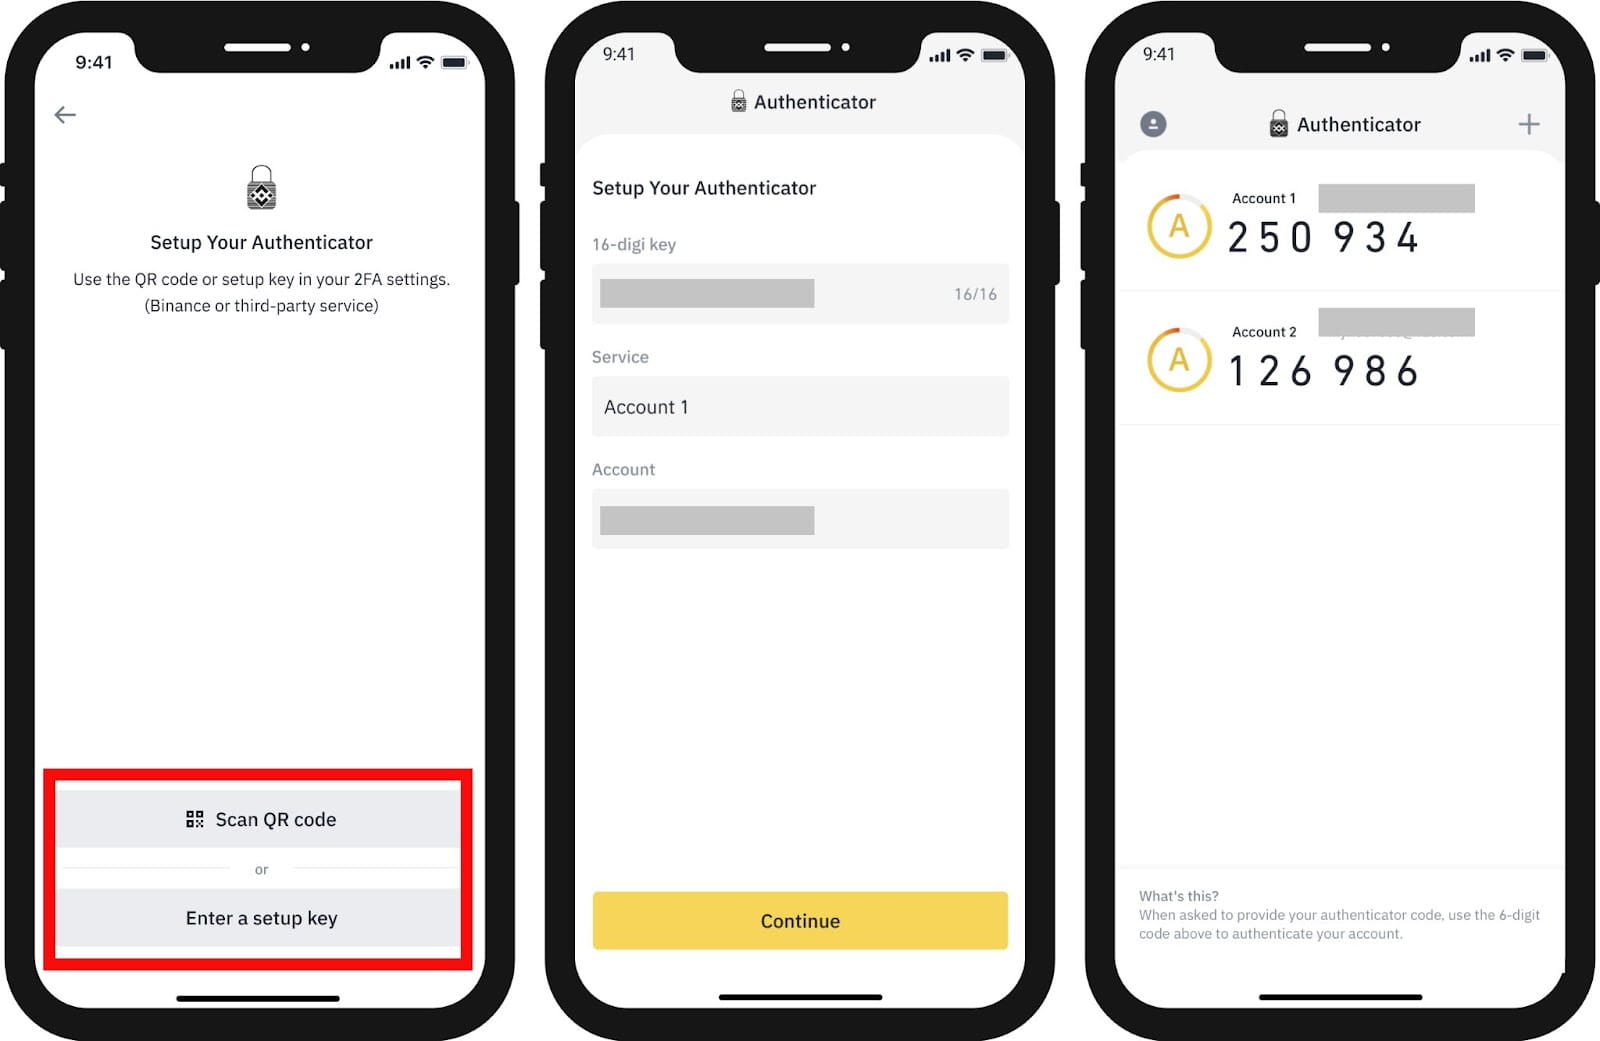
- Download and install the Google Authenticator app from the App Store (for iOS) or Google Play Store (for Android) on your mobile device.
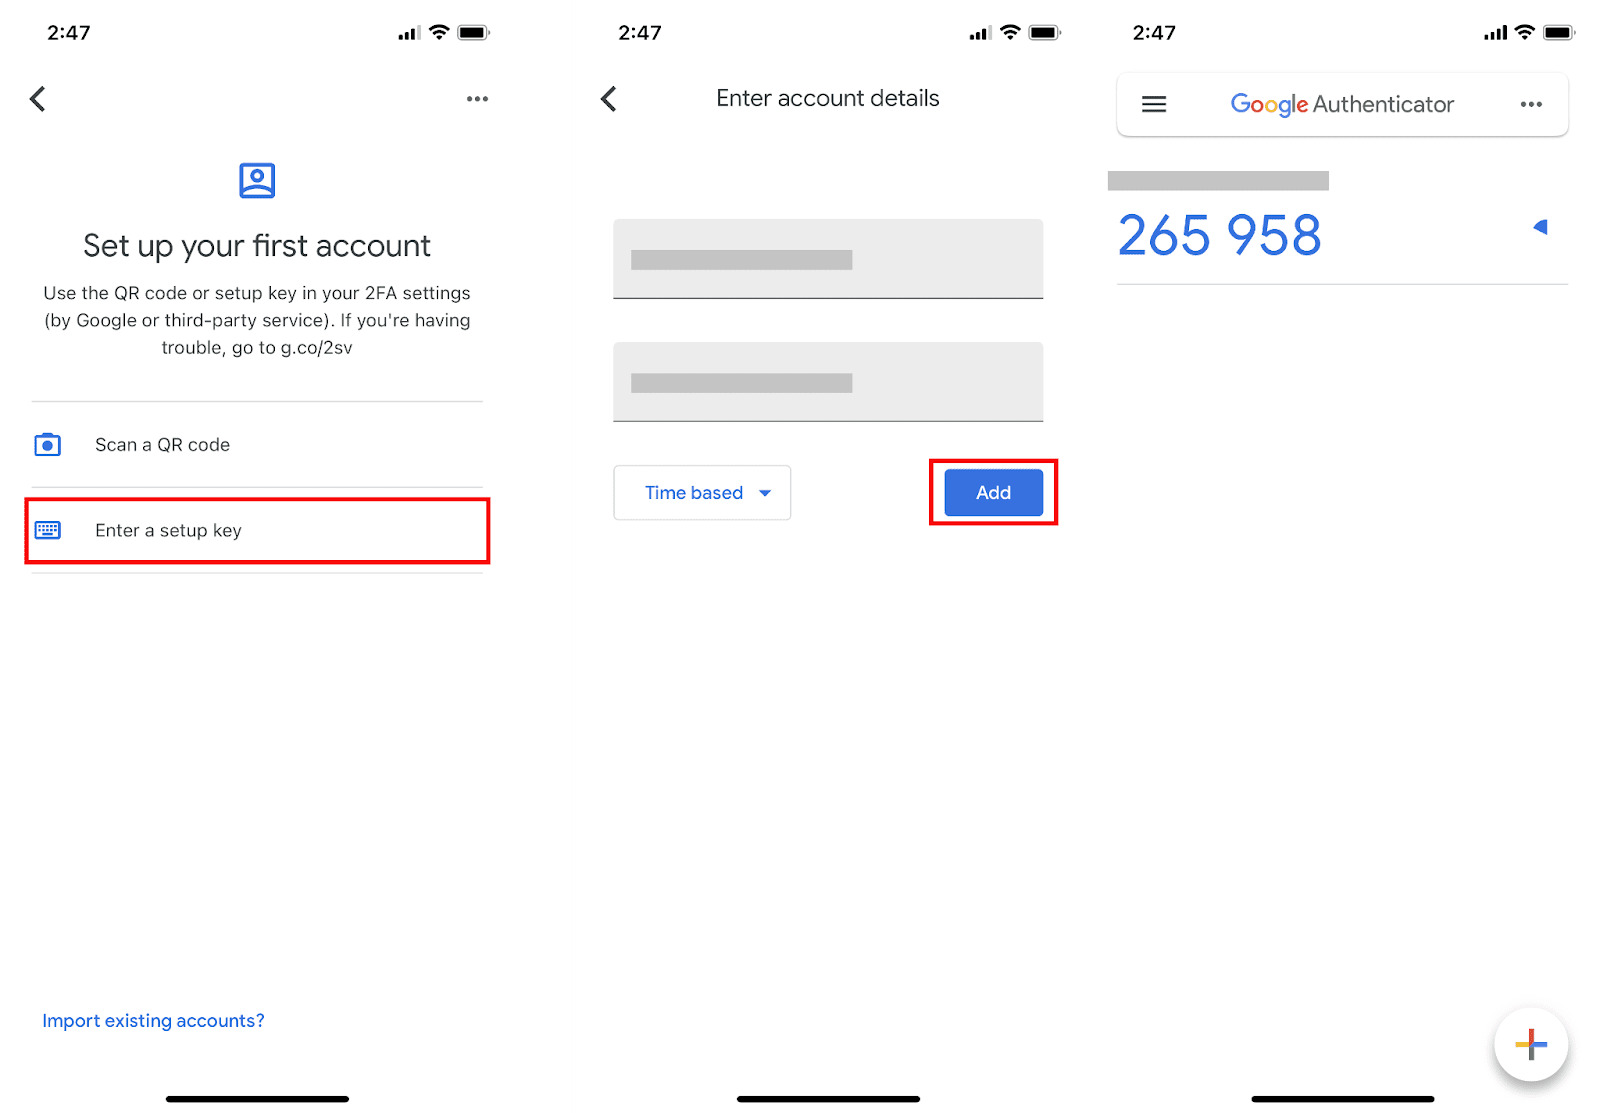
- Open the app and tap on the plus (+) icon to begin the setup process.
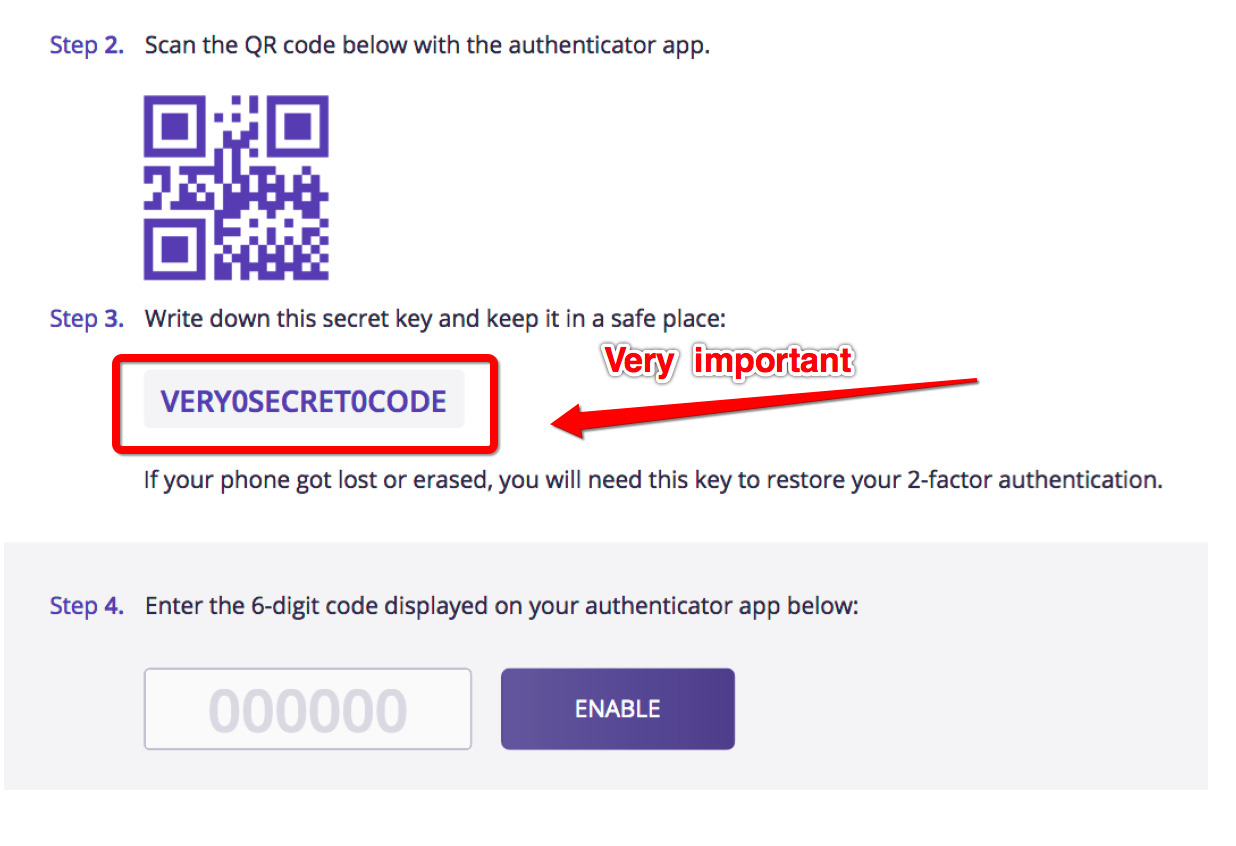
- Choose whether you want to scan a QR code or enter a secret key manually. The method will depend on what is provided by the service you are setting up.
- If you choose to scan a QR code, point your device’s camera at the QR code displayed on the service’s website or application. The app will automatically scan the code and configure the account in Google Authenticator.
- If you choose to enter a secret key manually, type in the key provided by the service. This key is typically a string of letters and numbers.
- Once the QR code is scanned or the secret key is entered, Google Authenticator will generate a six-digit code for that account.
- Enter this code into the service’s login page to complete the setup process.
- Verify that the setup is successful by entering the generated code and ensuring that it is accepted by the service.
It is important to note that each account or service you want to secure with Google Authenticator will have its own unique setup process. Therefore, you will need to repeat these steps for each account individually.
Additionally, it is highly recommended to enable backup options provided by the service. These options may include backup codes, SMS authentication, or other alternative methods that can be used to access your account in case you cannot generate a code using Google Authenticator. Storing backup codes in a secure place or enabling multiple devices to use Google Authenticator can also help prevent lockouts.
By following these simple steps, you can set up Google Authenticator for your online accounts and significantly enhance their security. It is an effective way to add an extra layer of protection and ensure that only individuals with physical access to your device can complete the authentication process.
What Is the Key on Google Authenticator?
The key on Google Authenticator is an essential component of the two-factor authentication process. It is a unique, randomly generated string of characters that serves as a shared secret between your device and the service or account you are setting up with Google Authenticator. This key is crucial for generating the one-time passwords (OTP) that provide an additional layer of security.
During the setup process, the key is either provided as a QR code or a manual string of characters. It is important to keep this key secure, as it represents the link between your device and the account you are securing with Google Authenticator. If an attacker gains access to this key, they could potentially generate valid one-time passwords and compromise your security.
The key is stored locally on your device and is never transmitted over any network. This means that even if the service’s server is compromised, the key would remain safe as it is never transmitted or stored on external servers.
Each account or service you set up with Google Authenticator will have its own unique key. This ensures that the one-time passwords generated by the app are specific to that particular account and cannot be used interchangeably between different services.
The key is used in conjunction with the Time-Based One-Time Password (TOTP) algorithm. This algorithm takes the key and the current time as inputs to generate the unique six-digit code that changes every 30 seconds. By entering the correct code during the login or verification process, you prove that you are in possession of the device that has the key and can therefore securely access the account.
It is crucial to handle the key with care. If you lose or accidentally delete the key, you may face difficulties recovering access to your account. Some services provide backup options, such as backup codes or alternative authentication methods, to help in such situations. It is also a good practice to store the key in a secure location, such as a password manager or an encrypted file, as a backup measure.
To maintain the security of your Google Authenticator setup, it is important to keep the key confidential and secure. By doing so, you can ensure that only authorized users with physical access to your device and the key can successfully generate the one-time passwords and access your accounts.
Where Can I Find the Key on Google Authenticator?
When setting up Google Authenticator for an account, you may wonder where to find the key. The key is a crucial element in the authentication process and is used to generate the time-based one-time passwords (OTP) that add an extra layer of security to your online accounts.
The location of the key may vary depending on the service or account you are setting up. Here are some common ways to find the key on Google Authenticator:
- QR Code: In many cases, the key is provided in the form of a QR code. During the setup process, you may be prompted to scan a QR code displayed on the service’s website or application using the Google Authenticator app. The QR code contains the necessary information, including the key, and once scanned, the app will automatically configure the account with the correct key.
- Manual Entry: Alternatively, the key may be given as a manual string of characters. In this case, you will need to enter the key manually into the Google Authenticator app. This key is typically a combination of letters and numbers and is unique to each account you are setting up.
- Account Setup Instructions: Some services may provide specific setup instructions that include the location of the key. These instructions could be in the form of a guide or a support document that outlines the steps for setting up Google Authenticator. Here, you can usually find details on where to locate the key for that particular service.
- Account Settings: Once you have successfully set up an account with Google Authenticator, you may be able to find the key within the account settings. Services often offer options to view or retrieve the key in case you need it for backup purposes or when setting up Google Authenticator on another device.
It is important to note that the key should be treated as a sensitive piece of information. It is recommended to keep the key secure and inaccessible to unauthorized individuals. The key represents the shared secret between your device and the service, and if it falls into the wrong hands, it could compromise the security of your account.
If you are unsure where to find the key, consult the service or account provider’s documentation or support channels for specific instructions. They will be able to guide you on the exact location of the key and ensure that you are setting up Google Authenticator correctly.
Remember, the key is a vital component of the Google Authenticator setup, and keeping it safe is paramount to maintaining the security and integrity of your online accounts.
Can I Change the Key on Google Authenticator?
Once you have set up Google Authenticator for an account, you may wonder whether it is possible to change the key associated with it. The key serves as the shared secret between your device and the service, and changing it can provide an added layer of security. However, it is important to note that Google Authenticator does not have a built-in feature to change the key directly.
The key used in Google Authenticator is typically generated during the initial setup process for each account. It is a randomly generated string of characters that establishes the connection between your device and the service. Once the key is set, it is not possible to change it within the Google Authenticator app itself.
If you wish to change the key associated with your account, you will need to follow specific procedures provided by the service or account provider. The steps to change the key will depend on the service’s policies and security measures. In some cases, the service may offer an option to regenerate a new key, while others may require you to disable and re-enable two-factor authentication entirely.
Changing the key typically involves going to the account settings or security settings of the service. Look for options related to two-factor authentication or Google Authenticator settings. From there, you may be able to find instructions on how to change the key or regenerate a new one.
It is important to note that changing the key on Google Authenticator may affect your ability to access your account if not done properly. It is recommended to carefully review the instructions provided by the service and ensure that you have alternative authentication methods set up or backup codes available.
Keep in mind that changing the key will require you to update the Google Authenticator app on your device. You may need to remove the existing account associated with the old key and perform the setup process again with the new key or re-scan the QR code provided by the service.
It is crucial to follow the instructions provided by the service accurately and keep a record of the new key in a secure place. Losing the key or not properly updating it in the Google Authenticator app may result in being locked out of your account.
If you are unsure about the specific steps to change the key on Google Authenticator, consult the service or account provider’s documentation or support channels for guidance. They will be able to provide you with accurate information on how to change the key and ensure that your accounts remain secure.
Are There Multiple Keys on Google Authenticator?
Google Authenticator allows you to set up and manage multiple accounts or services within the app. Each account or service you add to Google Authenticator will have its own unique key. In other words, there can be multiple keys associated with Google Authenticator.
When you set up Google Authenticator for a particular account or service, a unique secret key is generated or provided during the setup process. This key is specific to that account and is used to generate the time-based one-time passwords (OTP) required for authentication.
Having multiple keys on Google Authenticator allows you to secure and manage different accounts from various services within one app. This means that you can consolidate your two-factor authentication process into a single, convenient application.
Here are some scenarios where having multiple keys on Google Authenticator can be useful:
- Personal Accounts: You can set up and manage the two-factor authentication for your personal accounts, such as email, social media, or banking, within Google Authenticator.
- Work or Business Accounts: If you have work-related or business accounts that require additional security, you can add them as separate entries within Google Authenticator.
- Online Services: Many online services and platforms offer two-factor authentication, and you can utilize Google Authenticator to manage the security for each of these accounts.
- Multi-device Syncing: Google Authenticator allows you to sync your accounts across multiple devices. This means that even if you change or lose your device, you can still access your accounts by downloading Google Authenticator on your new device and syncing them using the same keys.
It is important to keep track of the keys associated with each account or service within Google Authenticator. The keys are not interchangeable, and each account requires its specific key to generate the correct OTP.
If you need to add a new account to Google Authenticator, you can follow the setup process provided by the service or account provider. This typically involves scanning a QR code or manually entering the secret key.
By having multiple keys on Google Authenticator, you can conveniently manage the two-factor authentication process for all your accounts in one place. This adds an extra layer of security and makes it easier for you to protect your online presence across various platforms and services.
Can I Recover the Key on Google Authenticator?
If you have lost or changed your device, you may be wondering if it is possible to recover the key on Google Authenticator. The key is a crucial component for generating time-based one-time passwords (OTP) and gaining access to your accounts. However, recovering the key depends on a few factors, including how you set up Google Authenticator and the backup options you have enabled.
Here are a few scenarios to consider:
If you still have access to your device:
If you still have access to your device, recovering the key is generally not necessary. You can simply reinstall the Google Authenticator app on the same device or a new one and re-scan the QR codes or manually enter the secret keys to set up your accounts. This will allow you to generate new OTPs and gain access to your accounts. It is important to keep the original QR codes or secret keys secure, as they serve as backups for account recovery in case of device loss or change.
If you enabled multi-device syncing:
If you have enabled multi-device syncing within the Google Authenticator app, you can easily recover the key on another device. Simply install the Google Authenticator app on the new device and sign in using your Google account. The app will automatically sync your accounts, including the associated keys, to the new device.
If you enabled backup options:
Some services or accounts offer backup options for Google Authenticator. These options may include backup codes, alternate verification methods, or a recovery process specific to the service. If you have set up these backup options, you may be able to recover access to your accounts by using them. Check the account settings or support documentation provided by the service to determine if such options are available and how to use them for account recovery.
If you did not enable any backup options:
If you did not enable any backup options, recovering the key can be more challenging. In this case, it may be necessary to contact the service or account provider directly. Some services have specific account recovery processes in place that may involve verifying your identity or providing additional information. Reach out to the service’s support team and explain your situation to explore potential options for key recovery.
It is important to note that the recovery process can vary between services and depends on the specific steps you took during the initial setup. It is always recommended to enable backup options whenever possible to ensure a smoother recovery process in case of device loss or change.
Remember to store your backup codes, secret keys, or any other recovery information in a secure location to prevent unauthorized access. Regularly review and update these backups as needed to maintain the security of your accounts.
If you are unable to recover the key on Google Authenticator, it is crucial to reach out to the service’s support team promptly for further assistance. They can guide you through the account recovery process and help restore access to your accounts.
Conclusion
Google Authenticator is a powerful tool that enhances the security of your online accounts by implementing two-factor authentication. By generating time-based one-time passwords (OTP), it adds an extra layer of protection to prevent unauthorized access to your accounts.
In this article, we explored various aspects of Google Authenticator, including how it works, the key concept, setup process, and recovery options. We learned that the key is a crucial piece of information that establishes a shared secret between your device and the service, enabling the generation of one-time passwords.
To set up Google Authenticator, you can download the app from the App Store or Google Play Store and follow the specific instructions provided by each service or account you intend to secure. By scanning a QR code or manually entering the secret key, you establish the connection between your device and the account.
While it may not be possible to directly change the key within Google Authenticator, some services offer options to regenerate the key or disable and re-enable two-factor authentication, ensuring your accounts remain secure.
With Google Authenticator, you can manage multiple accounts within the app, as each account has its unique key. This streamlines the two-factor authentication process and adds convenience for securing your online presence across various services.
If you face the need to recover the key on Google Authenticator, it depends on whether you have access to your device, enabled multi-device syncing, or set up backup options. By following the appropriate procedures or contacting the service’s support team, you can potentially regain access to your accounts.
In conclusion, Google Authenticator is an essential tool in safeguarding your online accounts, providing an additional layer of security through two-factor authentication. Understanding the key concept and following best practices for setup and recovery will help ensure the integrity of your accounts and protect your personal information.