Introduction
Welcome to the world of iMessage, Apple’s messaging platform that allows you to stay connected with your loved ones through texts, photos, videos, and more. With its plethora of features, iMessage has become a popular choice for iPhone and iPad users around the globe. One of the standout features of iMessage is the ability to pin messages, allowing you to easily access important conversations with just a few taps.
iMessage offers a convenient way to keep your most important conversations front and center, ensuring that you don’t lose track of important information or miss out on important messages. Whether it’s coordinating plans with friends, saving memorable messages from loved ones, or keeping important work conversations easily accessible, pinning messages on iMessage can make your life more organized and efficient.
By pinning messages on iMessage, you can quickly and easily access specific conversations without having to scroll through a long list of messages. This feature is especially useful for those who receive a high volume of texts or for those who have important conversations they need to refer back to frequently. Instead of searching through a sea of messages, you can simply pin the most important ones to the top for easy access.
In this guide, we will walk you through the simple steps to pin and unpin messages on iMessage. Whether you’re a seasoned iMessage user or new to the platform, you’ll find that pinning messages is a useful feature that can enhance your messaging experience and keep you organized.
So, if you’re ready to take your iMessage game to the next level and make your messaging life easier, let’s dive into the steps for pinning and unpinning messages on iMessage.
What is iMessage?
iMessage is Apple’s proprietary instant messaging platform that allows iPhone, iPad, and Mac users to send text messages, photos, videos, and more to one another. It is built into the Messages app, which comes preinstalled on Apple devices. Unlike regular SMS, which is sent over cellular networks, iMessage uses an internet connection to send and receive messages, making it a more versatile and feature-rich messaging platform.
Designed exclusively for Apple devices, iMessage offers a seamless and integrated messaging experience for iOS and macOS users. It not only enables users to send traditional text messages but goes beyond that with features like read receipts, typing indicators, and the ability to send high-quality photos, videos, and documents.
One of the key advantages of iMessage is its end-to-end encryption, which ensures that your conversations are secure and private. This means that only the intended recipient can decrypt and read the messages, providing an extra layer of security in your communication.
In addition to one-on-one conversations, iMessage also supports group chats, allowing users to engage in group conversations with friends, colleagues, or family members. Whether you’re planning a surprise party or collaborating on a project, iMessage makes it easy to keep everyone in the loop.
What sets iMessage apart from other messaging platforms is its seamless integration with other Apple services and apps. For example, you can share your location, send money with Apple Pay, collaborate on documents with Pages and Keynote, and even use iMessage apps to play games or share media content without leaving the conversation.
Furthermore, iMessage is not limited to text-based messaging. It supports a wide range of multimedia file types, allowing users to easily share photos, videos, voice memos, and more. Additionally, iMessage supports features like emojis, Animoji, and Memojis, which add a fun and expressive touch to your conversations.
iMessage is an essential part of the Apple ecosystem, providing a powerful and feature-rich messaging experience for Apple users. Whether you’re chatting with friends, coordinating plans, or collaborating on projects, iMessage offers a versatile and secure platform to connect with others.
Why Should You Pin Messages on iMessage?
Pinning messages on iMessage can be incredibly useful for a variety of reasons. Here are some compelling reasons why you should consider using the pinning feature:
1. Easy Access: By pinning messages, you can ensure that important conversations are always easily accessible. Instead of scrolling through a long list of messages to find a specific conversation, you can have it pinned to the top, saving you time and effort.
2. Organizational Efficiency: Pinning messages allows you to stay organized. Whether it’s saving important information, keeping track of essential tasks, or preserving sentimental messages, pinning helps you declutter your message list and keep important conversations separate from the rest.
3. Quick Reference: Pinning messages provides a convenient way to refer back to important information or instructions. Whether it’s an address, a phone number, or a crucial piece of information, having it pinned eliminates the need for unnecessary searching and ensures that the information is readily available.
4. Priority Communication: Pinning messages allows you to prioritize certain conversations over others. Whether it’s a chat with your boss, a project discussion with your team, or a conversation with a loved one, pinning ensures that these important threads are always visible and easily accessible.
5. Reminders and Tasks: If you use iMessage for task management or to keep track of important reminders, pinning messages is a game-changer. You can pin messages that contain important to-do lists, deadlines, or other important reminders, ensuring that they are always at the forefront of your messaging app.
6. Avoid Missed Messages: If you receive a high volume of messages or sometimes overlook important messages amidst the clutter, pinning can help mitigate this issue. By pinning crucial conversations, there’s a lesser chance of missing important information or messages from friends, family, or colleagues.
7. Enhanced Productivity: With pinned messages, you can streamline your messaging experience and improve productivity. Instead of spending time searching or scrolling through your message list, you can quickly access the conversations that matter most, allowing you to stay focused and efficient.
Pinning messages on iMessage offers a range of benefits, from easy access and organization to improved productivity and timely communication. By taking advantage of this feature, you can optimize your messaging experience and ensure that you never miss out on important conversations or information.
How To Pin Messages on iMessage
Pinning messages on iMessage is a straightforward process that can be done in just a few simple steps. Here is a step-by-step guide to help you pin messages on iMessage:
- Step 1: Open the iMessage App
- Step 2: Select the Conversation You Want to Pin
- Step 3: Swipe Right on the Conversation
- Step 4: Tap on the “Pin” Option
- Step 5: Confirm the Pinning
To begin, launch the iMessage app on your iPhone or iPad. You can typically find the iMessage app on your home screen or by swiping down and using the search function to locate it.
Once you have opened the iMessage app, navigate to the conversation that you want to pin. You can either choose an existing conversation or start a new one by tapping on the compose button in the top-right corner of the screen.
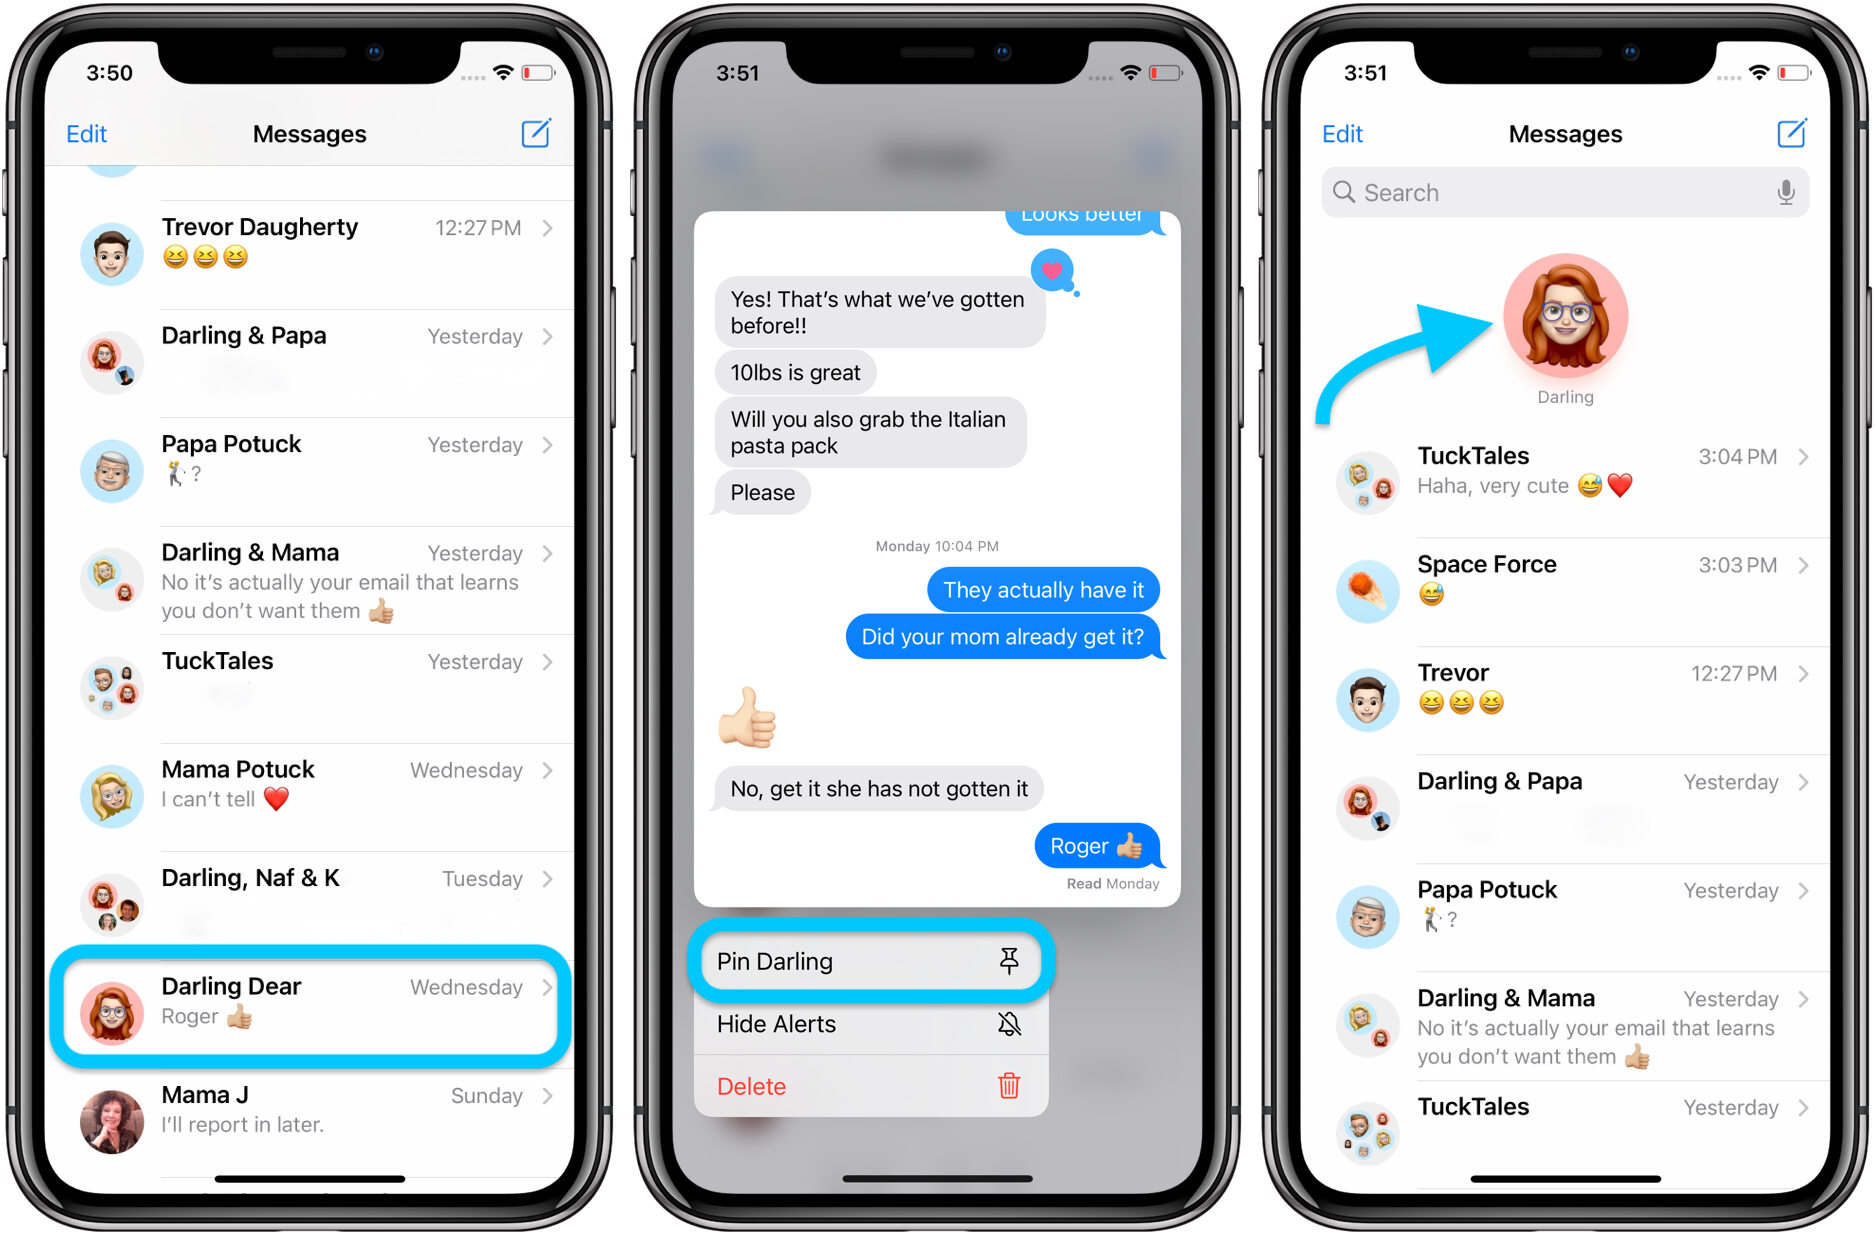
In the conversation view, swipe right on the specific conversation you want to pin. This action will reveal options for that conversation.
After swiping right on the conversation, you will see a “Pin” option. Tap on the pin icon or the “Pin” label to pin the conversation.
Once you tap on the “Pin” option, the conversation will be pinned to the top of your iMessage app. You will see a small pin icon next to the conversation, indicating that it is now pinned.
That’s it! You have successfully pinned a message on iMessage. The conversation will now remain at the top of your iMessage app, making it easily accessible for quick reference and easy navigation.
It’s important to note that you can pin multiple conversations on iMessage. Simply follow the above steps for each conversation you want to pin, and they will all be displayed at the top of your message list.
Now that you know how to pin messages on iMessage, let’s move on to the next section to learn how to unpin messages if you no longer need them to be at the top of your conversation list.
Step 1: Open the iMessage App
To begin pinning messages on iMessage, you need to open the iMessage app on your iPhone or iPad. The iMessage app comes preinstalled on Apple devices and is typically located on your home screen.
Look for the green conversation bubble icon with the word “Messages” written beneath it. Tap on this icon to launch the iMessage app.
If you can’t find the iMessage app on your home screen, you can also use the search function on your device. To do this, swipe down on the home screen to access the search bar, type “Messages” or “iMessage”, and the app should appear in the search results. Tap on it to open the app.
Once you have successfully opened the iMessage app, you will be taken to the main conversations screen where you can see a chronological list of your existing conversations.
It’s worth noting that you need to have an Apple ID and internet connection to use iMessage. Additionally, ensure that your device is running on a compatible iOS or macOS version to have access to the latest features and improvements of the iMessage app.
If you have multiple Apple devices that are connected with the same Apple ID, you can sync iMessage conversations across all devices. This means that if you pin a message on one device, it will also appear pinned on other devices, making it easy to manage and access important conversations.
Now that you have successfully opened the iMessage app, you are ready to move on to the next step and start pinning your desired messages for easy access and organization.
Step 2: Select the Conversation You Want to Pin
After opening the iMessage app, you can proceed to select the specific conversation that you want to pin. This can be an existing conversation that you have already had or a new conversation that you want to start.
In the main conversations screen of the iMessage app, you will see a list of your recent and ongoing conversations. Scroll through the list or use the search bar at the top to find the conversation that you want to pin.
If you have a lot of conversations and find it difficult to locate the one you want, try using the search function within the iMessage app. Swipe down on the conversation list to reveal the search bar, then enter the name or a keyword related to the conversation you want to pin. The search results will filter out irrelevant conversations, making it easier for you to find the specific one you are looking for.
Once you have located the conversation you want to pin, tap on it to open the chat view. This will display the entire conversation history and any recent messages exchanged between you and the other person or people involved in the conversation.
If you are starting a new conversation and want to pin it right away, tap on the compose button, usually represented by a pencil or a square with a pen icon, located in the top-right corner of the screen. Enter the recipient’s name or phone number in the “To” field, type your message, and then hit the send button.
Remember, you can pin both individual and group conversations on iMessage. Whether it’s a one-on-one chat or a group discussion, the process for pinning remains the same.
By selecting the conversation you want to pin, you are one step closer to keeping it easily accessible and organized within your iMessage app. Now, let’s move on to the next step to learn how to actually pin the conversation once you have it selected.
Step 3: Swipe Right on the Conversation
Once you have selected the conversation you want to pin in the iMessage app, it’s time to initiate the pinning process. To do this, you need to swipe right on the conversation in the chat view.
Start by placing your finger on the conversation itself. Then, swipe it to the right side of the screen. The conversation will move towards the right as you swipe, revealing additional options and actions related to that conversation.
It’s important to note that the swipe gesture needs to be performed on the conversation itself, and not on any other part of the screen or app interface. Make sure your finger starts on the conversation and follows a horizontal swipe motion to the right.
As you swipe right, you will notice that the conversation moves, and a menu or action panel appears on the left side of the screen. This panel contains various options for managing the conversation, including pinning, deleting, and muting.
To successfully swipe right on the conversation, it’s best to use a relatively fast and smooth motion. Avoid swiping too slowly or hesitating midway, as it may not trigger the desired action.
If you find it challenging to swipe right on the conversation, ensure that you are not accidentally tapping or clicking on the conversation instead of swiping. Remember, the swipe gesture requires you to move your finger across the screen in a horizontal motion without lifting it.
Once you have completed the swipe right gesture, you are ready to proceed to the next step and pin the selected conversation on iMessage. Keep in mind that swiping right is a crucial action for accessing additional options and features related to the conversation, so be sure to perform it correctly to leverage the pinning functionality effectively.
Step 4: Tap on the “Pin” Option
After performing the swipe right gesture on the conversation you want to pin in the iMessage app, you will see a menu or action panel appear on the left side of the screen. Within this panel, you will find the “Pin” option, which allows you to pin the selected conversation to the top of your message list.
To proceed with pinning the conversation, tap on the “Pin” option within the menu. You can either directly tap on the pin icon or the label that says “Pin”.
By tapping on the “Pin” option, the conversation will be pinned to the top of your iMessage app, indicating that it is now a pinned conversation that will remain easily accessible even as new messages come in.
If the conversation you are trying to pin is already pinned, you may see an option to “Unpin” instead. In such cases, you can tap on the “Unpin” option to remove the conversation from the pinned section.
It’s worth mentioning that you can pin multiple conversations on iMessage. Simply follow the same process for each conversation you want to pin. Each pinned conversation will be displayed as a separate card at the top of your message list, allowing you to easily distinguish and access them.
If you change your mind or want to reorganize your pinned conversations, you can always unpin or rearrange them as needed. Simply follow the steps outlined to unpin a conversation or tap and hold on a pinned conversation card to move it to a different position in your list.
With the successful tapping on the “Pin” option, you have now officially pinned the selected conversation on iMessage. Proceed to the next step to ensure the pinning process is confirmed and successfully applied.
Step 5: Confirm the Pinning
After tapping on the “Pin” option for the selected conversation in the iMessage app, it’s time to confirm and ensure that the pinning process has been successfully applied. This step allows you to verify that the conversation is now pinned and will appear at the top of your message list for easy access.
Upon tapping the “Pin” option, you will see a visual indication that the conversation has been pinned. Look for a small pin icon next to the conversation’s entry in the message list. This icon serves as a visual cue that the conversation is now pinned.
Additionally, you may notice that the pinned conversation is now positioned at the top of your message list, above other non-pinned conversations. This arrangement makes it easier for you to spot and access the conversation quickly without having to search through a long list of messages.
If you have pinned multiple conversations on iMessage, you will see each of them as separate cards at the top of your message list, all clearly marked with the pin icon. This allows you to distinguish your pinned conversations from the rest and easily navigate to the desired conversation.
It’s important to note that pinned conversations remain in the pinned section until you decide to unpin them. Even as new messages come in, the pinned conversations will stay fixed at the top, ensuring their visibility and accessibility.
By confirming the pinning process, you can be certain that the conversation you wanted to prioritize and keep readily accessible has been successfully pinned on iMessage. Now, you can enjoy the benefits of having important conversations conveniently and prominently displayed at the top of your message list.
With the process of pinning messages completed, you can continue to use iMessage with the assurance that you can easily find and refer back to your most significant conversations without any hassle or time-consuming search.
How To Unpin Messages on iMessage
If you have pinned conversations on iMessage that you no longer want to keep at the top of your message list, you can easily unpin them. Unpinning messages removes them from the pinned section and returns them to their original position in your message list. Here’s a step-by-step guide on how to unpin messages on iMessage:
- Step 1: Open the iMessage App
- Step 2: Go to the Pinned Messages Section
- Step 3: Swipe Left on the Conversation You Want to Unpin
- Step 4: Tap on the “Unpin” Option
To begin, launch the iMessage app on your iPhone or iPad. Locate the green conversation bubble icon with the word “Messages” written beneath it on your home screen, and tap on it to open the app.
In the iMessage app, tap on the top of your message list where the pinned conversations are displayed. This action will take you to the section that contains all of your pinned messages.
In the pinned messages section, find the conversation you wish to unpin and perform a leftward swipe on it. This action will reveal additional options and actions related to the conversation.
Within the options that appear after swiping left on the conversation, locate the “Unpin” option and tap on it. This will remove the conversation from the pinned section and return it to its original position in your message list.
Repeat these steps for each conversation you want to unpin. Once a conversation is successfully unpinned, it will appear in its chronological order among your other conversations, just like any other non-pinned message.
It’s important to note that the unpinning process allows you to customize and reorganize your message list based on your current needs and priorities. Feel free to unpin conversations that are no longer of immediate importance to you or those that you no longer wish to keep prominently displayed at the top of your iMessage app.
By knowing how to unpin messages on iMessage, you can easily manage and fine-tune the organization of your conversations, ensuring that your most relevant and important ones are readily accessible while maintaining flexibility for changing priorities and preferences.
Step 1: Open the iMessage App
To begin the process of unpinning messages on iMessage, you need to open the iMessage app on your iPhone or iPad. The iMessage app comes preinstalled on Apple devices and can be accessed easily from your home screen.
Look for the distinctive green conversation bubble icon with the word “Messages” written beneath it. Tap on this icon to launch the iMessage app.
In case you are unable to locate the iMessage app on your home screen, you can use the search function on your device. Simply swipe down on the home screen to reveal the search bar, type “Messages” or “iMessage”, and the app should appear in the search results. Tap on it to open the app.
Once you have successfully opened the iMessage app, you will be taken to the main conversations screen where you can see a chronological list of your recent and ongoing conversations.
It is important to ensure that you have an Apple ID and an active internet connection to use iMessage. Additionally, make sure that your device is running on a compatible iOS or macOS version to have access to the latest features and improvements of the iMessage app.
If you have multiple Apple devices connected with the same Apple ID, your iMessage conversations can be synchronized across all devices. This means that the unpinning action on one device will be reflected on others, ensuring consistency in your messaging experience.
Now that you have successfully opened the iMessage app, you are ready to move on to the next step and access the pinned messages section, where you can unpin specific conversations.
Step 2: Go to the Pinned Messages Section
Once you have opened the iMessage app on your iPhone or iPad, you need to navigate to the pinned messages section to unpin specific conversations. The pinned messages section is where all of your pinned conversations are displayed for easy access and management.
In the iMessage app, look at the top of your message list where the pinned conversations are located. This section is typically denoted by a separate area or a distinct visual separation from the rest of your messages.
To access the pinned messages section, tap on the top portion of your message list where the pinned conversations are displayed. You may need to swipe or scroll upwards to reveal the pinned section, depending on the number of pinned conversations you have.
Once you have tapped on the pinned messages section, it will expand, allowing you to view all of your pinned conversations. Each conversation will be displayed as a separate card or entry, clearly marked with a pin icon to signify that it is a pinned message.
If you have a large number of pinned conversations and need to scroll through them, you can swipe up or down within the pinned messages section to view additional conversations beyond what is initially visible.
By locating and accessing the pinned messages section, you are now ready to proceed to the next step and unpin specific conversations that you no longer want to keep at the top of your message list.
Note that conversations that are not pinned will be located below the pinned messages section in your message list.
Step 3: Swipe Left on the Conversation You Want to Unpin
Once you have accessed the pinned messages section in the iMessage app, the next step is to find the specific conversation that you want to unpin and perform a leftward swipe on it. This action will reveal additional options and actions related to that particular conversation.
Locate the conversation you wish to unpin from the list of pinned messages. Once you have identified the conversation, place your finger on it and swipe left across the screen. As you swipe, the conversation will move towards the left, exposing a menu or action panel specific to that conversation.
It’s important to note that the swipe gesture should be performed directly on the conversation itself, and not on any other part of the screen or app interface. Be sure to start your swipe gesture from the conversation and maintain a smooth leftward motion.
As you swipe left, you will notice that a set of options appear on the right side of the conversation. These options typically include actions such as “Pin” or “Unpin”, along with other options like “Delete” or “More”.
Keep in mind that the swipe left gesture is specific to unpinning conversations, so ensure that your motion and placement of the swipe are accurate to trigger the desired action.
If you are having difficulty swiping left on the conversation or inadvertently triggering other actions, double-check your technique, focus on the conversation itself, and try to perform the swipe smoothly and consistently.
By successfully performing the leftward swipe, you are now prepared to carry out the final step and unpin the conversation from the pinned messages section in iMessage.
Step 4: Tap on the “Unpin” Option
After swiping left on the conversation you want to unpin in the iMessage app, a set of options will be revealed on the right side of the conversation. Among these options, you will find the “Unpin” option, which allows you to remove the conversation from the pinned messages section and revert it to its original position in your message list.
To proceed with the unpinning process, tap on the “Unpin” option. You can either directly tap on the label that says “Unpin” or any corresponding icon that represents this action.
Once you tap on the “Unpin” option, the conversation will be removed from the pinned messages section and placed back among your other non-pinned conversations. The visual cue of a pin icon will no longer be displayed next to the conversation.
It’s important to note that unpinning a conversation does not delete the conversation or its message history. Rather, it simply removes it from the pinned messages section, allowing it to follow its original chronological order within your message list.
If you have multiple conversations that you wish to unpin, repeat this process for each conversation until you have unpinned all desired conversations.
By tapping on the “Unpin” option, you have successfully completed the unpinning process for the selected conversation on iMessage. It is now back in the regular message flow, giving you the flexibility to manage and organize your conversations based on your preferences and current priorities.
Keep in mind that pinned conversations can still be accessed and read even after they are unpinned. You can easily locate them by scrolling through your message list or using the search functionality within the iMessage app.
Now that you know how to unpin messages on iMessage, you can easily customize and adjust your pinned conversations based on your evolving messaging needs.
Conclusion
iMessage offers a powerful and versatile messaging platform for Apple users, allowing them to stay connected and communicate with others seamlessly. The ability to pin messages on iMessage provides a convenient way to keep important conversations easily accessible and organized.
Pinning messages on iMessage offers numerous benefits, including easy access to important conversations, enhanced organizational efficiency, quick reference to important information, priority communication, task and reminder management, avoidance of missed messages, and improved productivity.
To pin messages on iMessage, follow the simple steps outlined in this guide. Open the iMessage app, select the conversation you want to pin, swipe right on the conversation, tap on the “Pin” option, and confirm the pinning. You can pin multiple conversations, ensuring that your most important and frequently accessed messages are always at your fingertips.
When it comes to unpinning messages, the process is just as simple. Open the iMessage app, go to the pinned messages section, swipe left on the conversation you want to unpin, and tap on the “Unpin” option. The conversation will be removed from the pinned section and return to its original position in your message list.
By understanding how to efficiently pin and unpin messages on iMessage, you can customize your messaging experience, keep important conversations easily accessible, and maintain an organized message list.
So, take advantage of the pinning feature on iMessage and stay on top of your most vital conversations and information with ease!
FAQs about Pinning on iMessage
Here are some frequently asked questions regarding pinning messages on iMessage:
Q: Can I pin both individual and group conversations on iMessage?
A: Yes, you can pin both one-on-one conversations and group conversations on iMessage. The process for pinning remains the same regardless of the type of conversation.
Q: How many conversations can I pin on iMessage?
A: There is no limit to the number of conversations you can pin on iMessage. You can pin as many conversations as you require, ensuring easy access to all important messages.
Q: Can I change the order of my pinned conversations?
A: Currently, iMessage does not offer a built-in feature to manually reorder pinned conversations. However, as you continue to pin or unpin conversations, the order may automatically adjust based on activity and recency.
Q: Will I still receive notifications for pinned conversations?
A: Yes, pinning a conversation does not affect your ability to receive notifications for new messages in that conversation. You will receive notifications as usual, allowing you to stay updated on new messages.
Q: Can I unpin a conversation and then pin it again later?
A: Absolutely! Unpinning a conversation does not permanently remove it from your iMessage app. You can unpin a conversation and then pin it again at any time, depending on your current needs and preferences.
Q: Will pinned messages be synced across my Apple devices?
A: Yes, if you have multiple Apple devices connected with the same Apple ID, your pinned conversations will be synced across all devices. This ensures consistency and accessibility across your devices.
Q: Can I pin messages on iMessage on macOS?
A: Yes, you can pin messages on iMessage not only on iOS devices but also on macOS. The process for pinning and unpinning messages remains the same on macOS as well.
Q: Do pinned conversations take up additional storage on my device?
A: No, pinning conversations on iMessage does not add any significant storage requirements. Pinned conversations are merely a way to organize and prioritize messages within the app, without consuming extra storage space.
Q: Can I customize the appearance of pinned conversations on iMessage?
A: Currently, iMessage does not provide customization options for the appearance of pinned conversations. They are visually distinct with a pin icon, but you cannot change their appearance further.
By understanding the answers to these frequently asked questions, you can make the most of the pinning feature on iMessage and optimize your messaging experience.