Introduction
Welcome to this guide on how to delete a message on iMessage! Whether you sent a message you regret or you simply want to clean up your conversation history, deleting messages on iMessage is a useful feature. In this article, we will walk you through the step-by-step process of deleting individual messages, multiple messages, and even entire conversations on iMessage.
iMessage is a popular instant messaging platform developed by Apple, exclusively available on Apple devices such as iPhones, iPads, and Macs. It allows users to send text messages, photos, videos, and more through Wi-Fi or cellular data. With iMessage, you can communicate with other Apple users seamlessly and conveniently.
However, there may be instances where you want to remove certain messages from your iMessage conversations. Whether it’s a sensitive conversation or a message that you no longer wish to keep, deleting messages is a straightforward process that can help you maintain privacy and keep your conversations organized.
In the following sections, we will guide you through the steps you need to take to delete messages on iMessage. Whether you’re using an iPhone or an iPad, the process is similar, and we will highlight any differences along the way. So, without further ado, let’s get started!
Step 1: Open the iMessage app
The first step to deleting a message on iMessage is to open the iMessage app on your Apple device. On iPhone or iPad, look for the green speech bubble icon with the word “Messages” written underneath. Tap on it to open the app.
Once you have opened the iMessage app, you will see a list of conversations you have had with your contacts. These conversations contain the messages you can delete. If you are not already in the conversation that contains the message you want to delete, navigate to it by tapping on the conversation in the list.
The iMessage app organizes your conversations chronologically, with the most recent ones at the top. You can scroll through the list to find the conversation you are interested in. If you have a lot of conversations, you can use the search bar at the top of the screen to quickly find the conversation by typing in the name of the contact or a keyword from the conversation.
Pro Tip: If you find yourself frequently messaging a particular contact, you can “pin” the conversation to the top of your conversations list for easy access. To do this, swipe right on the conversation and then tap on the pin icon that appears. This way, you can always find your important conversations quickly.
Now that you have opened the iMessage app and located the conversation containing the message you want to delete, you are ready to move on to the next step: tapping and holding the message you want to delete.
Step 2: Locate the conversation
After opening the iMessage app, the next step is to locate the conversation that contains the message you want to delete. The iMessage app displays your conversations in a list format, organized based on recent activity. Scroll through the list to find the conversation you’re looking for.
Alternatively, if you have a long list of conversations, you can use the search bar at the top of the screen to quickly locate the desired conversation. Simply type in the name of the contact or a keyword related to the conversation, and iMessage will filter the results for you.
Additionally, you can use the search feature within the conversation itself to find specific messages within a lengthy chat. Just tap on the conversation, then swipe down to reveal the search bar. Enter your search term and iMessage will highlight the matching messages within the conversation.
If you find yourself frequently messaging a particular contact, you can also pin the conversation to the top of your conversations list. This makes it easier to find and access important conversations. To pin a conversation, swipe right on the conversation in the list, then tap on the pin icon that appears.
Remember, conversations in iMessage are listed in chronological order, with the most recent ones appearing at the top. If the conversation you’re looking for is older, you may need to scroll down to find it. You can also use the date headers within the conversations list to quickly navigate to a specific time period.
Now that you have located the conversation containing the message you want to delete, you can proceed to the next step: tapping and holding the message you wish to remove.
Step 3: Tap and hold the message
Once you have found the conversation that contains the message you want to delete in iMessage, the next step is to tap and hold the specific message you wish to remove.
Tap on the conversation to open it and view the messages. Scroll through the conversation if needed to locate the message you want to delete. Keep in mind that you can delete both text and media messages, such as photos or videos, using this method.
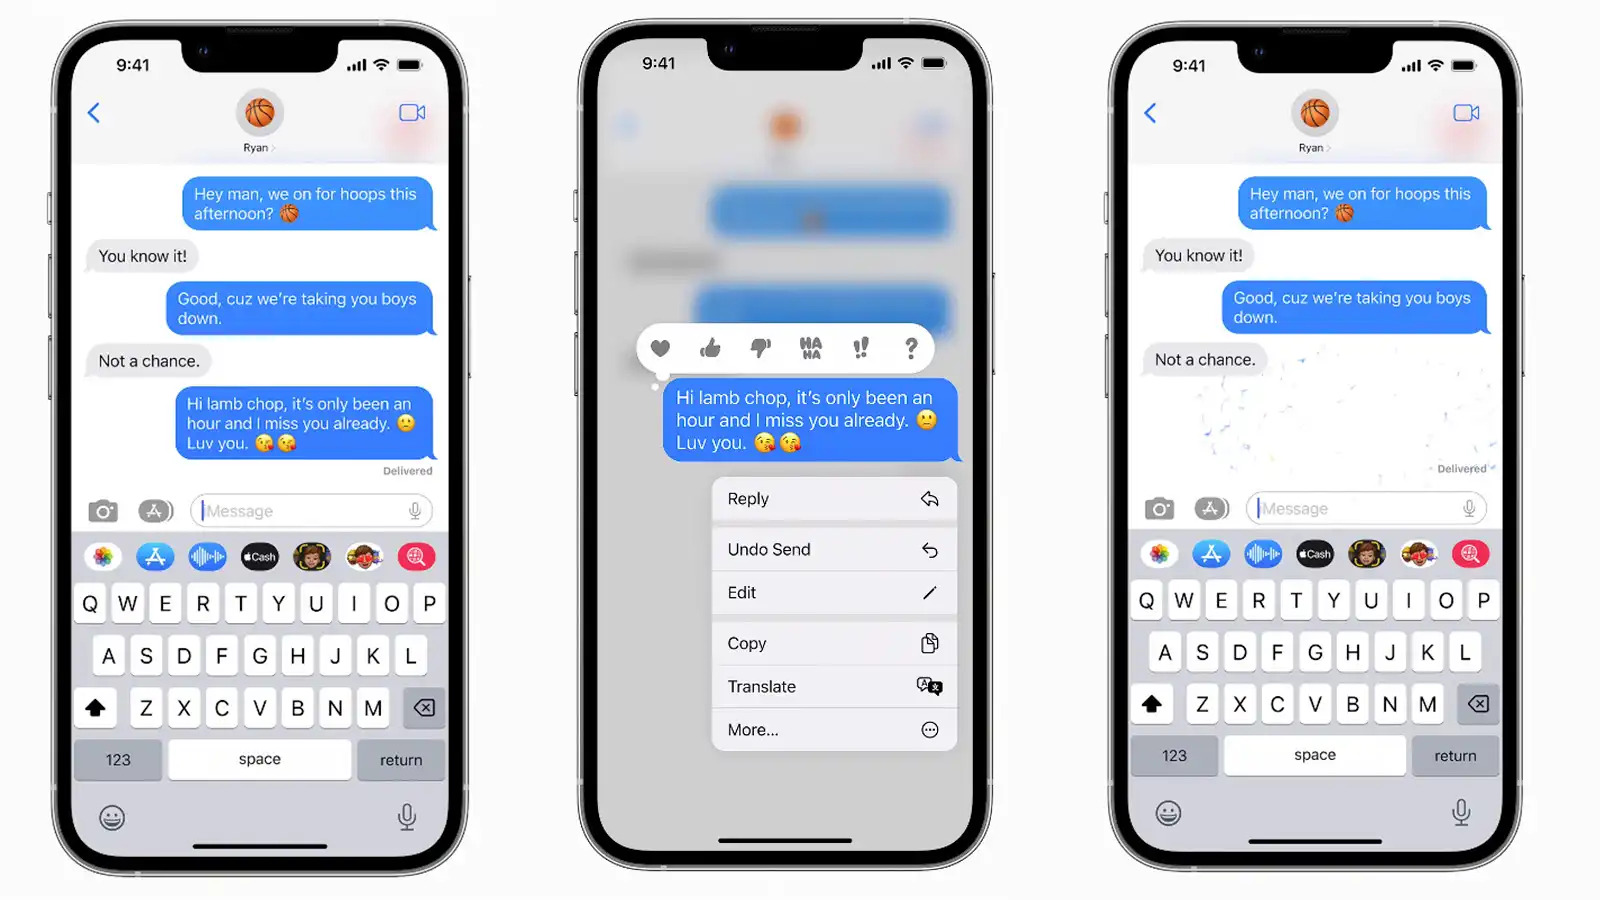
When you have found the message, press and hold your finger on it. After a moment, a menu of options will appear. This menu provides various actions you can take on the message.
Important! Make sure not to release your finger too quickly, as a quick tap will only select the message without displaying the options menu. To access the options, you need to press and hold until the menu appears.
Once the menu has appeared, you will see several options, including Copy, More, Forward, and Delete. These options allow you to perform different actions on the selected message. We will focus on the Delete option for now.
To delete the message, select the Delete option from the menu by tapping on it. This action will prompt a confirmation message asking if you are sure you want to delete the message.
In the next step, we will cover how to confirm the deletion of the message. Let’s move on to the next step!
Step 4: Choose the Delete option
After tapping and holding the message you wish to delete in iMessage, a menu of options will appear. In this step, you will choose the Delete option from the menu to proceed with the deletion.
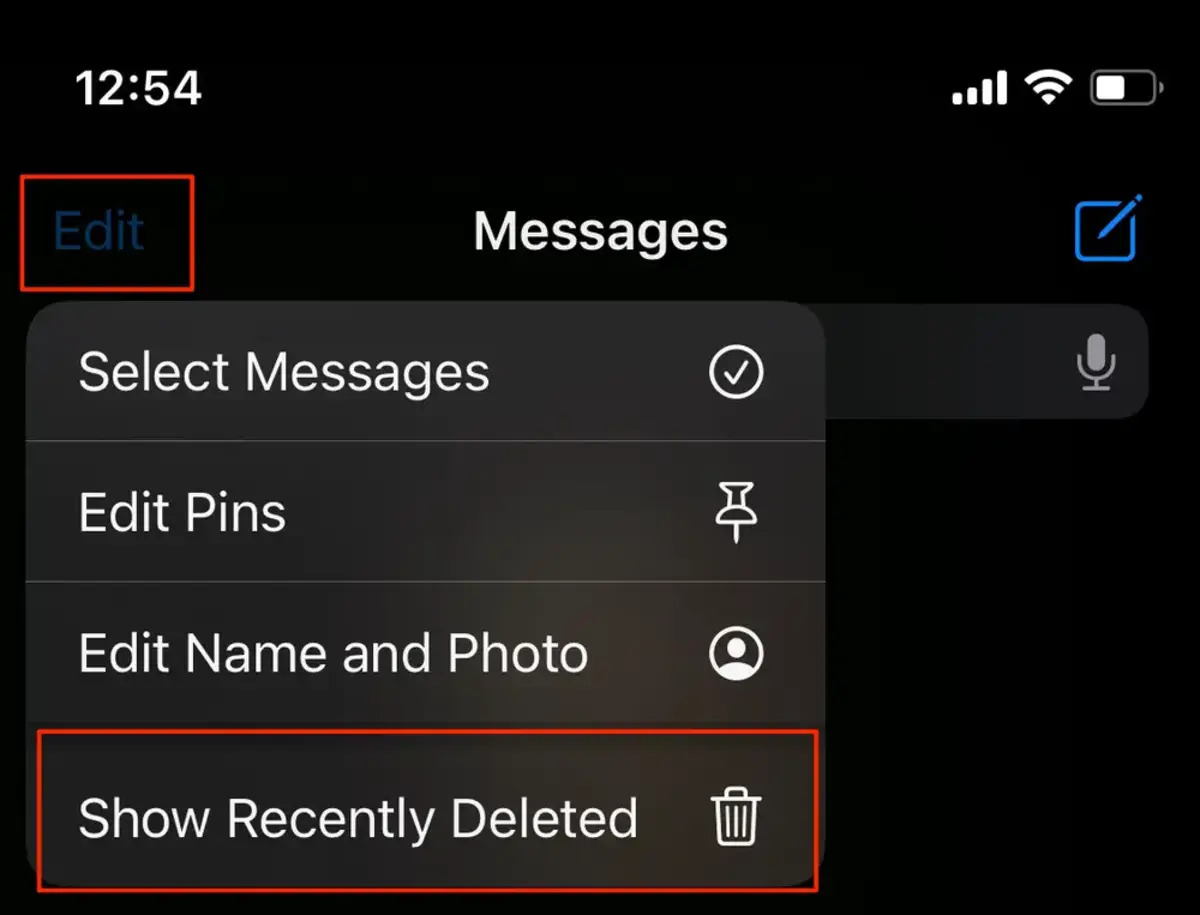
From the menu that appears after you tap and hold the message, look for the Delete option. On older versions of iMessage, this option might be represented by a trash bin icon, while newer versions may display the word “Delete” or an icon of a crossed-out trash bin.
Tap on the Delete option to select it. By selecting this option, you are indicating that you want to delete the message from the conversation.
Before the message is permanently deleted, you will be prompted with a confirmation message to ensure that you want to proceed with the deletion. This confirmation message is a necessary safeguard to prevent accidental deletions.
When the confirmation message appears, take a moment to review the content of the message and make sure it is indeed the one you want to delete. If you’re confident in your decision, proceed by tapping on the confirmation option, which is usually labeled “Delete” or “Yes.”
It’s important to note that once you confirm the deletion, the message will be permanently removed from the conversation and cannot be recovered. If you accidentally delete a message, there is no built-in way to retrieve it, so exercise caution when selecting the Delete option.
Now that you have chosen the Delete option and confirmed the deletion of the message, you have successfully removed the selected message from the conversation. In the next step, we will cover how to delete multiple messages at once. Let’s move on!
Step 5: Confirm the deletion
After selecting the Delete option for the message you wish to delete in iMessage, a confirmation message will appear. Confirming the deletion is an essential step to ensure that you want to proceed with removing the message from the conversation.
The confirmation message serves as a final check to prevent accidental deletions. It allows you to review the content of the message before permanently removing it. Take a moment to verify that you have selected the correct message for deletion.
Read the confirmation message carefully, as it may contain a warning that the action cannot be undone. Once you confirm the deletion, the message will be permanently removed from the conversation and cannot be recovered through iMessage.
To proceed with confirming the deletion, tap on the confirmation option provided in the message. The confirmation option is typically labeled “Delete” or “Yes,” indicating your intent to remove the message.
It’s worth noting that deleting a message on your device does not remove it from the recipient’s device or the servers of your respective carriers. The deletion is limited to your device and the conversation on iMessage.
Once you have confirmed the deletion, the selected message will be swiftly and permanently removed from the conversation, ensuring a clutter-free and organized messaging experience.
Now that you have successfully confirmed the deletion of the message, you can proceed with deleting multiple messages at once. In the next step, we will guide you through this process. Let’s move on!
Step 6: Delete multiple messages at once
If you have multiple messages you want to delete in a conversation on iMessage, you can take advantage of the ability to delete multiple messages at once. This allows you to quickly and efficiently clean up your conversation history.
Follow these steps to delete multiple messages at once on iMessage:
- Open the iMessage app on your Apple device and navigate to the conversation containing the messages you want to delete.
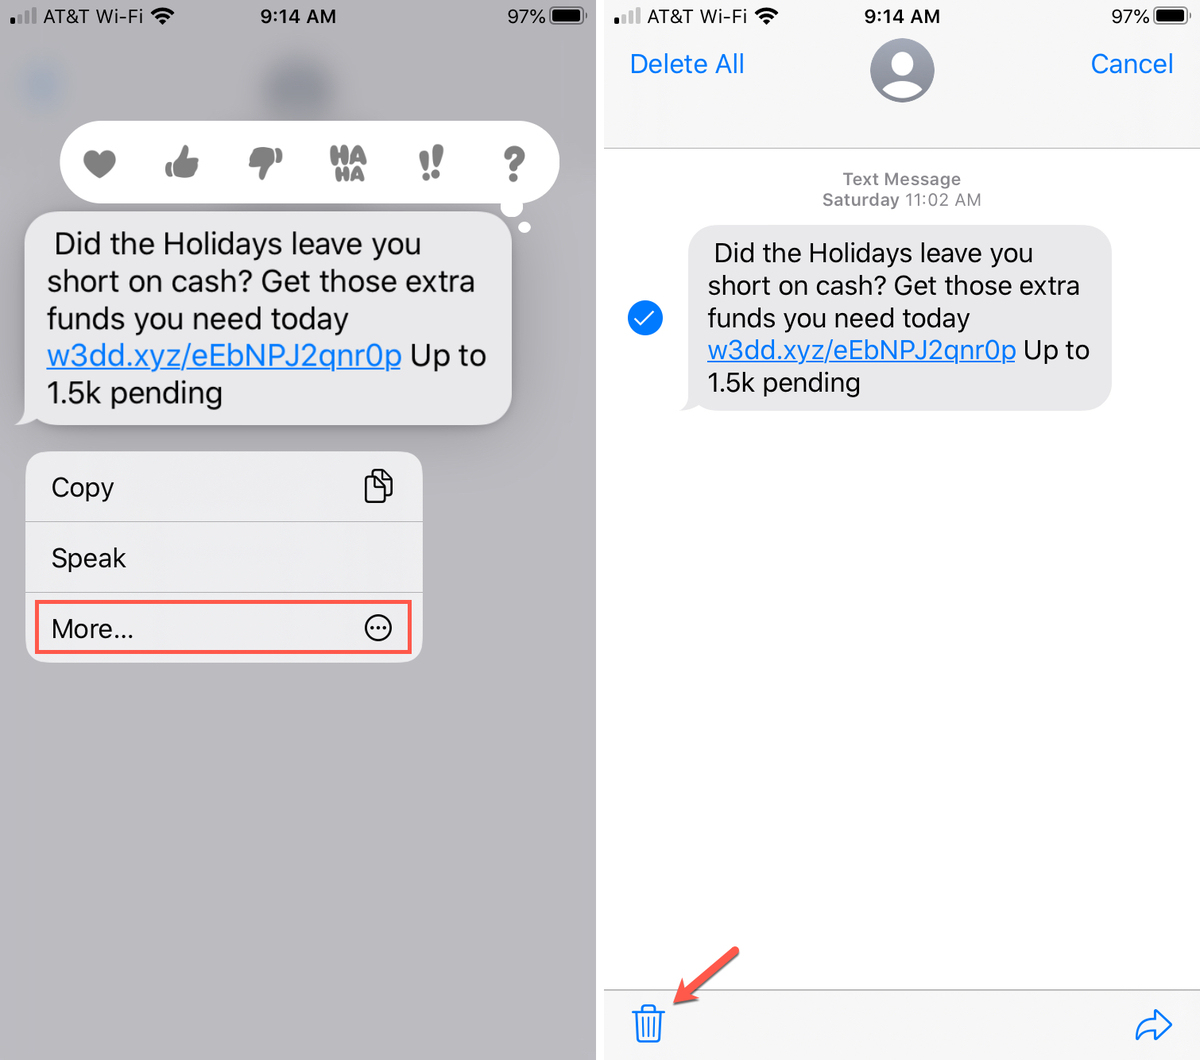
- Tap and hold on any of the messages you wish to delete. After a moment, a menu will appear with various options.
- In the menu, tap on the More option. This will activate the multi-select mode.
- You will now see checkboxes appearing next to each message in the conversation. Tap on the checkboxes of the messages you want to delete.
- Once you have selected all the messages you want to delete, look for the trash bin icon or the Delete button, usually located at the bottom or top of the screen.
- Tap on the trash bin icon or the Delete button to remove the selected messages from the conversation.
- A confirmation message may appear to confirm the deletion. Review the message and, if satisfied, tap on the confirmation option, typically labeled “Delete” or “Yes.”
By following these steps, you can efficiently delete multiple messages at once on iMessage. This feature is especially useful when you want to remove a series of messages or conversations in one go without having to delete them individually.
Keep in mind that the deleted messages cannot be recovered, so make sure you review your selection before confirming the deletion. Also, note that deleting messages on your device does not remove them from the recipient’s device or the carriers’ servers.
Now that you know how to delete multiple messages at once, you can also consider deleting an entire conversation if needed. In the next step, we will guide you through this process. Let’s continue!
Step 7: Delete an entire conversation
If you want to clear a conversation entirely from your iMessage app, deleting the entire conversation is the way to go. This is helpful when you no longer need the conversation history or want to free up space on your device by removing old conversations.
To delete an entire conversation on iMessage, follow these steps:
- Open the iMessage app on your Apple device.
- Navigate to the conversation you want to delete.
- Swipe left on the conversation. A red Delete button will appear on the right side of the screen.
- Tap on the Delete button.
- A confirmation message will appear, asking if you are sure you want to delete the conversation. Review the message to ensure you are deleting the correct conversation.
- If you are certain you want to proceed, tap on the confirmation option, typically labeled “Delete” or “Yes.”
By following these steps, you can delete an entire conversation from your iMessage app. Once the conversation is deleted, it will no longer appear in your list of conversations, and all the messages, photos, and other media within that conversation will be permanently removed from your device.
It’s important to note that deleting a conversation on your device does not remove it from the recipient’s device or the carriers’ servers. The deletion is limited to your device and the iMessage app. If you want to remove the conversation from all devices involved, you will need to delete it on each respective device.
Now that you know how to delete an entire conversation, you can keep your iMessage app organized and free of unnecessary clutter. In the next section, we will conclude this guide. Let’s wrap things up!
Conclusion
Congratulations! You have successfully learned how to delete messages on iMessage. Whether you need to remove a single message, multiple messages, or even an entire conversation, the steps outlined in this guide should help you achieve your goal.
iMessage provides a convenient and user-friendly messaging platform for Apple device users. The ability to delete messages allows you to maintain privacy, organize your conversations, and keep your messaging app clutter-free.
Throughout this guide, we covered various steps to assist you in deleting messages on iMessage. From opening the iMessage app and locating the conversation, to tapping and holding the message, choosing the Delete option, confirming the deletion, deleting multiple messages at once, and even deleting an entire conversation, you now have the knowledge to manage and remove messages according to your needs.
Remember, exercise caution when deleting messages, as they are not recoverable once deleted. Take the time to review your selection before confirming the deletion to avoid any unintended consequences.
We hope this guide has been helpful in teaching you how to delete messages on iMessage. Now you can confidently manage your conversations and maintain a tidy messaging app.
Thank you for reading, and happy messaging!