Introduction
Welcome to the fascinating world of iMessage, the built-in messaging app for iPhone users. With iMessage, you can send text messages, photos, videos, and more to other iPhone users, all for free using your internet connection. It offers a range of features and functionalities that make messaging not only convenient but also fun and interactive.
Whether you’re new to iPhone or just looking to make the most out of iMessage, this guide is here to help. We’ll walk you through the process of setting up iMessage, show you how to send messages, add attachments, use special effects and animojis, manage conversations, personalize your iMessage experience, and troubleshoot any issues that may arise.
iMessage is a fantastic way to stay connected with your friends, family, and colleagues. You can send messages to individuals or create group chats, making it easier than ever to coordinate plans, share photos and videos, or simply have a conversation. And with features like read receipts and message effects, your messages can have an extra touch of personality.
It’s worth noting that iMessage is only available for devices running iOS, which means it’s exclusive to Apple users. If you’re sending a message to someone who doesn’t have an iPhone, your message will be sent as a regular SMS message instead.
In this guide, we’ll delve into the various aspects of using iMessage. You’ll learn how to set it up, make the most of its features, and troubleshoot any issues you may encounter. So, let’s dive in and explore the wonderful world of iMessage together!
Setting Up iMessage
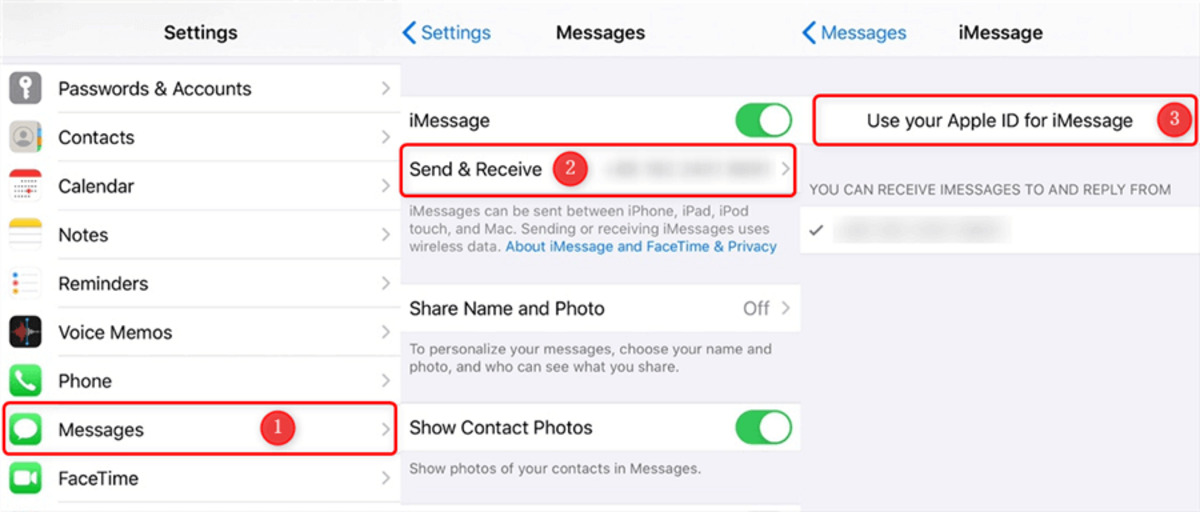
Before you can start using iMessage, you’ll need to set it up on your iPhone. Luckily, the process is simple and straightforward. Here’s how to get started:
- Open the “Settings” app on your iPhone.
- Scroll down and tap on “Messages”.
- Toggle the “iMessage” switch to turn it on.
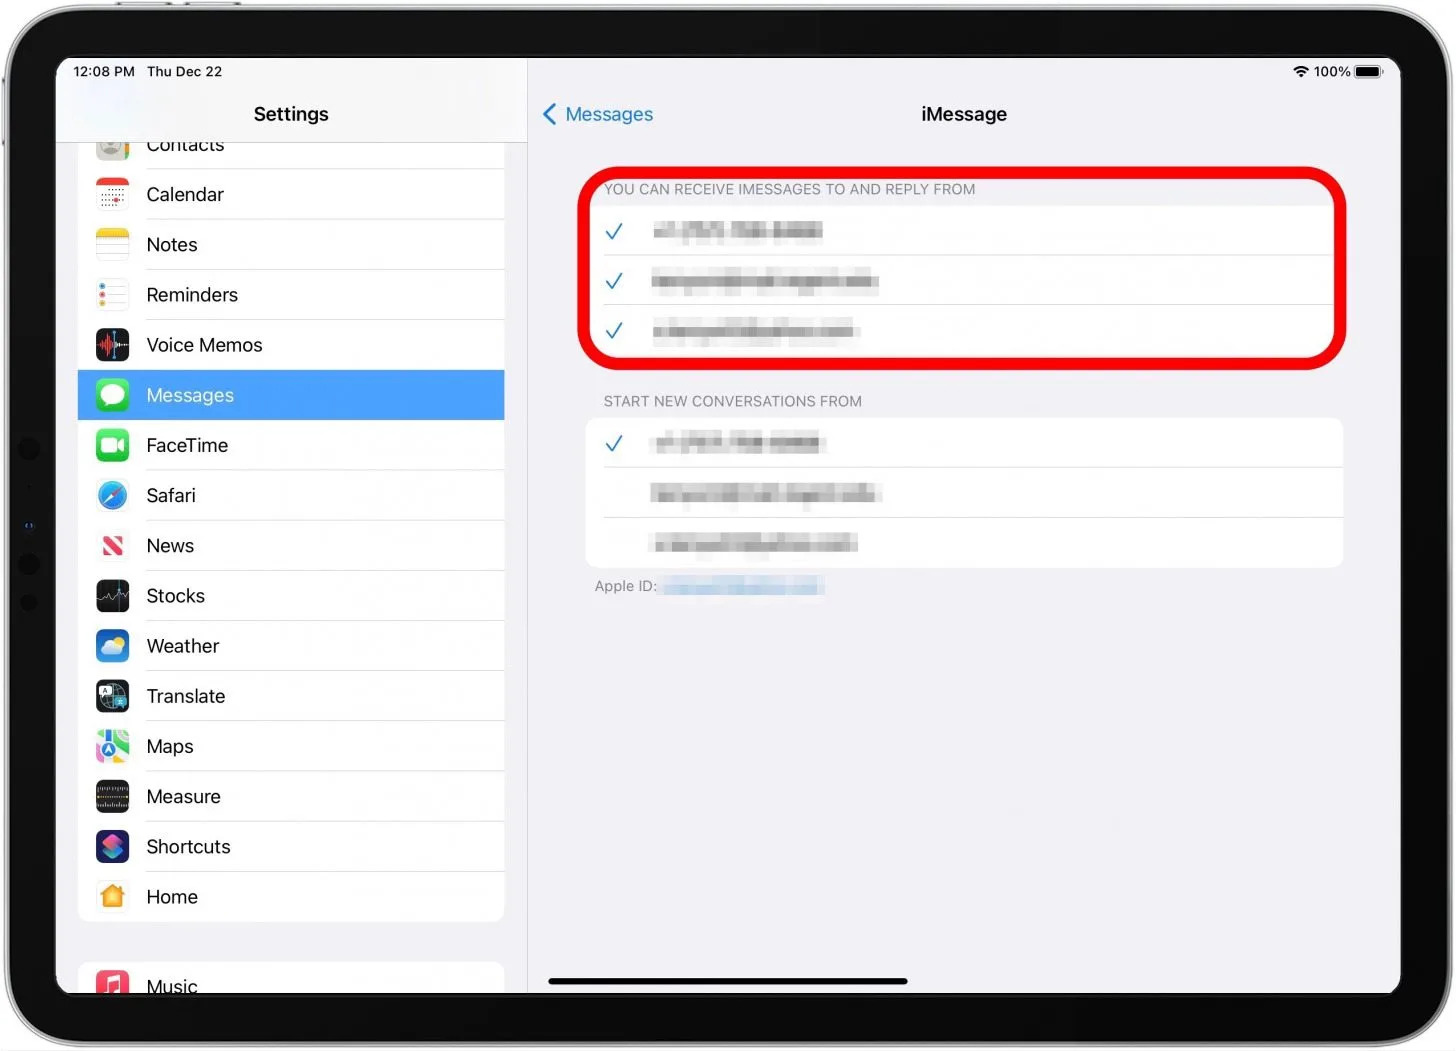
- If prompted, sign in with your Apple ID. If you don’t have an Apple ID, you can create one during this step.
- Once signed in, you’ll notice that your phone number is automatically selected as your “Send & Receive” address. You can choose to add an email address as well by tapping on “Add Another Email…”.
- Under the “You Can Be Reached By iMessage at” section, make sure to checkmark both your phone number and email address to ensure that you receive messages on all registered devices.
- You can also customize other iMessage settings such as enabling read receipts, controlling how long messages are kept, and managing notification preferences.
Once you’ve completed these steps, iMessage will be set up and ready to use on your iPhone. You’ll be able to start sending messages to other iPhone users and enjoy the benefits of a feature-rich messaging experience.
Note that for iMessage to work properly, you need to have a stable internet connection, either through Wi-Fi or cellular data. It’s also crucial to keep your iPhone updated with the latest version of iOS for optimal performance and compatibility.
With iMessage set up, you’re all set to start messaging your friends, family, and colleagues. In the next section, we’ll delve into the various ways you can send messages using iMessage and explore some of its key features. Let’s keep the conversation rolling!
Sending Messages
With iMessage, sending messages to your contacts is quick and easy. Here’s how you can do it:
- Open the “Messages” app on your iPhone.
- Tap on the compose button (usually a pencil icon) in the top right corner of the screen.
- In the “To:” field, start typing the name or phone number of the contact you want to message. As you type, you’ll see suggestions based on your contacts.
- Tap on the contact’s name or number when it appears in the suggestions.
- Type your message in the text field at the bottom of the screen.
- Once you’ve composed your message, tap the send button (usually an arrow icon) to send it.
That’s it! Your message will be sent instantly to the selected contact. When sending a message to someone who has an iPhone and iMessage enabled, the message will be sent using iMessage by default. If the recipient doesn’t have iMessage, your message will be sent as a regular SMS or MMS message.
But sending plain text messages is just the beginning of what you can do with iMessage. You can also make your messages more expressive and personalized by using various features and effects. Let’s explore some of those in the next section!
Adding Attachments
One of the great features of iMessage is the ability to easily share attachments with your contacts. Whether it’s a photo, video, document, or location, you can conveniently send it through iMessage. Here’s how:
- Open the conversation in iMessage where you want to add an attachment.
- Tap on the camera icon next to the text field to access the media options.
- You can now choose from the available options:
- Photo or Video: Tap on this option to take a new photo or video using your iPhone’s camera, or choose one from your photo library.
- Choose Existing: This option allows you to browse through your photo library and select an existing photo or video to send.
- Document: If you want to send a document, you can tap on this option and choose a file from your iCloud Drive, Files app, or other supported document storage services.
- Location: To share your current location or a specific location, tap on this option and choose the location from the map.
- After selecting the attachment, you can add a caption or additional text if desired.
- Finally, tap the send button to send the message with the attachment.
Attachments can add an extra level of richness and context to your conversations. Whether you want to share amazing travel photos, important documents, or your current location, iMessage makes it effortless.
Furthermore, iMessage also supports various other attachment types, such as contacts, voice memos, and even apps. To access these options, simply tap on the “More” option (usually represented by three dots) in the media options. From there, you can explore additional ways to enhance your messaging experience.
Now that you know how to add attachments in iMessage, let’s move on to discovering the fun effects and animojis that you can use to add a touch of delight to your messages.
Using Effects and Animojis
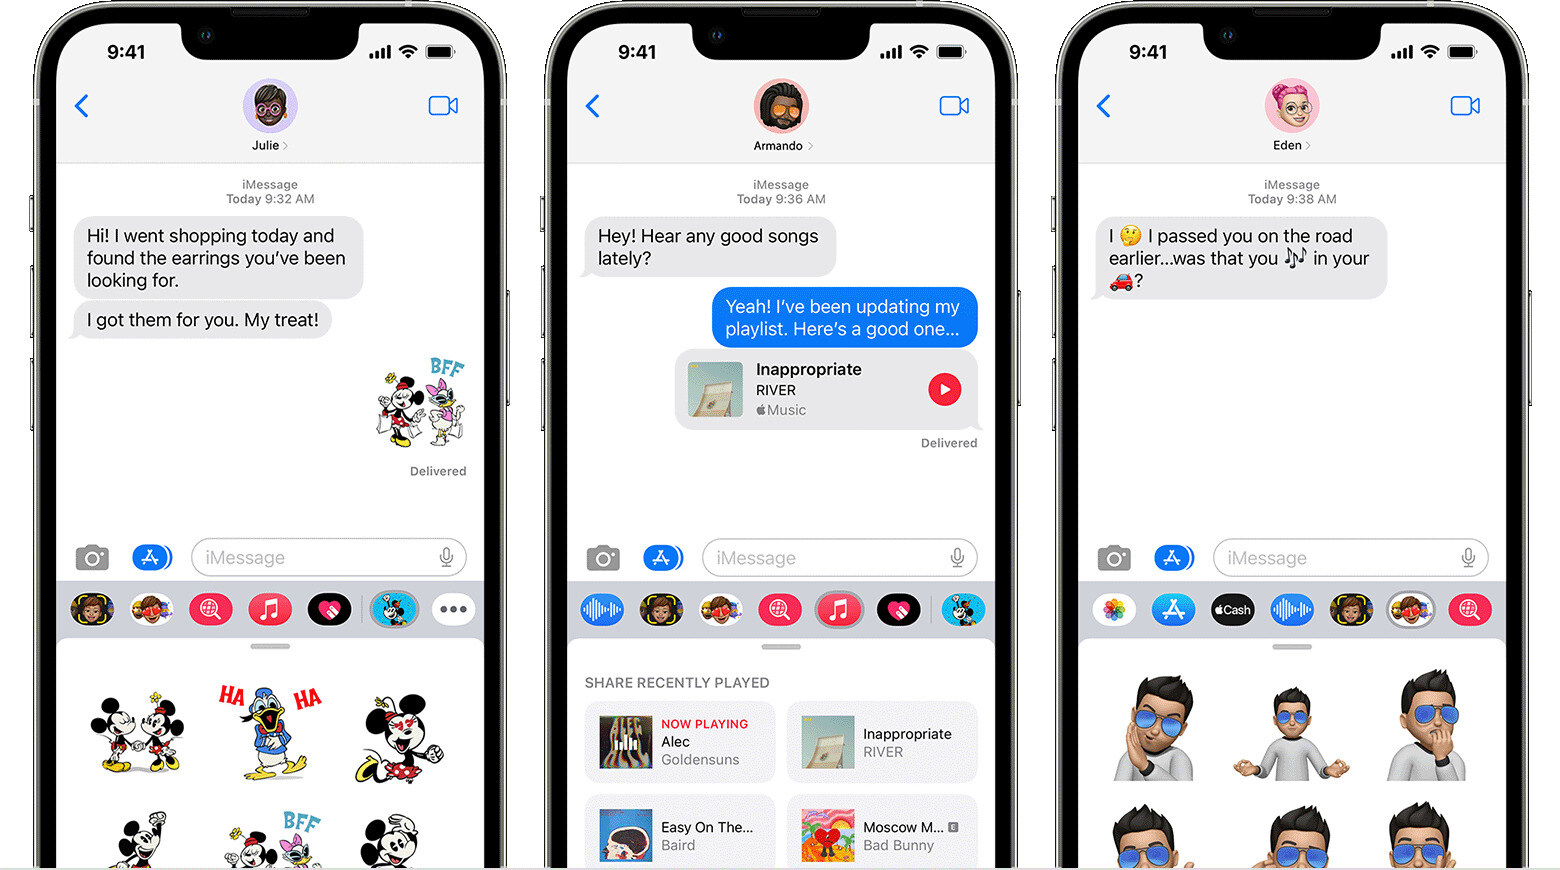
iMessage offers a range of effects and animojis that can bring your messages to life and make them more engaging. These features allow you to add visual and animated elements to your conversations. Here’s how you can use effects and animojis:
Message Effects:
- Open a conversation in iMessage or start a new one.
- Type your message in the text field as you normally would.
- Press and hold the send button (represented by an upward arrow) until the effects menu appears.
- Swipe from right to left to access different message effects, such as bubble effects and screen effects.
- Tap on the desired effect to preview it.
- Once you’ve selected the effect you want to use, tap the send button to send the message with the effect.
Animojis:
- Open a conversation in iMessage or start a new one.
- Tap on the animoji button (usually represented by a monkey face) in the app drawer.
- Select the animoji character that you want to use from the available options.
- Position your face within the frame on the screen, and the animoji will mirror your facial expressions and movements in real time.
- Tap and hold the red record button to record a message as the animoji character.
- Release the record button to stop recording, and then tap the send button to send the animoji message.
Effects and animojis can add a touch of fun and personality to your messages. From sending messages with invisible ink or confetti effects to transforming yourself into a talking panda or alien, the possibilities are limitless.
It’s worth noting that to use animojis, you’ll need a device with a TrueDepth camera, such as an iPhone X or a newer model. However, message effects are available on a wider range of devices running iOS.
Now that you’ve mastered the art of using effects and animojis in iMessage, let’s explore how you can effectively manage conversations and stay organized in the next section.
Managing Conversations
As you engage in conversations through iMessage, it’s important to know how to effectively manage and organize your chats. Here are some tips for managing your iMessage conversations:
- Mute or Hide Conversations: If you want to temporarily silence notifications from a specific conversation, you can mute it. Swipe left on the conversation in the Messages app, tap on the “More” option (represented by three dots), and select “Hide Alerts.” This will prevent the conversation from appearing in your notifications until you unmute it. Alternatively, you can hide a conversation from the main conversation list by swiping left and tapping on “Hide.”
- Pin Important Conversations: To keep important conversations easily accessible, you can pin them to the top of your conversation list. Swipe right on the conversation in the Messages app, and tap on the pin icon. The conversation will then remain at the top of your list, even as you receive new messages from other contacts.
- Search for Messages: When you need to find a specific message or information within a conversation, you can use the search functionality in iMessage. Simply swipe down on the chat screen to reveal the search bar, then enter your search term. iMessage will display relevant messages and conversations that match your search.
- Manage Group Chats: If you’re part of a group chat, you can manage the settings for that specific conversation. Tap on the group chat in the Messages app, then tap on the group name at the top of the screen. From there, you can adjust options like changing the group name, adding or removing participants, leaving the group, and even muting or customizing notifications for that specific group chat.
- Archive or Delete Conversations: If you want to tidy up your conversation list, you have the option to archive or delete individual conversations. To archive a conversation, swipe left on the chat in the Messages app and tap on “Archive.” The conversation will be moved to the Archived Chats folder. If you wish to delete a conversation permanently, swipe left on the chat and tap on “Delete.” Be cautious as this action cannot be undone.
By implementing these tips, you can effectively manage your iMessage conversations and maintain a clean and organized messaging experience on your iPhone. Whether it’s muting noisy conversations, pinning important chats, or quickly finding specific messages, iMessage offers the tools to help you stay in control.
Now that you’re an expert at managing conversations, let’s explore another useful feature of iMessage: enabling read receipts. Read on to find out more in the next section.
Enabling Read Receipts
Read receipts can be a handy feature in iMessage, as it allows you to know when your sent messages have been read by the recipients. Enabling read receipts can provide you with greater insight into the status of your messages and improve communication efficiency. Here’s how you can enable read receipts:
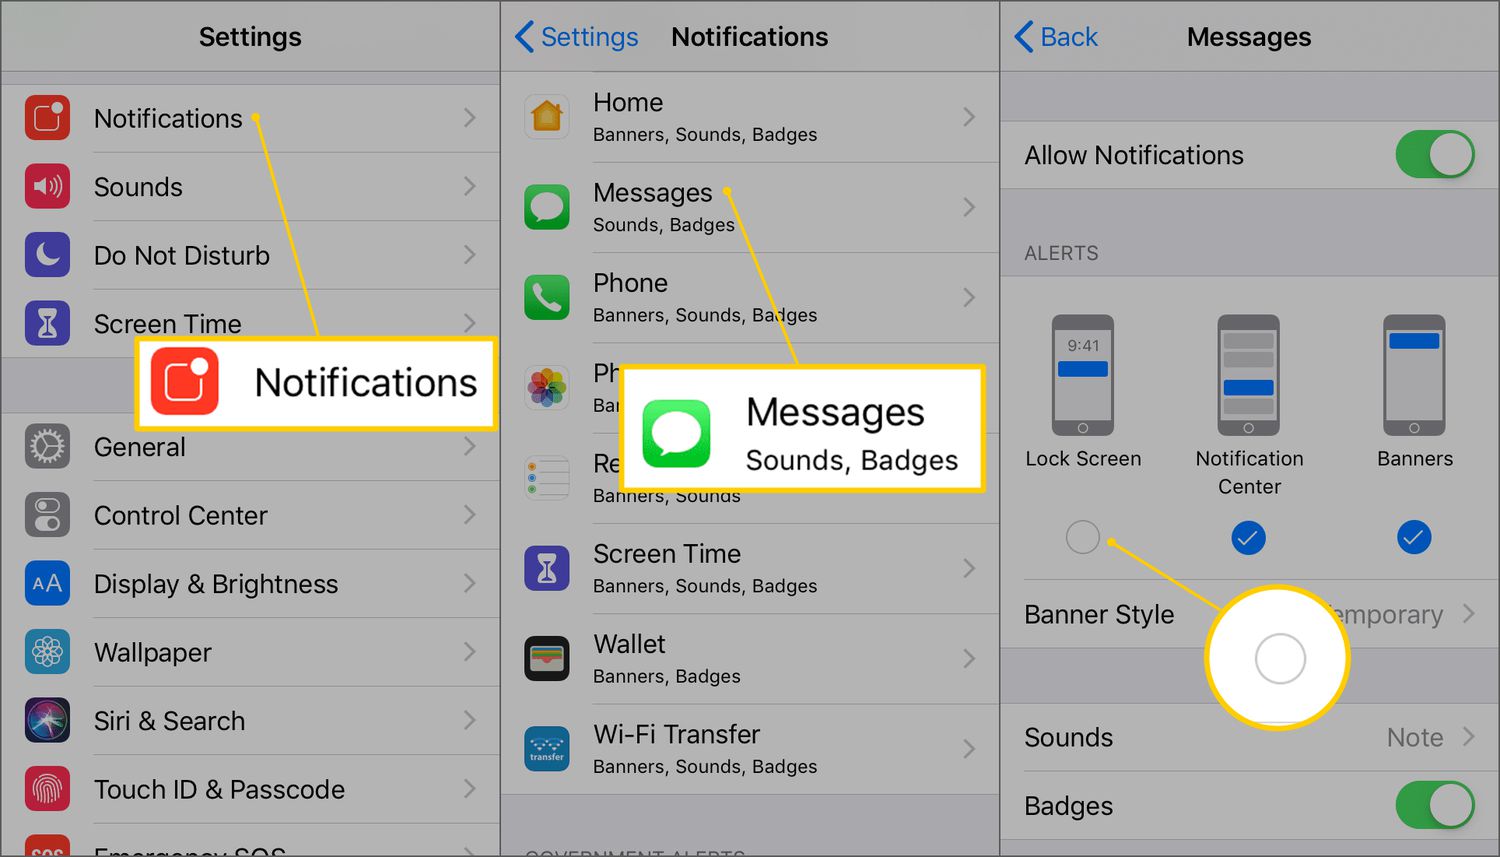
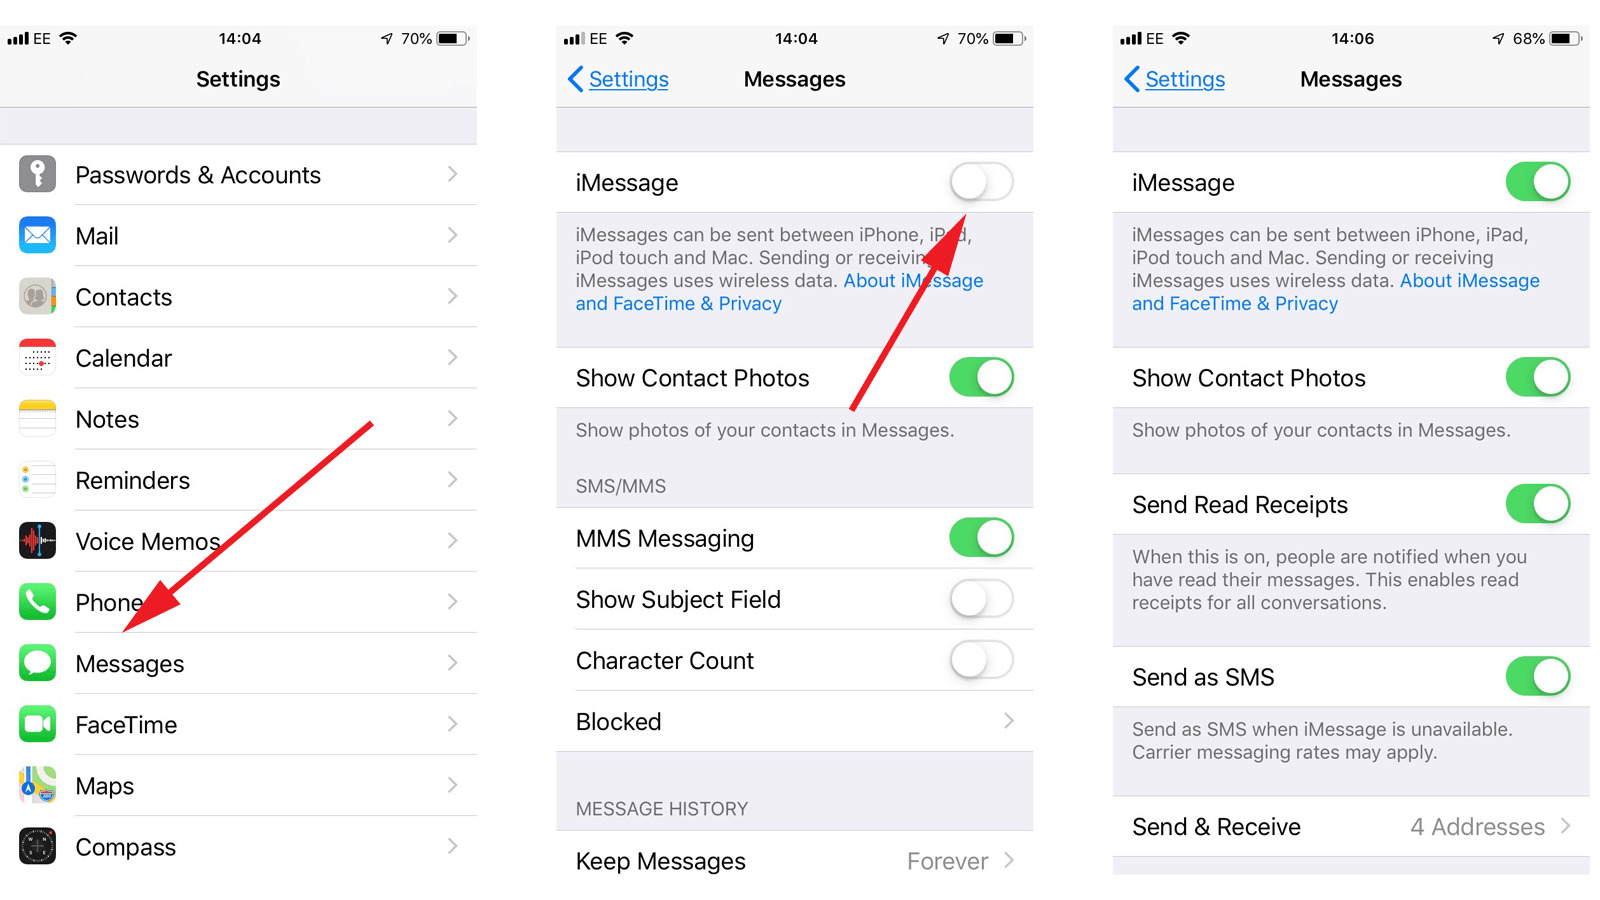
- Open the “Settings” app on your iPhone.
- Scroll down and tap on “Messages”.
- Toggle the “Send Read Receipts” switch to turn it on.
Once read receipts are enabled, a small timestamp will appear below your sent message indicating the time it was read. However, keep in mind that read receipts work both ways, meaning that your contacts will also be able to see when you have read their messages if they have read receipts enabled.
It’s important to note that not all recipients may have read receipts enabled, and some may choose to disable them for privacy reasons. Therefore, you may not always see read receipts for all of your messages. Additionally, read receipts are only applicable to iMessage messages, not regular SMS or MMS messages.
Enabling read receipts in iMessage can be especially useful in certain situations. For instance, in group chats, it helps you gauge if everyone has seen your message before proceeding with the conversation. It can also be helpful in confirming whether urgent or time-sensitive messages have been received and read.
If you’d rather not have read receipts enabled for all of your conversations, you can also enable or disable read receipts on a per-conversation basis. Simply open the conversation in iMessage, tap on the contact’s name at the top of the screen, and toggle the “Send Read Receipts” switch for that specific contact.
Now that you know how to enable read receipts in iMessage, you can tailor your messaging experience to your preferences and stay informed about the status of your messages. In the next section, we’ll explore ways to personalize your iMessage settings and make it truly your own.
Personalizing iMessage
iMessage offers various customization options that allow you to personalize your messaging experience and make it reflect your style and preferences. From changing the appearance of your chat bubbles to selecting custom alert tones, here are some ways to personalize iMessage:
- Chat Bubbles: You can change the appearance of your chat bubbles in iMessage to make them stand out or match your preferred color scheme. Open the “Settings” app on your iPhone, go to “Display & Brightness”, and select “Messages”. From there, you can choose a different style, such as a different color or a different shape, for your outgoing messages and incoming messages.
- Custom Wallpapers: You have the option to set a custom wallpaper for your iMessage app. Open the “Settings” app, go to “Wallpaper”, choose a wallpaper image from your photo library or built-in options, and select “Set” for the “Home Screen” or “Both” options. Your chosen wallpaper will then be visible as the background in your iMessage app when you open it.
- Customize Alert Tones: You can assign different alert tones for incoming messages in iMessage to differentiate them. Open the “Settings” app, go to “Sounds & Haptics”, and select “Sound and Vibration Patterns”. From there, you can customize the sound and vibration settings for your incoming iMessage notifications.
- Sticker Packs: iMessage allows you to add sticker packs to enhance your conversations and express yourself creatively. You can browse and download various sticker packs from the App Store specifically designed for iMessage. Open a conversation, tap on the App Store icon, and select the “Sticker Store” option to explore the available sticker packs.
- Emoji Suggestions: iMessage can suggest emojis as you type based on the words you’re typing. To enable this feature, open the “Settings” app, go to “General”, select “Keyboard”, and toggle on the “Predictive” option. This will make emoji suggestions appear above the keyboard as you type, making it easier to add emojis to your messages.
Personalizing iMessage can add a touch of uniqueness and creativity to your conversations. Whether it’s customizing the appearance of chat bubbles, adding your own wallpaper, or using fun sticker packs, these customization options allow you to make iMessage truly yours.
Experiment with the different options and find the combination that best reflects your style and enhances your messaging experience. Now that you’ve personalized iMessage to your liking, let’s address any potential issues or troubleshooting tips in the next section.
Troubleshooting iMessage Issues
While iMessage is generally a reliable messaging platform, you may encounter occasional issues that can disrupt your messaging experience. Here are some common iMessage issues and troubleshooting tips to resolve them:
- Message Not Sending: If you’re having trouble sending a message, ensure that you have a stable internet connection. Check your Wi-Fi or cellular data connection and try again. If the issue persists, you can toggle the iMessage switch off and on in the “Settings” app or restart your iPhone.
- Message Not Receiving: If you’re not receiving iMessages, confirm that the sender is using the correct phone number or email address to reach you. Additionally, ensure that you have the appropriate notifications enabled for iMessage in your iPhone’s “Settings” app under “Notifications” > “Messages”.
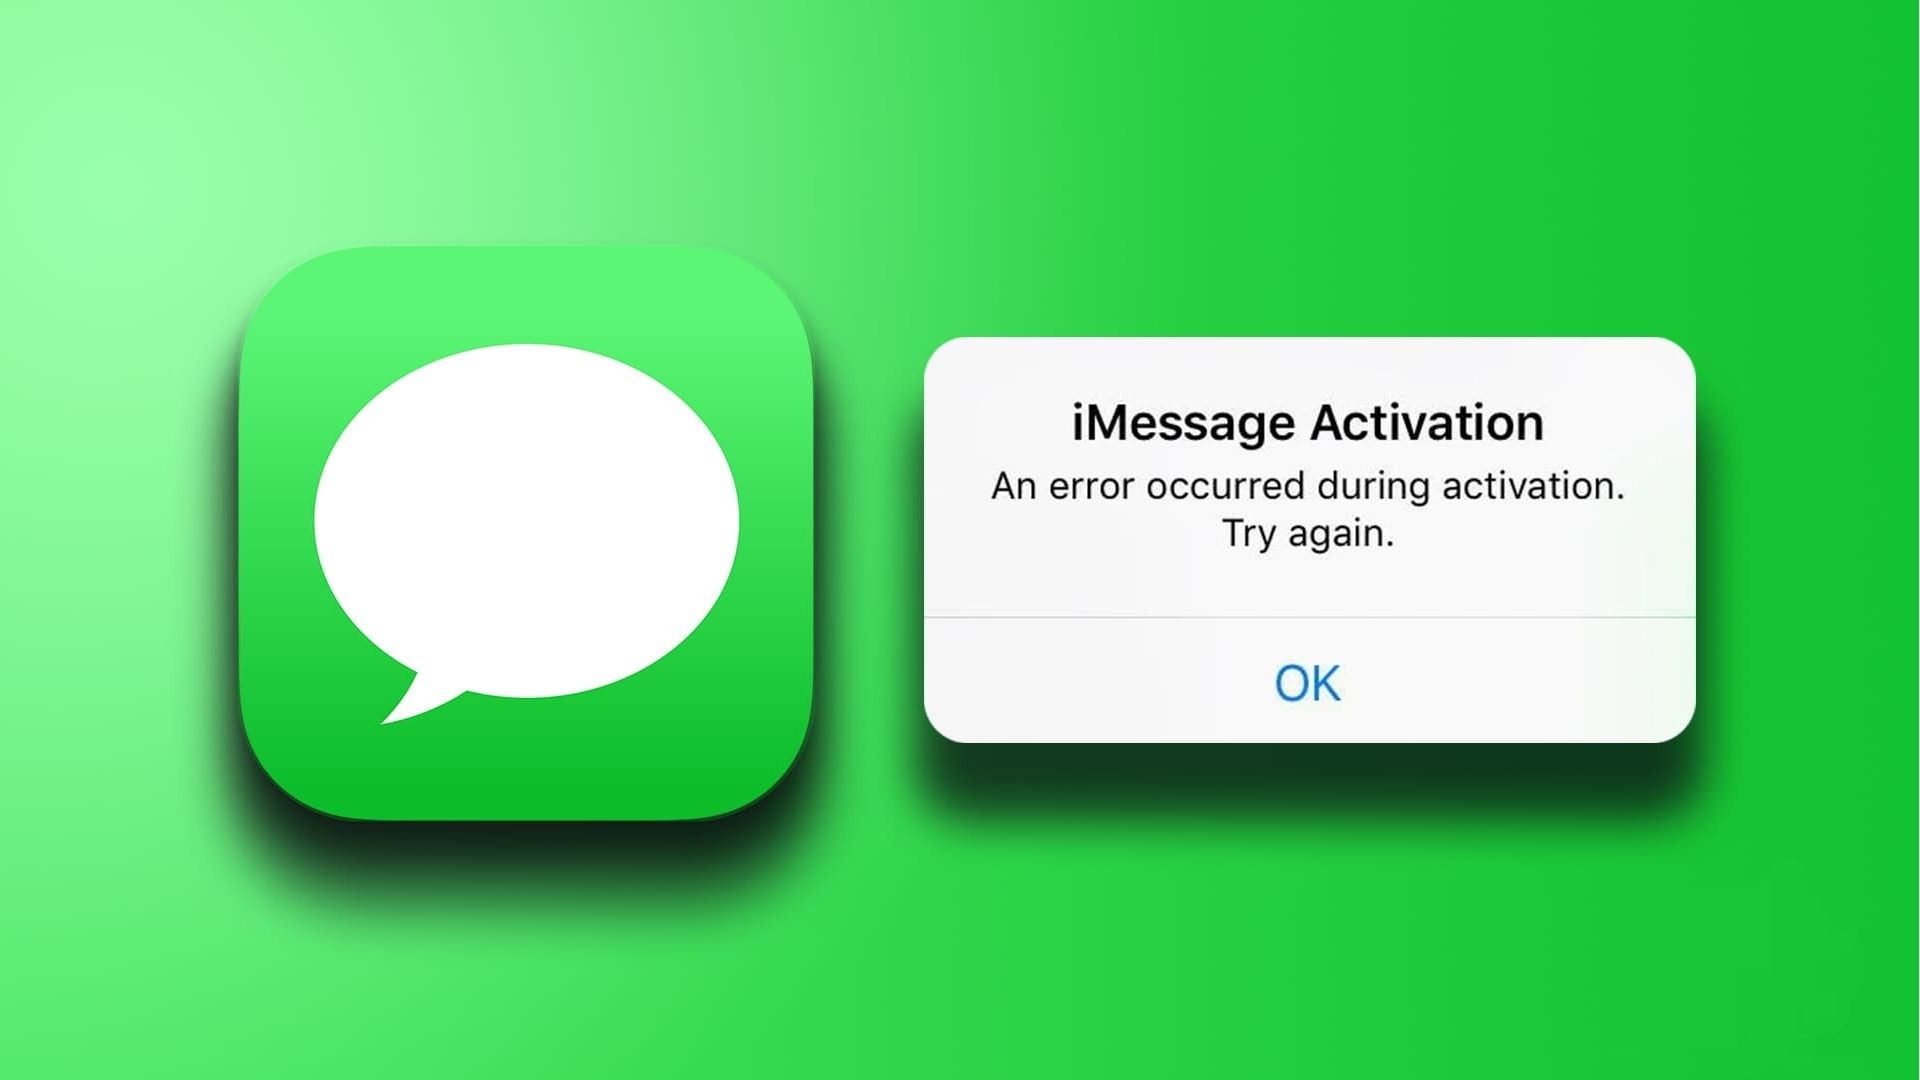
- iMessage Activation Error: If you encounter an error message when trying to activate iMessage, ensure that you have a stable internet connection. Check that your Apple ID is correctly signed in under the “Settings” app > “Messages” > “Send & Receive”. If the problem persists, sign out and sign back in to your Apple ID or contact Apple Support.
- Cannot See Read Receipts: If you’re unable to see read receipts for your messages, verify that both you and the recipient have read receipts enabled in the “Settings” app > “Messages”. Remember that not all recipients may have read receipts enabled, and it only applies to iMessage messages, not regular SMS or MMS messages.
- Mismatched Message Threads: If you notice that messages from the same conversation are appearing in separate threads, it could be due to syncing issues. To resolve this, restart your iPhone and ensure that you’re logged in with the same Apple ID on all your devices. Also, check that “Messages in iCloud” is enabled under the “Settings” app > “[Your Name]” > “iCloud”.
If you continue to experience difficulties with iMessage, it can be helpful to update your iPhone to the latest version of iOS available. Apple regularly releases updates that address bug fixes and improve overall performance.
In situations where none of the aforementioned troubleshooting steps resolve your iMessage issues, it may be necessary to contact Apple Support for further assistance in diagnosing and resolving the problem.
By following these troubleshooting tips, you can overcome common iMessage issues and enjoy a seamless messaging experience. Now that you’re well-equipped to troubleshoot, let’s wrap up and summarize what we’ve covered in this guide.
Conclusion
Congratulations! You’ve reached the end of our comprehensive guide on using iMessage on your iPhone. We’ve covered everything from setting up iMessage to sending messages, adding attachments, using effects and animojis, managing conversations, enabling read receipts, personalizing iMessage, and troubleshooting common issues.
iMessage offers a feature-rich and convenient messaging experience for iPhone users. With its ability to send messages, photos, videos, and more, it’s a versatile platform that keeps you connected with your contacts. Through iMessage, you can express yourself with effects and animojis, manage your conversations effectively, and personalize the app to match your style.
Remember to take advantage of the customization options available, such as changing chat bubble styles, incorporating custom wallpapers, and exploring sticker packs. These features can make your iMessage conversations more enjoyable and add a touch of personalization.
If you ever encounter any issues with iMessage, troubleshooting steps, such as verifying your internet connection, toggling settings, or updating your device, can often resolve them. Don’t hesitate to reach out to Apple Support for further assistance if needed.
Now that you’re equipped with the knowledge and skills to make the most out of iMessage, it’s time to put it into action. Start sending messages, sharing attachments, and exploring all the features and personalization options available to you.
Happy messaging and enjoy the wonderful world of iMessage!