Introduction
iMessage is a popular messaging platform exclusive to Apple devices that allows users to send text messages, photos, videos, and other multimedia content to each other. These conversations can hold valuable information, memories, or even important discussions that you may want to keep for future reference. However, what if you need to export these iMessage conversations? Whether you’re switching to a new device, need to back up your conversations, or simply want to keep a record of them, the process of exporting iMessage conversations can be helpful.
In this article, we will guide you through the step-by-step process of exporting iMessage conversations from your iPhone to your computer. This method allows you to save the conversations either as PDF or text files, making them easily accessible and transferable to other devices or storage mediums. By following this guide, you will be able to securely preserve and access your iMessage conversations whenever you need them.
Please note that the steps provided in this guide require the use of third-party software called iExplorer. This software greatly simplifies the process of exporting iMessage conversations and ensures a seamless experience. Additionally, before proceeding with the export process, it is important to have a backup of your iPhone to prevent any data loss. Now, let’s dive into the step-by-step instructions on how to export iMessage conversations from your iPhone.
Step 1: Back Up Your iPhone
Before you begin the process of exporting iMessage conversations, it is crucial to back up your iPhone. This will ensure that your data is safely stored and can be easily restored if anything goes wrong during the export process. Follow these steps to back up your iPhone:
- Connect your iPhone to a stable Wi-Fi network.
- Open the Settings app on your iPhone.
- Tap your name at the top of the screen to access your Apple ID settings.
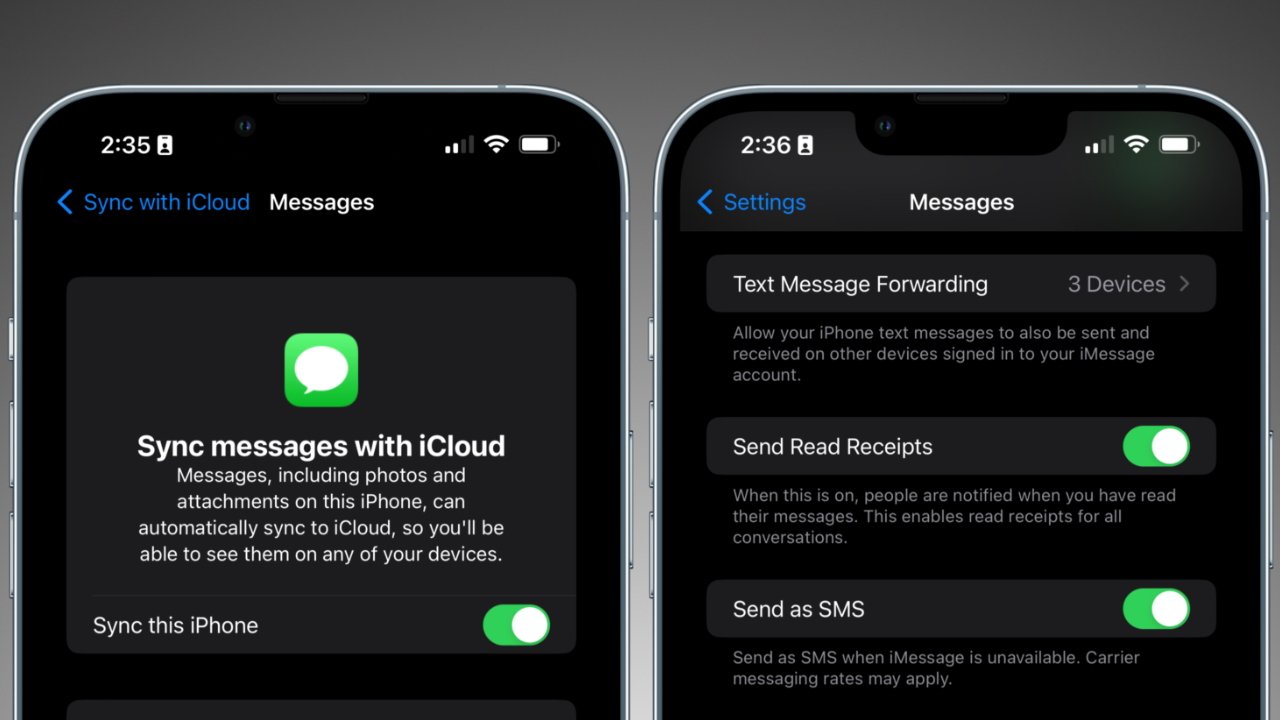
- Select “iCloud” from the list of options.
- Scroll down and tap on “iCloud Backup.”
- Toggle on the “iCloud Backup” option if it is not already enabled.
- Tap on “Back Up Now” to initiate the backup process. Ensure that you have enough available storage on iCloud to accommodate the backup.
- Wait for the backup to complete. This may take some time depending on the size of your data and the speed of your internet connection.
Once the backup process is complete, you can proceed with confidence, knowing that your iPhone’s data is securely backed up. It is always a good practice to regularly back up your device to prevent any potential data loss. Now that your iPhone is backed up, we can move on to the next step – installing iExplorer on your computer.
Step 2: Install iExplorer
To export your iMessage conversations, you will need to install a software called iExplorer on your computer. iExplorer is a reliable and user-friendly tool that allows you to access and export various data from your iPhone. Follow the steps below to install iExplorer on your computer:
- Open your preferred web browser and go to the official iExplorer website.
- Click on the “Download” button to start downloading the iExplorer installer file.
- Once the download is complete, locate the installer file in your computer’s Downloads folder.
- Double-click on the installer file to launch the installation wizard.
- Follow the on-screen instructions to complete the installation process. Make sure to read and accept the terms and conditions.
- Once the installation is finished, launch iExplorer on your computer.
- If prompted, grant any necessary permissions for iExplorer to access your device.
After successfully installing iExplorer, you are now ready to connect your iPhone to your computer and begin exporting your iMessage conversations. Having iExplorer installed will greatly simplify the process and provide you with a convenient interface to manage the export process. In the next step, we will guide you on how to connect your iPhone to your computer using iExplorer. So let’s move on to Step 3 – Connect Your iPhone to Your Computer!
Step 3: Connect Your iPhone to Your Computer
Now that you have iExplorer installed on your computer, it’s time to connect your iPhone to your computer in order to proceed with exporting your iMessage conversations. Follow these steps to establish a connection between your iPhone and computer:
- Using the appropriate cable, connect your iPhone to your computer’s USB port.
- Ensure that your computer is powered on and running.
- If prompted on your iPhone, unlock your device and enter your passcode to grant access to your computer.
- You may also see a prompt asking whether to “Trust This Computer.” Tap “Trust” to continue.
- iExplorer should automatically detect your iPhone and establish a connection.
- Once the connection is established, you will see your iPhone displayed within the iExplorer interface.
Establishing a successful connection between your iPhone and computer is an essential step to enable iExplorer to access and export your iMessage conversations. It’s important to ensure that your iPhone is securely connected and recognized by iExplorer before proceeding to the next steps. With your iPhone connected, you’re now ready to open iExplorer and select your device. This will be covered in the next step – Step 4: Open iExplorer and Select Your iPhone!
Step 4: Open iExplorer and Select Your iPhone
Now that your iPhone is successfully connected to your computer, it’s time to open iExplorer and select your device within the software. Follow these steps to open iExplorer and locate your iPhone:
- Locate the iExplorer icon on your computer desktop or in your applications folder.
- Double-click on the iExplorer icon to launch the software.
- After launching iExplorer, you will see a list of connected devices on the left-hand side of the screen.
- Locate your iPhone in the list and click on it to select it.
By selecting your iPhone within iExplorer, you are granting the software access to your device’s data, including your iMessage conversations. This step is crucial to ensure that iExplorer can retrieve and export your conversations successfully. Once you have selected your iPhone, you are now ready to proceed to the next step – exporting your iMessage conversations. We will cover this process in detail in Step 5: Export iMessage Conversations. So let’s move on to the next step!
Step 5: Export iMessage Conversations
With iExplorer open and your iPhone selected, you’re now ready to begin exporting your iMessage conversations. Follow these steps to export your conversations using iExplorer:
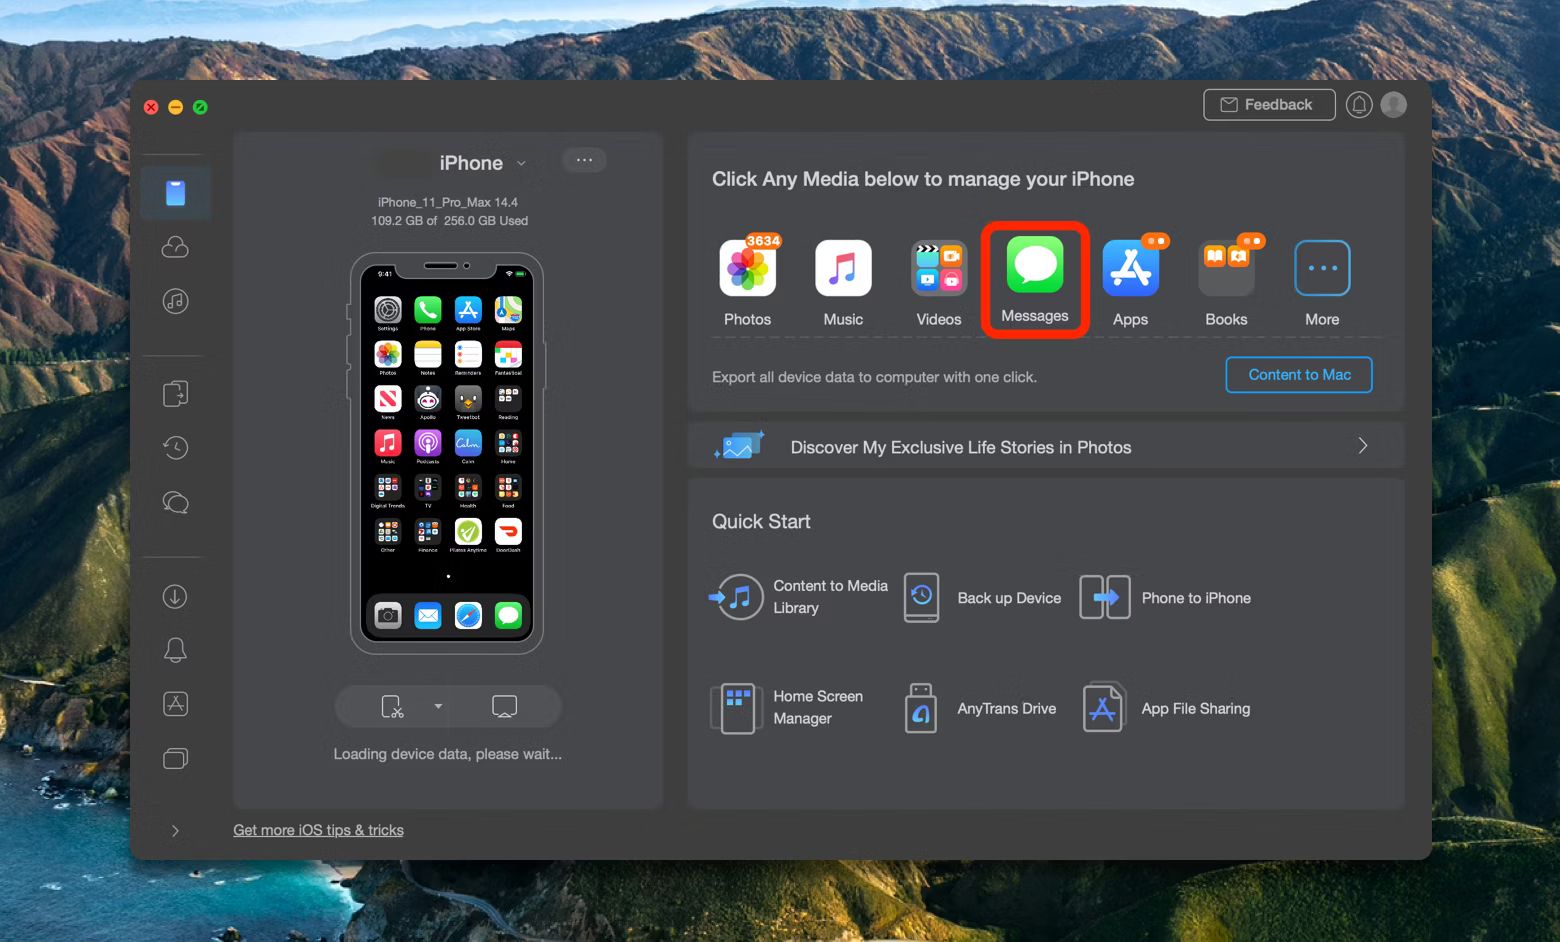
- In the iExplorer interface, you will see a list of data categories on the left-hand side. Click on the “Messages” category.
- This will display a list of all the iMessage conversations on your iPhone.
- To export a specific conversation, click on it to select it.
- If you wish to export multiple conversations, you can select them by holding down the Ctrl (Windows) or Command (Mac) key and clicking on each conversation.
- Once you have selected the conversations you want to export, click on the “Export” button at the top of the iExplorer interface.
- A menu will appear, prompting you to choose the format in which you want to export your conversations. You can choose between PDF or text files.
- Select your preferred format and choose a destination folder on your computer to save the exported conversations.
- Click on “Export” to initiate the export process.
- iExplorer will start exporting your selected conversations and saving them to the specified destination folder.
Once the export process is complete, you will have a copy of your iMessage conversations saved as PDF or text files on your computer. This allows you to easily access, review, or share your conversations whenever you need to. Congratulations! You have successfully exported your iMessage conversations using iExplorer. In the next step, we will guide you on how to save the exported conversations as PDF or text files. So let’s proceed to Step 6: Save Exported Conversations as PDF or Text Files!
Step 6: Save Exported Conversations as PDF or Text Files
With your iMessage conversations exported from iExplorer, it’s time to save them as PDF or text files, depending on your preference. Follow these steps to save your exported conversations:
- Locate the destination folder on your computer where your exported conversations were saved.
- In the folder, you will find the exported conversations organized by conversation name or contact name, depending on how you exported them.
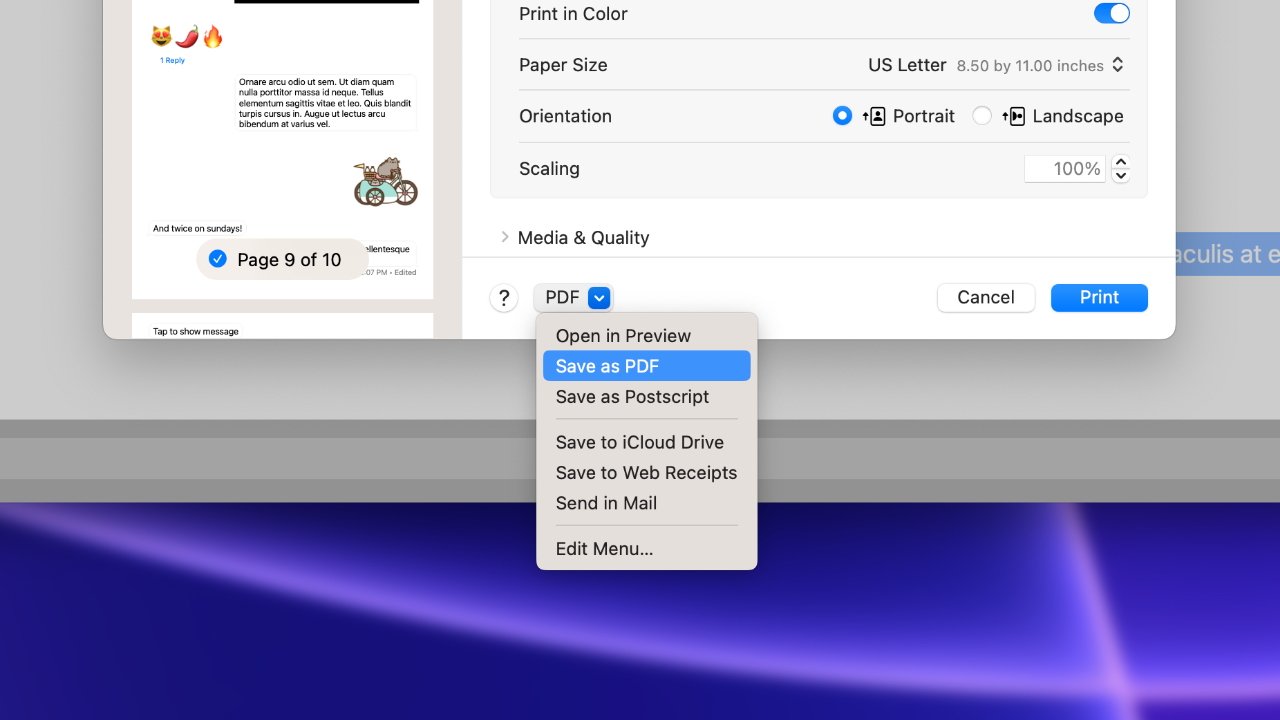
- To save a conversation as a PDF file, simply double-click on it to open it.
- Once the conversation is open, click on “File” in the menu bar and choose the “Save As” option.
- Select a folder on your computer where you want to save the PDF file and choose a name for the file.
- Click “Save” to save the conversation as a PDF file.
- To save a conversation as a text file, right-click on it in the destination folder.
- In the context menu, choose the “Rename” option and change the file extension from “.pdf” to “.txt”.
- Press “Enter” to save the changes and convert the file to a text file.
By saving your exported conversations as PDF or text files, you can easily access and view them on your computer. PDF files provide a more visually appealing format that retains the conversation’s original layout, while text files offer a simpler, plain-text format without any formatting elements. Choose the format that best suits your needs and preferences.
Now that you have successfully saved your exported conversations, you can proceed to the next step – transferring the exported conversations to your computer. This will ensure you have a backup copy and can access them even if your iPhone is not connected. In Step 7, we will guide you on how to transfer the exported conversations to your computer. Let’s move on to the next step!
Step 7: Transfer Exported Conversations to Your Computer
Once you have saved your exported iMessage conversations as PDF or text files, it’s time to transfer them to your computer for easy access and backup. Follow these steps to transfer the exported conversations to your computer:
- Connect your iPhone to your computer using the USB cable.
- Open the destination folder where the exported conversations are saved.
- Select the conversations you want to transfer by either dragging a selection box around them or holding down the Ctrl (Windows) or Command (Mac) key and clicking on each conversation.
- With the conversations selected, right-click on them and choose the “Copy” option.
- Navigate to the desired folder on your computer where you want to store the conversations.
- Right-click in the folder and choose the “Paste” option to transfer the conversations from your iPhone to your computer.
- Wait for the transfer process to complete. This may take some time depending on the size of the conversations and the speed of your computer.
Now, you have successfully transferred your exported iMessage conversations from your iPhone to your computer. By having them stored on your computer, you can access and manage the conversations even without your iPhone connected. It also provides an additional backup in case anything happens to your iPhone or the exported files.
In the next step, we will guide you on how to access and view the exported conversations on your computer using various applications or tools. This will enable you to conveniently read, search, and refer to your iMessage conversations whenever you need them. So let’s move on to Step 8: Access and View Exported Conversations!
Step 8: Access and View Exported Conversations
Now that you have successfully transferred your exported iMessage conversations from your iPhone to your computer, it’s time to access and view them. Depending on whether you saved the conversations as PDF or text files, there are various applications and tools you can use to access and view them. Here are some options:
- If you saved the conversations as PDF files, you can use Adobe Acrobat Reader, a popular PDF viewer, to open and read them. You can easily search for specific keywords or phrases within the PDF file and navigate through the conversation using the convenient toolbar.
- If you saved the conversations as text files, you can use any text editor application, such as Notepad (Windows) or TextEdit (Mac), to open and view them. Text files offer a simple, plain-text format without any formatting elements, allowing you to easily read and search through the conversations.
To access and view the exported conversations:
- Locate the folder on your computer where you transferred the exported conversations.
- Depending on the file format (PDF or text), open the conversations using the appropriate application mentioned above.
- In the application, you will be able to view the complete conversations, search for specific keywords or phrases, and navigate through the conversation.
By accessing and viewing the exported iMessage conversations on your computer, you have the flexibility to analyze and refer to them whenever needed. Whether you need to find a specific piece of information, revisit a cherished memory, or simply keep a record of important discussions, having the conversations easily accessible on your computer provides convenience and peace of mind.
Congratulations! You have successfully completed the process of exporting, saving, transferring, and accessing your iMessage conversations on your computer. It’s important to remember to regularly back up your conversations and keep them organized for easy retrieval in the future.