Introduction
Welcome to the world of text messaging, where communication is just a tap away. We send messages to our friends, families, and colleagues every day, but have you ever thought about texting yourself? Yes, you read that right. Texting yourself can be a helpful and convenient way to stay organized, save important information, and even boost productivity.
In this article, we will explore the benefits of texting yourself on iMessage and guide you through the process of setting it up on iOS 16. Whether you need to save important notes, links, or reminders, or simply want to have a designated space for personal thoughts, texting yourself can be a game-changer.
By leveraging the features of iMessage, you can create a virtual self-assistant that is always accessible. And the best part? You don’t need any third-party apps or complicated setups. With just a few simple steps, you’ll be able to start texting yourself on iMessage like a pro.
Now, let’s dive into the world of self-texting and discover how it can revolutionize the way you organize and communicate with yourself.
Benefits of Texting Yourself
Texting yourself on iMessage may seem unconventional, but it offers a range of benefits that can enhance your productivity and organization. Here are some key advantages to consider:
1. Quick Note Taking: When you have a brilliant idea or need to jot down important information, texting yourself provides a quick and easy way to do so. Instead of fumbling for a pen and paper, simply open the iMessage app and send a message to yourself. It’s like having a virtual notepad at your fingertips.
2. Convenient Reminder System: Do you often forget important tasks or appointments? Texting yourself allows you to set reminders that will pop up on your device at the scheduled time. Whether it’s a doctor’s appointment, a deadline, or a special event, you can rely on your self-texts to keep you on track.
3. Centralized Information Hub: By sending important links, photos, or documents to yourself, you create a centralized hub for storing and accessing vital information. Whether it’s a recipe you want to try, an article you want to read later, or a document you need for work, having all of these resources in your iMessage conversations makes it easy to find them when you need them.
4. Efficient Content Sharing: Sometimes you come across an interesting article, video, or podcast that you want to share with others. Instead of cluttering your social media feeds or bombarding your friends with messages, share it with yourself. You can then review the content later and decide if it’s worth sharing with others.
5. Easy File Transfers: Need to transfer a file from your computer to your mobile device quickly? Texting yourself allows for seamless file transfers. Simply attach the file to the message and send it to your own number. You can then access the file on your device and save it in the appropriate location.
6. Backup and Sync: Texting yourself ensures that important information is backed up and synced across your devices. If you change or upgrade to a new device, you can easily retrieve the self-texts from your previous device without any hassle.
By utilizing these benefits, texting yourself on iMessage becomes a powerful tool for staying organized, managing information, and boosting productivity. Now that we understand the advantages, let’s explore how to set up text forwarding and add yourself as a contact in iMessage.
Setting Up Text Forwarding
Before you can start texting yourself on iMessage, you’ll need to set up text forwarding to ensure that messages sent to your phone number are also delivered to your own device. Here are the steps to get started:
1. Enable iCloud on All Devices: Make sure you have iCloud enabled on all the devices you want to receive forwarded messages on. This will help in syncing your conversations across all devices seamlessly.
2. Open Settings: Access the “Settings” app on your iPhone or iPad.
3. Tap on your Apple ID: Scroll down and tap on your Apple ID at the top of the screen.
4. Select “iCloud”: In the Apple ID menu, tap on “iCloud” to access the iCloud settings.
5. Enable “Messages”: Locate the “Messages” option in the iCloud menu and toggle it on to enable iCloud syncing for your messages.
6. Choose Sync Settings: After enabling Messages, you’ll be given the option to choose how you want to sync your messages. You can either choose to sync all messages or only messages from the past 30 days. Select your preferred option.
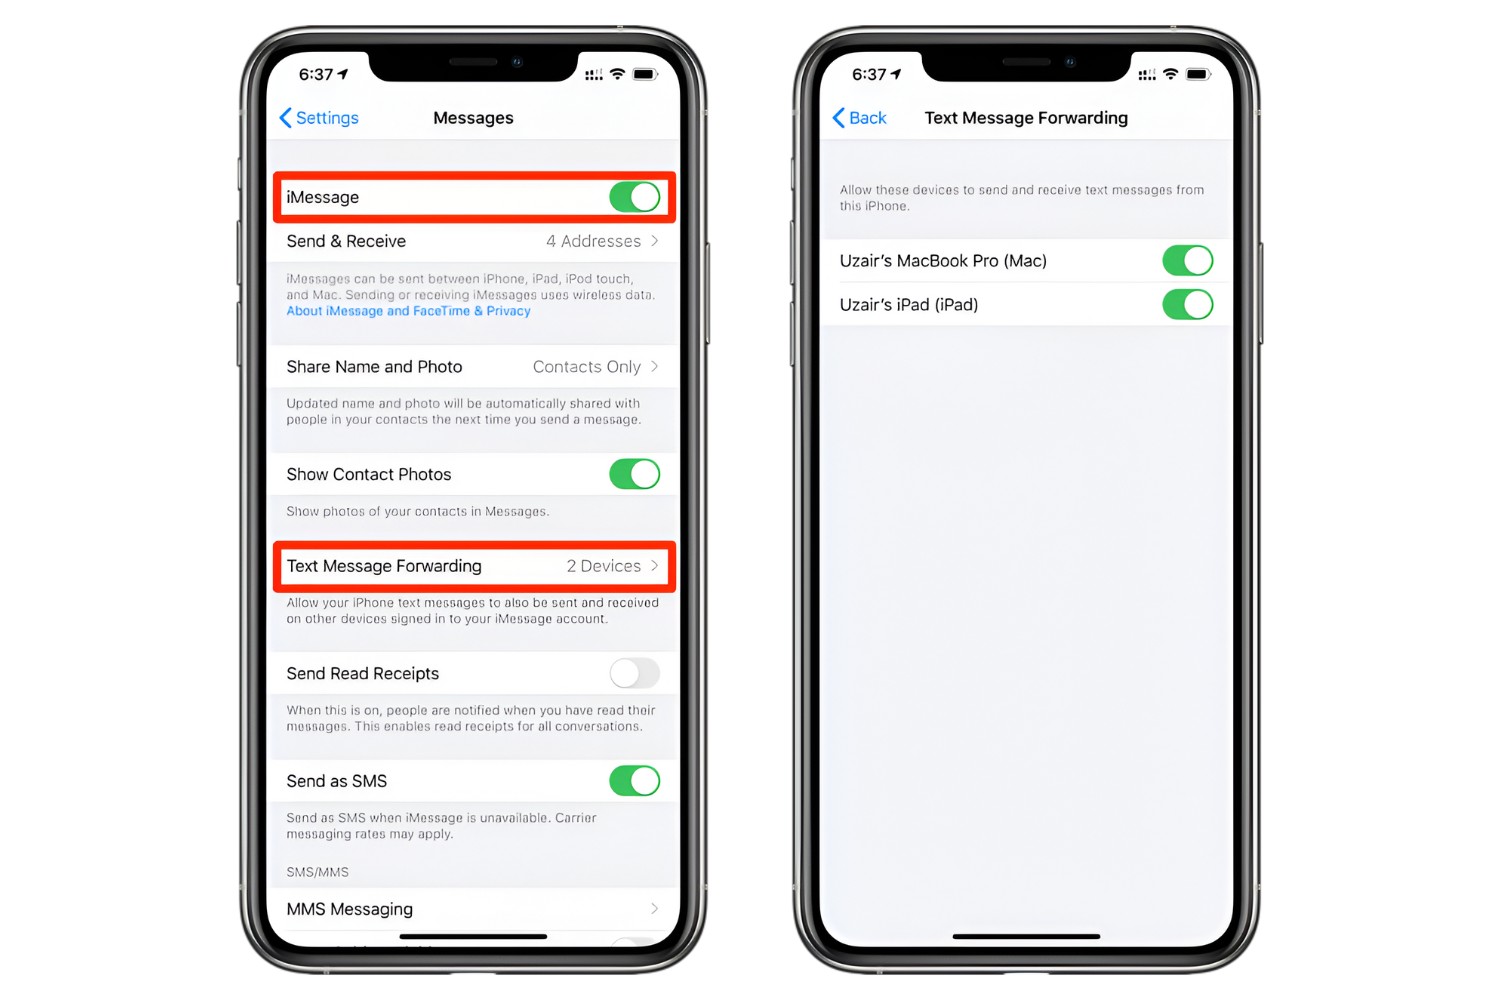
7. Enable Text Message Forwarding: To enable text message forwarding, go back to the main settings menu and scroll down until you see “Messages”. Tap on it.
8. Tap on “Text Message Forwarding”: In the Messages settings, you’ll find the “Text Message Forwarding” option. Tap on it to proceed.
9. Enable Forwarding for Desired Devices: A list of devices associated with your Apple ID will appear. Toggle on the devices you want to forward messages to. You may need to enter a verification code that appears on the selected devices to confirm the forwarding process.
10. Verification Complete: Once the verification process is complete, the selected devices will be able to receive text messages sent to your phone number.
By following these steps, you’ll be able to forward messages to your own device and ensure that you can easily access and interact with your self-texts. In the next section, we’ll explore how to add yourself as a contact in iMessage to easily initiate conversations with your own number.
Adding Yourself as a Contact
In order to text yourself on iMessage, you’ll need to add your own phone number as a contact. This will make it easy to initiate conversations with yourself and keep your self-texts organized. Here’s how to add yourself as a contact:
1. Open Contacts: Open the “Contacts” app on your iPhone or iPad.
2. Tap on the “+” icon: Look for the “+” icon at the top-right corner of the screen and tap on it to add a new contact.
3. Enter Your Details: In the contact creation screen, enter your own name, phone number, and any other details you want to include. You can add your email address, home address, or even a profile picture if desired.
4. Save the Contact: Once you’ve entered your details, tap on the “Done” or “Save” button to save the contact.
5. Verify the Contact: To ensure that the contact is added successfully, open the iMessage app and search for your own name in the search bar. You should see your contact appear in the search results.
By adding yourself as a contact, you create a dedicated space for sending and receiving messages to yourself. This makes it easy to keep your self-texts separate from other conversations and ensures that you can easily find and access them when needed. With text forwarding set up and yourself added as a contact, you’re ready to start sending messages to yourself on iMessage.
In the next section, we’ll explore how to send messages to yourself and discuss different methods of organizing your self-texts for easy retrieval.
Sending Messages to Yourself
Now that you’ve set up text forwarding and added yourself as a contact, it’s time to start sending messages to yourself on iMessage. Here are a few methods you can use:
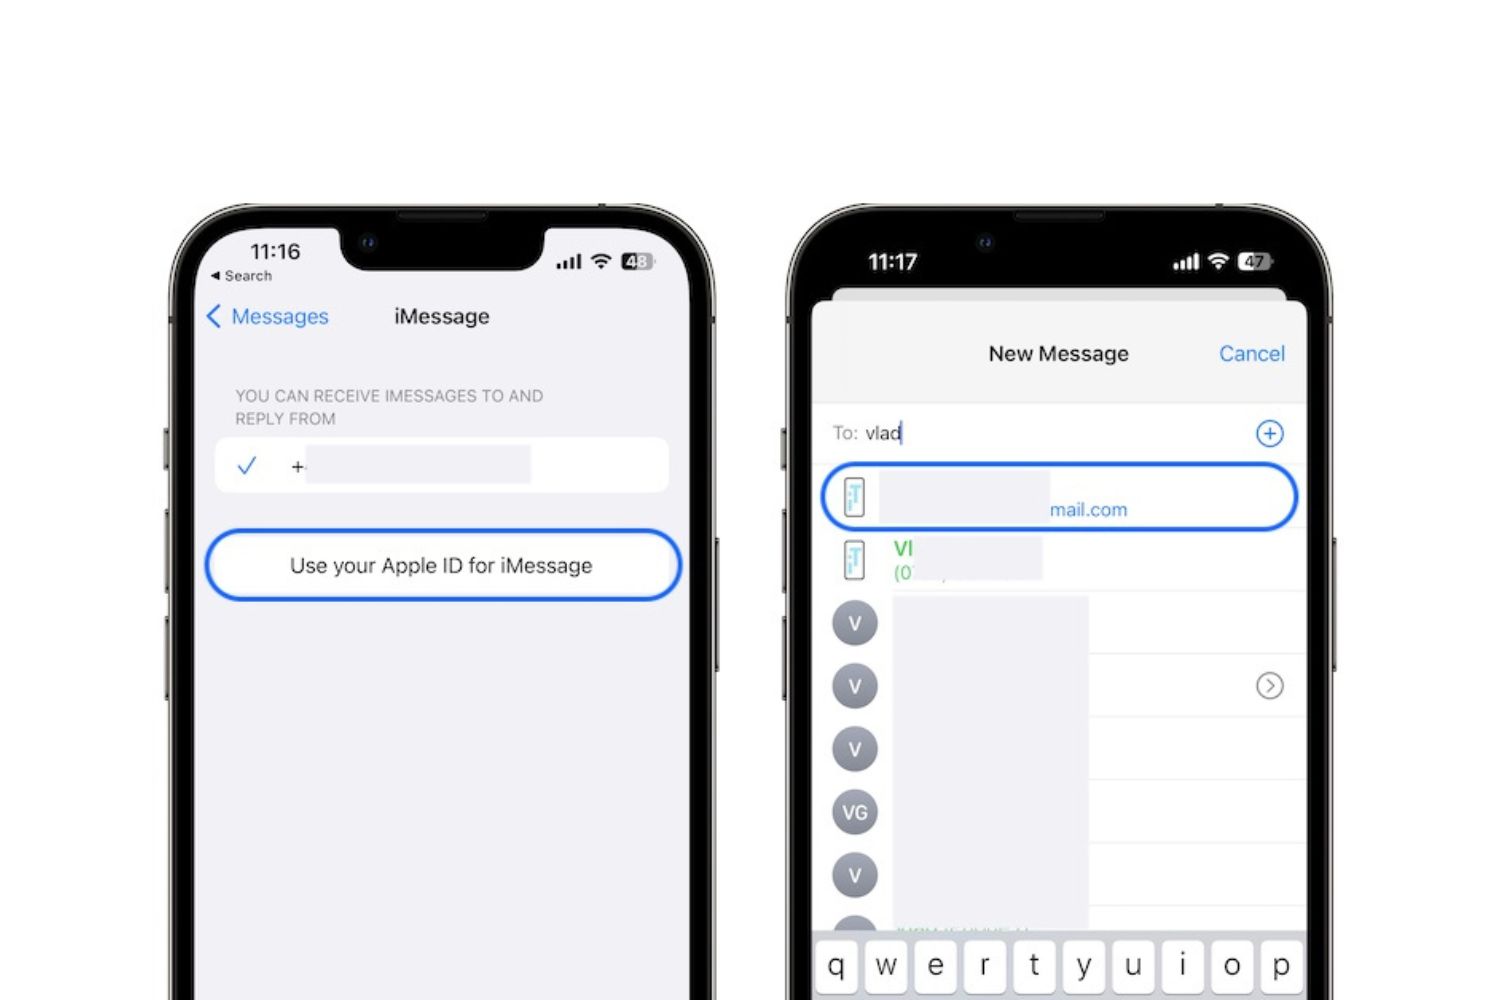
1. Using the New Message Option: Open the iMessage app and tap on the compose button (usually represented by a pen and paper icon). In the recipient field, start typing your own name or phone number. Once your contact appears in the suggestions, select it, and you can begin typing your message. Hit send when you’re ready, and the message will be delivered to your own device.
2. Replying to Existing Conversations: If you receive a message from someone else and want to send a response to yourself, simply tap on the message and select the “Reply” option. In the recipient field, select your own contact, type your message, and send it.
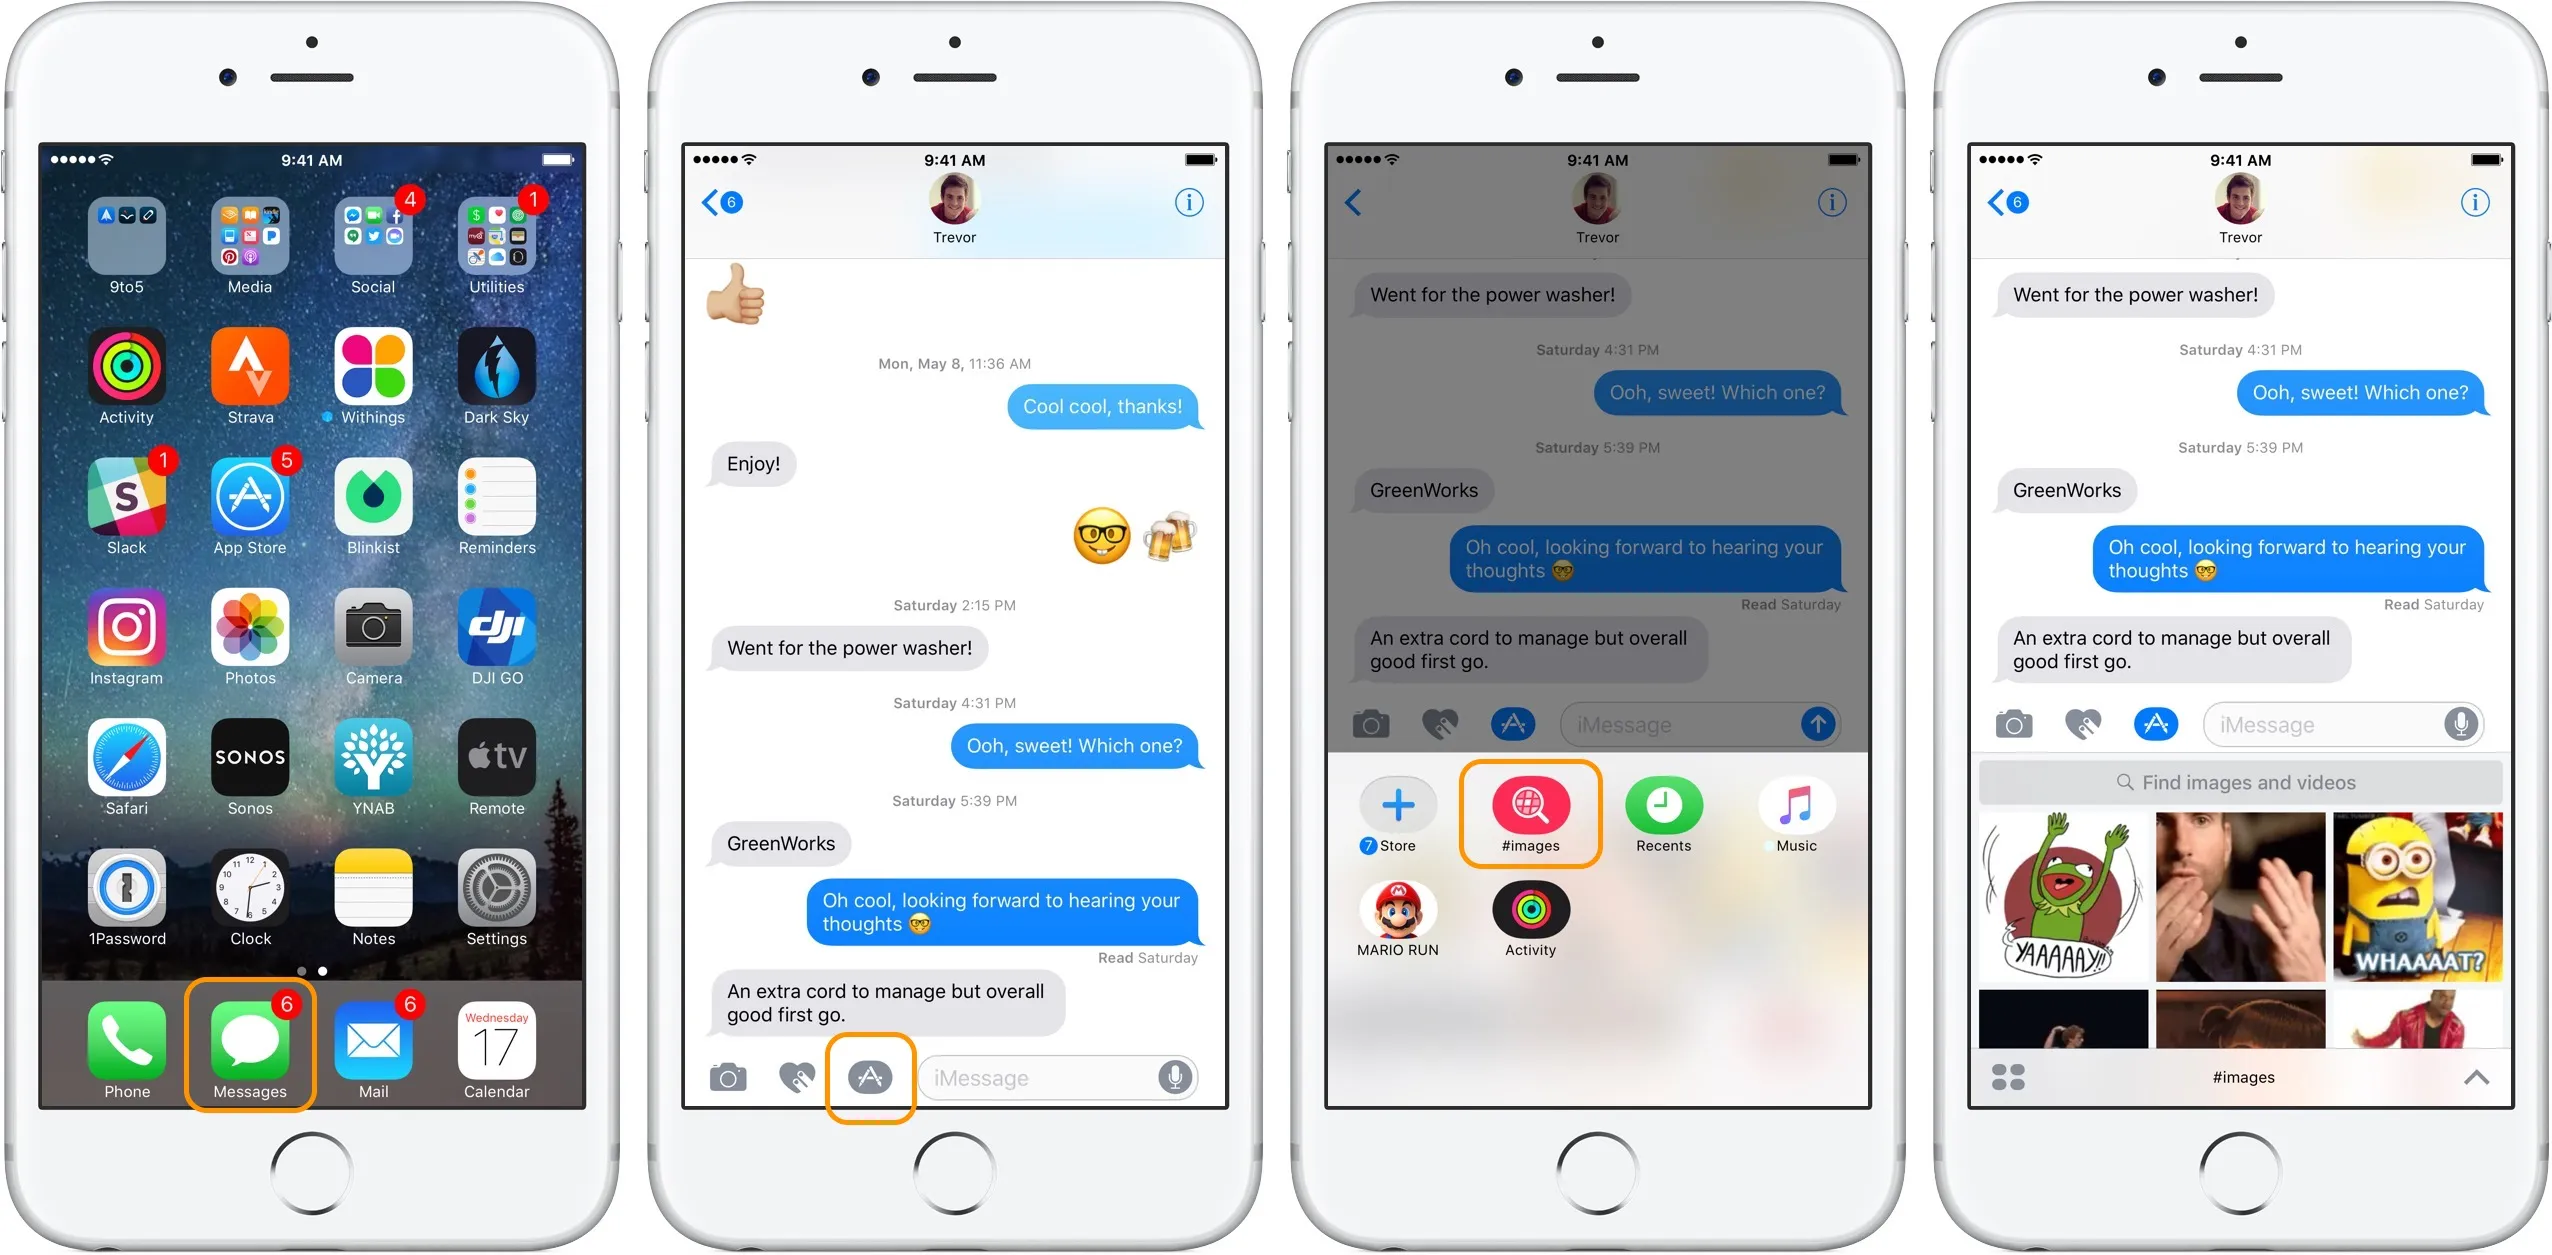
3. Digital Touch: If you want to add a more personal touch to your self-texts, you can use the Digital Touch feature in iMessage. Open a new message to yourself, tap on the “App Store” icon, and select the “Digital Touch” option. From here, you can draw or send taps, kisses, and even heartbeats to yourself.
4. Voice Messages: Another option is to send voice messages to yourself. Open a new message, tap on the microphone icon next to the text input field, and record your voice message. When you’re done recording, release the microphone icon to send the message as an audio file to yourself.
These methods will allow you to send messages to your own number on iMessage, ensuring that all your self-texts are delivered to the right place. Now that you’ve learned how to send messages to yourself, let’s explore different ways to organize your self-texts for easy retrieval and reference.
Organizing Messages Using Folders or Tags
As you start texting yourself on iMessage, you’ll likely accumulate a collection of self-texts that you’ll want to organize for easy retrieval. Fortunately, iMessage provides a few options for organizing your messages using folders or tags. Here’s how you can keep your self-texts organized:
1. Create Folders: iMessage allows you to create custom folders to group related conversations. To create a new folder, open the iMessage app and tap on the “Edit” button at the top-left corner of the screen. Then, tap on “New Folder” and give it a name. You can move conversations to this folder by tapping on the “Edit” button again, selecting the conversations, and choosing the folder from the “Move to” option. This way, you can categorize your self-texts based on topics, projects, or any other criteria that make sense to you.
2. Use Labels or Tags: Another way to organize your self-texts is by using labels or tags. This can be done by adding specific keywords or hashtags to your messages. For example, if you have a self-text related to a vacation plan, you can add the hashtag #vacation to it. Later, when you need to find all your vacation-related self-texts, simply search for the hashtag in the iMessage search bar, and all the relevant messages will be displayed.
3. Archive or Delete Old Conversations: To keep your iMessage conversations neat and clutter-free, consider archiving or deleting old self-texts that are no longer relevant or needed. Archiving will move the conversation to an “Archived Chats” folder, keeping them out of sight but not deleting them permanently. On the other hand, if you no longer need certain self-texts, you can delete them to free up space and keep your iMessage app tidy.
By organizing your self-texts using folders or tags, you’ll be able to quickly locate and retrieve specific messages when you need them. Whether you prefer folders to categorize conversations or labels to identify specific topics, the choice is entirely up to you. Now that you know how to organize your self-texts, let’s explore additional features of the iMessage app that can further enhance your self-texting experience.
Using Notes and Reminders in the Messages App
While texting yourself on iMessage provides a convenient way to save and organize information, you can also make use of built-in features like Notes and Reminders within the Messages app to enhance your self-texting experience. Here’s how you can utilize these features:
1. Notes: The Messages app allows you to create notes and attach them to your self-texts. To create a note, open a conversation with yourself and tap on the “i” button at the top-right corner of the screen. In the contact details screen, scroll down and tap on “Add Note”. You can then type in the note, which will be associated with that specific conversation. Notes can be used to add extra details, to-do lists, or reminders related to the self-texts.
2. Reminders: In addition to notes, you can use the Reminders feature in the Messages app to set reminders for yourself directly within a conversation. Simply open a conversation with yourself, tap on the “i” button, and select “Add Reminder”. Set the title, date, and time for the reminder, and it will appear as a separate item in your reminders list. This allows you to keep track of important tasks or deadlines associated with your self-texts.
3. Pin Conversations: To keep important or frequently accessed self-texts easily accessible, you can pin the conversations to the top of your Messages app. Simply swipe right on the conversation you want to pin, and tap on the pin icon that appears. This will keep the conversation at the top of your conversation list, making it quick and convenient to find when needed.
These features, such as Notes, Reminders, and pinned conversations, provide additional ways to enhance your self-texting experience and keep important information organized. Whether you need to add additional context to a self-text, set reminders for tasks, or have quick access to important conversations, the Messages app offers these tools to make your self-texts even more powerful.
In the next section, we’ll discuss some common troubleshooting tips to help you overcome any issues you may encounter while texting yourself on iMessage.
Troubleshooting Common Issues
While texting yourself on iMessage is generally a smooth and seamless process, you may encounter some common issues along the way. Here are a few troubleshooting tips to help you overcome any obstacles:
1. Check Network Connection: If you’re having trouble sending or receiving messages to yourself, ensure that you have a stable internet connection. Check your Wi-Fi or cellular data settings and try again.
2. Verify Forwarding Settings: If you’re not receiving forwarded messages on your device, double-check the text message forwarding settings. Make sure that you have enabled forwarding for the desired devices and that they are connected to the same iCloud account.
3. Restart Devices: Sometimes, restarting your iPhone or iPad can help resolve any temporary glitches or connectivity issues. Try restarting your device and see if the problem persists.
4. Update iMessage and iOS: Ensure that you are using the latest version of iMessage and iOS on your device. Updates often include bug fixes and performance improvements that can address known issues.
5. Reset iMessage Settings: If none of the above steps work, you can try resetting your iMessage settings. Go to “Settings” > “Messages” > “iMessage” and toggle it off. Wait for a few seconds and toggle it on again. This can refresh the iMessage connection and resolve any configuration-related issues.
6. Contact Apple Support: If you continue to experience issues with texting yourself on iMessage, it may be helpful to reach out to Apple Support for further assistance. They can provide additional troubleshooting steps or help identify any underlying technical issues.
By following these troubleshooting steps, you can troubleshoot common issues and ensure a smooth experience while texting yourself on iMessage.
Now that we’ve covered various troubleshooting tips, let’s summarize what we’ve learned from this guide on texting yourself on iMessage and the benefits it offers.
Conclusion
Texting yourself on iMessage can be a powerful tool for staying organized, saving important information, and boosting productivity. By setting up text forwarding, adding yourself as a contact, and sending messages to your own number, you create a virtual self-assistant that is always accessible.
The benefits of texting yourself on iMessage are numerous. It allows for quick note-taking, convenient reminder systems, and a centralized hub for storing and accessing important information. It also provides a seamless way to share content, transfer files, and keep backups across devices.
To enhance your self-texting experience, you can organize your messages using folders or tags, making it easy to retrieve specific self-texts when needed. Additionally, you can utilize the Notes and Reminders features within the Messages app to add more context to your self-texts and set reminders for important tasks or deadlines.
If you encounter any issues while texting yourself on iMessage, follow the troubleshooting tips mentioned above to resolve common problems. And remember, if all else fails, Apple Support is always there to assist you.
By incorporating these practices into your messaging routine, you can harness the power of self-texting on iMessage to stay organized, boost productivity, and have a centralized space to communicate with yourself. So, why not give it a try and unlock the full potential of iMessage as your virtual self-assistant?