Introduction
Welcome to the wonderful world of homemade ice cream! Who doesn’t love the creamy, cold, and delightful treat that is ice cream? But what if you want to enjoy ice cream without the guilt of consuming excessive sugar? That’s where sugar-free ice cream comes to the rescue!
Whether you are watching your sugar intake for health reasons or simply looking to reduce your overall sugar consumption, making sugar-free ice cream with an ice cream maker is a fantastic option. By using alternative sweeteners and carefully chosen ingredients, you can create delicious and guilt-free frozen desserts right in the comfort of your own home.
In this article, we will guide you through the process of making sugar-free ice cream with an ice cream maker. We will discuss the benefits of choosing sugar-free options, how to select the right ice cream maker, and provide step-by-step instructions for making your own sugar-free ice cream masterpiece.
By making sugar-free ice cream at home, you have full control over the ingredients and flavors. You can experiment with different sweeteners, such as stevia or erythritol, and add in your favorite fruits, nuts, or chocolate chunks for extra flavor and texture.
So, say goodbye to store-bought sugar-laden ice creams and join us on this sweet and health-conscious journey as we explore the world of sugar-free ice cream making with an ice cream maker. Get ready for a tantalizing treat that won’t leave you feeling weighed down by sugar guilt!
Why Make Sugar-Free Ice Cream?
There are several reasons why you might want to make sugar-free ice cream. Let’s explore some of the key benefits:
1. Health Consciousness: Sugar-free ice cream allows you to indulge in the joy of ice cream without the negative impact of excessive sugar consumption. By replacing refined sugars with alternative sweeteners, you can enjoy a guilt-free dessert option that won’t spike your blood sugar levels or contribute to weight gain.
2. Dietary Restrictions: For those following specific dietary plans, such as low-carb, keto, or diabetic diets, sugar-free ice cream is a game-changer. It provides a delicious and satisfying alternative to traditional ice cream, allowing individuals with dietary restrictions to still enjoy a frozen treat.
3. Control Over Ingredients: When you make your own sugar-free ice cream, you have full control over the ingredients used. You can choose high-quality dairy or dairy-free options, organic ingredients, and avoid artificial additives or preservatives commonly found in store-bought ice creams.
4. Customization: Making sugar-free ice cream at home allows you to get creative with flavors and mix-ins. You can experiment with a wide range of fruits, nuts, extracts, spices, and even incorporate natural sweeteners like honey or maple syrup if desired. The possibilities for flavor combinations are endless!
5. Tailored to Your Taste Preferences: Have you ever found yourself disappointed by the lack of variety in sugar-free ice cream flavors available at the grocery store? By making your own, you can create personalized flavors that cater to your unique taste preferences. From classic vanilla and chocolate to exotic fruit blends or indulgent caramel swirls, the choice is yours.
By opting for sugar-free ice cream, you can enjoy the pleasure of a frozen dessert while aligning with your health goals and dietary requirements. It’s a win-win situation that allows you to satisfy your sweet tooth without compromising on taste or your well-being.
Choosing the Right Ice Cream Maker
When it comes to making sugar-free ice cream at home, having the right ice cream maker is key to achieving that creamy and smooth texture we all love. Here are some factors to consider when choosing an ice cream maker:
1. Type of Ice Cream Maker: There are various types of ice cream makers available, including manual crank, electric freezer bowl, and compressor ice cream makers. Manual crank ice cream makers require manual effort to churn the ice cream, while electric freezer bowl and compressor ice cream makers are more convenient options that do the churning for you. Consider your preferences for convenience, ease of use, and the amount of ice cream you plan to make.
2. Capacity: Ice cream makers come in different sizes and capacities. Think about how much ice cream you will be making at a time. If you have a large family or plan to entertain guests with your homemade frozen treats, a larger capacity ice cream maker would be beneficial. On the other hand, if you have limited counter space or prefer smaller batches, a compact ice cream maker may be suitable.
3. Freezing Time: Some ice cream makers require pre-freezing the bowl for a specific amount of time before use. This is typically the case with electric freezer bowl ice cream makers. Consider the freezing time required and your own schedule. If you prefer a more spontaneous ice cream-making session, you might opt for a compressor ice cream maker that doesn’t require pre-freezing.
4. Additional Features: Look for additional features that may enhance your ice cream-making experience. Some ice cream makers come with timers, automatic shut-off functions, or multiple speed settings. These features can help you achieve the perfect consistency and take the guesswork out of the process.
5. Budget: Ice cream makers range in price, so consider your budget when making a decision. While it can be tempting to splurge on a high-end model, there are also affordable options available that can produce excellent results.
By taking these factors into account, you can select an ice cream maker that aligns with your specific needs and preferences. Whether you choose a manual crank or an electric freezer bowl ice cream maker, the most important thing is to find one that allows you to enjoy the process of making and indulging in delicious homemade sugar-free ice cream.
Gather Your Ingredients and Equipment
Before diving into the process of making sugar-free ice cream, it’s essential to gather all the necessary ingredients and equipment. Here’s what you’ll need:
1. Ice Cream Maker: As mentioned earlier, ensure you have the appropriate ice cream maker for your chosen recipe. Consider factors such as type, capacity, and any additional features that may enhance your ice cream-making experience.
2. Ingredients:
- Base Ingredients: The base of your ice cream typically consists of dairy or dairy-free alternatives, such as heavy cream, whole milk, coconut milk, or almond milk. Choose the option that aligns with your preferences and dietary needs.
- Sweetener: Select your preferred sugar-free sweetener. Popular options include stevia, erythritol, monk fruit extract, or a blend of natural sweeteners. Be sure to check the conversion measurements on the sweetener packaging to achieve the desired level of sweetness.
- Flavorings: Enhance the taste of your ice cream with flavorings such as vanilla extract, cocoa powder, fruit extracts, or spices like cinnamon or nutmeg.
- Optional Mix-Ins: Consider what mix-ins you’d like to incorporate for added texture and flavor. This could include chopped nuts, chocolate chips, fruit chunks, or shredded coconut. Get creative and tailor it to your preferences!
3. Mixing Bowls and Utensils: Have a selection of mixing bowls and utensils on hand to prepare and mix your ice cream ingredients. This may include measuring cups and spoons, a whisk or an electric mixer, a rubber spatula, and a fine-mesh sieve.
4. Freezer-Safe Container: Ensure you have a freezer-safe container to store your freshly made ice cream. Glass or plastic containers with lids work well. Make sure the container is of adequate size to hold the desired amount of ice cream.
5. Ice and Salt (for manual crank ice cream makers): If you are using a manual crank ice cream maker, you will need ice and salt to create the freezing environment required for churning the ice cream. It’s a good idea to gather enough ice and coarse salt in advance.
By gathering all the necessary ingredients and equipment upfront, you’ll have a smooth and organized ice cream-making experience. This will allow you to focus on the fun part – experimenting with flavors and eagerly awaiting the delightful result of your sugar-free ice cream creation!
Selecting Your Sweetener
When making sugar-free ice cream, selecting the right sweetener is crucial to achieving the perfect balance of sweetness without the added sugar. Here are some popular sugar-free sweeteners to consider:
1. Stevia: Stevia is a natural sweetener extracted from the leaves of the Stevia rebaudiana plant. It is considerably sweeter than sugar, so only a small amount is needed to achieve the desired sweetness. Stevia is popular due to its zero-calorie and low glycemic index properties, making it suitable for those on calorie-restricted or low-carb diets.
2. Erythritol: Erythritol is a sugar alcohol that naturally occurs in some fruits and fermented foods. It provides a similar level of sweetness to sugar, with only a fraction of the calories and no impact on blood sugar levels. Erythritol does not have a strong aftertaste or cooling effect that some other sugar alcohols may have, making it a favorite for many sugar-free recipes.
3. Monk Fruit Extract: Monk fruit is a small fruit native to Southeast Asia. The extract from the monk fruit contains natural compounds called mogrosides, which provide intense sweetness without the calories or effects on blood sugar levels. Monk fruit extract is highly concentrated, so a small amount goes a long way in sweetening your ice cream.
4. Combination Sweeteners: Some sugar-free ice cream recipes utilize a combination of sweeteners to achieve the best flavor and texture. For example, blending stevia with erythritol or combining monk fruit extract with stevia can balance out any potential aftertastes and provide a more well-rounded sweetness.
It’s essential to keep in mind that each sweetener has its own unique taste profile, and the level of sweetness may vary. Experimenting with different sweeteners and adjusting quantities according to taste will help you find the perfect match for your palate.
When selecting a sweetener, opt for brands that use high-quality, pure extracts, with no added fillers or artificial ingredients. It’s also a good practice to check the conversion measurements on the packaging, as the sweetness level of different sweeteners can vary. Most sweeteners will provide conversion guidelines to help you substitute them in recipes effectively.
By carefully selecting the right sweetener or combination of sweeteners for your sugar-free ice cream, you can enjoy the perfect balance of sweetness without the negative impacts of refined sugar. Get ready to tantalize your taste buds and create a delectable dessert that proves you don’t need sugar to satisfy your ice cream cravings!
Preparing the Base for Your Ice Cream
The base is the foundation of your sugar-free ice cream. It provides the creamy texture and serves as a canvas for the flavors you’ll incorporate. Here’s how to prepare the perfect base for your ice cream:
1. Choose your Dairy or Dairy-Free Alternative: Start by selecting the base ingredient for your ice cream. This can be heavy cream, whole milk, coconut milk, almond milk, or any other dairy or non-dairy option that suits your preferences and dietary needs. Keep in mind that different bases will yield different textures and flavors, so choose wisely.
2. Heat the Base: In a saucepan over medium heat, warm your chosen base until it reaches a gentle simmer. This allows any added sweeteners or flavorings to dissolve fully and infuse the base with their flavors. Be careful not to let the mixture boil.
3. Add the Sweetener: Once the base is warm, add your selected sugar-free sweetener. Follow the recommended conversion measurements provided by the sweetener manufacturer for the desired level of sweetness. Stir well until the sweetener is fully dissolved.
4. Incorporate Flavorings: If you plan on adding flavorings such as vanilla extract, cocoa powder, or fruit extracts, now is the time to do so. Add your desired flavorings to the warm base and whisk until fully combined. This will ensure that the flavors are evenly distributed throughout the ice cream.
5. Strain the Mixture: To achieve a smooth and creamy texture, strain the mixture through a fine-mesh sieve to remove any lumps, clumps, or unwanted particles. This step ensures that your ice cream base is velvety and free from any unwanted texture.
6. Cool the Mixture: Allow the strained mixture to cool completely. You can speed up the cooling process by placing the mixture in the refrigerator or using an ice bath. Cooling the base thoroughly is essential before transferring it to the ice cream maker, as it will expedite the freezing and churning process.
With the base prepared, you are one step closer to enjoying your homemade sugar-free ice cream. The base sets the stage for the flavors and textures you’ll incorporate in the next steps. Take the time to infuse it with your desired sweeteners and flavorings, ensuring a delightful frozen treat that will leave your taste buds craving more.
Making the Ice Cream Mixture
With the base prepared and cooled, it’s time to turn it into a delicious sugar-free ice cream mixture. Follow these steps to create the perfect ice cream mixture:
1. Retrieve Your Chilled Base: Remove the cooled ice cream base from the refrigerator or ice bath. It should be very cold but not frozen.
2. Give It a Good Stir: Give the base a good stir with a whisk or spoon to ensure that it is well mixed and any settled ingredients are evenly distributed.
3. Churning Methods:
- For Electric Freezer Bowl Ice Cream Makers: Retrieve your ice cream maker and insert the frozen bowl. Turn on the machine and pour the ice cream base into the bowl while it’s running. Follow the manufacturer’s instructions for churning time, usually around 20-30 minutes.
- For Compressor Ice Cream Makers: Pre-cool the compressor for a few minutes, then pour the ice cream base into the machine and turn it on. The machine will handle the churning and freezing process, which may take around 30-60 minutes.
- For Manual Crank Ice Cream Makers: Transfer the ice cream base to the canister of the ice cream maker. Place the canister into the larger bucket and surround it with a mixture of ice and coarse salt. Attach the crank and churn for approximately 20-30 minutes or until the desired consistency is reached.
4. Monitor the Churning Process: Keep an eye on the ice cream mixture during churning. You’ll notice its transformation from a liquid to a creamy and thick consistency. The churning process incorporates air into the mixture, giving it that light and fluffy texture.
5. Check for the Right Consistency: The exact churning time may vary depending on your ice cream maker and the desired level of firmness. Check the consistency periodically by lifting the lid or paddle of the ice cream maker. The ice cream should have a thick, soft-serve consistency before transferring it to a freezer-safe container for further freezing.
6. Transfer to a Freezer-Safe Container: Once the desired consistency is achieved, transfer the ice cream mixture from the ice cream maker to a freezer-safe container. Use a rubber spatula to scrape out every last bit, ensuring no delicious ice cream goes to waste.
With the ice cream mixture ready, you’re just one step away from enjoying your homemade sugar-free ice cream. Whether you opt for an electric freezer bowl, compressor, or manual crank ice cream maker, the churning process transforms the base into a delightful frozen treat that’s bound to satisfy your cravings.
Chilling the Mixture
After churning your ice cream mixture, it’s important to give it time to chill and firm up before enjoying it. Chilling the mixture allows the flavors to meld together and for the ice cream to achieve the perfect texture. Follow these steps to properly chill your sugar-free ice cream:
1. Freezer-Safe Container: Make sure you have a clean and freezer-safe container ready to receive the churned ice cream. A container with a tight-fitting lid will help prevent ice crystals from forming and maintain the freshness of your ice cream.
2. Transfer the Mixture: Carefully transfer the churned ice cream mixture from the ice cream maker into the prepared container. Use a rubber spatula to scrape out every last bit and ensure none is wasted.
3. Smooth the Surface: Use the back of a spoon or spatula to smooth the surface of the ice cream. This helps prevent air pockets and gives the ice cream an even consistency.
4. Cover and Seal: Place a piece of wax paper or parchment paper directly on the surface of the ice cream to create a barrier against ice crystals. Then, cover the container with the lid to seal it tightly.
5. Chill in the Freezer: Transfer the container of ice cream to the coldest part of your freezer. Allow it to chill for a minimum of 4 hours, or ideally overnight, to ensure it is completely frozen and firm.
6. Avoid Frequent Opening: While waiting for the ice cream to chill, resist the temptation to open the freezer and check on it too frequently. Opening the container can cause temperature fluctuations, which may affect the quality and texture of your ice cream.
Once the ice cream has thoroughly chilled, it’s ready to be scooped, served, and enjoyed! Remember to remove the ice cream from the freezer a few minutes before serving to allow it to soften slightly, making it easier to scoop. Store any remaining ice cream in the freezer, ensuring it remains tightly sealed to maintain its freshness.
By giving the ice cream mixture time to chill and firm up, you set the stage for a creamy, velvety, and flavorful sugar-free ice cream. So be patient, let it chill, and get ready to savor each delicious scoop!
Using Your Ice Cream Maker
Using an ice cream maker is a straightforward and fun process that allows you to create homemade sugar-free ice cream with ease. Whether you have an electric freezer bowl, compressor, or manual crank ice cream maker, follow these general steps for optimal results:
1. Prepare the Freezing Component: If using an electric freezer bowl or compressor ice cream maker, ensure that the freezing component is properly frozen according to the manufacturer’s instructions. It’s best to freeze it overnight or as recommended.
2. Assemble the Ice Cream Maker: Set up your ice cream maker according to the manufacturer’s instructions. This may involve attaching any necessary paddles, canisters, or other components. Make sure everything is secure and in place before proceeding.
3. Turn on the Machine: If using an electric or compressor ice cream maker, plug it in and turn it on before adding the ice cream mixture. This ensures that the machine is properly prepared and ready for churning.
4. Pour in the Ice Cream Mixture: Slowly pour the cooled ice cream mixture into the ice cream maker while it is running. Allow the mixture to flow into the churning container or canister, making sure not to overfill it. Leave enough space for the ice cream to expand as it churns.
5. Churn the Ice Cream: Once the ice cream mixture is added, the machine will begin the churning process. The paddles or mechanisms within the machine will agitate the mixture, incorporating air and freezing it simultaneously. Follow the recommended churning time provided in the ice cream maker’s instructions. This usually ranges from 20 to 30 minutes, but it can vary.
6. Monitor the Churning Process: Keep an eye on the churning process to ensure that the ice cream mixture reaches the desired consistency. The mixture will thicken and gradually transform into a creamy texture as it churns. Avoid removing the lid too frequently, as this can cause temperature fluctuations inside the machine.
7. Check for Proper Consistency: Towards the end of the recommended churning time, check the ice cream for the desired consistency. It should resemble a thick, soft-serve texture. Keep in mind that the ice cream will firm up further during the chilling process in the freezer.
8. Turn off the Machine: Once the ice cream has reached the desired consistency, turn off the ice cream maker and unplug it. Take note of any specific instructions for removing the canister or paddles safely.
9. Transfer to a Freezer-Safe Container: Using a rubber spatula, transfer the churned ice cream from the ice cream maker to a freezer-safe container. Smooth the surface with the back of a spoon or spatula to create an even layer.
10. Chill in the Freezer: Place the container of ice cream in the coldest part of the freezer and allow it to chill for a minimum of 4 hours, or preferably overnight, until it is completely frozen and firm.
Using your ice cream maker is a delightful process that transforms your sugar-free ice cream ingredients into a delightful frozen treat. Enjoy the anticipation as the machine churns and be rewarded with homemade ice cream that is sure to impress your taste buds.
Tips for Achieving the Perfect Consistency
For sugar-free ice cream enthusiasts, achieving the perfect consistency is key to a delightful frozen treat. Here are some helpful tips to help you achieve that smooth and creamy texture:
1. Follow Chilling Time Guidelines: Ensure that you properly chill your ice cream mixture before transferring it to the ice cream maker. This allows the base to cool completely and helps the ice cream freeze evenly during the churning process.
2. Pre-Freeze the Churning Component: If using an electric freezer bowl or compressor ice cream maker, make sure to pre-freeze the churning component according to the manufacturer’s instructions. A well-frozen component aids in proper freezing and ensures a creamy consistency.
3. Don’t Overfill the Ice Cream Maker: Be mindful not to overfill the churning container or canister. Leave some room for the ice cream to expand as it churns. Overfilling may prevent proper churning by restricting airflow and volume expansion, resulting in a less creamy texture.
4. Chill Ingredients before Churning: If you plan to add mix-ins like chocolate chips, nuts, or fruit chunks, it’s a good idea to chill them in the refrigerator before incorporating them into the churned ice cream mixture. This prevents them from melting quickly and potentially affecting the texture of the ice cream.
5. Avoid Over-Churning: Over-churning the ice cream can lead to a dense and icy texture. Be mindful of the recommended churning time provided by your ice cream maker’s instructions. Check the consistency periodically during churning to ensure that it reaches a thick, soft-serve texture without going too far.
6. Embrace Additions during Churning: For mix-ins or add-ins that you want to be evenly distributed throughout the ice cream, add them during the last few minutes of churning. This allows them to blend seamlessly into the ice cream mixture, enhancing both flavor and texture.
7. Properly Store Your Ice Cream: After transferring the churned ice cream to a freezer-safe container, make sure to press a layer of wax paper or plastic wrap directly onto the surface of the ice cream before sealing the container with a lid. This helps prevent ice crystals from forming and maintains the desired creamy consistency.
8. Thaw and Scoop with Ease: When it’s time to enjoy your sugar-free ice cream, remove it from the freezer a few minutes before serving to allow it to soften slightly. This makes scooping easier and ensures a pleasantly creamy texture.
By following these tips, you’ll be on your way to achieving the perfect consistency for your sugar-free ice cream. Remember, experimentation and adjusting techniques to suit your preferences may be necessary. Enjoy the process and delight in the creamy, velvety goodness of your homemade creation!
Adding Flavors and Mix-Ins
One of the joys of making sugar-free ice cream at home is the ability to customize the flavors and add delightful mix-ins. Here are some ideas and tips for adding flavors and mix-ins to elevate your sugar-free ice cream:
1. Extracts: Enhance the flavor of your ice cream with extracts such as vanilla, almond, mint, or coconut. A small amount goes a long way, so start with a teaspoon or two and adjust to your taste preferences.
2. Cocoa Powder: For a rich and indulgent chocolate flavor, incorporate unsweetened cocoa powder into your ice cream base. Sift it into the base and whisk until fully combined for a smooth and velvety texture.
3. Fresh Fruit: Add bursts of fruity flavor by including chopped or pureed fresh fruit in your ice cream base. Berries, peaches, mangoes, and bananas work particularly well. Just make sure to adjust the sweetness of the base accordingly to balance the natural tartness of the fruit.
4. Fruit Swirls: To create delicious fruit swirls in your ice cream, puree your desired fruit and simmer it in a saucepan with a sugar-free sweetener until it thickens slightly. Once cooled, swirl the fruit mixture into the churned ice cream during the last few minutes of churning for beautiful ribbons of fruit throughout.
5. Nut Butters: Add a creamy and nutty twist to your ice cream with the addition of nut butters like almond butter, peanut butter, or cashew butter. Stir the nut butter into the chilled ice cream base before churning for a luscious and indulgent treat.
6. Chopped Nuts: For added texture and crunch, fold in chopped nuts such as almonds, pecans, walnuts, or pistachios. Toasting the nuts beforehand can enhance their flavor and add an extra dimension to your ice cream.
7. Chocolate Swirls or Chips: Create irresistible chocolatey goodness in your ice cream by swirling in melted, sugar-free chocolate or by folding in sugar-free chocolate chips. The melt-in-your-mouth chocolate pockets will make each bite even more delightful.
8. Coconut Flakes: If you’re a fan of coconut, sprinkle in some unsweetened shredded coconut or coconut flakes for a tropical twist. Toasting the coconut before adding it to the ice cream can intensify its flavor and give a satisfying crunch.
Remember to carefully consider the sweetness of your mix-ins and adjust the sweetness level of your ice cream base accordingly. Taste test as you go to ensure a well-balanced flavor profile.
Adding flavors and mix-ins to your sugar-free ice cream allows you to get creative and tailor the taste to your preferences. Experiment with different combinations and have fun exploring new flavor profiles. The result will be a delicious and personalized frozen treat that will have you coming back for seconds!
Storing and Serving Your Sugar-Free Ice Cream
Now that you have made your delectable sugar-free ice cream, it’s important to properly store it and serve it for the ultimate enjoyment. Here are some tips for storing and serving your homemade frozen treat:
1. Freezer-Safe Container: Transfer your churned ice cream into a freezer-safe container with a tight-fitting lid. Ensure that the container is of appropriate size and has enough room to accommodate the ice cream without allowing excess air space, which can cause freezer burn.
2. Press and Seal: Before sealing the container, press a layer of wax paper or plastic wrap directly onto the surface of the ice cream. This helps minimize the formation of ice crystals and maintains a smoother texture. Then, seal the container tightly with the lid.
3. Store in the Coldest Part of the Freezer: Place the container of ice cream in the coldest part of your freezer, such as the back or the bottom shelf. Avoid storing it near the freezer door, where temperature fluctuations are more likely to occur.
4. Thawing Before Scooping: When ready to enjoy your ice cream, remove it from the freezer and let it sit at room temperature for a few minutes to soften slightly. This makes scooping easier and ensures a smooth and creamy texture.
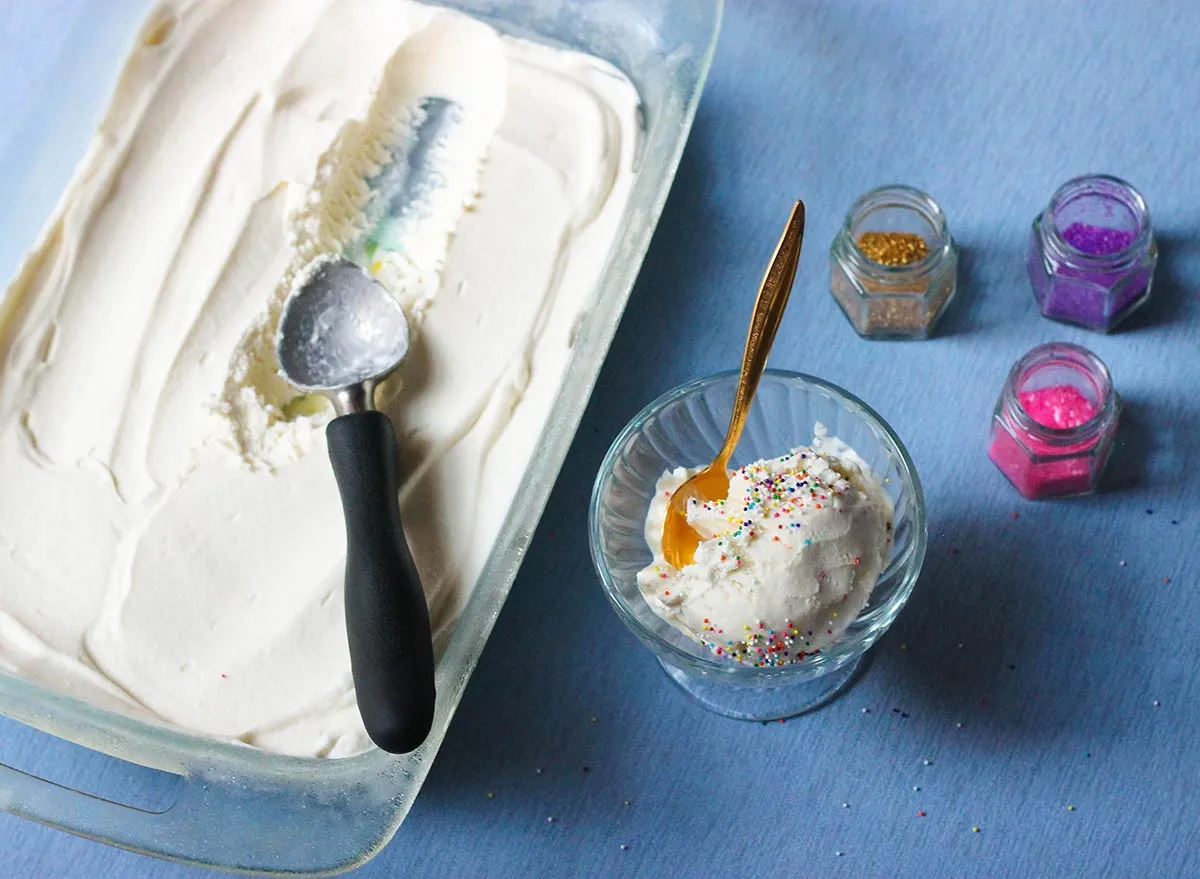
5. Scooping Tips: Use a sturdy ice cream scoop warmed with hot water to scoop the ice cream. Dip the scoop into hot water between each scoop to prevent the ice cream from sticking. This helps create beautiful, smooth scoops.
6. Garnishing and Serving: Serve your sugar-free ice cream in chilled bowls or cones and garnish with additional toppings if desired. Fresh berries, sugar-free chocolate sauce, whipped cream, or chopped nuts can add that extra touch of indulgence.
7. Return Unused Portion to Freezer: If there are leftovers, quickly return the remaining ice cream to the freezer in a tightly sealed container. Ensure the surface is covered with wax paper or plastic wrap before sealing to maintain its creamy consistency.
8. Quality and Shelf Life: Homemade sugar-free ice cream typically has the best texture and flavor within the first few weeks of freezing. While it can be stored for longer, it may start to lose its freshness and develop ice crystals over time. Enjoy it within 1 to 2 months for the best experience.
Remember to close the freezer tightly after each use to maintain the optimal storage conditions for your ice cream. Proper storage and serving techniques will ensure that your sugar-free ice cream stays delicious and maintains its creamy texture for as long as possible.
So, grab a scoop, savor the sweet flavors, and relish in the fact that you can enjoy a guilt-free frozen treat with your homemade sugar-free ice cream!
Conclusion
Congratulations! You have completed your journey into the world of making sugar-free ice cream with an ice cream maker. By embracing alternative sweeteners and carefully selecting ingredients, you have discovered the joy of creating delicious and guilt-free frozen desserts right in the comfort of your own home.
Throughout this process, you learned about the benefits of making sugar-free ice cream, from health-conscious choices to dietary restrictions. You explored the various types of ice cream makers and gained valuable insights into choosing the right one for your needs.
You gathered the necessary ingredients and equipment, selecting the perfect sweetener to achieve the desired level of sweetness. You prepared a base that served as the canvas for your ice cream masterpiece, ensuring that it was smooth, well-flavored, and ready for churning.
Using your ice cream maker, you patiently and eagerly churned the ice cream mixture, monitoring the consistency and anticipating the transformation from liquid to creamy delight. You discovered the art of adding flavors and mix-ins, customized to suit your taste buds and preferences.
After achieving the perfect consistency, you carefully stored your sugar-free ice cream, taking steps to prevent ice crystals and maintain its creamy texture. You learned the art of serving and enjoyed each delightful scoop, savoring the flavors and relishing in your homemade creation.
Now that you have become a master of sugar-free ice cream, feel free to continue experimenting with new flavors, ingredients, and techniques. The possibilities are endless, allowing you to continuously delight yourself and others with your homemade frozen creations.
Remember, making sugar-free ice cream is not only about satisfying your sweet tooth but also about making healthier choices and embracing a lifestyle that aligns with your dietary needs. With your newfound knowledge and skills, you can indulge in the pleasure of ice cream without the guilt of excessive sugar consumption.
So go ahead, get creative, and enjoy the journey of making delicious, sugar-free ice cream with your trusty ice cream maker. Happy scooping!