Introduction
Welcome to this step-by-step guide on how to add your Outlook email to your iPhone. By following these simple instructions, you’ll be able to access your Outlook emails, contacts, and calendar directly from your iPhone’s Mail app.
Having your Outlook email set up on your iPhone provides you with the convenience of accessing your emails on the go, syncing your contacts and calendar events, and staying connected whether you’re at work, traveling, or relaxing at home.
Outlook is a popular email client that offers numerous features and functionalities to manage your emails efficiently. Whether you use Outlook for personal or professional purposes, adding your Outlook email to your iPhone is a seamless process that can be done in just a few minutes.
With your Outlook email added to your iPhone, you can send and receive emails, access your email folders, and organize your mailbox with ease. This integration ensures that you stay connected and up to date with your emails, without the need to switch between devices or platforms.
So, without further ado, let’s dive into the step-by-step instructions to add your Outlook email to your iPhone. Whether you’re a tech-savvy individual or a newbie to email setup, these instructions will guide you through the process and have your Outlook account up and running on your iPhone in no time.
Step 1: Open the Settings app on your iPhone
The first step to adding your Outlook email to your iPhone is to open the Settings app. The Settings app allows you to customize various aspects of your iPhone, including email settings.
To find the Settings app, look for the icon on your iPhone’s home screen. It resembles a gear or a set of cogwheels. Once you locate the icon, tap on it to open the Settings app.
Alternatively, you can swipe down on your home screen and use the search bar at the top of the screen. Type in “Settings” and select the corresponding search result to open the app.
Once the Settings app is open, you will see a list of categories and options. Scroll through the list until you find “Mail” and tap on it to access the email settings.
The Mail settings allow you to manage your email accounts, customize mail options, and configure different aspects of your email experience. By accessing these settings, you’ll be able to add new email accounts, including your Outlook email.
By completing this step, you are ready to move on to the next step, which is to tap on “Accounts” to proceed with adding your Outlook email to your iPhone.
Step 2: Scroll down and tap on “Mail”
Once you have opened the Settings app on your iPhone, the next step is to scroll down until you find the “Mail” option. This option allows you to manage the settings related to your email accounts, including adding and configuring new emails.
Scrolling down in the Settings app will reveal a list of categories, and “Mail” should be one of them. Look for the “Mail” option and tap on it to proceed.
By tapping on “Mail,” you will enter the Mail settings menu, which will provide you with various options to customize your email accounts. From here, you’ll be able to add, remove, and manage different email accounts on your iPhone.
It’s important to note that the Mail settings menu is not specific to your Outlook email; it encompasses all the email accounts you have added to your iPhone. Therefore, any changes or configurations made within the “Mail” settings will apply universally to all your email accounts.
Now that you have successfully tapped on “Mail,” you are one step closer to adding your Outlook email to your iPhone. The next step is to tap on “Accounts,” which will allow you to add a new email account to your device.
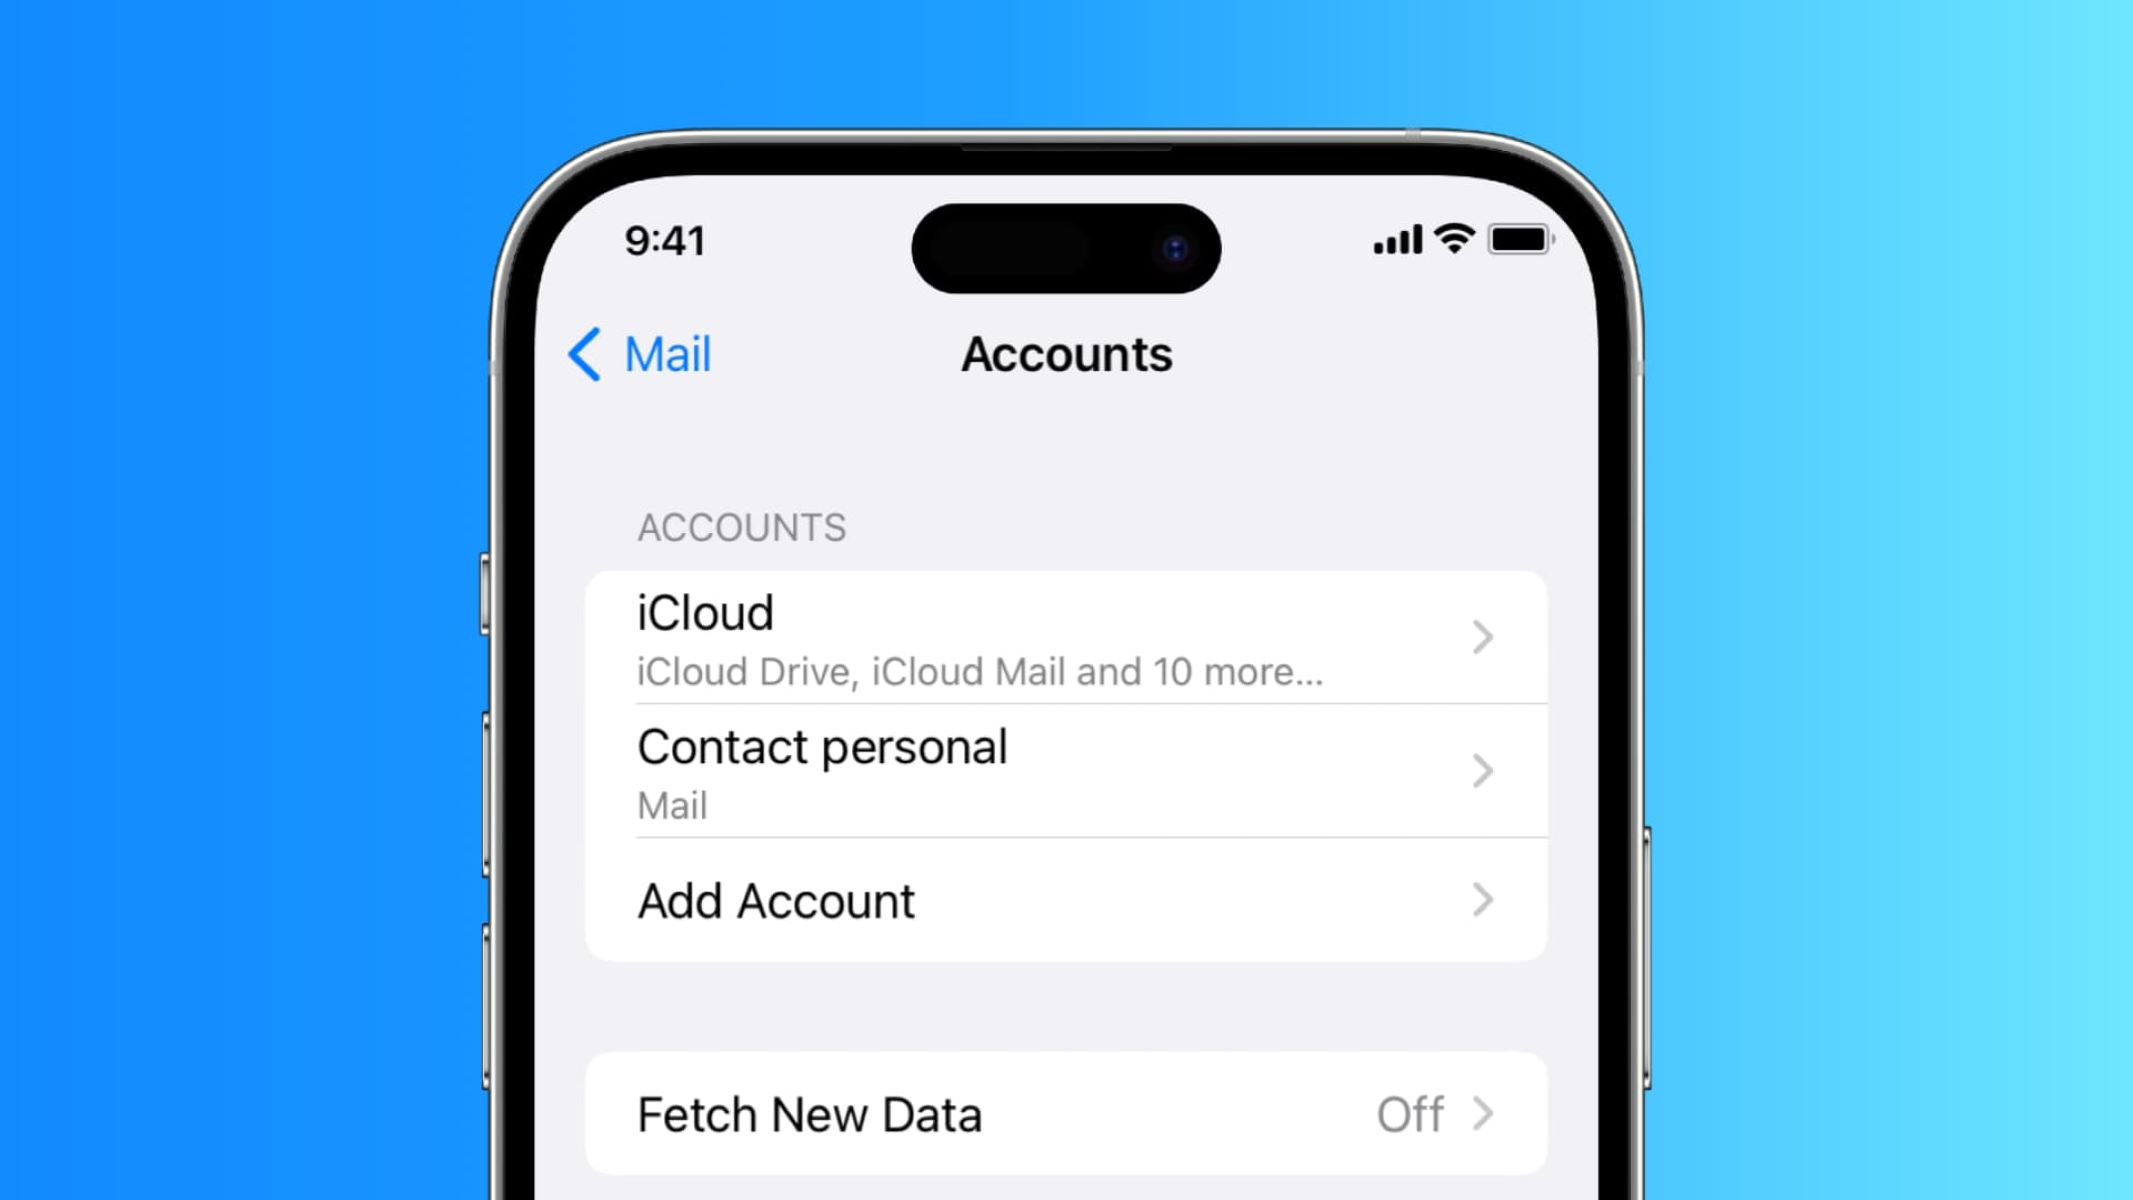
Step 3: Tap on “Accounts”
After tapping on “Mail” in the Settings app, the next step is to locate and tap on the “Accounts” option. This option allows you to manage your existing email accounts and add new ones to your iPhone.
Scroll through the Mail settings menu until you find the “Accounts” section. This section is where all your email accounts, including your Outlook email, will be listed. Tap on “Accounts” to proceed with adding your Outlook email to your iPhone.
By tapping on “Accounts,” you will be presented with a list of email accounts that are currently configured on your device. This list includes any accounts you have previously added, such as Gmail, Yahoo, or iCloud.
If you already have an existing Outlook email account configured on your iPhone, it will be listed in the “Accounts” section. In that case, you can simply select your Outlook email account and make any necessary changes or updates.
However, if you don’t have your Outlook email account listed, don’t worry! The next steps will guide you on how to add a new email account, specifically your Outlook email, to your iPhone.
Now that you have successfully tapped on “Accounts,” you are ready to move on to the next step, which is to tap on “Add Account” to begin the process of adding your Outlook email to your iPhone.
Step 4: Tap on “Add Account”
Once you have accessed the “Accounts” section in the Mail settings, the next step is to tap on “Add Account.” This option allows you to add a new email account to your iPhone, including your Outlook email.
When you tap on “Add Account,” your iPhone will present you with a list of popular email providers, such as Google, Yahoo, Outlook, and more. These options make it easier to set up your email account without needing to manually enter all the server settings.
In this case, since you want to add your Outlook email, tap on the “Outlook” option from the list of email providers. Tapping on “Outlook” will initiate the process of setting up your Outlook email account on your iPhone.
After tapping on “Outlook,” your iPhone will prompt you to enter your Outlook email address and password. Ensure that you have the correct login credentials for your Outlook email account.
Once you have entered your Outlook email address and password, tap on “Next” to proceed. Your iPhone will then attempt to verify your account information and establish a secure connection with the Outlook email server.
If the account verification process is successful, you will be taken to the next step, which involves filling in the necessary information for your Outlook account. If there are any issues with the verification process, double-check your email address and password, and ensure you have a stable internet connection.
Now that you have successfully tapped on “Add Account,” you are one step closer to having your Outlook email set up on your iPhone. The next step is to fill in the necessary information for your Outlook account, which will be covered in the following section.
Step 5: Tap on “Other”
After entering your Outlook email address and password in the previous step, the next step is to tap on “Other.” This option allows you to manually configure your Outlook email account settings on your iPhone.
By tapping on “Other,” you will have more control over the setup process and can ensure that all the necessary settings are entered correctly to access your Outlook email.
Choosing “Other” also gives you the flexibility to add email accounts from providers that are not listed as popular options in the previous step.
When you select “Other,” your iPhone will prompt you to enter various account information, including the type of account (IMAP or POP), incoming mail server settings, outgoing mail server settings, and any additional security settings required by your email provider.
Ensure that you have the correct information for your Outlook email account, as this step requires accurate server settings to establish a successful connection with the Outlook email server.
If you’re not sure about the specific server settings required for your Outlook email, you can consult your email provider’s support documentation or contact their customer support for assistance.
Now that you have successfully tapped on “Other,” you are ready to move on to the next step, which is to tap on “Add Mail Account” to proceed with the manual configuration of your Outlook email account on your iPhone.
Step 6: Tap on “Add Mail Account”
After choosing the “Other” option in the previous step, the next step is to tap on “Add Mail Account.” This option allows you to manually input the necessary information for your Outlook email account on your iPhone.
By tapping on “Add Mail Account,” you will be presented with a form where you can enter your name, email address, password, and a description for your Outlook email account.
Start by entering your name. This is the name that will be displayed when you send emails from your Outlook email account.
Next, enter your full Outlook email address. Make sure to enter it correctly to avoid any errors during the account setup process.
Then, type in your Outlook email account password. Double-check your password to ensure it is accurate and matches the one associated with your Outlook email account.
Finally, you can enter a description for your Outlook email account. This description is optional and can be any text that helps you identify the specific email account.
Once you’ve filled in all the necessary information, tap on “Next” to proceed.
Your iPhone will then attempt to verify the account information and establish a connection with the Outlook email server using the provided details.
If the account verification is successful, you will be taken to the next step, where you can fill in any additional information required for your Outlook email account setup.
Now that you have successfully tapped on “Add Mail Account,” you are one step closer to having your Outlook email account set up on your iPhone. The next step involves entering the necessary information for your Outlook account, which will be covered in the following section.
Step 7: Enter your Outlook email address and password
After tapping on “Add Mail Account” in the previous step, you will be prompted to enter your Outlook email address and password. It is crucial to provide accurate and up-to-date information for a successful setup of your Outlook email account on your iPhone.
Start by entering your full Outlook email address in the designated field. Make sure to include “@outlook.com” or the applicable domain associated with your Outlook email account.
Next, enter the corresponding password for your Outlook email account. Double-check your password to ensure it is correct and matches the one associated with your Outlook email address.
Note that your iPhone will securely store your Outlook email password so that you don’t have to enter it each time you access your emails. This added convenience allows for a seamless and hassle-free email experience on your device.
Once you have entered your Outlook email address and password, tap on the “Next” button to proceed with the account verification process. Your iPhone will attempt to connect to the Outlook server and authenticate your account information.
If the account verification is successful, you will be taken to the next step, which involves filling in the necessary information for your Outlook account configuration. However, if there are any issues with the verification process, double-check your email address and password for accuracy.
It’s important to provide the correct login credentials to ensure a secure and uninterrupted email access on your iPhone. If you face any difficulties during this step, you can refer to your Outlook email provider’s support documentation or reach out to their customer support for further assistance.
Now that you have successfully entered your Outlook email address and password, you are ready to move on to the next step, where you can fill in the necessary information for your Outlook account configuration.
Step 8: Fill in the necessary information for your Outlook account
After entering your Outlook email address and password in the previous step, you will now need to provide the necessary information to configure your Outlook account on your iPhone.
The information required may vary depending on the specific settings and preferences of your Outlook email account. However, there are a few key pieces of information that you will likely need to input, including:
1. Incoming Mail Server: Enter the server address for incoming emails. This information is typically provided by your email provider or can be found in their support documentation.
2. Outgoing Mail Server: Enter the server address for outgoing emails. Similar to the incoming server, you may have to consult with your email provider or refer to their support documentation for this information.
3. Port Numbers: Specify the port numbers for incoming and outgoing servers. Port numbers help establish a connection between your device and the email server. The commonly used port numbers for Outlook are 995 for POP3 (incoming) and 465 for SMTP (outgoing).
4. SSL/TLS: Enable SSL or TLS encryption for a secure connection to your Outlook email server. This is an important security measure that protects your email communications from unauthorized access.
5. Authentication: Choose the authentication method required by your Outlook email server. The options commonly available are password authentication or OAuth2, which allows you to securely authorize access to your email account without sharing your actual password.
It’s essential to input this information accurately to ensure a successful configuration of your Outlook account on your iPhone. If you’re unsure about any of the details, contact your email provider’s support team or refer to their documentation for guidance.
Once you have entered all the necessary information, tap on “Next” to proceed. Your iPhone will then attempt to connect to the Outlook server using the provided configurations and verify the settings.
If everything is set up correctly, your Outlook email account will be successfully added to your iPhone, and you can start accessing your emails, contacts, and calendar from the Mail app.
Now that you have filled in the necessary information for your Outlook account configuration, you are ready to move on to the next step, in which you can choose which Outlook features you want to sync with your iPhone.
Step 9: Tap on “Next”
After filling in the necessary information for your Outlook account configuration, the next step is to tap on the “Next” button. This action will allow your iPhone to verify the settings and establish a connection with the Outlook server.
By tapping on “Next,” your iPhone will attempt to connect to the Outlook server using the provided configurations, including the incoming and outgoing server addresses, port numbers, SSL/TLS encryption, and authentication method.
This process may take a few moments as your iPhone communicates with the Outlook server to validate the settings and ensure a secure connection.
If the server verification is successful, your iPhone will proceed to the next step, where you can choose which Outlook features you want to sync with your iPhone. These features typically include Mail, Contacts, Calendars, and Notes.
The ability to sync these features allows you to access your Outlook emails, contacts, calendar events, and notes directly from the respective built-in apps on your iPhone.
Depending on your preferences and usage requirements, you can enable or disable the syncing of individual features. Simply toggle the corresponding switches to enable or disable the synchronization based on your needs.
Once you have made your selections, tap on the “Save” button to save the changes and finalize the setup process for your Outlook account on your iPhone.
Now that you have successfully tapped on “Next,” you are one step closer to completing the setup of your Outlook email account on your iPhone. The next step involves verifying your account settings and making any necessary changes, which will be covered in the following section.
Step 10: Choose which Outlook features you want to sync with your iPhone
After tapping on “Next” in the previous step, you will be presented with the option to choose which Outlook features you want to sync with your iPhone. These features typically include Mail, Contacts, Calendars, and Notes.
Syncing these features allows you to access and manage your Outlook emails, contacts, calendar events, and notes directly from the respective built-in apps on your iPhone.
To choose which features to sync, simply toggle the switches next to each feature to enable or disable synchronization based on your preferences.
If you want to access your Outlook emails on your iPhone, ensure that the “Mail” switch is turned on. This will sync your Outlook emails and allow you to send and receive messages through the Mail app on your iPhone.
If you want to access your Outlook contacts on your iPhone, turn on the “Contacts” switch. Enabling this feature will sync your Outlook contacts with your iPhone’s Contacts app, ensuring that your contact list is always up to date.
Similarly, if you want to view and manage your Outlook calendar events on your iPhone, toggle the “Calendars” switch to enable syncing. This will ensure that your Outlook calendar is accessible through the Calendar app on your iPhone.
Lastly, if you have any notes stored in your Outlook account and wish to access them on your iPhone, turn on the “Notes” switch. Enabling this feature will sync your Outlook notes with the Notes app on your iPhone.
Take a moment to review your selections and ensure that the desired features are enabled for synchronization. You can always modify these settings later by going to the Mail settings on your iPhone.
Once you have made your selections, tap on the “Save” button to confirm and save your chosen sync settings for your Outlook account on your iPhone.
Now that you have successfully chosen the Outlook features to sync with your iPhone, you’re almost done with the setup process! The next step involves verifying your account settings and making any necessary changes, which will be covered in the following section.
Step 11: Tap on “Save”
After choosing which Outlook features you want to sync with your iPhone, the next step is to tap on the “Save” button. This action will save your selected settings and finalize the setup process for your Outlook account on your iPhone.
By tapping on “Save,” your iPhone will save the configured settings and establish a connection between your device and the Outlook server. This connection allows for seamless synchronization of your Outlook email, contacts, calendar events, and notes with the respective built-in apps on your iPhone.
It’s important to ensure that you have reviewed your selections before tapping on “Save” to verify that the desired features are enabled for synchronization. This step gives you the opportunity to make any last-minute changes or adjustments.
Once you tap on “Save,” your iPhone will start the synchronization process, which may take a few moments depending on the amount of data to be transferred.
During the synchronization process, your iPhone will download your Outlook emails, contacts, calendar events, and notes to the corresponding apps on your device. This ensures that you have access to your Outlook information at your fingertips, even when you’re away from your computer.
Once the synchronization is complete, you can access your Outlook emails, contacts, calendar events, and notes directly from the Mail, Contacts, Calendar, and Notes apps on your iPhone. Any changes or updates you make on your iPhone will also be reflected in your Outlook account and vice versa.
Congratulations! You have successfully tapped on “Save,” and your Outlook account is now fully set up and synced with your iPhone. You can now enjoy the convenience of accessing and managing your Outlook emails and other information directly from your iPhone.
Now that you have completed Step 11, the setup process for adding your Outlook email to your iPhone is almost complete. The next step involves verifying your account settings and making any necessary changes, which will be covered in the following section.
Step 12: Verify your account settings and make any necessary changes
After tapping on “Save” in the previous step, it is essential to verify your account settings and ensure that everything is configured correctly. This step allows you to double-check your Outlook email account settings and make any necessary changes or adjustments if needed.
To verify your account settings, open the respective apps on your iPhone that correspond to the Outlook features you enabled for synchronization. For example, open the Mail app to check your Outlook emails, the Contacts app to review your synced contacts, the Calendar app to view your Outlook events, and the Notes app to access your synced notes.
Take a few moments to navigate through these apps and ensure that your Outlook information is visible and accurately displayed. Check for any missing emails, contacts, calendar events, or notes that should be present.
If you notice any discrepancies or issues, you may need to make some changes to your account settings. To do this, go to the Settings app on your iPhone, scroll down and tap on “Mail,” then select your Outlook email account from the list of accounts.
From there, you can make changes to your incoming and outgoing mail server settings, enable or disable specific sync options, update your password, or modify any other settings that may need adjustment. Make sure to save any changes you make before exiting the settings.
If you’re uncertain about specific settings or need further guidance, you can consult your Outlook email provider’s support documentation or contact their customer support for assistance.
By verifying your account settings and making any necessary changes, you ensure that your Outlook email account is set up correctly on your iPhone and that your emails, contacts, calendar events, and notes are seamlessly synced and accessible.
Congratulations! You have now successfully completed all the steps to add your Outlook email to your iPhone. You can now enjoy the convenience of accessing and managing your Outlook email and other information from your iPhone’s built-in apps.
Keep in mind that you can always revisit the Mail settings on your iPhone to modify your Outlook account settings or make any further adjustments as needed.
With your Outlook email account added to your iPhone, you can stay connected, respond to emails, manage contacts and appointments, and stay organized while on the go.
Conclusion
Adding your Outlook email to your iPhone is a straightforward process that allows you to access your emails, contacts, calendar events, and notes conveniently from your device. With the integration of your Outlook account into the iPhone’s built-in apps, you can stay connected and organized even while on the go.
In this step-by-step guide, we walked through the process of adding your Outlook email to your iPhone, from opening the Settings app to verifying your account settings. We covered each step in detail, providing clear instructions to help you successfully set up your Outlook email account.
By following these steps, you can ensure that your Outlook email is securely configured on your iPhone, and all your important information is synchronized across devices. From checking your emails to managing your calendar appointments and contacts, your Outlook email account will be seamlessly integrated into your iPhone’s native apps.
Remember to double-check your account settings and make any necessary changes to ensure that your Outlook email account is accurately set up on your iPhone. If you encounter any issues or need further assistance, consult your email provider’s support documentation or reach out to their customer support for guidance.
Now that you have successfully added your Outlook email account to your iPhone, you can enjoy the convenience of accessing and managing your emails and information from one device. Stay productive and connected, no matter where you are.
Thank you for following this guide, and we hope you find it helpful in adding your Outlook email to your iPhone!