Introduction
Welcome to our guide on how to block emails. In today’s digital age, email has become an essential communication tool for both personal and professional matters. However, sometimes we find ourselves bombarded with unwanted or spam emails that clutter our inbox and waste our time. Blocking these emails can be an effective solution to regain control over our email experience.
In this article, we will walk you through various methods to block emails on different platforms and devices. Whether you use Gmail, Outlook, Yahoo Mail, Apple Mail, Thunderbird, AOL Mail, or even mobile devices like iPhone and Android, we’ve got you covered.
By blocking specific email addresses or domains, you can prevent unwanted senders from reaching your inbox, saving you from the annoyance and frustration caused by spam and unwanted emails. Blocking emails also helps to protect your online security and privacy by preventing phishing attempts, scams, and malicious content from reaching you.
So, if you’re tired of seeing irrelevant promotional emails, dealing with persistent spammers, or receiving offensive messages, let’s dive into the methods and techniques that will empower you to take control of your inbox.
Why Blocking Emails is Important
Blocking emails is essential for maintaining a clean, organized, and secure inbox. Here are several reasons why blocking emails is important:
1. Minimize Distractions: Unwanted emails can be a significant distraction, constantly vying for your attention and diverting you from important tasks. Blocking emails enables you to filter out irrelevant messages and focus on what matters most.
2. Reduce Clutter: Unwanted emails, including promotional offers, newsletters, and spam, can quickly fill up your inbox and make it difficult to locate important emails. Blocking these emails helps to declutter your inbox, making it more manageable and allowing you to find crucial information easily.
3. Protect Privacy: Some emails may contain phishing attempts, scams, or malicious content that pose a threat to your privacy and online security. Blocking emails from unknown senders or suspicious domains can help protect your sensitive information and prevent falling victim to fraudulent schemes.
4. Improve Efficiency: By blocking irrelevant emails, you can save time and improve your productivity. Instead of wasting time sifting through irrelevant messages, you can focus on tasks that require your attention, resulting in more efficient work processes.
5. Enhanced Security: Blocki
Method 1: Blocking Emails in Gmail
Gmail offers a straightforward process for blocking unwanted emails. Here’s how to do it:
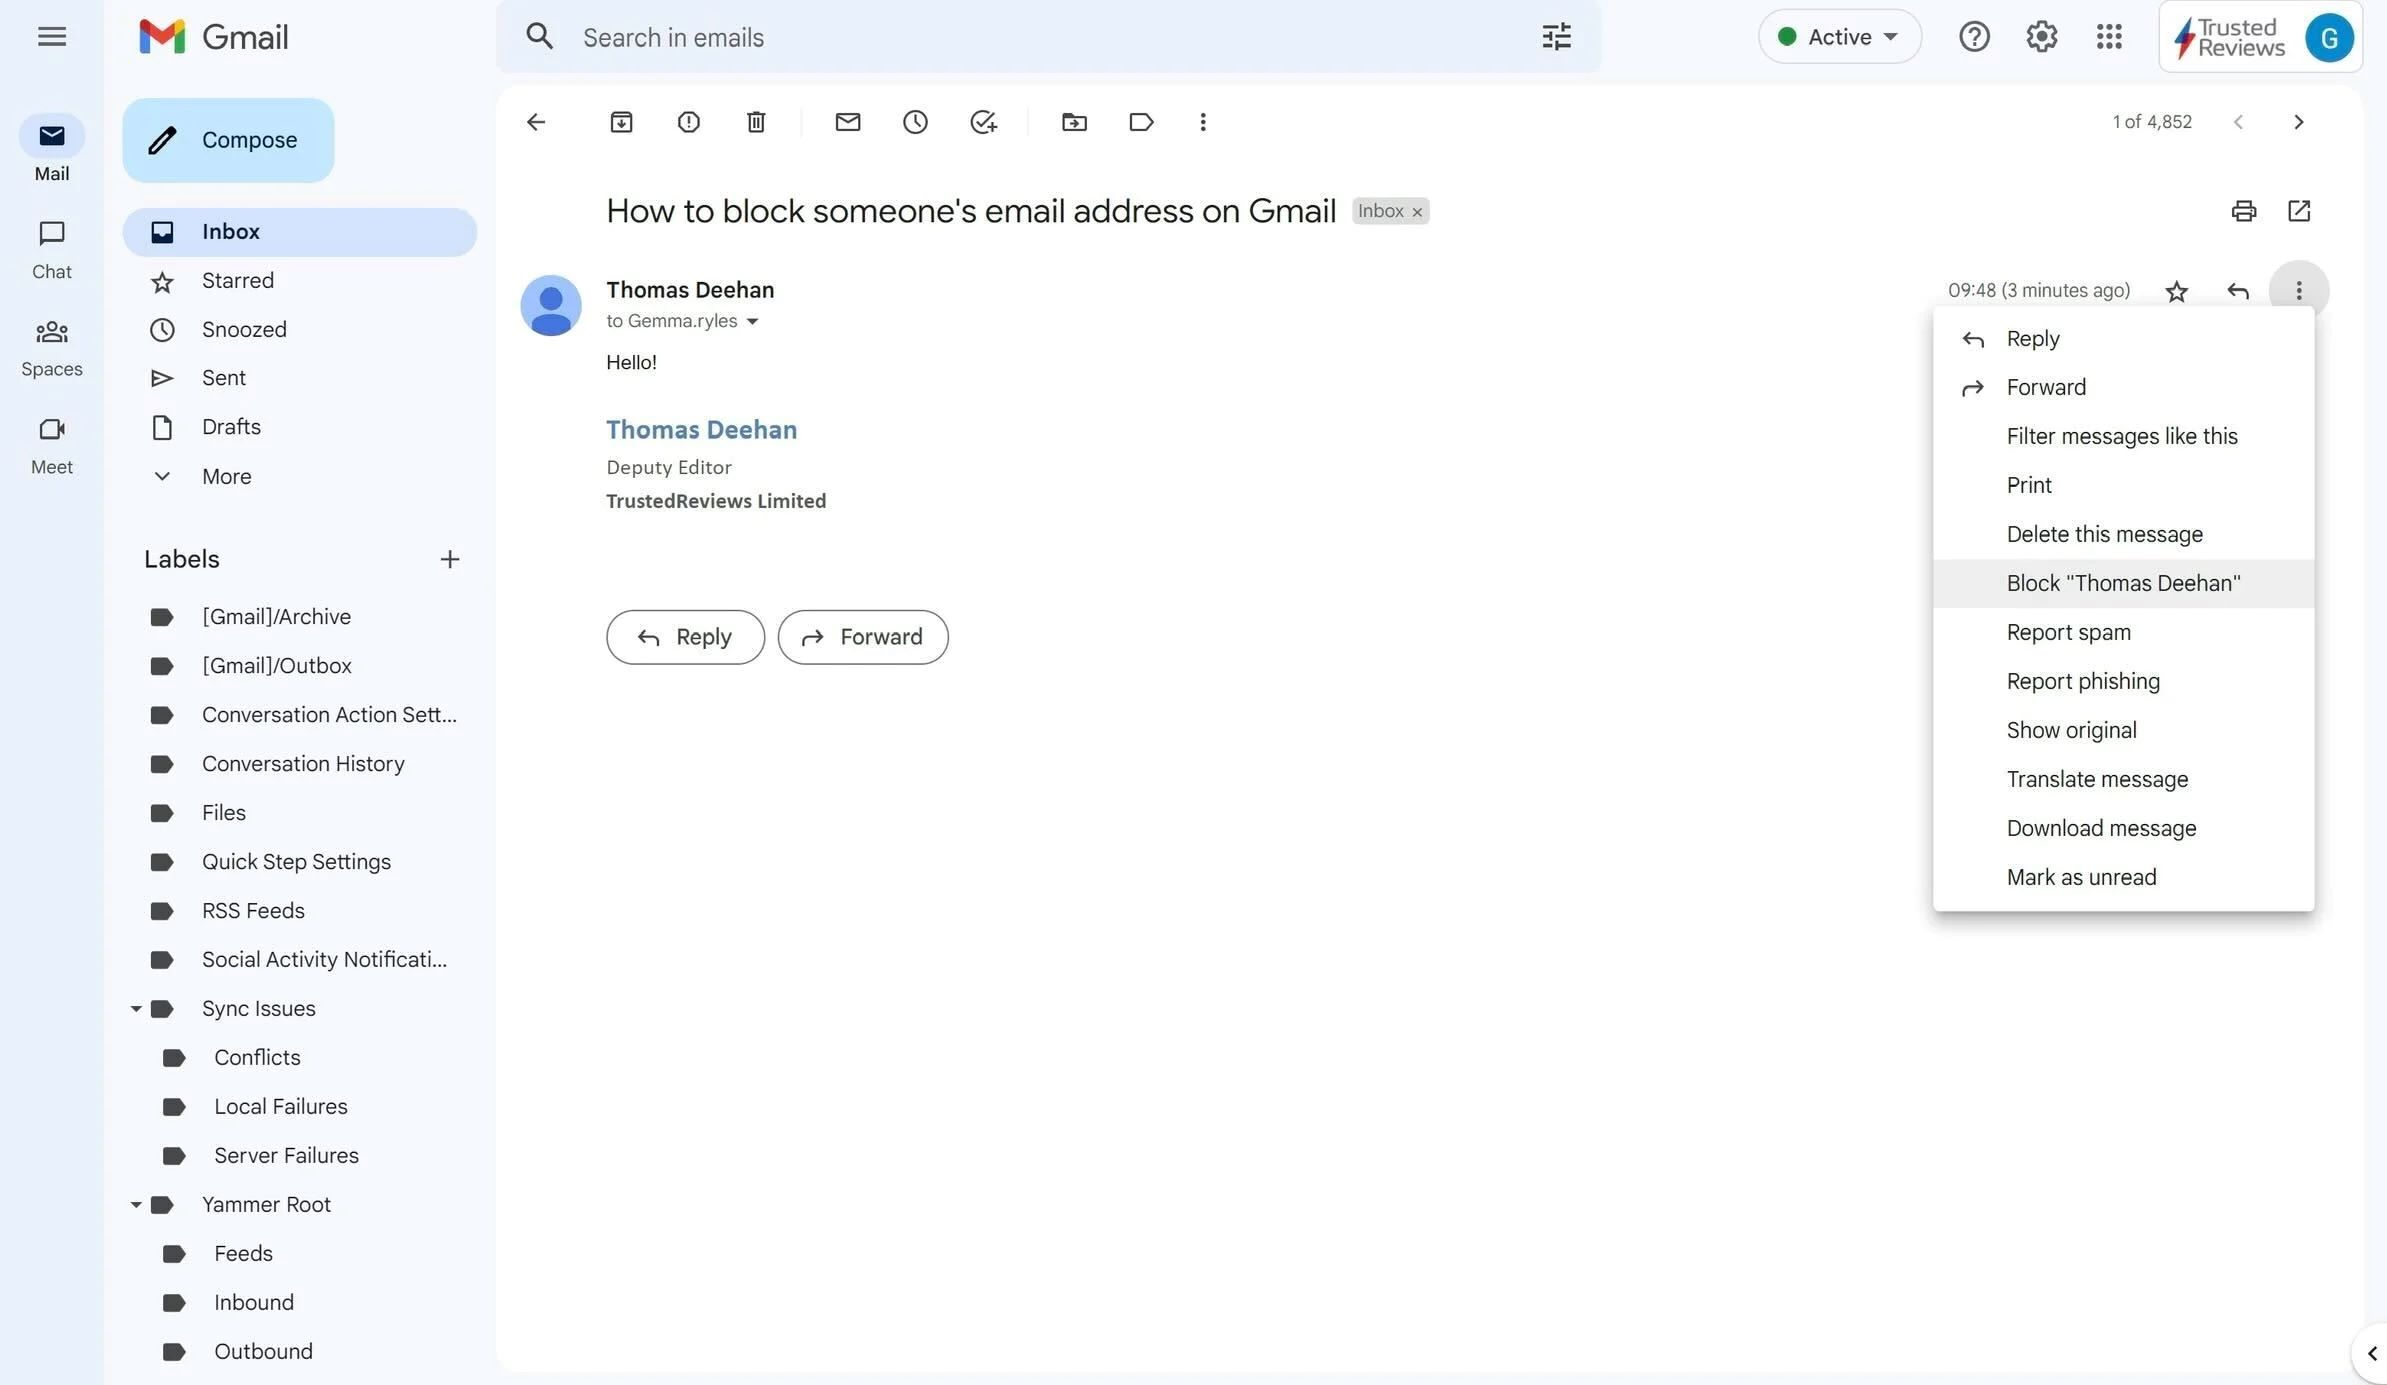
Step 1: Log in to your Gmail account and open the email you want to block. If you want to block a specific address, open an email from that sender.
Step 2: In the top-right corner of the email, you’ll find a small arrow or three dots icon. Click on it to reveal a dropdown menu.
Step 3: From the dropdown menu, click on the “Block [Sender Name]” option. Gmail will confirm the action and inform you that all future emails from that sender will be sent to the spam folder.
Step 4: If you change your mind or want to unblock a sender, open any email from the blocked sender and click on the “Unblock [Sender Name]” option, which is usually located near the top of the email.
Note: Blocking a sender in Gmail sends their future emails directly to your spam folder. It’s worth periodically checking your spam folder to ensure no important emails get filtered incorrectly.
By following these steps, you can easily block unwanted emails in Gmail and regain control over your inbox.
If you want to take the blocking process a step further, Gmail also allows you to create filters that automatically delete or archive incoming messages from specific senders or with certain keywords. This additional level of customization can help you fine-tune your email management and ensure a clutter-free inbox.
Gmail’s blocking feature is an effective way to filter out unwanted emails and maintain a more organized and secure email experience.
Method 2: Blocking Emails in Outlook
If you are an Outlook user, you can easily block unwanted emails using the following steps:
Step 1: Open Outlook and go to your inbox. Locate the email you want to block or the sender’s email address.
Step 2: Right-click on the email or the sender’s name to open a contextual menu. From the menu, select “Junk” or “Junk Email.
Step 3: In the submenu, choose “Block Sender” or “Block Sender’s Domain”. This action will send future emails from the blocked sender to your junk or spam folder.
Note: Outlook also provides an option to “Block Sender’s Domain”. This allows you to block all emails coming from a specific domain, preventing any email from that domain from reaching your inbox.
Step 4: If you change your mind or want to unblock a sender, go to the “Junk” or “Junk Email” folder. Locate the email from the blocked sender, right-click on it, and choose the “Junk” or “Not Junk” option. Outlook will prompt you to confirm the action, and subsequent emails from that sender will no longer be sent to the junk folder.
By following these steps, you can easily block unwanted emails in Outlook, ensuring a clutter-free and more organized email experience.
Outlook also provides additional features to customize your junk email filters. You can access these settings by going to the “File” tab, selecting “Options,” then “Mail,” and finally clicking on “Junk Email.” Here, you can adjust the level of filtering and specify trusted senders and domains to ensure important emails are not mistakenly sent to the junk folder.
With Outlook’s blocking and filtering capabilities, you can effectively manage unwanted emails and keep your inbox free from clutter.
Method 3: Blocking Emails in Yahoo Mail
If you use Yahoo Mail and want to block unwanted emails, follow these steps:
Step 1: Login to your Yahoo Mail account and navigate to your inbox.
Step 2: Locate the email from the sender you want to block or the email address you want to block.
Step 3: Hover over the email to reveal a toolbar on the right side. Click on the three-dot icon to open a dropdown menu.
Step 4: From the dropdown menu, select “Block Senders”. Yahoo Mail will confirm the action and inform you that future emails from that sender will be sent to the spam folder.
Note: Yahoo Mail also allows you to block entire domains. Instead of selecting “Block Senders”, choose “Block Domain”. This will prevent any emails from the specified domain from reaching your inbox.
Step 5: If you change your mind or want to unblock a sender, go to the “Settings” menu in Yahoo Mail by clicking on the gear icon in the top-right corner. Then, select “More Settings”. Under the “Security and Privacy” tab, click on “Blocked Addresses”. Here, you can manage your blocked senders and unblock any addresses as needed.
By following these steps, you can easily block unwanted emails in Yahoo Mail, ensuring a more streamlined and organized inbox.
Yahoo Mail also provides additional features to enhance your email experience. You can explore settings like automatic filters, spam protection, and custom folder organization to customize your inbox and ensure important emails are easily accessible.
With Yahoo Mail’s blocking feature, you can regain control over your inbox and enjoy a more pleasant email experience.
Method 4: Blocking Emails in Apple Mail
If you’re an Apple Mail user and wish to block unwanted emails, follow these steps:
Step 1: Open the Apple Mail application on your Mac or iOS device.
Step 2: Locate the email from the sender you want to block or the email address you want to block.
Step 3: Right-click on the email or the sender’s name to open a contextual menu.
Step 4: From the options presented, choose “Block Sender” or “Add to Blocked Sender List”. Apple Mail will automatically move future emails from that sender to the trash or junk folder.
Note: If you want to unblock a sender, follow the same steps and select the “Unblock Sender” option.
By following these steps, you can effectively block unwanted emails in Apple Mail and maintain a clutter-free inbox.
Apple Mail also provides additional tools to manage and filter your emails. You can create rules and filters to automatically organize incoming messages based on specific criteria, such as sender, subject, or keywords. This level of customization helps you further streamline your email experience.
If you encounter persistent spammers or unwanted emails that manage to bypass the blocking feature, you can report them as spam. This action not only helps you protect your own inbox but also contributes to the collective effort of combating spam and improving email security for all users.
With Apple Mail’s blocking features and additional customization options, you can take control of your inbox, filter out unwanted emails, and enjoy a more organized email experience.
Method 5: Blocking Emails in Thunderbird
If you use Thunderbird as your preferred email client and want to block unwanted emails, follow these steps:
Step 1: Open Thunderbird and navigate to your inbox.
Step 2: Locate the email from the sender you want to block or the email address you want to block.
Step 3: Right-click on the email or the sender’s name to open a contextual menu.
Step 4: From the options presented, choose “Create Filter From Message” or “Create Filter From Message”. This will open the Filter Rules window.
Step 5: In the Filter Rules window, you can specify the criteria for blocking emails. You can choose to block based on the sender’s email address, domain, subject, or other parameters.
Step 6: Once you have specified the blocking criteria, click on the “OK” button to save the filter.
By following these steps, you can effectively block unwanted emails in Thunderbird and maintain a more organized inbox.
Thunderbird also provides additional filter options and customization features to enhance your email experience. You can create complex filter rules, specify actions to be taken on filtered emails (such as deleting, moving to a specific folder, or marking as read), and manage multiple filters to fit your specific needs.
In addition to blocking emails, Thunderbird also allows you to report spam. If you receive unsolicited or spam emails, you can mark them as spam, which helps train Thunderbird’s spam filter and reduces the chances of similar emails reaching your inbox in the future.
With Thunderbird’s versatile filtering and blocking capabilities, you can easily manage unwanted emails, reduce distractions, and maintain a clutter-free email experience.
Method 6: Blocking Emails in AOL Mail
If you use AOL Mail and want to block unwanted emails, you can follow these steps:
Step 1: Log in to your AOL Mail account and navigate to your inbox.
Step 2: Locate the email from the sender you want to block or the email address you want to block.
Step 3: Hover over the email to reveal a toolbar at the top. Click on the “More” option (usually represented by three dots or an arrow).
Step 4: From the dropdown menu, select “Block Sender”. AOL Mail will inform you that future emails from that sender will automatically be sent to the spam folder.
Note: AOL Mail also allows you to block an entire domain. To do this, select “Block Domain” from the dropdown menu and enter the domain you want to block.
Step 5: If you change your mind or want to unblock a sender, go to the “Settings” menu by clicking on the gear icon at the top-right corner. Navigate to “Spam Settings” and then “Sender Filter”. Here, you can manage your blocked senders list and remove any addresses or domains as needed.
By following these steps, you can easily block unwanted emails in AOL Mail and maintain a clutter-free inbox.
AOL Mail also provides additional features to manage and organize your emails. You can create customized folders to categorize your messages, filter incoming emails based on specific criteria, and set up rules for automatic actions on incoming messages.
Furthermore, AOL Mail’s spam filter helps to keep unwanted emails out of your inbox. It is recommended to periodically check your spam folder to ensure no legitimate emails are mistakenly marked as spam.
With AOL Mail’s blocking feature and additional customization options, you can effectively manage and control your inbox, ensuring a more pleasant and organized email experience.
Method 7: Blocking Emails on iPhone/iPad
If you use an iPhone or iPad and want to block unwanted emails, you can follow these steps:
Step 1: Open the Mail app on your iPhone or iPad.
Step 2: Locate the email from the sender you want to block or the email address you want to block.
Step 3: Swipe left on the email to reveal a menu with options.
Step 4: Tap on the “More” option (represented by three dots) in the revealed menu.
Step 5: From the options presented, select “Block this Contact” or “Mark as Junk”.
Step 6: If you choose to block the contact, a confirmation message will appear. Tap on “Block Contact” to confirm. Future emails from that sender will be sent directly to the trash or junk folder.
Note: If you change your mind or want to unblock a sender, go to the “Settings” app on your iPhone or iPad. Navigate to “Mail”, then “Blocked” or “Blocked Senders”. Here, you can manage your blocked contacts and unblock any addresses or domains as needed.
By following these steps, you can easily block unwanted emails on your iPhone or iPad’s Mail app and maintain a clutter-free inbox.
It’s important to note that blocking a contact on your iPhone or iPad’s Mail app only applies to that specific device. If you access your email account from other devices or apps, you will need to block the contact on those platforms as well.
Alternatively, you can also consider setting up filters or rules in your email provider’s web-based interface to block senders or move certain emails directly to the trash or junk folder across all devices.
With the ability to block emails on your iPhone or iPad, you can keep unwanted messages out of your inbox and enjoy a more streamlined email experience on your Apple device.
Method 8: Blocking Emails on Android Devices
If you use an Android device and want to block unwanted emails, you can follow these steps:
Step 1: Open the Email app on your Android device.
Step 2: Locate the email from the sender you want to block or the email address you want to block.
Step 3: Tap and hold the email to select it.
Step 4: From the options presented, look for a “More” or “Menu” button (represented by three dots).
Step 5: Tap on the “More” or “Menu” button and select “Block” or “Block Sender”.
Step 6: If you choose to block the sender, a confirmation message will appear. Tap on “Block” to confirm. Future emails from that sender will be sent directly to the trash or spam folder.
Note: If you change your mind or want to unblock a sender, go to the settings menu of your Email app. Look for the “Blocked Senders” or “Blocked Contacts” section. Here, you can manage your blocked senders and unblock any addresses or domains as needed.
By following these steps, you can easily block unwanted emails on your Android device’s Email app and maintain a clutter-free inbox.
Just like with iOS devices, it’s crucial to note that blocking a contact on your Android device’s Email app only applies to that specific device. If you access your email account from other devices or apps, you will need to block the contact on those platforms as well.
Additionally, consider exploring your email provider’s web-based interface to set up more comprehensive filters or rules to block senders or automatically categorize and handle specific types of emails.
With the ability to block emails on your Android device, you can easily keep unwanted messages out of your inbox and enjoy a more streamlined email experience on the go.
Conclusion
Blocking unwanted emails is a crucial aspect of maintaining a clean, organized, and secure email experience. By following the methods outlined in this guide, you can easily block emails on various platforms and devices, including Gmail, Outlook, Yahoo Mail, Apple Mail, Thunderbird, AOL Mail, and on iPhone/iPad and Android devices.
Whether you’re dealing with spam, promotional emails, persistent spammers, or offensive messages, blocking emails provides an effective solution. It helps minimize distractions, reduce clutter, protect privacy, improve efficiency, and enhance security.
Each platform and email client offers its own method for blocking emails, but the general process remains consistent. It usually involves selecting the email or the sender, accessing a contextual menu, and choosing the option to block or add the contact to the blocked sender list. The steps may vary slightly in different interfaces, but the overarching goal remains the same: to prevent future emails from reaching your inbox.
Keep in mind that blocking a sender or domain is not foolproof. It’s possible for spammers to use different email addresses or domains to bypass blocking measures. Therefore, it’s important to regularly monitor your spam or junk folders and adjust your filters and rules as needed.
Additionally, explore the customization options provided by your email provider or client. Features such as creating filters, setting up rules, and marking emails as spam or junk can help augment the effectiveness of blocking unwanted emails.
By using the blocking methods outlined in this guide and taking advantage of the additional features offered by your email provider, you can regain control over your inbox, filter out unwanted emails, and enjoy a more organized, efficient, and secure email experience.


