Introduction
Logitech webcams have gained popularity due to their high-quality video and audio capabilities, making them a popular choice for video conferencing, streaming, and online communication. However, like any technological device, webcams can sometimes encounter issues that require troubleshooting to ensure they are functioning properly.
In this article, we will guide you through the process of testing your Logitech webcam to ensure that it is working correctly. Whether you are using it for business meetings, online classes, or simply connecting with friends and family, these steps will help you identify and resolve any potential issues.
From checking the physical connection to testing in various applications and using Logitech’s dedicated webcam software, we will provide you with a comprehensive guide to ensure a smooth webcam experience. Additionally, we will address common problems that users may encounter and troubleshoot them effectively.
So let’s dive in and learn how to test your Logitech webcam and troubleshoot any issues that may arise!
Step 1: Check the physical connection
The first step in testing your Logitech webcam is to ensure that it is properly connected to your computer. A loose or faulty physical connection can often be the cause of issues with the webcam’s functionality.
1. Check the USB connection: Make sure that your Logitech webcam is securely connected to your computer’s USB port. Unplug and re-plug the USB cable to ensure a stable connection. If you are using an external USB hub, try connecting the webcam directly to the computer’s USB port.
2. Verify power supply: If your Logitech webcam requires external power, such as a power adapter or batteries, ensure that it is properly powered. Replace the batteries or use a different power adapter if necessary.
3. Inspect the cable: Examine the USB cable for any signs of damage or fraying. A damaged cable can cause connectivity issues and may need to be replaced.
4. Try different ports and cables: If you have multiple USB ports on your computer, try connecting the webcam to a different port to check if the issue lies with the specific port. Additionally, if you have another USB cable available, try using that to eliminate the possibility of a faulty cable.
5. Restart your computer: Sometimes, a simple restart can fix connectivity issues. Restart your computer and then reconnect the Logitech webcam to see if it resolves the problem.
Checking the physical connection is a crucial first step in troubleshooting your Logitech webcam. By ensuring that the webcam is properly connected, you can rule out any issues related to faulty connections before moving on to further testing.
Step 2: Check device settings
Once you have verified the physical connection of your Logitech webcam, the next step is to check the device settings on your computer. Incorrect or outdated settings can often prevent your webcam from functioning properly.
1. Open the device manager: On Windows, you can access the Device Manager by right-clicking on the Start menu and selecting “Device Manager” from the options. On macOS, go to “System Preferences” and click on “Hardware” or “Devices”. Look for the webcam in the list of devices and ensure it is recognized without any errors or warnings.
2. Update drivers: Outdated or incompatible drivers can cause compatibility issues with your Logitech webcam. Visit Logitech’s official website or the manufacturer’s website and check for any available driver updates for your specific webcam model. Download and install any updated drivers to ensure optimal performance.
3. Check privacy settings: Some operating systems have privacy settings that allow you to control which apps can access your webcam. Make sure that the necessary permissions are granted to the applications you want to use your Logitech webcam with.
4. Adjust camera settings: Depending on the webcam model, you may have access to various camera settings such as exposure, white balance, and focus. Use the software provided by Logitech or your computer’s built-in camera settings to adjust these options for optimal video quality.
5. Test the webcam in different applications: Open applications such as Skype, Zoom, or any other video conferencing software you use and check if the Logitech webcam is recognized and working correctly. Make a test call or join a meeting to evaluate the video and audio quality.
Checking and adjusting the device settings can often resolve issues with your Logitech webcam. Ensure that the webcam is recognized by your computer, update the drivers if necessary, adjust camera settings, and test it in various applications to ensure proper functionality.
Step 3: Test in a video conferencing application
Now that you have checked the physical connection and device settings of your Logitech webcam, it’s time to test it in a video conferencing application. This step will help ensure that your webcam is functioning properly and delivering high-quality video and audio during online meetings or video calls.
1. Choose a video conferencing application: Select a video conferencing platform that you frequently use or plan to use with your Logitech webcam. Popular options include Zoom, Microsoft Teams, Skype, Google Meet, and Cisco Webex.
2. Start a video call or meeting: Launch the video conferencing application and initiate a video call or meeting. If you don’t have anyone to call, most applications offer a test call or meeting feature that allows you to check your webcam and audio settings without disturbing others.
3. Check video and audio settings: Within the video conferencing application, navigate to the settings or preferences section and verify that your Logitech webcam is selected as the default camera and microphone. Adjust the video resolution and audio settings as desired for optimal performance.
4. Join a test call or meeting: Join a test call or meeting within the video conferencing application to evaluate the video quality and ensure that the Logitech webcam is capturing clear and smooth video. Pay attention to any issues such as pixelation, lag, or poor audio quality.
5. Seek feedback from participants: If possible, ask the participants in your test call or meeting to provide honest feedback on the quality of your video and audio. They can help identify any issues that you may not notice on your own.
Testing your Logitech webcam in a video conferencing application allows you to evaluate its performance in a real-world scenario. By checking the video and audio settings, joining a test call or meeting, and gathering feedback, you can ensure that your webcam is delivering the desired results during online interactions.
Step 4: Test with Logitech’s webcam software
In addition to testing your Logitech webcam in video conferencing applications, you can also utilize Logitech’s dedicated webcam software to further assess its performance and access additional features.
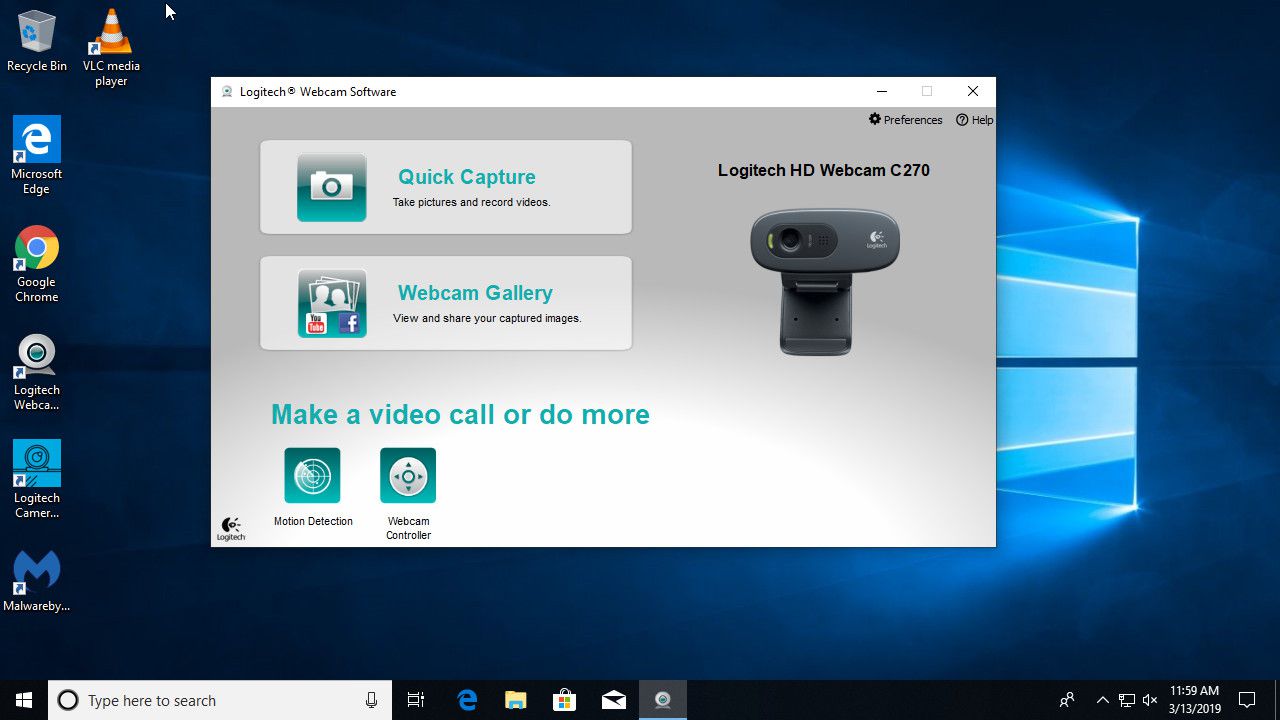
1. Install Logitech webcam software: Visit Logitech’s official website and download the appropriate webcam software for your webcam model. Follow the installation instructions to install the software on your computer.
2. Launch the webcam software: Once installed, open the Logitech webcam software. The interface may vary depending on the specific software version, but it typically provides options for adjusting camera settings, accessing additional features, and utilizing advanced controls.
3. Explore camera settings: Use the Logitech webcam software to explore and adjust camera settings such as brightness, contrast, zoom, and image quality. These settings can help optimize the visual output of your webcam.
4. Test advanced features: Logitech’s webcam software often offers advanced features such as motion detection, face tracking, and video effects. Experiment with these features to see if they enhance your webcam experience.
5. Capture and review test footage: Use the Logitech webcam software to capture some test footage or take snapshots. Review the captured content to ensure that the video quality and audio are satisfactory.
Testing your Logitech webcam with the dedicated webcam software provides more control over the camera settings and allows you to utilize additional features. By exploring the software’s options, adjusting camera settings, and capturing test footage, you can further optimize your webcam’s performance.
Step 5: Troubleshooting common issues
While testing your Logitech webcam, you may encounter common issues that can hinder its functionality. Here are some troubleshooting steps to help you address these problems:
1. No video or black screen: Ensure that the lens cap is removed, the webcam is not covered by any objects, and there is adequate lighting in the surroundings. Additionally, check the camera settings in the video conferencing application or Logitech webcam software to ensure that the correct camera is selected.
2. Poor video quality: Adjust the camera settings in the video conferencing application or Logitech webcam software to improve the video quality. Increase the brightness, contrast, or resolution as needed. Also, consider the internet connection speed and bandwidth, which can affect video quality.
3. Low audio volume or no audio: Make sure that the microphone is not muted in the video conferencing application or Logitech webcam software. Adjust the microphone settings and ensure that the correct microphone is selected. Check the computer’s audio settings to ensure that the microphone is not disabled or set to a low volume.
4. Compatibility issues: Ensure that your Logitech webcam is compatible with the operating system you are using. Visit Logitech’s website to check for any software or driver updates that may address compatibility issues.
5. Unexpected freezing or lag: Check for any software or driver updates for both the webcam and the video conferencing application. Close any unnecessary applications running in the background that may strain your computer’s resources. If the problem persists, try connecting the webcam to a different USB port.
6. Webcam not recognized: If your Logitech webcam is not recognized by your computer, try unplugging and re-plugging the USB cable. Ensure that the webcam is connected directly to the computer’s USB port and not through a USB hub. If the issue persists, try connecting the webcam to a different computer to check if it is a hardware or software problem.
If troubleshooting these common issues does not resolve the problem with your Logitech webcam, it may be necessary to reach out to Logitech customer support for further assistance.
Conclusion
Testing your Logitech webcam is essential to ensure that it is functioning properly and delivering high-quality video and audio during your online interactions. By following the steps outlined in this guide, you can identify and resolve any potential issues that may arise.
Start by checking the physical connection of your webcam, ensuring it is securely connected and powered. Then, proceed to check the device settings on your computer, updating drivers if necessary and adjusting camera settings for optimal performance.
Next, test your Logitech webcam in a video conferencing application to evaluate its performance in a real-world scenario. Pay attention to video and audio quality, seeking feedback from participants if possible.
Additionally, utilize Logitech’s dedicated webcam software to further adjust camera settings and explore advanced features. This software can enhance your webcam experience and provide more control over its functionality.
If you encounter any common issues, such as no video, poor quality, or compatibility problems, follow the troubleshooting steps provided to address and resolve these issues.
Through thorough testing and troubleshooting, you can ensure that your Logitech webcam is working optimally, allowing you to have seamless video conferences, online classes, or video calls with friends and family.
Remember, if you are unable to resolve the issues with your Logitech webcam on your own, don’t hesitate to reach out to Logitech’s customer support for further assistance and guidance.
Now that you have the knowledge and steps to test your Logitech webcam, go ahead and put it into practice. Enjoy the crisp, clear, and uninterrupted video communication that your Logitech webcam brings to your online experiences!