Introduction
With the evolution of technology, smartphone manufacturers have introduced advanced security features to protect user data. One such feature that has revolutionized the way we secure our phones is Face ID. Apple’s iPhone 12, the latest addition to the iconic iPhone lineup, comes equipped with the cutting-edge Face ID technology. Face ID allows you to unlock your iPhone, authenticate app purchases, and access sensitive data using facial recognition technology. Gone are the days of relying solely on pin codes or fingerprints to unlock your device; now, a mere glance is all it takes to unlock your iPhone 12.
Face ID offers enhanced security by analyzing over 30,000 invisible dots on your face, creating a detailed depth map, and comparing it with the data stored in the device’s secure enclave. This technology ensures that only you can unlock your device, offering a higher level of security than traditional methods. Additionally, Face ID continues to adapt and learn over time, making it even more accurate and reliable.
If you’re a proud owner of the iPhone 12 and would like to take advantage of the seamless Face ID experience, you’ve come to the right place. In this article, we will guide you through the step-by-step process of setting up Face ID on your iPhone 12 and offer troubleshooting tips to resolve any issues you may encounter.
Face ID: A Game-Changer in iPhone Security
Face ID is not just a convenient way to unlock your iPhone; it is a significant leap in smartphone security. By utilizing advanced facial recognition technology, Face ID provides a secure and seamless user experience. It has proven to be a game-changer in iPhone security for several reasons.
First and foremost, Face ID offers an unprecedented level of accuracy. With the ability to analyze the unique features of your face, such as the shape of your eyes, nose, and mouth, Face ID ensures that only you can unlock your device. The chance of someone else having a similar facial structure is extremely low, making it highly secure compared to traditional methods like passcodes or fingerprints.
Furthermore, Face ID is designed to adapt and learn. It continuously improves its performance by incorporating changes in your appearance, such as growing a beard, wearing glasses, or even aging. This adaptability ensures that Face ID remains reliable and accurate in different scenarios, allowing you to effortlessly access your device in any situation.
Privacy is another key aspect of Face ID. Unlike other facial recognition systems, such as those used for surveillance, Face ID data is securely stored on the device’s secure enclave, ensuring that your biometric information remains private and cannot be accessed by anyone else, including Apple. Additionally, Face ID data is not backed up to iCloud or shared with any third-party apps, further safeguarding your privacy and personal information.
Face ID is also incredibly convenient. With just a glance, you can unlock your iPhone, eliminating the need to remember complex passcodes or physically place your finger on a sensor. This means that even if your hands are occupied or you are in a rush, Face ID allows for quick and effortless access to your device.
Overall, Face ID has revolutionized iPhone security by offering a highly accurate, adaptable, and private authentication method. With its seamless integration and enhanced convenience, Face ID is undoubtedly a game-changer in smartphone security.
How Does Face ID Work?
Face ID utilizes a combination of advanced hardware and software technologies to provide secure facial recognition and authentication on the iPhone 12. Let’s dive into the inner workings of this innovative feature.
When you set up Face ID, the TrueDepth camera system, located in the notch at the top of the iPhone’s display, captures precise details of your face. This camera system consists of multiple components, including an infrared camera, flood illuminator, and dot projector.
The dot projector emits thousands of infrared dots onto your face, creating a detailed 3D map of its unique contours. Simultaneously, the infrared camera captures this dot pattern along with the intensity of reflected infrared light. The flood illuminator helps to optimize the quality of infrared imaging by illuminating your face with infrared light even in low-light conditions.
Once the TrueDepth camera captures this facial data, it is processed by the neural engine within Apple’s A14 Bionic chip using sophisticated algorithms. These algorithms analyze the depth information, shape, and pattern of your face to create a mathematical representation called a faceprint. The faceprint is a highly secure data that is unique to your face.
When you attempt to unlock your iPhone or authenticate an app, the TrueDepth camera system is activated again, capturing and analyzing your face in real-time. The acquired facial data is compared against the stored faceprint in the device’s secure enclave, a dedicated encrypted area of the device’s processor.
If the facial data matches the stored faceprint within a certain threshold of accuracy, Face ID is successfully authenticated, and your iPhone unlocks or grants access to the desired app. This entire process happens almost instantaneously, ensuring a seamless and secure user experience.
It is important to note that Face ID is designed to require your attention for authentication. This means that your eyes must be open and directed towards the screen for Face ID to work. This attention detection feature prevents unauthorized access to your device by requiring a conscious interaction with your face.
Overall, the complex interplay between the TrueDepth camera system, neural engine, and secure enclave allows Face ID to accurately and securely authenticate your face, delivering a convenient and reliable user experience for unlocking your iPhone and securing your data.
Step-by-Step Guide to Set Up Face ID on iPhone 12
Setting up Face ID on your iPhone 12 is a straightforward process that only requires a few simple steps. Let’s walk through the process to get your Face ID up and running.
- Step 1: Locate the Face ID Settings
- Step 2: Set Up a Passcode
- Step 3: Enroll Your Face
- Step 4: Adjust Face ID Settings
- Step 5: Test Face ID
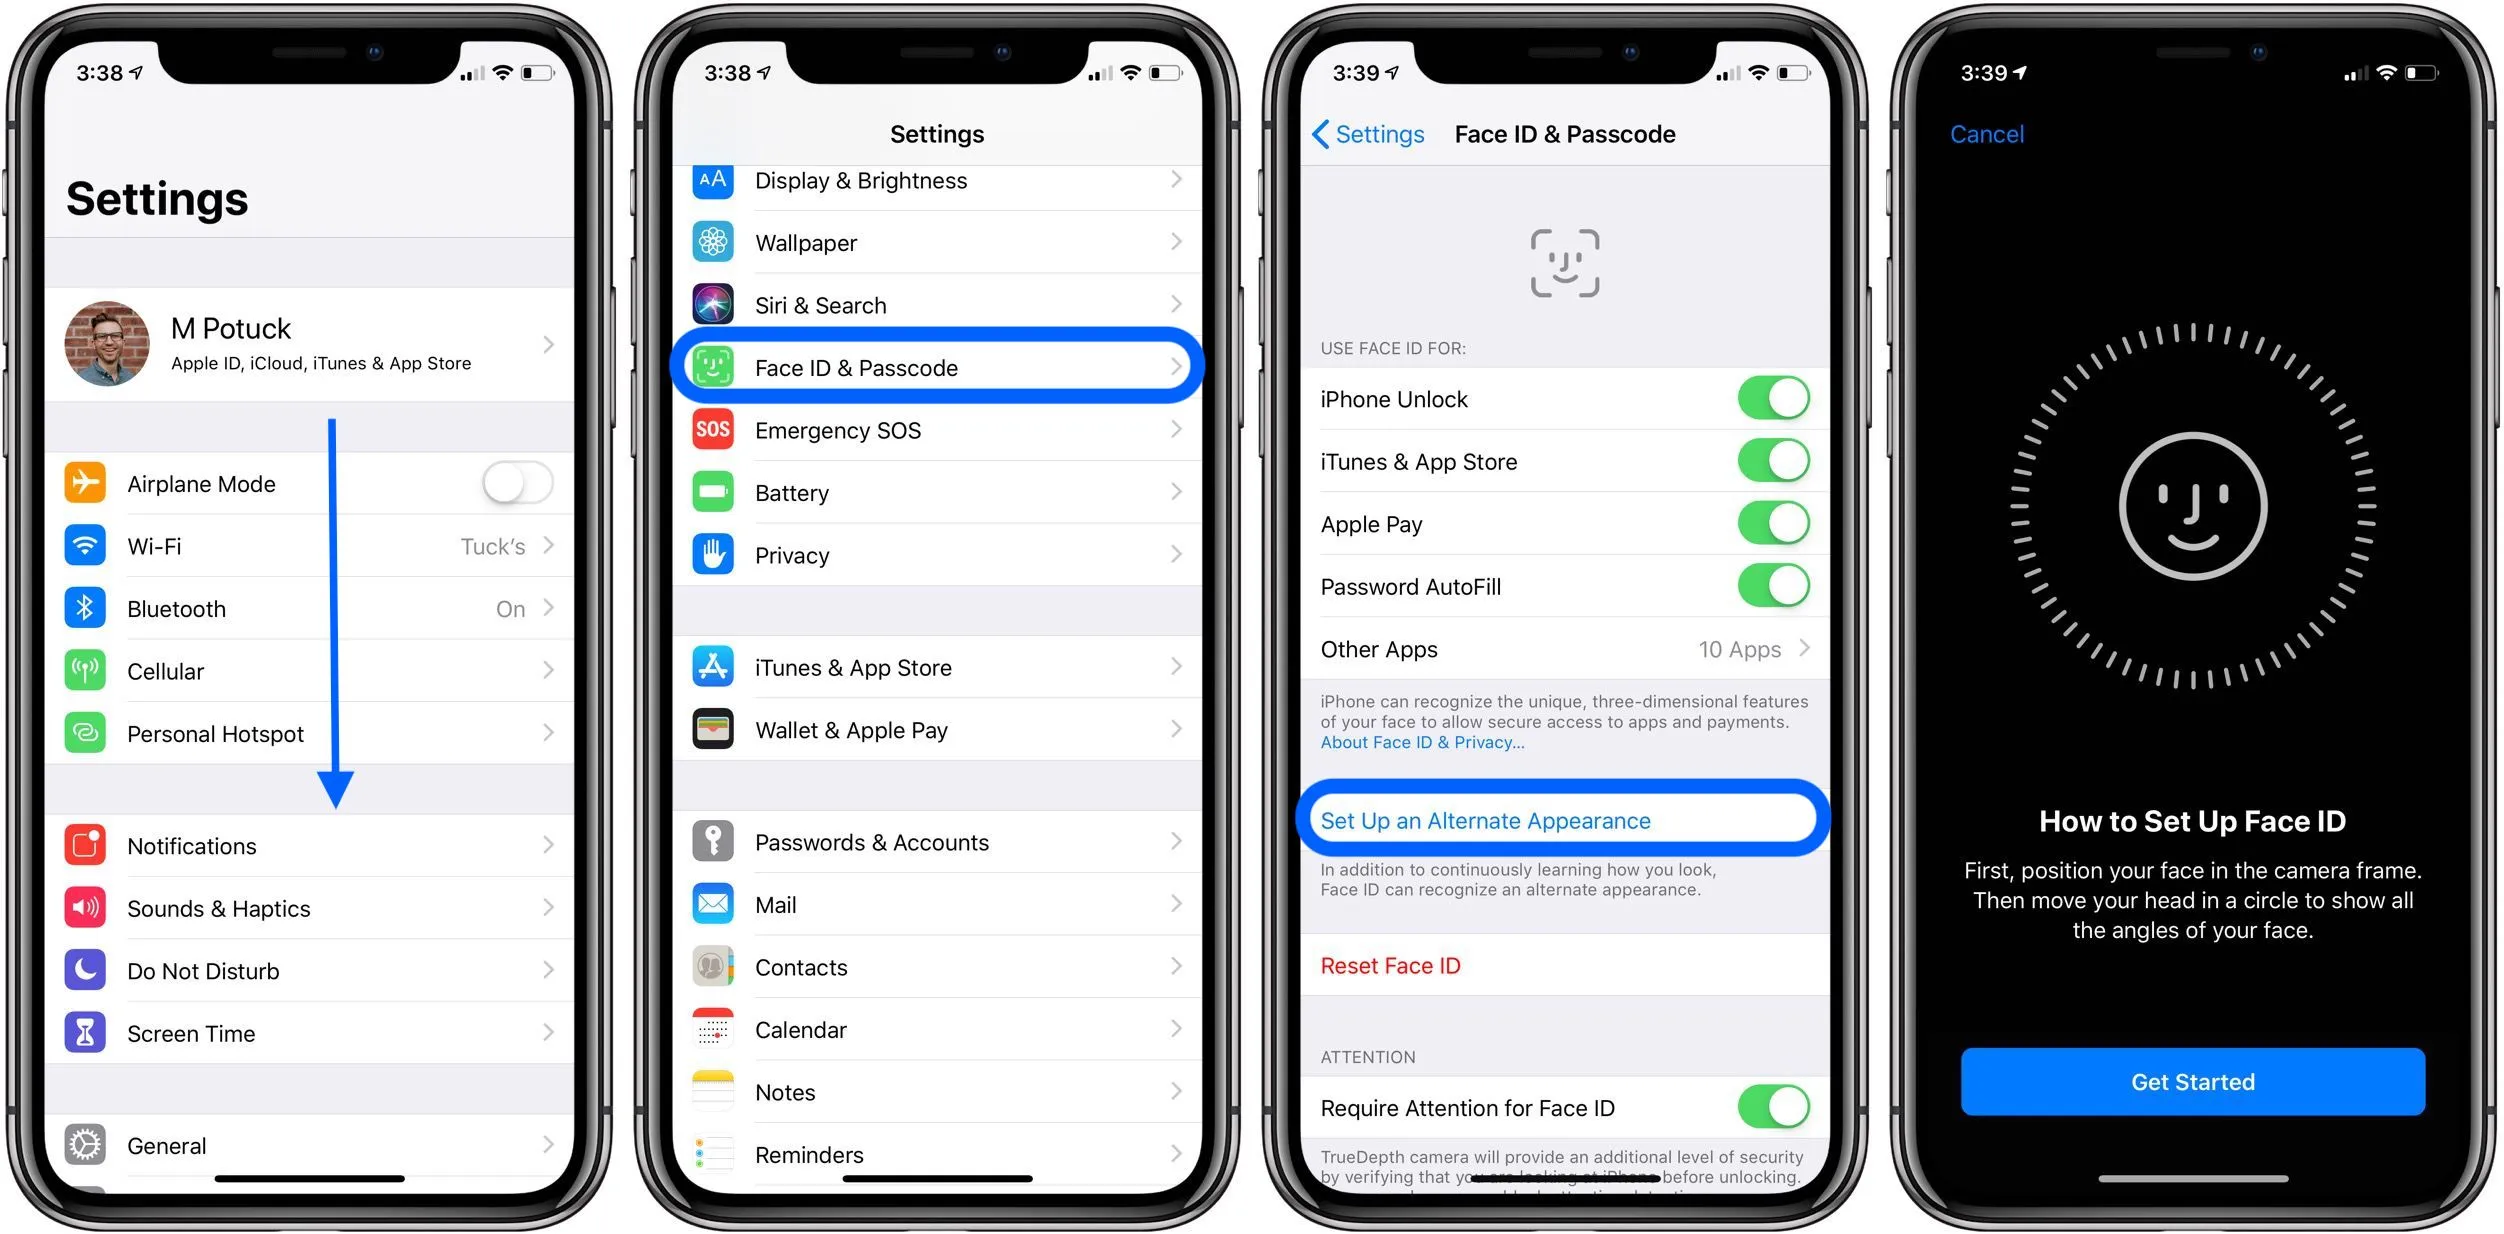
Start by unlocking your iPhone 12 and navigating to the Settings app. Scroll down and tap on “Face ID & Passcode.”
If you haven’t already set up a passcode for your device, you will be prompted to do so. This passcode serves as an alternative authentication method in case Face ID fails to recognize your face.
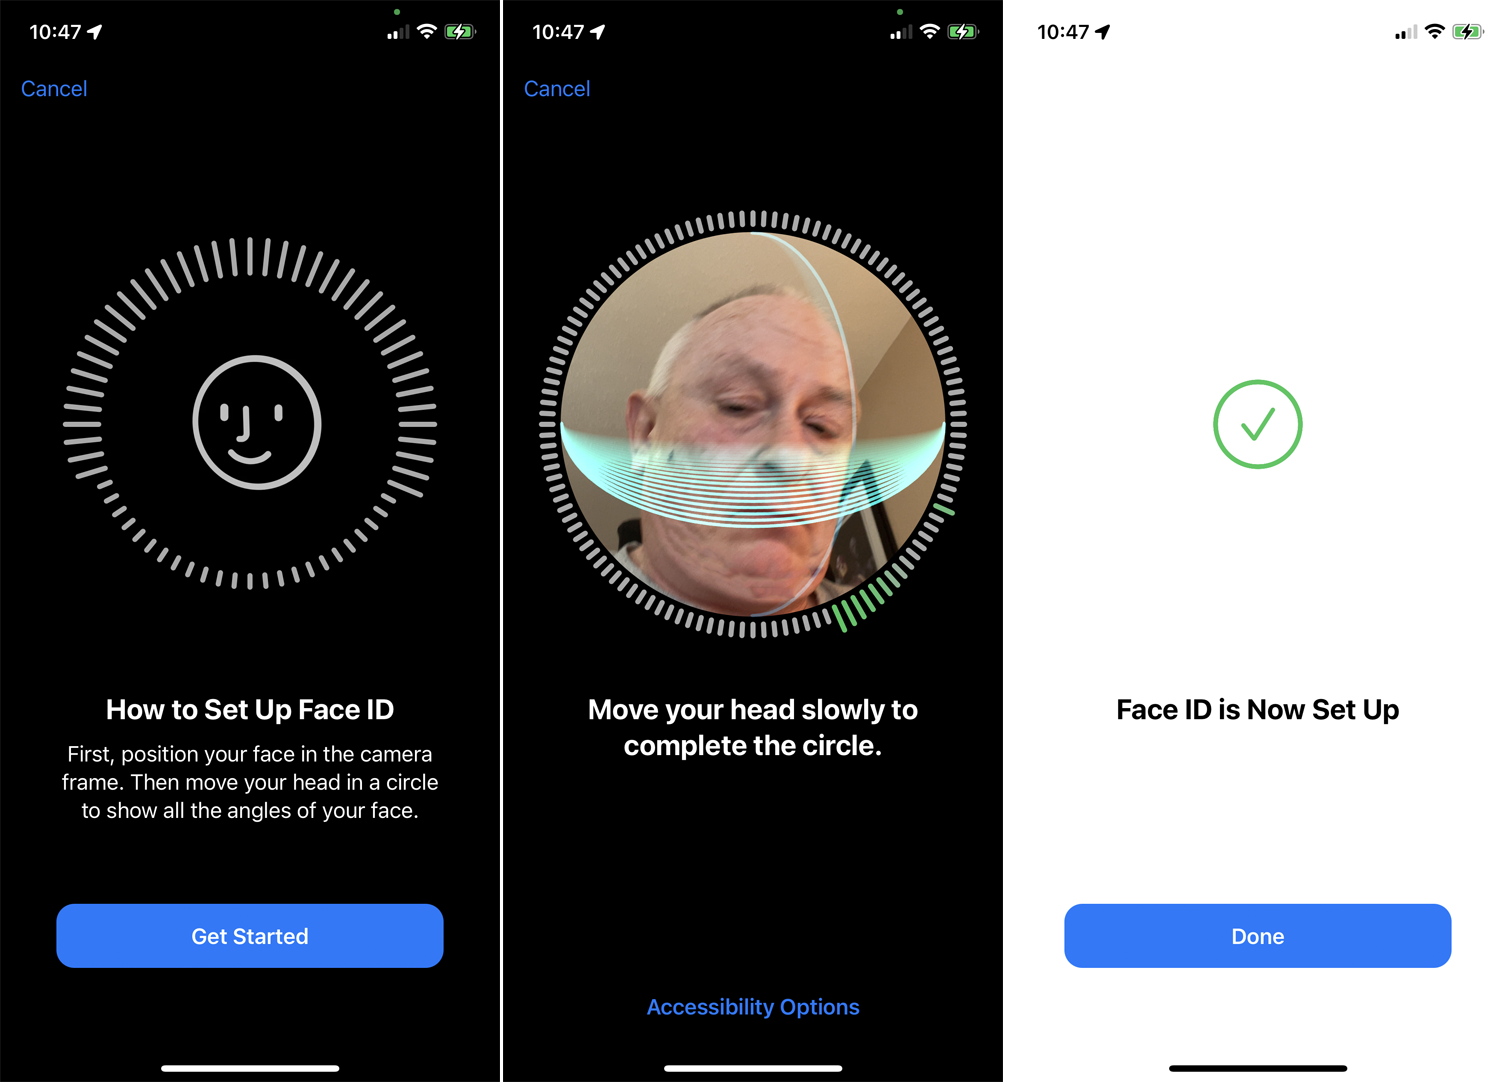
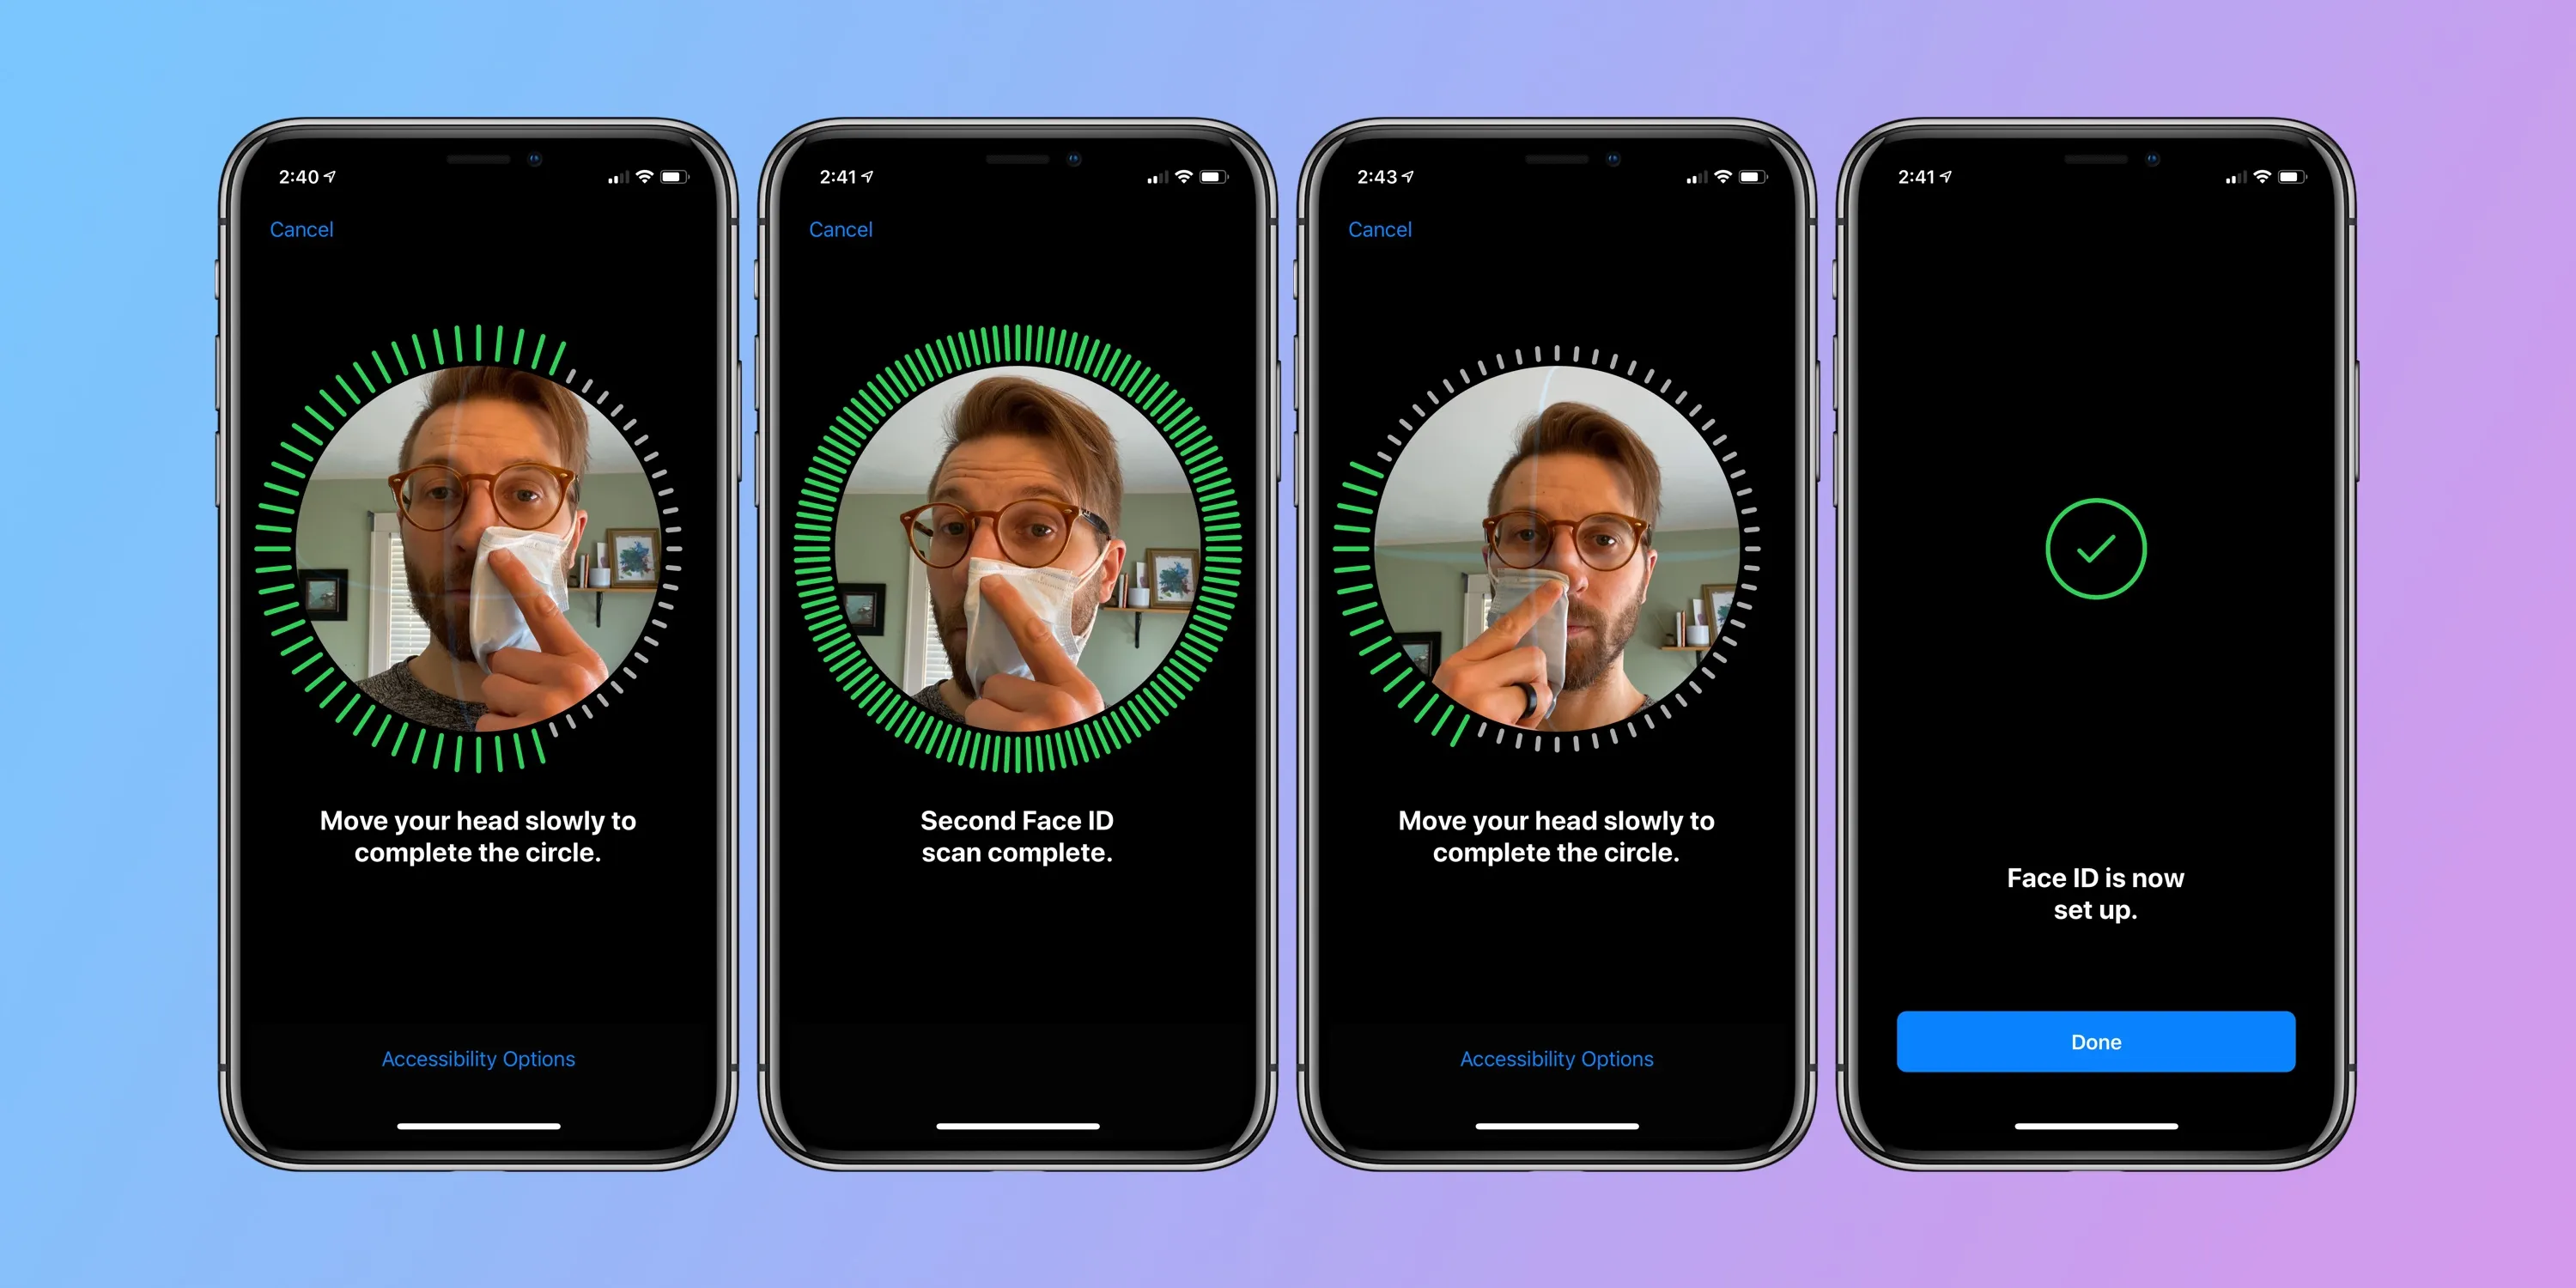
Tap on “Enroll Face” to begin the Face ID setup process. Position your face within the frame displayed on the screen. The TrueDepth camera will automatically capture your face as you move it around. Make sure to follow the on-screen instructions, including rotating your head in a circular motion to capture different angles of your face. As you progress, a progress bar will indicate how much of your face has been scanned. Once the scanning is complete, tap on “Continue.”
In this step, you have the option to customize Face ID settings to suit your preferences. You can enable or disable features such as Attention Aware Features, which requires you to be looking at the screen for Face ID to unlock your device. You can also choose whether to use Face ID for enabling purchases and downloads from the App Store and iTunes Store. Adjust these settings according to your preferences and tap on “Continue.”
It’s time to test your newly set up Face ID. Position your face in front of the TrueDepth camera and make sure your eyes are open. The system will indicate if Face ID successfully recognizes your face by displaying “Face ID” with a checkmark. You can now use Face ID to unlock your iPhone, authenticate app purchases, and access certain system features securely.
If Face ID fails to work correctly during the setup process or does not recognize your face after setup, you can tap on “Set Up Face ID Again” to repeat the enrollment process.
Congratulations! You have successfully set up Face ID on your iPhone 12. Enjoy the seamless and secure authentication experience that Face ID provides.
Step 1: Locate the Face ID Settings
In order to set up Face ID on your iPhone 12, the first step is to locate the Face ID settings within your device’s settings menu. Follow these simple instructions to find the Face ID settings:
- Unlock your iPhone 12 by entering your passcode or using Touch ID, if applicable.
- Open the Settings app by tapping on the gear icon, which is usually located on your home screen or within the app drawer.
- Scroll down the Settings menu and look for the “Face ID & Passcode” option. It’s usually located near the top of the menu, but the precise location may vary depending on your iOS version.
- Tap on “Face ID & Passcode” to access the Face ID settings.
Once you have reached the Face ID settings, you are ready to proceed with the next steps to set up Face ID on your iPhone 12.
Locating the Face ID settings is crucial as it allows you to access and customize the settings related to Face ID, such as enabling or disabling attention-aware features, specifying the apps for which Face ID can be used, and managing other Face ID preferences. By finding the Face ID settings, you can ensure that your Face ID experience is tailored to your specific needs and preferences.
If you are having trouble locating the Face ID settings on your iPhone 12, you can also use the search function within the Settings app. Simply swipe down from the top of the Settings screen and type “Face ID” in the search bar. This will quickly bring up the relevant settings option, allowing you to access the Face ID settings directly.
Take your time to familiarize yourself with the Face ID settings and explore the various customization options available. Once you have successfully located the Face ID settings, you can move on to the subsequent steps to set up and optimize Face ID on your iPhone 12.
Step 2: Set Up a Passcode
Before proceeding with the Face ID setup process on your iPhone 12, it is essential to set up a passcode as an alternative authentication method. This passcode will act as a backup in case Face ID encounters any issues or fails to recognize your face. Follow these steps to set up a passcode:
- From the Face ID & Passcode settings screen, tap on “Set Passcode”.
- You will be prompted to enter a six-digit passcode. Tap on “Passcode Options” if you prefer to use a custom alphanumeric passcode or a four-digit numeric passcode instead.
- Enter your desired passcode and then re-enter it to confirm.
- Once you have set your passcode, you can choose whether to require the passcode immediately or after a certain duration of inactivity. This option can be adjusted by selecting “Require Passcode” and choosing the desired timeframe.
- After setting up your passcode, you may also have the option to enable Touch ID, depending on your iPhone model. Touch ID allows you to unlock your device and authenticate certain actions using your fingerprint. If your iPhone 12 is equipped with Touch ID, you can also decide to enable this feature.
Setting up a passcode is a crucial step in securing your device and protecting your personal data. While Face ID provides a convenient and secure way to unlock your iPhone, having a passcode as a backup ensures that you can still access your device if Face ID encounters any limitations or if you need to authenticate in a different manner.
When choosing a passcode, it is advisable to select a combination that is easy for you to remember but difficult for others to guess. Avoid using common or obvious passcodes, such as your birthdate or consecutive numbers. Opt for a unique and secure passcode to further enhance the security of your iPhone 12.
Once you have successfully set up a passcode, you are ready to proceed with the next step in the Face ID setup process on your iPhone 12.
Step 3: Enroll Your Face
The next step in setting up Face ID on your iPhone 12 is to enroll your face. This process involves capturing and storing a detailed facial representation, allowing the device to recognize and authenticate your unique features. Follow these steps to enroll your face:
- From the Face ID & Passcode settings, tap on “Enroll Face”.
- Position your face within the framing rectangle displayed on the screen. Make sure your face is fully visible and centered.
- Follow the on-screen instructions to move your head in a circular motion. This helps the TrueDepth camera capture your face from various angles, providing a more comprehensive facial representation.
- The device will indicate your progress with a progress bar or other visual cues. Keep moving your head as instructed until the scanning is complete.
- Once the scanning process is finished, tap on “Continue” to proceed to the next step.
During the enrollment process, it is crucial to keep your face well-lit and ensure that your eyes are open and looking directly at the screen. This helps the TrueDepth camera capture accurate facial details and facilitates successful face recognition in various lighting conditions.
Enrolling your face is an essential step in creating a secure and personalized Face ID experience. The more accurately your face is scanned and represented, the better Face ID will work for you. This ensures a seamless and convenient authentication process whenever you use Face ID to unlock your iPhone 12 or authenticate various actions like app purchases or password autofill.
If, for any reason, the device fails to capture your face accurately during the enrollment process, you can choose to “Set Up an Alternate Appearance.” This option allows you to enroll a different appearance of your face, such as when wearing glasses, to ensure accurate recognition in various scenarios.
Once you have successfully enrolled your face, you can proceed to the next step to adjust the Face ID settings according to your preferences.
Step 4: Adjust Face ID Settings
After enrolling your face, the next step in setting up Face ID on your iPhone 12 is to adjust the Face ID settings according to your preferences. These settings allow you to customize your Face ID experience and fine-tune the behavior of the feature. Follow these steps to adjust the Face ID settings:
- From the Face ID & Passcode settings, locate the section titled “Use Face ID For”. This section presents a list of various functions and features that can be authenticated using Face ID.
- Review each option and toggle the switch next to it to enable or disable Face ID authentication for the corresponding function. For example, you can enable or disable Face ID for unlocking your device, accessing the App Store, or enabling Apple Pay.
- Under the “Attention Aware Features” section, you can choose whether or not to use Face ID only when you are actively looking at the screen. Enabling this feature enhances the security of Face ID by preventing others from unlocking your device when you are not looking.
- Depending on your preference, you may also decide to enable or disable the “Require Attention for Face ID” option. This feature requires your eyes to be open and looking directly at the screen in order for Face ID to authenticate.
Adjusting the Face ID settings allows you to tailor the feature to your specific needs and preferences. Whether you want Face ID to be utilized for certain actions or functions or prefer to have additional security measures in place, adjusting these settings provides you with greater control over your device’s authentication process.
By enabling or disabling Face ID for different functions, you can streamline the authentication process and ensure that Face ID is used where it is most convenient and useful for you. Additionally, by adjusting the attention-aware and eye-contact settings, you can further enhance the security and accuracy of Face ID authentication.
Take your time to review and adjust the Face ID settings according to your preferences. Once you are satisfied with the settings, you can proceed to the final step of the Face ID setup process on your iPhone 12.
Step 5: Test Face ID
After completing the setup and adjusting the Face ID settings on your iPhone 12, it is important to test Face ID to ensure that it is working correctly. This final step allows you to verify that your face is recognized accurately and that Face ID is successfully authenticating your identity. Here’s how you can test Face ID:
- Hold your iPhone 12 in front of you, ensuring that the TrueDepth camera system is facing your face.
- Position your face within the framing rectangle displayed on the screen.
- Make sure that your eyes are open and looking directly at the screen.
- Once your face is in the correct position, Face ID will immediately scan and analyze your facial features.
- If Face ID recognizes your face successfully, your iPhone 12 will automatically unlock, and you will see the “Face ID” text with a checkmark on the screen. Alternatively, if Face ID fails to authenticate, your iPhone 12 will prompt you to enter your passcode.
Testing Face ID ensures that the feature is working as intended and that your iPhone 12 can reliably recognize your facial characteristics. By performing this test, you can gain confidence in using Face ID as your primary authentication method for unlocking your device, making purchases, and accessing protected features and data.
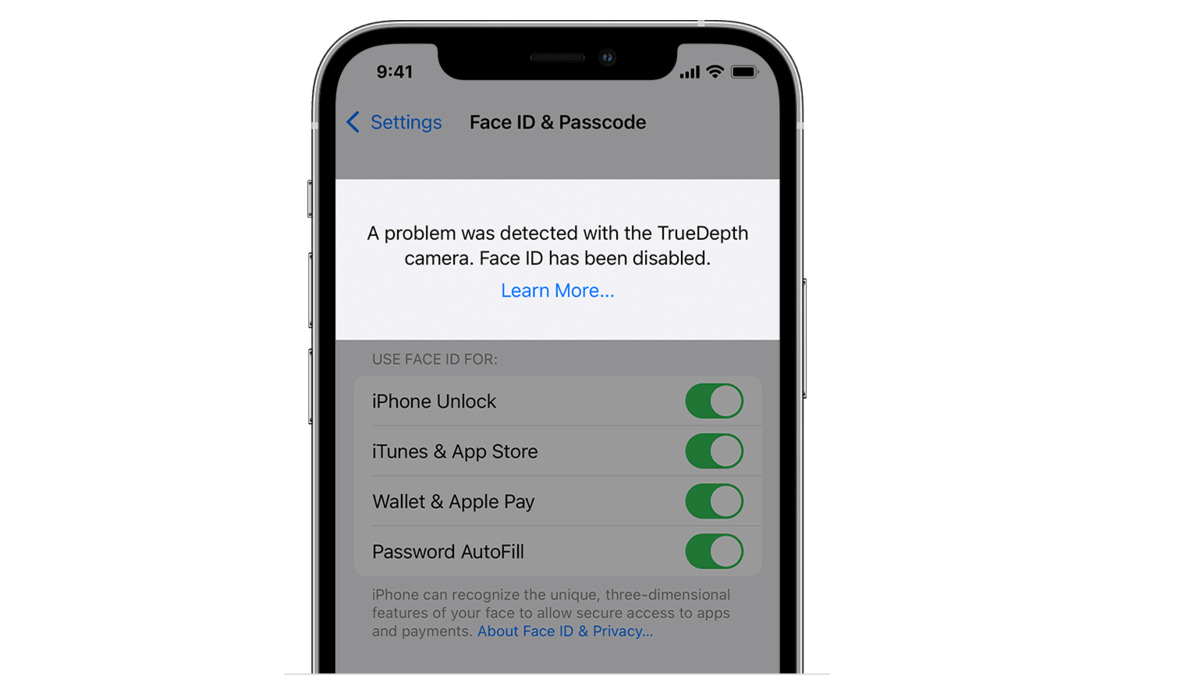
If Face ID fails to recognize your face during the test or if you encounter any issues, consider the following troubleshooting tips:
- Ensure that your face is well-lit and not obscured by objects or shadows.
- Make sure that you are positioning your face properly within the framing rectangle on the screen.
- Check that your eyes are open and looking directly at the screen.
- Remove any accessories that may obstruct the view of your face, such as hats, glasses, or scarves.
- If you have recently changed your appearance, such as growing a beard or getting a new hairstyle, consider enrolling your face again to update the Face ID data.
By following these troubleshooting tips, you can address any potential issues and ensure that Face ID functions smoothly and accurately on your iPhone 12.
Once you have successfully tested Face ID and confirmed its functionality, you can now enjoy the convenience and security of using your face to unlock your iPhone 12 and authenticate various actions.
Face ID Troubleshooting Tips
While Face ID is a highly advanced and reliable technology, there may be instances where you encounter issues or difficulties with its functionality. Here are some troubleshooting tips to help resolve common Face ID-related problems:
- Ensure Proper Positioning: Make sure that you are positioning your face properly within the framing rectangle displayed on the screen. Adjust the angle and distance as needed to allow the TrueDepth camera system to capture your face accurately.
- Check Lighting Conditions: Face ID works best in well-lit environments. Ensure that your face is adequately illuminated so that the TrueDepth camera can capture clear and detailed facial features. Avoid extreme lighting conditions or shadows that may interfere with the facial recognition process.
- Remove Obstructions: Accessories like hats, scarves, or sunglasses can obstruct the view of your face and hinder Face ID performance. Remove any obstructions that may be covering or partially blocking your face.
- Clean the TrueDepth Camera System: Use a soft, lint-free cloth to clean the front-facing TrueDepth camera system on your iPhone 12. Any smudges, dirt, or debris on the camera lens or sensors can affect Face ID accuracy.
- Enroll Your Face Again: If you have recently made significant changes to your facial appearance, such as growing a beard or changing hairstyles, consider enrolling your face again in the Face ID settings. This allows the system to update its facial recognition data with your new appearance.
- Reset Face ID: In certain cases, resetting Face ID can help resolve issues. To do this, go to the Face ID & Passcode settings, tap on “Reset Face ID,” and then set it up again from scratch.
- Try Alternate Appearance: If you frequently change your appearance due to makeup, different hairstyles, or accessories, consider enrolling an alternate appearance in the Face ID settings. This allows Face ID to recognize you in different scenarios.
- Update iOS: Keeping your iPhone 12’s software up to date is important for optimal Face ID performance. Check for any available updates in the Settings app under “General” -> “Software Update,” and download and install any updates if needed.
If you have tried the troubleshooting tips above and are still experiencing issues with Face ID, it may be beneficial to contact Apple Support or visit an Apple retail store for further assistance. They can provide specific solutions or diagnose any hardware-related problems that may be affecting Face ID.
Remember, Face ID is designed to continuously adapt and improve over time, enhancing its accuracy and performance. By following these troubleshooting tips and staying up to date with software updates, you can ensure the best possible experience with Face ID on your iPhone 12.
Conclusion
Setting up Face ID on your iPhone 12 is a simple and intuitive process that offers a seamless and secure authentication experience. Through advanced facial recognition technology, Face ID provides a high level of accuracy and convenience, allowing you to unlock your device and authenticate various actions using just your face.
During the setup process, you learned how to locate the Face ID settings, set up a passcode as a backup authentication method, enroll your face, adjust Face ID settings according to your preferences, and test Face ID to ensure its functionality. Troubleshooting tips were also provided to help resolve common Face ID-related issues.
With the successful setup of Face ID, you can enjoy the benefits of secure and effortless authentication on your iPhone 12. Whether it’s unlocking your device, authorizing app purchases, or accessing sensitive data, Face ID provides a convenient and reliable solution.
Remember to keep your device updated with the latest iOS version, as Apple continuously enhances Face ID’s performance and security through software updates. Regularly cleaning the TrueDepth camera system and ensuring optimal lighting conditions will also contribute to improved Face ID accuracy.
By following the steps provided in this guide and taking advantage of the troubleshooting tips, you can ensure a smooth and reliable Face ID experience on your iPhone 12. Embrace the future of smartphone security with Face ID, and enjoy the seamless, hands-free convenience it provides.