Introduction
Setting up Face ID on your iPhone is a simple and convenient way to secure your device and safeguard your personal information. With Face ID, your iPhone can recognize your unique facial features and use it as a biometric authentication method. This means that you can unlock your phone, authorize purchases, and access sensitive data with just a glance.
Gone are the days of entering passcodes or using fingerprint scanners. Face ID offers an intuitive and seamless user experience, allowing you to effortlessly interact with your iPhone. Whether you’ve just purchased a new iPhone or you’ve never set up Face ID before, this guide will walk you through the process step by step.
Before we dive into the details, it’s worth noting that Face ID is available on most recent iPhone models, including the iPhone X, XR, XS, XS Max, 11, 11 Pro, 11 Pro Max, 12, 12 mini, 12 Pro, and 12 Pro Max. So, no matter which device you have, you can take advantage of the convenience and security that Face ID offers.
In this guide, we will cover the entire process of setting up Face ID, from opening the settings menu to completing the setup. By the end, you’ll have a fully functional Face ID system ready to enhance the security of your iPhone. So, grab your iPhone, follow the instructions, and let’s get started on setting up Face ID!
Step 1: Open Settings
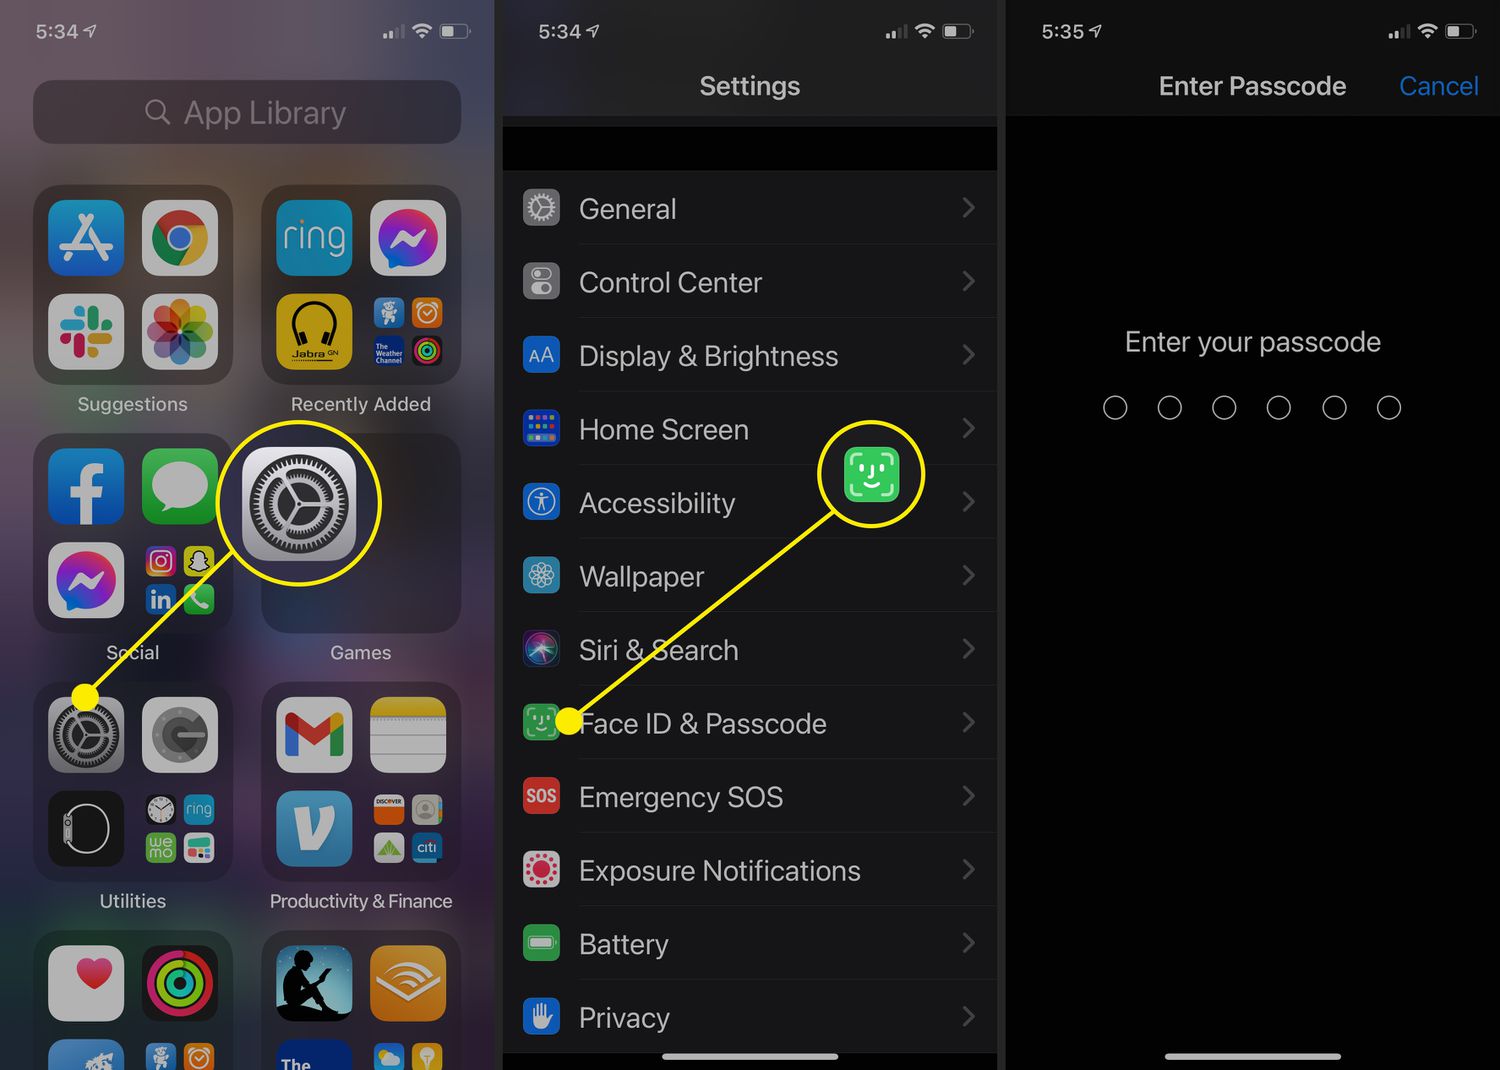
The first step in setting up Face ID on your iPhone is to open the Settings app. This is where you’ll find all the necessary options to customize your device and manage various features. You can easily locate the Settings app on your home screen, as it is represented by a gray gear icon.
Tap on the Settings app icon to open it. You’ll be taken to the main settings menu, where you can find a wide range of options to personalize your iPhone’s functionality. The Settings menu acts as the control center for your device, allowing you to configure various system settings.
If you can’t find the Settings app on your home screen, you can swipe down on the screen and use the search bar at the top. Simply type in “Settings,” and the app should appear in the search results. Tap on it to open the Settings menu.
Once you’ve successfully opened the Settings app, you’re ready to move on to the next step in the process of setting up Face ID. Remember, accessing the Settings menu is the first and essential step to begin configuring Face ID on your iPhone.
Step 2: Tap Face ID & Passcode
After successfully opening the Settings app on your iPhone, the next step is to navigate to the Face ID & Passcode settings. This is where you’ll find all the options related to Face ID, including the ability to set it up and manage its functionality.
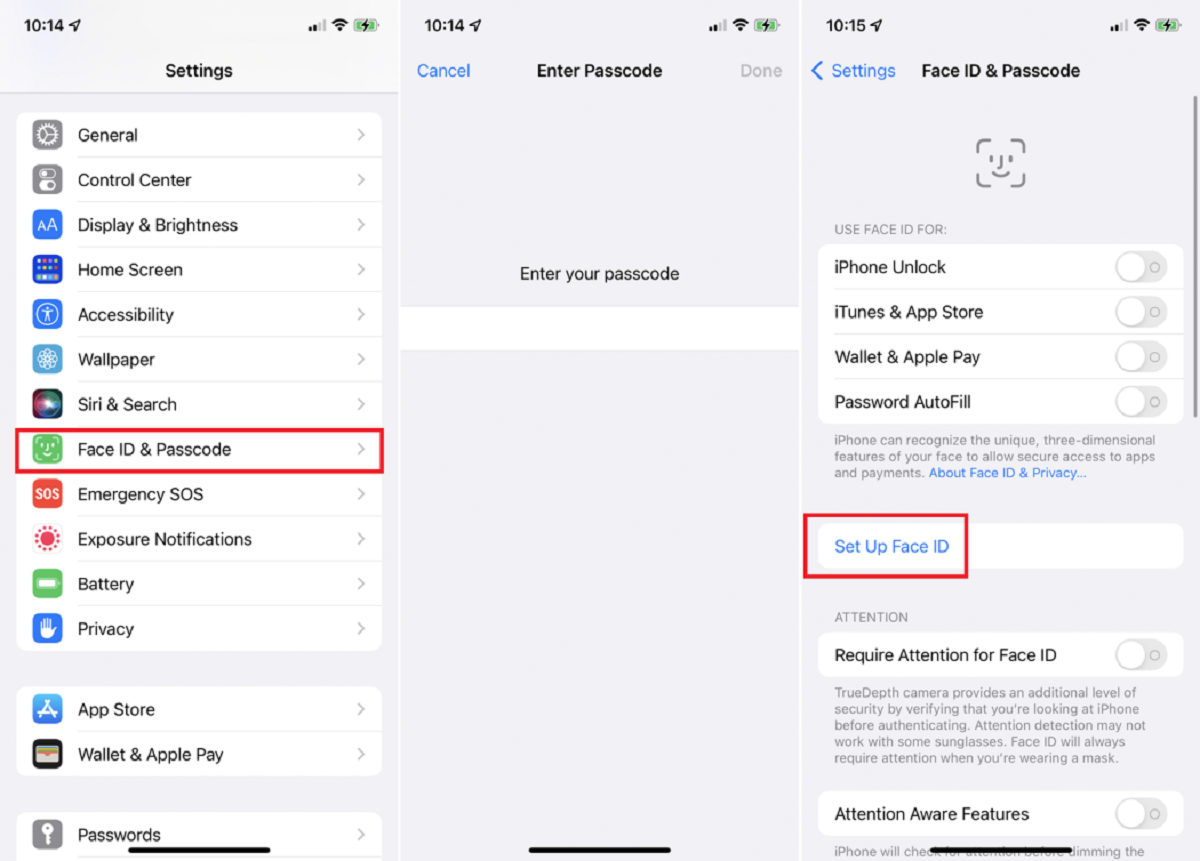
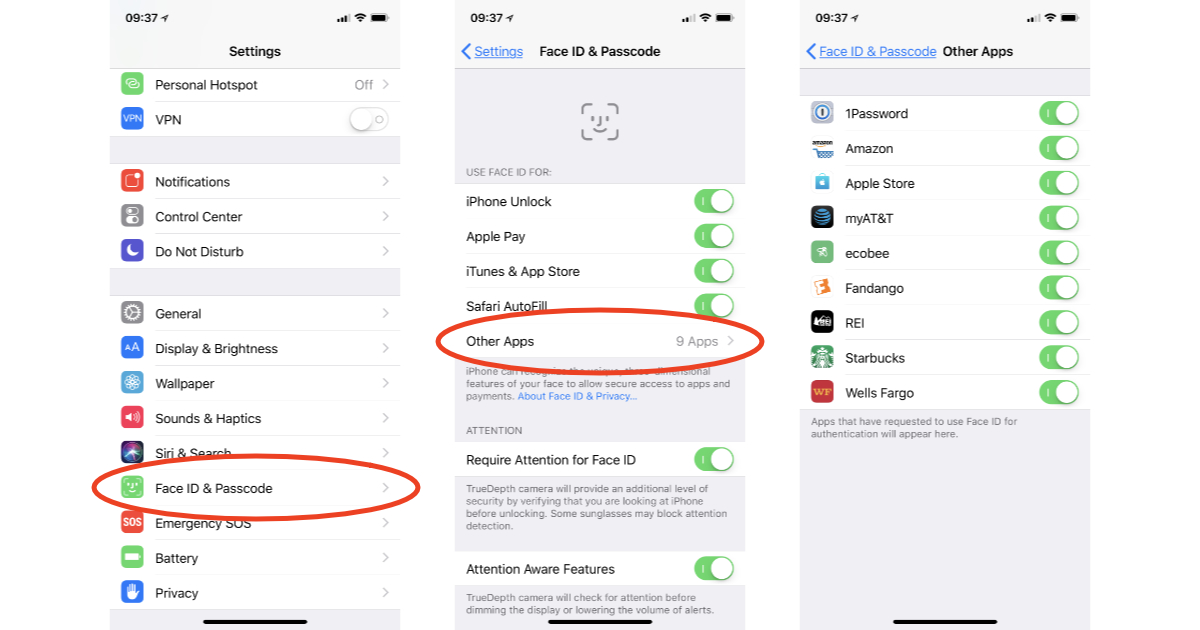
Scroll down the Settings menu until you find the “Face ID & Passcode” option. It should be located within the “Touch ID & Passcode” section, depending on your iPhone model. Tap on this option to access the Face ID settings.
If prompted, enter your device passcode to proceed. This is a security measure to ensure that only authorized users can make changes to the Face ID settings. Once you’ve entered your passcode, you’ll be granted access to the Face ID & Passcode settings.
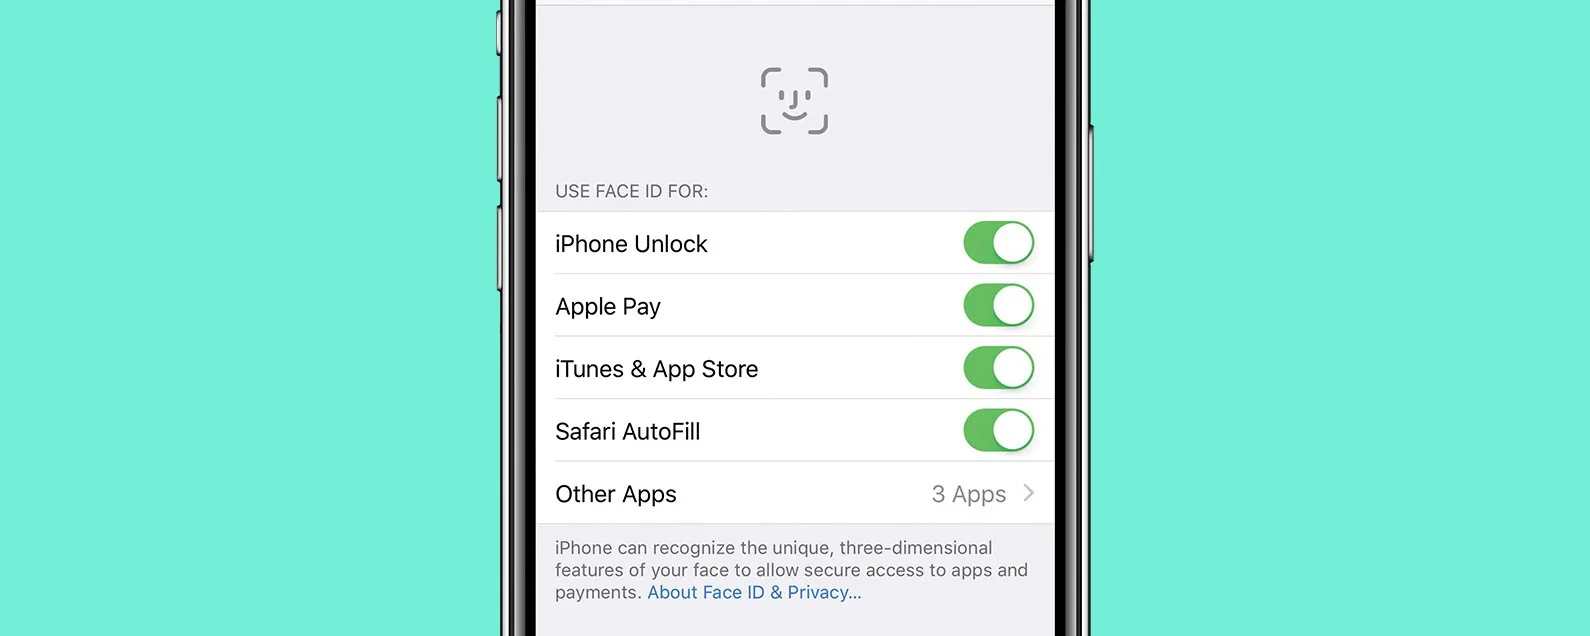
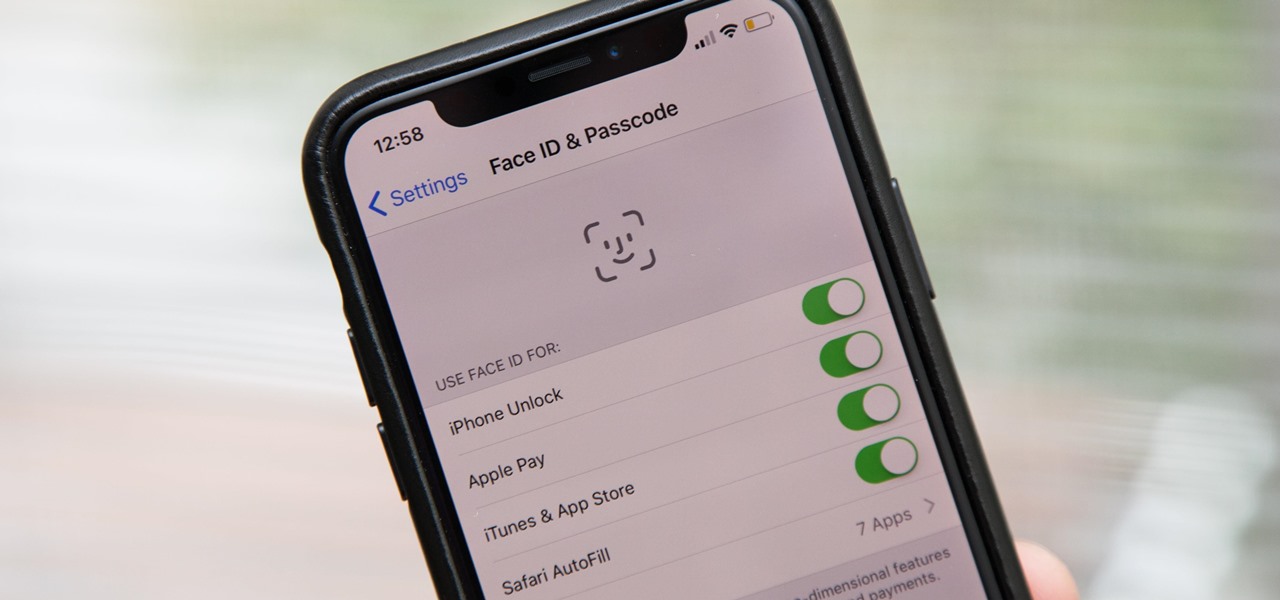
Within the Face ID & Passcode settings, you’ll find various options to manage Face ID. You can set up Face ID for unlocking your device, making App Store and iTunes purchases, and autofilling passwords. Additionally, you can choose to reset Face ID data or disable the functionality altogether if desired.
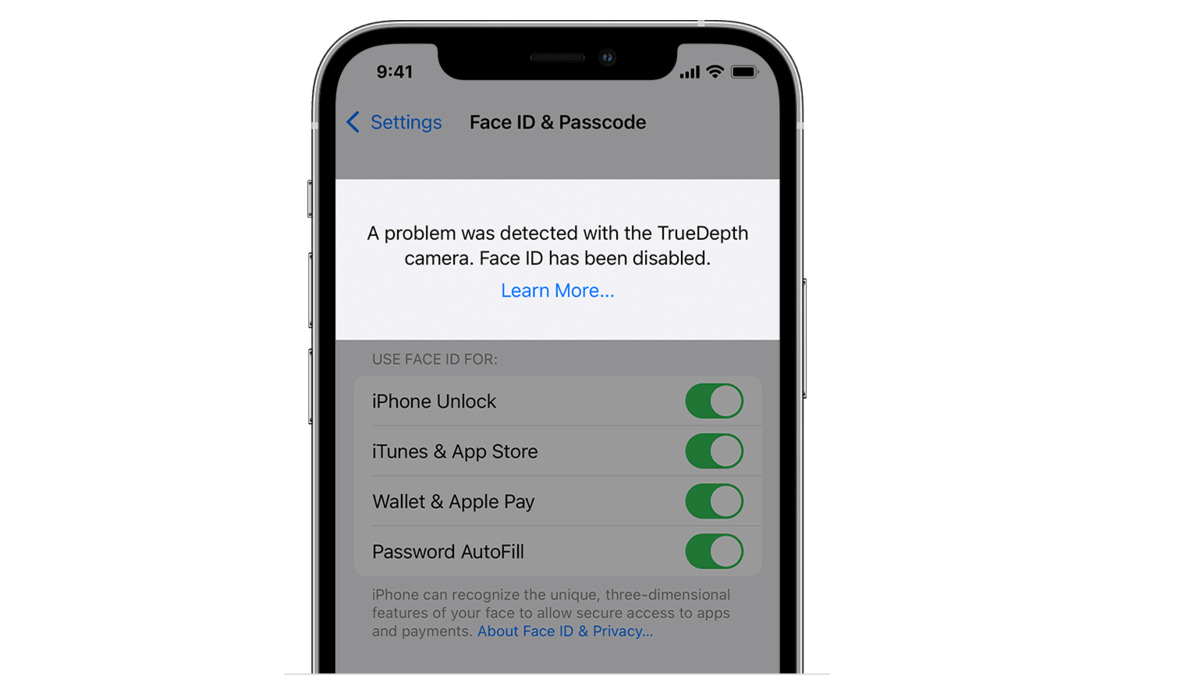
The Face ID & Passcode settings also provide an option to configure a passcode for situations when Face ID is not available. This adds an extra layer of security and ensures that you can still access your device even in instances when Face ID may not work, such as wearing a mask or gloves.
Once you’ve tapped on the Face ID & Passcode option and explored the available settings, you’re ready to proceed to the next step in setting up Face ID on your iPhone. Let’s move on to step 3 and begin the actual configuration process.
Step 3: Set Up Face ID
Now that you’ve navigated to the Face ID & Passcode settings, it’s time to begin the process of setting up Face ID on your iPhone. This step involves capturing your facial features to create a unique biometric profile that can be used for authentication.
Tap on the “Set Up Face ID” option within the Face ID & Passcode menu. This will initiate the Face ID setup process and guide you through the necessary steps to configure the feature.
Before proceeding, make sure you are in a well-lit environment and hold your iPhone at a comfortable angle for optimal face detection. It’s important to position your face properly to ensure accurate and reliable Face ID recognition.
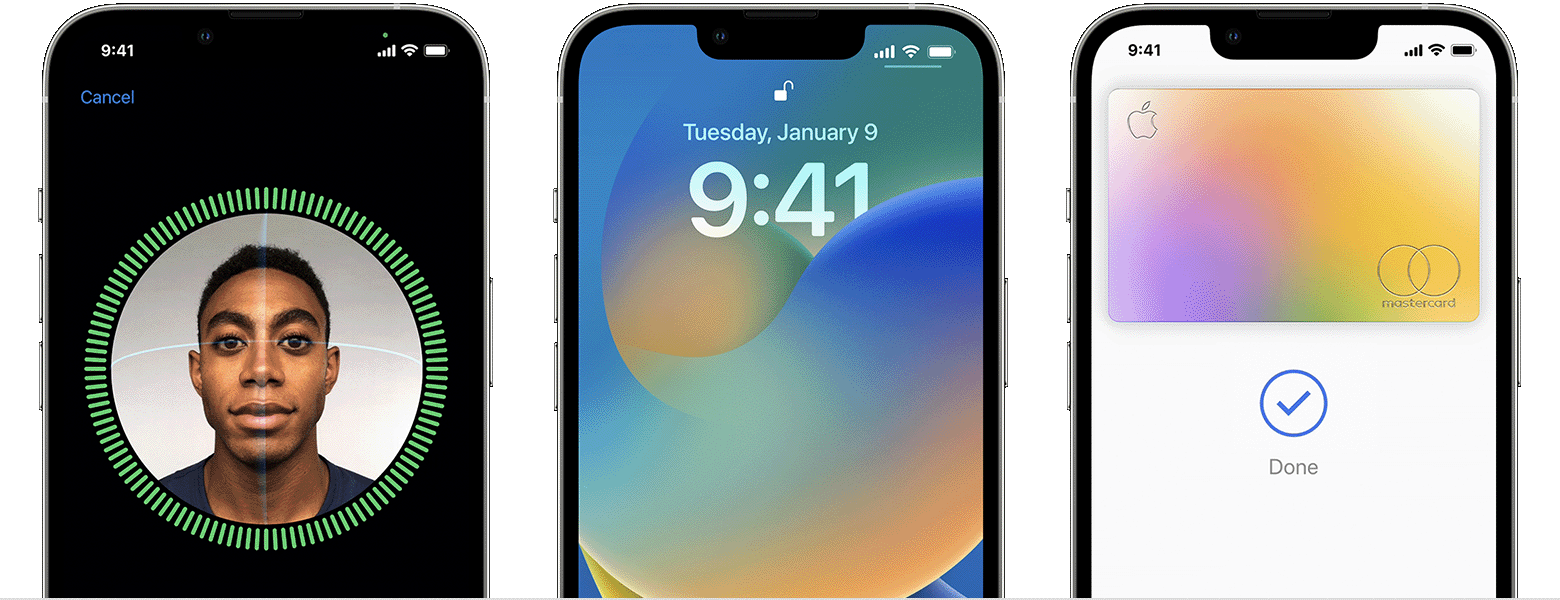
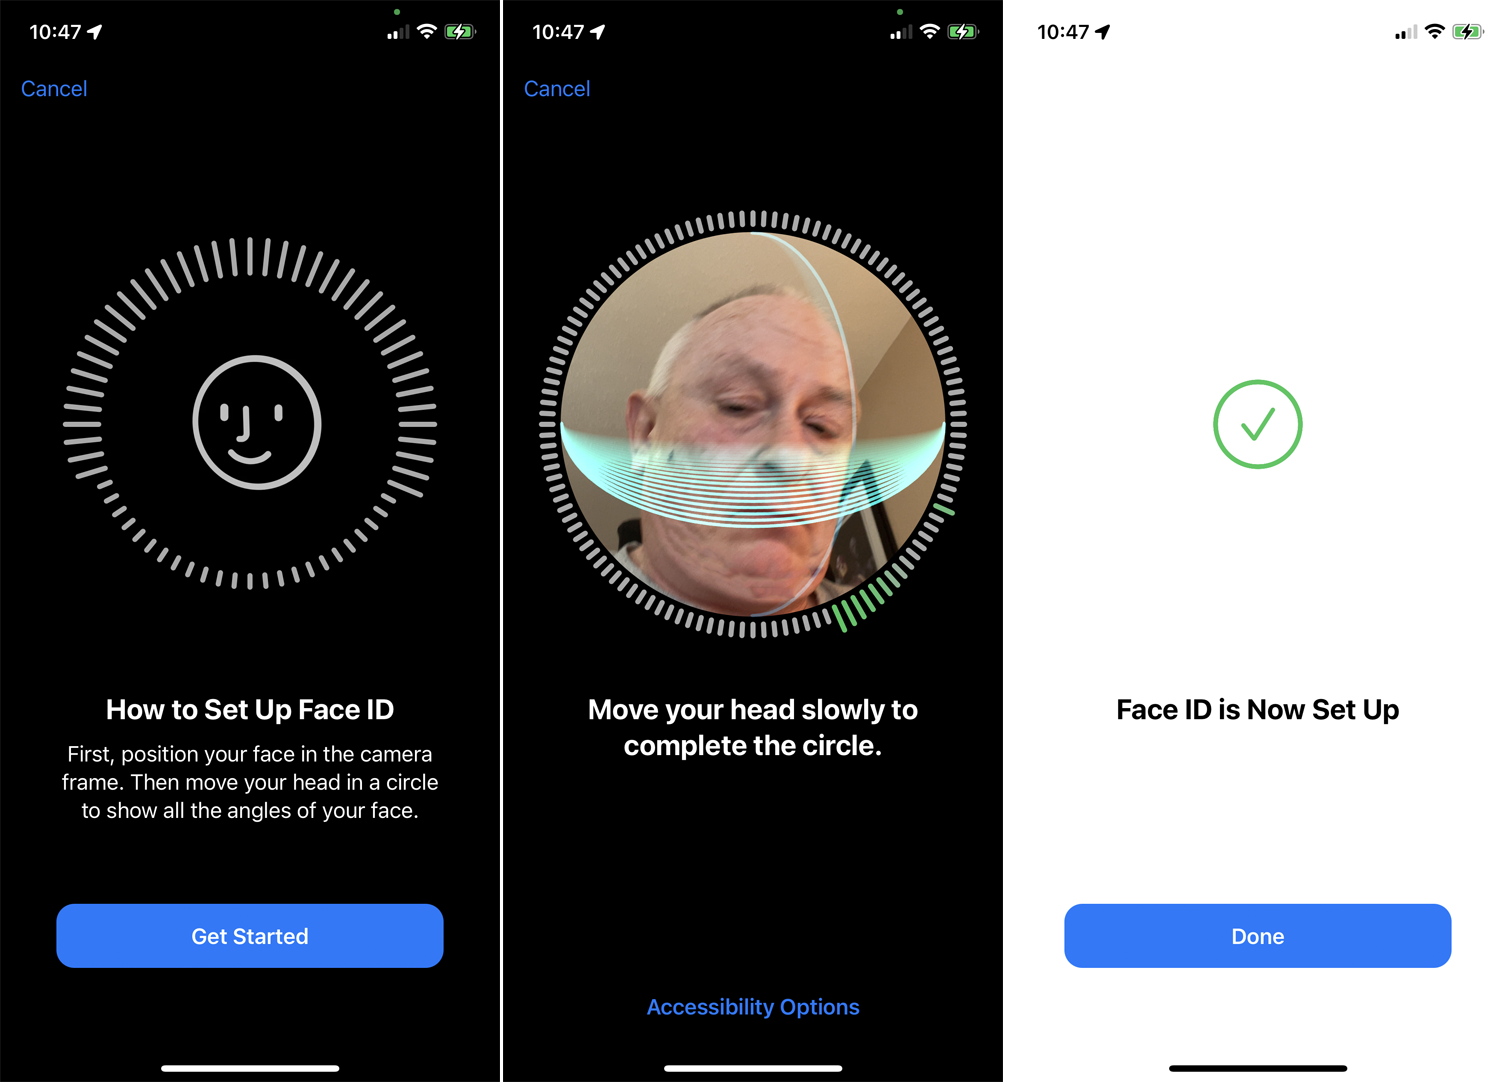
On the screen, you’ll see a preview of your iPhone’s camera and instructions to guide you through the setup process. Follow the on-screen prompts and position your face within the frame. Make sure your entire face is visible to the camera, including your eyes, nose, and mouth.
Once your face is aligned within the frame, your iPhone will begin capturing your facial data. You’ll see a series of circles or animation on the screen, indicating that the data is being collected. It’s important to keep your face steady during this process to ensure accurate registration.
Be patient as your iPhone captures the necessary data to create your Face ID profile. This may take a few seconds, and you may be required to make slight adjustments or turn your head slightly to allow the camera to capture different angles of your face.
Once the data collection is complete and your Face ID profile has been successfully created, you’ll proceed to the next step in the setup process. Tap “Continue” or follow any additional prompts provided by your iPhone to move forward.
Congratulations! You’ve successfully set up Face ID on your iPhone. This means your device can now recognize your unique facial features and use them for biometric authentication. But we’re not done just yet. Let’s move on to the next step to ensure optimal Face ID functionality.
Step 4: Tap Set Up Face ID
After completing the initial Face ID setup, the next step is to tap the “Set Up Face ID” option on your iPhone. This step allows you to further enhance the accuracy and reliability of Face ID by capturing additional facial data.
Tap the “Set Up Face ID” option within the Face ID & Passcode settings menu. This will take you to a screen where you can perform the secondary face capture process.
Similar to the initial setup, make sure you are in a well-lit environment and hold your iPhone at a comfortable angle. Position your face within the frame as instructed on the screen, ensuring that your entire face is visible to the camera.
During this secondary face capture process, your iPhone will again capture additional facial data to refine and improve the accuracy of Face ID recognition. This step helps your iPhone learn more about your unique facial features and optimize the authentication process.
Keep your face steady, and let your iPhone capture the necessary data by following the on-screen instructions. You may need to make slight adjustments or move your head slightly to allow the camera to capture different angles of your face.
Once the secondary face capture process is complete, your iPhone will confirm that the additional data has been successfully captured and incorporated into your Face ID profile. Tap “Continue” or follow any additional prompts provided to proceed.
By tapping “Set Up Face ID,” you have fine-tuned and improved the accuracy of Face ID on your iPhone. This means that your device will now have a more comprehensive and detailed representation of your facial features for authentication purposes.
Now that you’ve completed this step, you’re one step closer to fully utilizing the convenience and security of Face ID on your iPhone. Let’s move on to the next step to further optimize your Face ID experience.
Step 5: Position Your Face
In step 5 of setting up Face ID on your iPhone, you’ll need to position your face correctly within the frame to ensure optimal functionality. This step is crucial in allowing your iPhone to accurately recognize and authenticate your facial features.
To begin, make sure you are in a well-lit environment with minimal glare or shadows. Holding your iPhone at a comfortable angle, open the Face ID & Passcode settings menu and tap on “Set Up Face ID.”
Once prompted, position your face within the designated frame displayed on your iPhone’s screen. The frame will outline where your face should be positioned for the best results. Make sure your entire face is visible to the camera, including your eyes, nose, and mouth.
During this process, it’s essential to keep your face steady and avoid any excessive movement or tilting. Maintaining a relaxed and natural expression will help ensure that your iPhone captures an accurate representation of your facial features.
If needed, adjust your grip on the iPhone or reposition yourself slightly to align your face properly within the frame. The goal is to provide your iPhone with a clear and unobstructed view of your face to facilitate accurate Face ID recognition.
As you position your face, your iPhone will use the front-facing TrueDepth camera to capture and analyze various facial data points. This includes depth information, facial landmarks, and unique features that make up your individual facial identity.
Ensure that you maintain a comfortable distance from the iPhone’s camera, neither too close nor too far away, to ensure optimal results. Find the right balance that allows the camera to capture the necessary detail without compromising the accuracy of Face ID.
Once your face is properly positioned within the frame and your iPhone indicates that it has successfully captured the necessary data, you can proceed to the next step. Tap “Continue” or follow any additional prompts provided by your iPhone.
By positioning your face correctly, you are taking the necessary steps to ensure that Face ID on your iPhone works flawlessly. With Face ID set up, you can now enjoy the convenience and security of biometric authentication on your device.
Let’s move on to the next step to further optimize the Face ID experience on your iPhone.
Step 6: Move Your Head
In step 6 of setting up Face ID on your iPhone, you’ll be asked to move your head to allow the device to capture different angles of your face. This motion helps enhance the accuracy and versatility of Face ID recognition for various viewing scenarios.
At this stage, your face should already be positioned within the frame as instructed in the previous step. Make sure you are in a well-lit environment and hold your iPhone at a comfortable angle to begin.
As prompted by your iPhone, gradually move your head in a circular motion or from side to side. This movement allows the front-facing TrueDepth camera to capture your face from different angles, helping to build a more comprehensive profile of your unique facial features.
The purpose of this step is to ensure that Face ID works reliably no matter how you hold your iPhone or whether your face is viewed from slightly different perspectives. By capturing multiple angles during the setup process, your iPhone can account for these variations and authenticate your face accurately.
While moving your head, try to maintain a steady and natural pace. Avoid sudden or jerky movements that may disrupt the data collection process. This will help ensure that your iPhone captures the necessary facial data accurately and without any distortions.
It’s important to note that you don’t need to rotate your head completely or perform any exaggerated movements. Just a gentle and smooth motion is sufficient to allow the camera to capture the required data points from different angles.
As you move your head, your iPhone may display visual cues or provide feedback to indicate that it’s successfully capturing the necessary information. Pay attention to any prompts or instructions displayed on the screen, and follow them accordingly.
Once your iPhone has captured the data from various head movements, it will indicate that the process is complete. Tap “Continue” or follow any additional prompts provided to proceed to the next step.
By moving your head during the Face ID setup, you are ensuring that the recognition system is robust and adaptable to different viewing angles. This step enhances the overall functionality of Face ID on your iPhone, making it more accurate and dependable.
Now that you’ve completed this step, let’s move on to the next one to further customize and enhance your Face ID experience.
Step 7: Create Alternative Appearance (optional)
In step 7 of setting up Face ID on your iPhone, you have the option to create an alternative appearance. This feature allows you to register a different facial expression or appearance that can be used as an alternative way to unlock your device.
While not necessary for everyone, creating an alternative appearance can be helpful in situations where your regular facial appearance may change, such as when wearing a hat, glasses, or a different hairstyle. It provides added flexibility and convenience in using Face ID.
To create an alternative appearance, go to the Face ID & Passcode settings menu and tap on “Set Up an Alternative Appearance.” This will initiate the process to capture the unique features of the new appearance.
Ensure that the new appearance you want to register is reflective of how you may typically appear in daily scenarios. For example, if you frequently wear glasses, it’s recommended to wear them during this step to ensure accurate recognition in those situations.
Similar to the initial setup process, follow the on-screen instructions to position your face within the frame and allow the camera to capture the necessary data points. Make gentle movements if needed to capture the alternative appearance from different angles.
It’s important to note that creating an alternative appearance doesn’t replace your default appearance. Both appearances will be stored in your Face ID settings and can be used interchangeably to unlock your device or authorize purchases.
Once the alternative appearance has been successfully captured and registered, you can tap “Continue” or follow any additional prompts provided by your iPhone to proceed to the next step.
Remember, creating an alternative appearance is an optional step, but it can be useful in scenarios where your typical facial appearance may vary. It adds an extra layer of flexibility to Face ID, ensuring that your device can recognize you even in different circumstances.
Now that you’ve completed this step, you’re almost done with the Face ID setup process. Let’s move on to the final step to finalize the configuration and start benefiting from the convenience and security that Face ID offers.
Step 8: Complete Face ID Set Up
Congratulations! You’ve reached the final step in setting up Face ID on your iPhone. This step involves completing the configuration process and ensuring that all necessary settings are properly enabled.
Review the options and settings within the Face ID & Passcode menu to make sure everything is set up according to your preferences. This includes enabling Face ID for device unlocking, app purchases, and password autofill.
If you haven’t already, it’s highly recommended to enable Face ID for all available options. This ensures that you can take full advantage of the convenience and security that Face ID provides across various aspects of your iPhone usage.
Once you’re satisfied with your settings, exit the Face ID & Passcode menu and start using your iPhone as usual. You’ll now be able to unlock your device, authorize purchases, and access sensitive information simply by looking at your phone.
It’s essential to remember that Face ID is a secure and reliable form of biometric authentication. Your facial data is encrypted and stored securely on your iPhone, ensuring that your privacy is protected.
If at any point you wish to update or change your Face ID settings, you can return to the Face ID & Passcode menu in the Settings app. From there, you can manage Face ID preferences, reset data, or disable Face ID if needed.
With Face ID fully set up on your iPhone, you can enjoy the seamless and effortless experience of unlocking your device and accessing your personal information. It’s a convenient and secure way to ensure that only you have the key to your iPhone.
Now that you’ve completed all the steps, you can confidently take advantage of the advanced Face ID technology on your iPhone. Say goodbye to passcodes and hello to the simplicity of facial recognition.
Remember to keep your iPhone updated with the latest software version, as Apple regularly releases updates that may improve the performance and security of Face ID. Enjoy the incredible features that Face ID brings to your iPhone, making your daily interactions more convenient and secure.
Conclusion
Congratulations on successfully setting up Face ID on your iPhone! You’ve taken the necessary steps to enable this advanced biometric authentication system, adding a new level of convenience and security to your device.
With Face ID, you can unlock your iPhone, authorize app purchases, and access sensitive information with just a glance. It eliminates the need for passcodes or fingerprint scanning, providing a seamless and effortless user experience.
Throughout the setup process, you learned how to open the Settings app, navigate to the Face ID & Passcode settings, and set up Face ID by positioning your face, moving your head, and even creating an alternative appearance if desired.
By following these steps, you’ve allowed your iPhone’s TrueDepth camera to capture and analyze the unique features of your face, creating a personalized biometric profile that ensures only you can unlock and access your device.
Remember to keep your face properly positioned within the frame when using Face ID, ensuring a clear line of sight for the camera. Avoid excessive movement or obstruction to ensure optimal recognition.
Furthermore, regularly review your Face ID settings to make sure they align with your preferences. Enable Face ID for device unlock, app purchases, and password autofill to maximize the benefits of this convenient feature across various aspects of your iPhone usage.
Rest assured that Face ID is designed with privacy and security in mind. Your facial data is encrypted and stored securely on your device, keeping it safe from unauthorized access.
With Face ID set up on your iPhone, enjoy the peace of mind knowing that your device is protected by a sophisticated and reliable biometric authentication system. Say goodbye to the hassle of passcodes and welcome the ease of simply looking at your phone to unlock it.
Remember to keep your iPhone’s software up to date, as future updates may bring enhancements to the Face ID experience. Stay informed about additional features and functionalities that Apple may introduce regarding Face ID.
So go ahead, explore your iPhone, and experience the seamless convenience of Face ID. Enjoy the streamlined user experience, knowing that your device is protected with the most advanced facial recognition technology available.