Introduction
Welcome to the era of Face ID – the latest and most secure biometric authentication method developed by Apple. With the advent of Face ID, unlocking your iPhone has never been easier. No more fumbling with passcodes or fingerprints; a simple glance is all it takes to gain access to your device. In this article, we will delve into the intricacies of Face ID and learn how to turn it on for a seamless and secure iPhone experience.
Face ID revolutionizes the way we interact with our iPhones, offering a faster and more intuitive alternative to traditional authentication methods. By utilizing advanced facial recognition technology, Face ID ensures that only you have the power to unlock your device and authenticate sensitive transactions.
Unlike its predecessor, Touch ID, which relied on a fingerprint scanner, Face ID uses the TrueDepth camera system to project and analyze over 30,000 invisible dots on your face. These dots create a detailed depth map, mapping the unique contours and dimensions of your face. This sophisticated technology not only enhances device security, but also provides a more personalized user experience.
Setting up Face ID is a breeze. The initial setup process prompts you to position your face within the frame, rotating your head to capture different angles. This ensures that Face ID has a comprehensive and accurate representation of your facial features.
With Face ID enabled, let’s explore how to turn it on. In the next section, we will guide you through the step-by-step process of enabling Face ID on your iPhone, so you can unlock it effortlessly with just a glance.
How Does Face ID Work?
Face ID functions by utilizing a combination of innovative hardware and advanced software algorithms. When you look at your iPhone, the TrueDepth camera system activates, emitting infrared light and capturing an infrared image of your face. This image, along with depth data obtained from the same process, is transferred to the Neural Engine, a powerful neural network processor built into the device’s A-series chip.
The Neural Engine processes the infrared image and depth data, creating a highly accurate mathematical representation of your face. This representation, also known as a facial map, is then compared to the stored facial map on your iPhone. If there is a match, Face ID grants access to your device.
It’s important to note that Face ID is designed to adapt and recognize your face accurately over time. The system is intelligent enough to adjust to changes in appearance, such as growing a beard, wearing glasses, or even aging. This ensures that Face ID remains reliable and efficient in different conditions and situations.
Apple has implemented several security measures to protect the integrity of Face ID. The facial recognition data is stored securely in the device’s Secure Enclave, a dedicated chip that stores sensitive information. This data is never uploaded to Apple’s servers or shared with any third parties. Additionally, the infrared camera used for Face ID detection is designed to work only when needed, ensuring privacy and preventing unauthorized access.
The accurate and secure nature of Face ID extends beyond unlocking your iPhone. The advanced technology also allows Face ID to be used for authorizing purchases through Apple Pay and authenticating various apps and services. This means you can conveniently make secure transactions and access sensitive information with a simple glance, providing both ease and peace of mind.
In the next section, we will walk you through the step-by-step process of setting up Face ID on your iPhone, so you can experience the seamless and secure authentication firsthand.
Setting Up Face ID
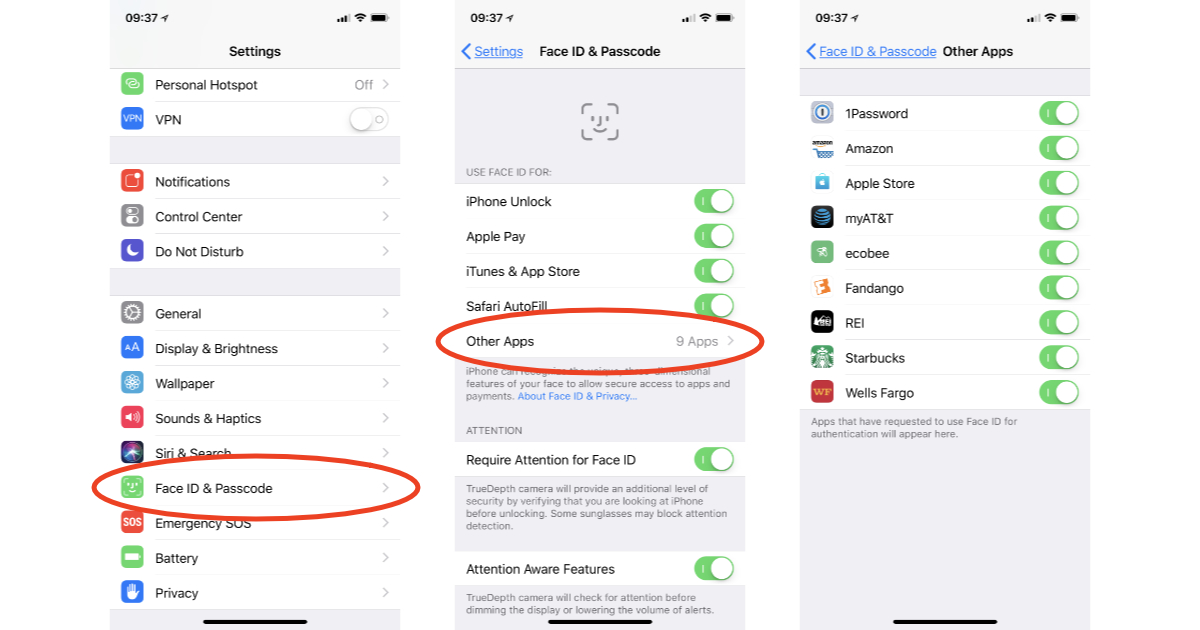
Setting up Face ID is a straightforward process that ensures your iPhone recognizes your unique facial features accurately. Follow these steps to set up Face ID on your device:
- Open the Settings app on your iPhone.
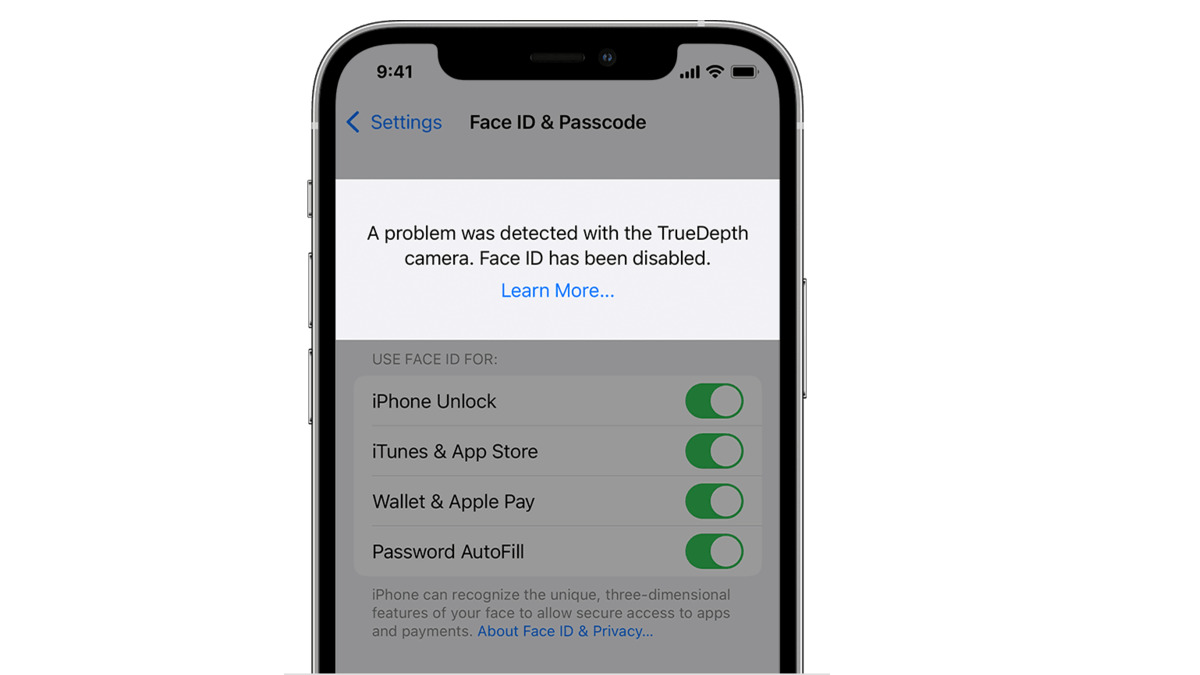
- Select “Face ID & Passcode.”
- Enter your passcode to proceed to the Face ID settings.
- Tap on the “Enroll Face” option to begin the setup process.
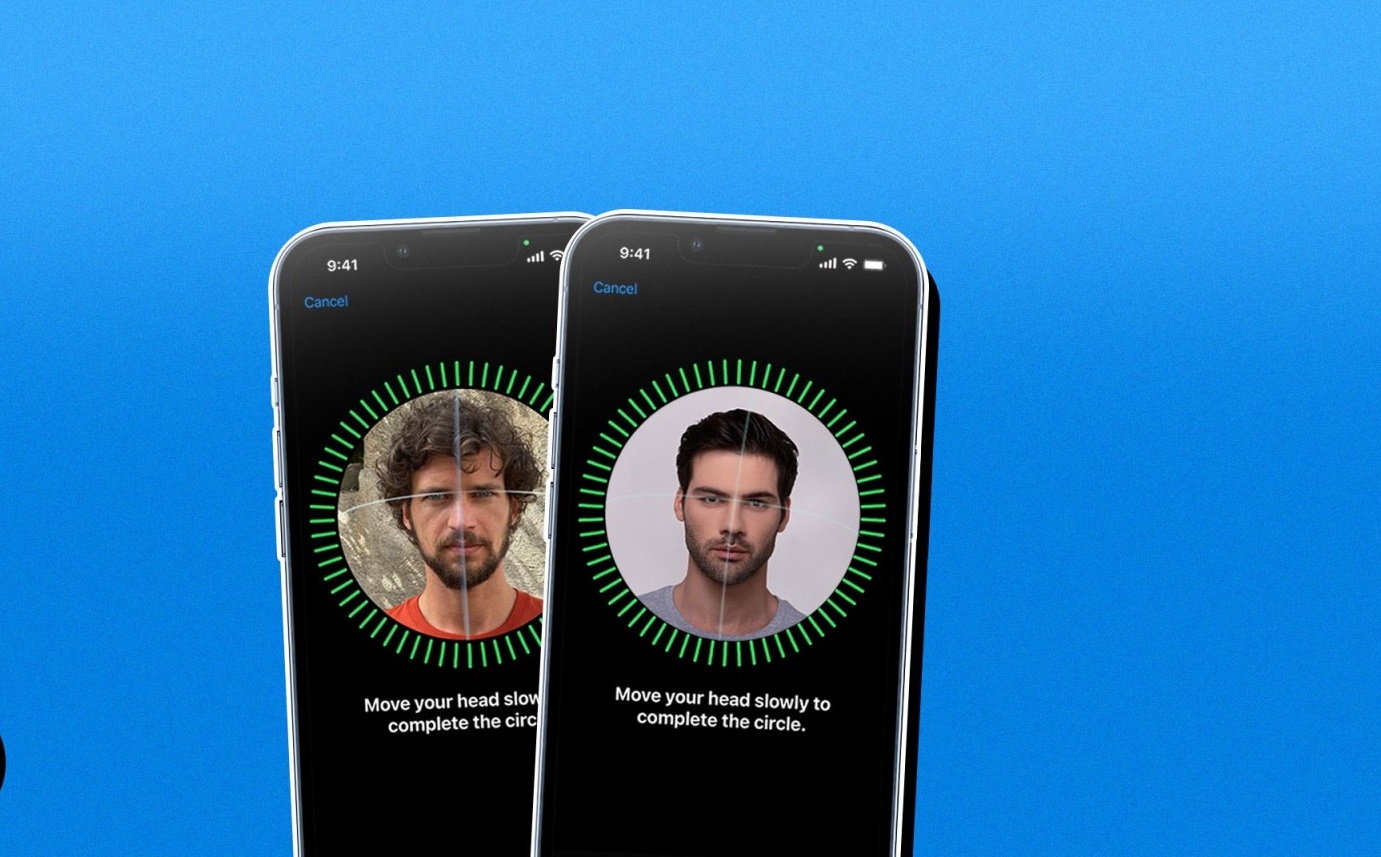
- Position your face within the frame provided on the screen.
- Slowly move your head in a circular motion to capture different angles of your face.
- When prompted, tilt your head up and down to enable Face ID to recognize your face from various angles.
- Once the setup is complete, you can choose to enable Face ID for specific functions, such as unlocking your device, authorizing purchases, or accessing sensitive apps.
During the setup process, make sure to follow the on-screen instructions carefully to ensure optimal results. It’s advisable to do the setup in a well-lit environment, avoiding excessive shadows or glare that may hinder Face ID’s accuracy.
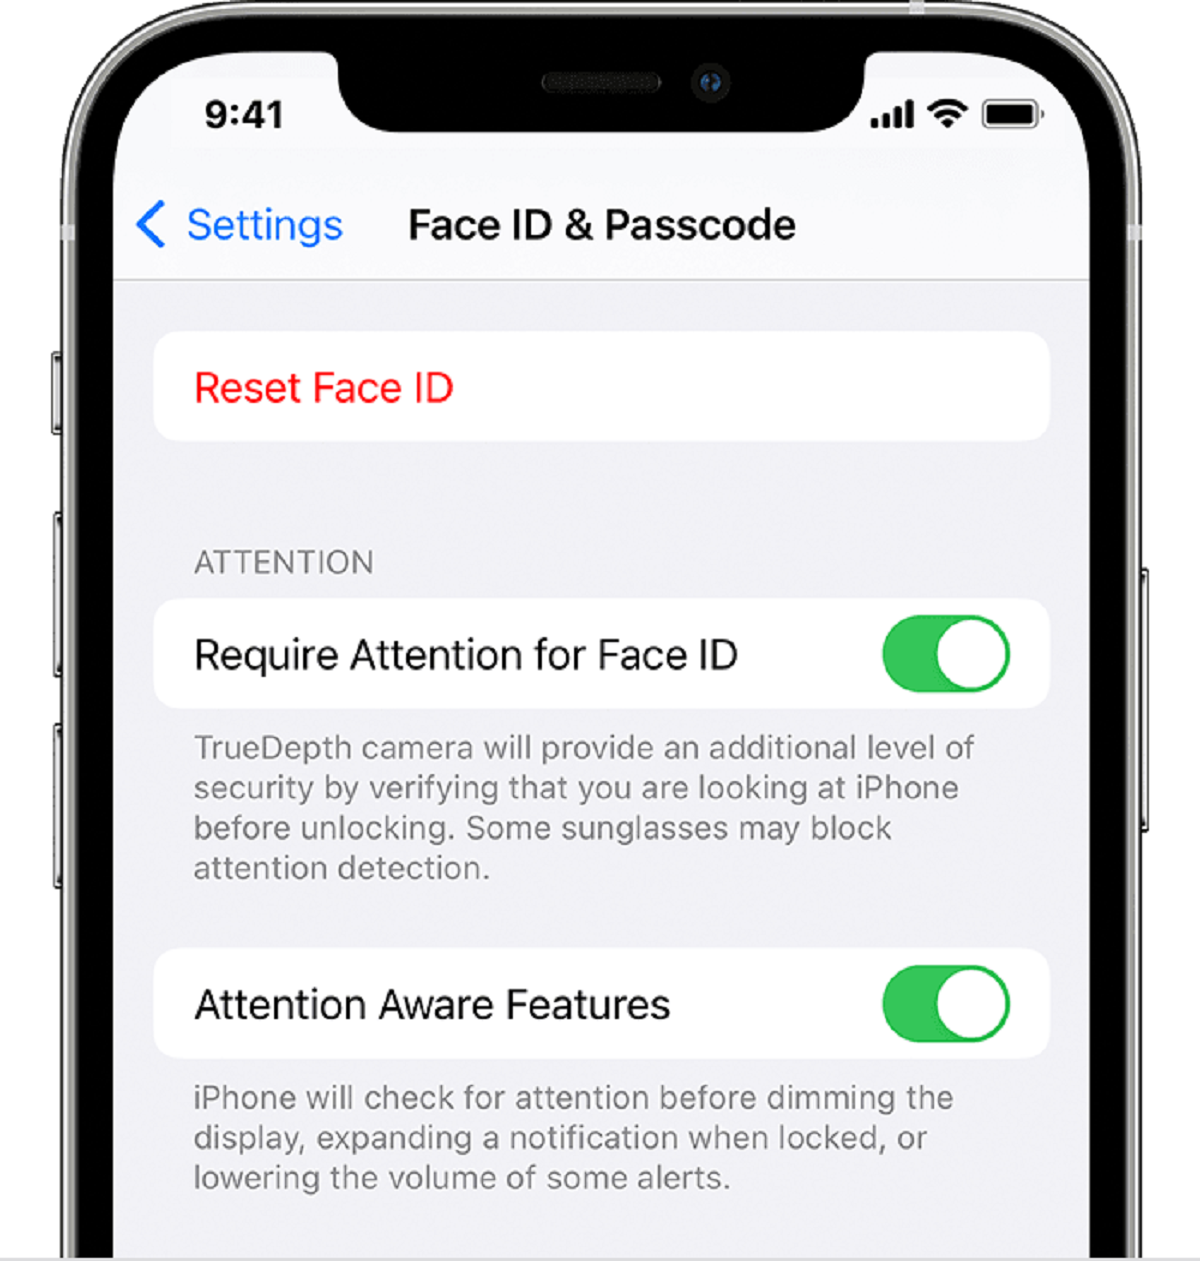
If at any point you wish to reconfigure or improve Face ID recognition, you can return to the Face ID & Passcode settings and select the “Reset Face ID” option. This will remove the existing facial data and allow you to set up Face ID again.
Now that you have successfully set up Face ID on your iPhone, let’s move on to the next section to learn how to turn on Face ID and make unlocking your device effortless.
Turning On Face ID
Now that you have set up Face ID on your iPhone, it’s time to turn it on so you can take advantage of this convenient and secure biometric authentication method. To turn on Face ID, follow these steps:
- Open the Settings app on your iPhone.
- Select “Face ID & Passcode.”
- Enter your passcode to access the Face ID settings.
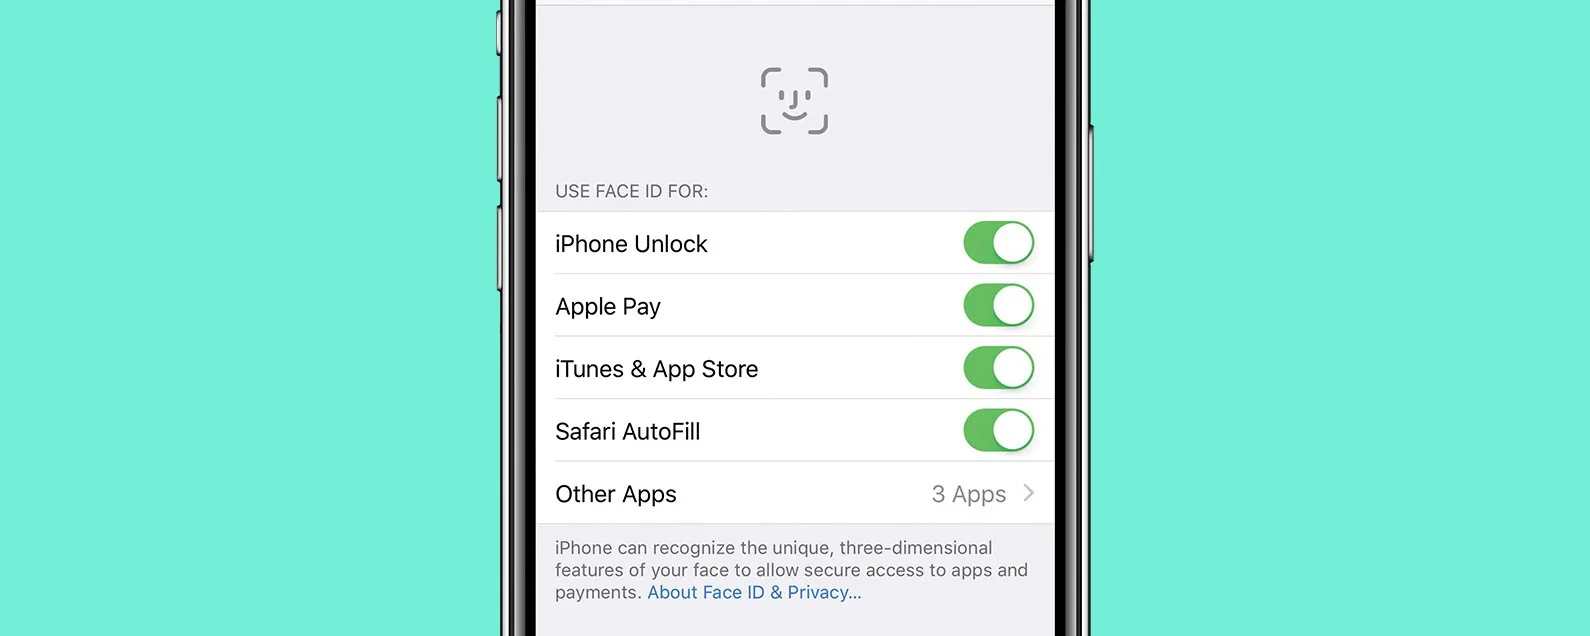
- Toggle the switch next to “iPhone Unlock” to enable Face ID for unlocking your device.
Once you toggle the switch, Face ID will be activated, allowing you to unlock your iPhone simply by looking at it. This eliminates the need for entering a passcode or using your fingerprint, providing a faster and more seamless authentication experience.
In addition to unlocking your iPhone, you can also enable Face ID for authorizing purchases using Apple Pay. To do this, follow the steps below:
- Go back to the Face ID & Passcode settings.
- Toggle the switch next to “iTunes & App Store” to enable Face ID for authorizing purchases.
Enabling Face ID for purchases ensures that only you can authorize transactions using your facial recognition, adding an extra layer of security to your transactions.
It’s worth noting that certain apps and services may also offer the option to use Face ID for authentication. You can customize these settings by going to the specific app’s settings and enabling Face ID if available.
By enabling Face ID for unlocking your device and authorizing purchases, you can enjoy the convenience and security of this cutting-edge technology. But what if you want to customize certain Face ID settings for a more tailored experience? In the next section, we will explore the options available for customizing Face ID settings on your iPhone.
Using Face ID to Unlock Your iPhone
With Face ID enabled on your iPhone, unlocking your device becomes as simple as looking at it. To unlock your iPhone using Face ID, follow these steps:
- Press the side button (or the Sleep/Wake button) to wake up your iPhone.
- Look at the screen directly and position your face within the view of the TrueDepth camera system.
- If Face ID recognizes your face, the lock icon will animate, indicating that your iPhone has been unlocked.
- Swipe up from the bottom of the screen to access the Home screen or the app you were last using.
It’s important to note that your face should be within a comfortable distance and angle for Face ID to work effectively. Ensure that your face is well-illuminated, as poor lighting conditions may hinder Face ID’s ability to recognize your face accurately.
If Face ID fails to unlock your iPhone, you can manually enter your passcode by tapping the “Enter Passcode” option on the screen. This might happen in situations where your face is not fully visible, or there are significant changes to your appearance, such as wearing a hat or sunglasses.
Face ID makes unlocking your iPhone faster and more convenient, eliminating the need to enter a passcode or use your fingerprint. It seamlessly integrates into your daily routine, saving you valuable time and ensuring the security of your device.
Now that you know how to use Face ID to unlock your iPhone, let’s discuss how you can utilize this feature to authorize secure purchases through Apple Pay.
Using Face ID to Make Purchases
One of the convenient features of Face ID is its ability to authenticate and authorize purchases using Apple Pay. With Face ID enabled, you can securely make transactions without the need to enter your passcode or use your fingerprint. To use Face ID for purchases, follow these steps:
- When making a purchase through an app or website that supports Apple Pay, proceed to the payment section.
- Once prompted, look at your iPhone to activate Face ID.
- Face ID will scan and verify your face, ensuring that it matches the registered facial data stored on your device.
- If Face ID recognizes you and authenticates your identity, the transaction will be approved, and the payment will be completed.
Using Face ID for purchases provides a convenient and secure way to authorize transactions on your iPhone. It eliminates the need to enter credit card details or additional authentication information, streamlining the payment process.
It’s important to note that not all apps or websites support Apple Pay or Face ID for purchases. However, as Face ID technology continues to gain popularity, more and more merchants are integrating this secure authentication method into their payment systems.
By utilizing Face ID for purchases, you can confidently make transactions with just a glance, knowing that your payment information is protected behind Apple’s stringent security measures.
Now that you understand how to use Face ID for purchases, let’s explore the customization options available for Face ID settings on your iPhone, allowing you to tailor the experience to your preferences.
Customizing Face ID Settings
Face ID offers customizable settings that allow you to tailor the experience to your preferences and needs. To access the Face ID settings on your iPhone, follow these steps:
- Open the Settings app on your iPhone.
- Select “Face ID & Passcode.”
- Enter your passcode to access the Face ID settings.
Once you’re in the Face ID settings, you’ll find a range of options that you can customize. These include:
- iPhone Unlock: Toggle this option to enable or disable Face ID for unlocking your iPhone.
- Apple Pay: Toggle this option to enable or disable Face ID for authorizing purchases with Apple Pay.
- Password AutoFill: Toggle this option to allow Face ID to fill in saved usernames and passwords automatically in apps and websites.
- App Store & iTunes Purchases: Toggle this option to enable or disable Face ID for authorizing purchases from the App Store, iTunes, and other Apple services.
- Other Apps: Here you can manage individual apps’ access to Face ID for authentication purposes.
By customizing these settings, you can have more control over when and how Face ID is used on your iPhone. You can choose which functions or apps can utilize Face ID for a seamless and secure authentication experience.
In addition to the customization options mentioned above, you can also reset Face ID or update your facial data if needed. To do this, go back to the Face ID & Passcode settings and select the “Reset Face ID” option. This will remove your current facial data and give you the opportunity to set up Face ID again from scratch.
Customizing Face ID settings allows you to tailor the facial recognition experience on your iPhone to suit your personal preferences and security requirements. Take advantage of these settings to make Face ID work seamlessly for you.
Now that you have a better understanding of how to customize Face ID settings, let’s move on to the next section, which will guide you through troubleshooting common Face ID issues.
Troubleshooting Face ID Issues
While Face ID is a reliable and secure authentication method, there may be instances where you encounter issues or have trouble getting it to work as expected. Here are some common Face ID issues and troubleshooting steps to help resolve them:
- Face ID Not Recognizing Your Face: If Face ID fails to recognize your face, make sure you are positioning your face correctly within the view of the TrueDepth camera. Remove any obstructions, such as hats or glasses, and ensure that your face is well-illuminated. If the problem persists, consider reconfiguring Face ID by going to the Face ID & Passcode settings and selecting the “Reset Face ID” option to set it up again.
- Inconsistent Face ID Performance: If you notice that Face ID performance is inconsistent or slower than usual, check for any software updates available for your iPhone and install them. Software updates often include bug fixes and performance improvements that can enhance Face ID functionality.
- Face ID Not Working on App: If Face ID is not working for a specific app that supports this feature, ensure that you have granted the app permission to access Face ID. Go to the app’s settings and enable Face ID if available. If the issue persists, consider reinstalling the app or contacting the app’s developer for further assistance.
- Changes in Appearance: If you have made significant changes to your appearance, such as growing a beard, wearing glasses, or getting a new hairstyle, Face ID may have difficulty recognizing your face. In such cases, go to the Face ID & Passcode settings and select “Reset Face ID” to reconfigure it with your updated appearance.
- Environmental Factors: Poor lighting conditions, excessive shadows, or direct sunlight shining on your face may affect Face ID performance. When using Face ID, make sure you are in a well-lit environment that allows the TrueDepth camera to capture a clear image of your face.
If you’ve followed these troubleshooting steps and are still experiencing issues with Face ID, it’s recommended to contact Apple Support for further assistance. They can provide personalized guidance and help resolve any persistent problems you may be facing.
Now that you are equipped with troubleshooting knowledge for Face ID, you can ensure a smooth and seamless experience with this innovative authentication method.
Conclusion
Face ID has revolutionized the way we interact with our iPhones, providing a seamless and secure authentication experience through facial recognition technology. By understanding how Face ID works and following the steps to set it up, you can unlock your device and make purchases with just a glance, saving time and enhancing security.
Throughout this article, we have explored the intricacies of Face ID, from its advanced hardware and software algorithms to its customizable settings. We’ve learned how to turn on Face ID, use it to unlock our iPhones, and authorize secure transactions through Apple Pay. Additionally, we’ve discussed troubleshooting steps to address common issues that may arise with Face ID.
Face ID offers a level of convenience and security that was once unimaginable. It adapts to changes in appearance and ensures that only you can unlock your device and authorize important actions. With its integration into various apps and services, Face ID is becoming increasingly prevalent and is poised to shape the future of biometric authentication.
As technology continues to evolve, Apple continues to refine and enhance Face ID, providing updates and improvements to make the experience even more seamless and secure. By staying informed and utilizing the full potential of Face ID, you can unlock the true power of your iPhone.
So go ahead, enable Face ID on your device, and experience the convenience and security it brings. Unlock your iPhone with a simple glance, make purchases effortlessly, and enjoy the peace of mind that comes with knowing your personal data is protected. Embrace the power of your face and let Face ID transform the way you interact with your iPhone.