Introduction
Face ID is a convenient feature on iOS devices that allows users to unlock their phones and authenticate certain actions using facial recognition. One of the features tied to Face ID is the ability to secure recently deleted photos in the “Photos” app. By default, Face ID will require authentication before permanently deleting photos from the “Recently Deleted” album.
While this extra layer of security is beneficial for many users, there may be instances where you want to turn off Face ID for recently deleted photos. Perhaps you find it inconvenient to authenticate every time you want to permanently remove a photo, or maybe you simply prefer a more streamlined workflow. Whatever your reasons may be, disabling Face ID for recently deleted photos is a quick and easy process.
In this article, we will guide you through the step-by-step process of turning off Face ID for recently deleted photos on your iPhone or iPad. By following these instructions, you can customize the behavior of Face ID and tailor it to your specific needs.
Please note that the instructions provided here may vary slightly depending on the iOS version running on your device. However, the general concept and steps should remain the same across different versions.
Why Turn Off Face ID for Recently Deleted Photos?
While Face ID provides an added layer of security for your iPhone or iPad, there may be situations where you prefer to disable it for recently deleted photos. Here are a few reasons why you might choose to turn off Face ID for this specific feature:
1. Convenience: Disabling Face ID for recently deleted photos allows for a smoother and more streamlined experience when managing your photo library. You won’t have to authenticate each time you want to permanently delete a photo, saving you time and effort in the process.
2. Personal Preference: Some users may simply prefer the freedom to delete photos from the “Recently Deleted” album without the need for additional authentication. If you trust the security of your device and want to bypass the Face ID verification step for this particular feature, turning it off gives you that flexibility.
3. Faster Workflow: If you frequently delete photos from your iPhone or iPad, disabling Face ID for recently deleted photos can speed up your workflow. Without the need for authentication, you can delete multiple photos quickly and efficiently, especially when organizing or cleaning up your photo library.
4. Enhanced Privacy: While Face ID provides a secure way to authenticate actions on your device, some users may have concerns about biometric data privacy. By turning off Face ID for recently deleted photos, you can have peace of mind knowing that your facial recognition data is not being used for every action performed in the “Photos” app.
5. Specific Use Cases: There might be specific situations where turning off Face ID for recently deleted photos is beneficial. For example, if you’re sharing your device with others and want to prevent accidental deletion of important photos, disabling Face ID can help ensure that photos are not deleted unintentionally.
It’s important to note that disabling Face ID for recently deleted photos does not compromise the overall security of your device. Face ID will still be active for unlocking your device and authenticating other actions; it’s only the authentication requirement for permanently deleting photos that is affected.
Now that you understand why you might want to turn off Face ID for recently deleted photos, let’s dive into the step-by-step process to accomplish this on your iOS device.
Step-by-Step Guide to Turning Off Face ID for Recently Deleted Photos
Disabling Face ID for recently deleted photos on your iPhone or iPad is a straightforward process. Follow the steps outlined below to customize this feature to your liking:
1. Open the Settings app: Locate and tap on the “Settings” app icon on your device’s home screen. It is represented by a gear-shaped icon.
2. Scroll down and select “Face ID & Passcode”: In the Settings menu, scroll down and tap on the “Face ID & Passcode” option. You may be prompted to enter your passcode to proceed.
3. Authenticate with Face ID: If prompted, authenticate yourself using Face ID or enter your passcode to access the Face ID settings.
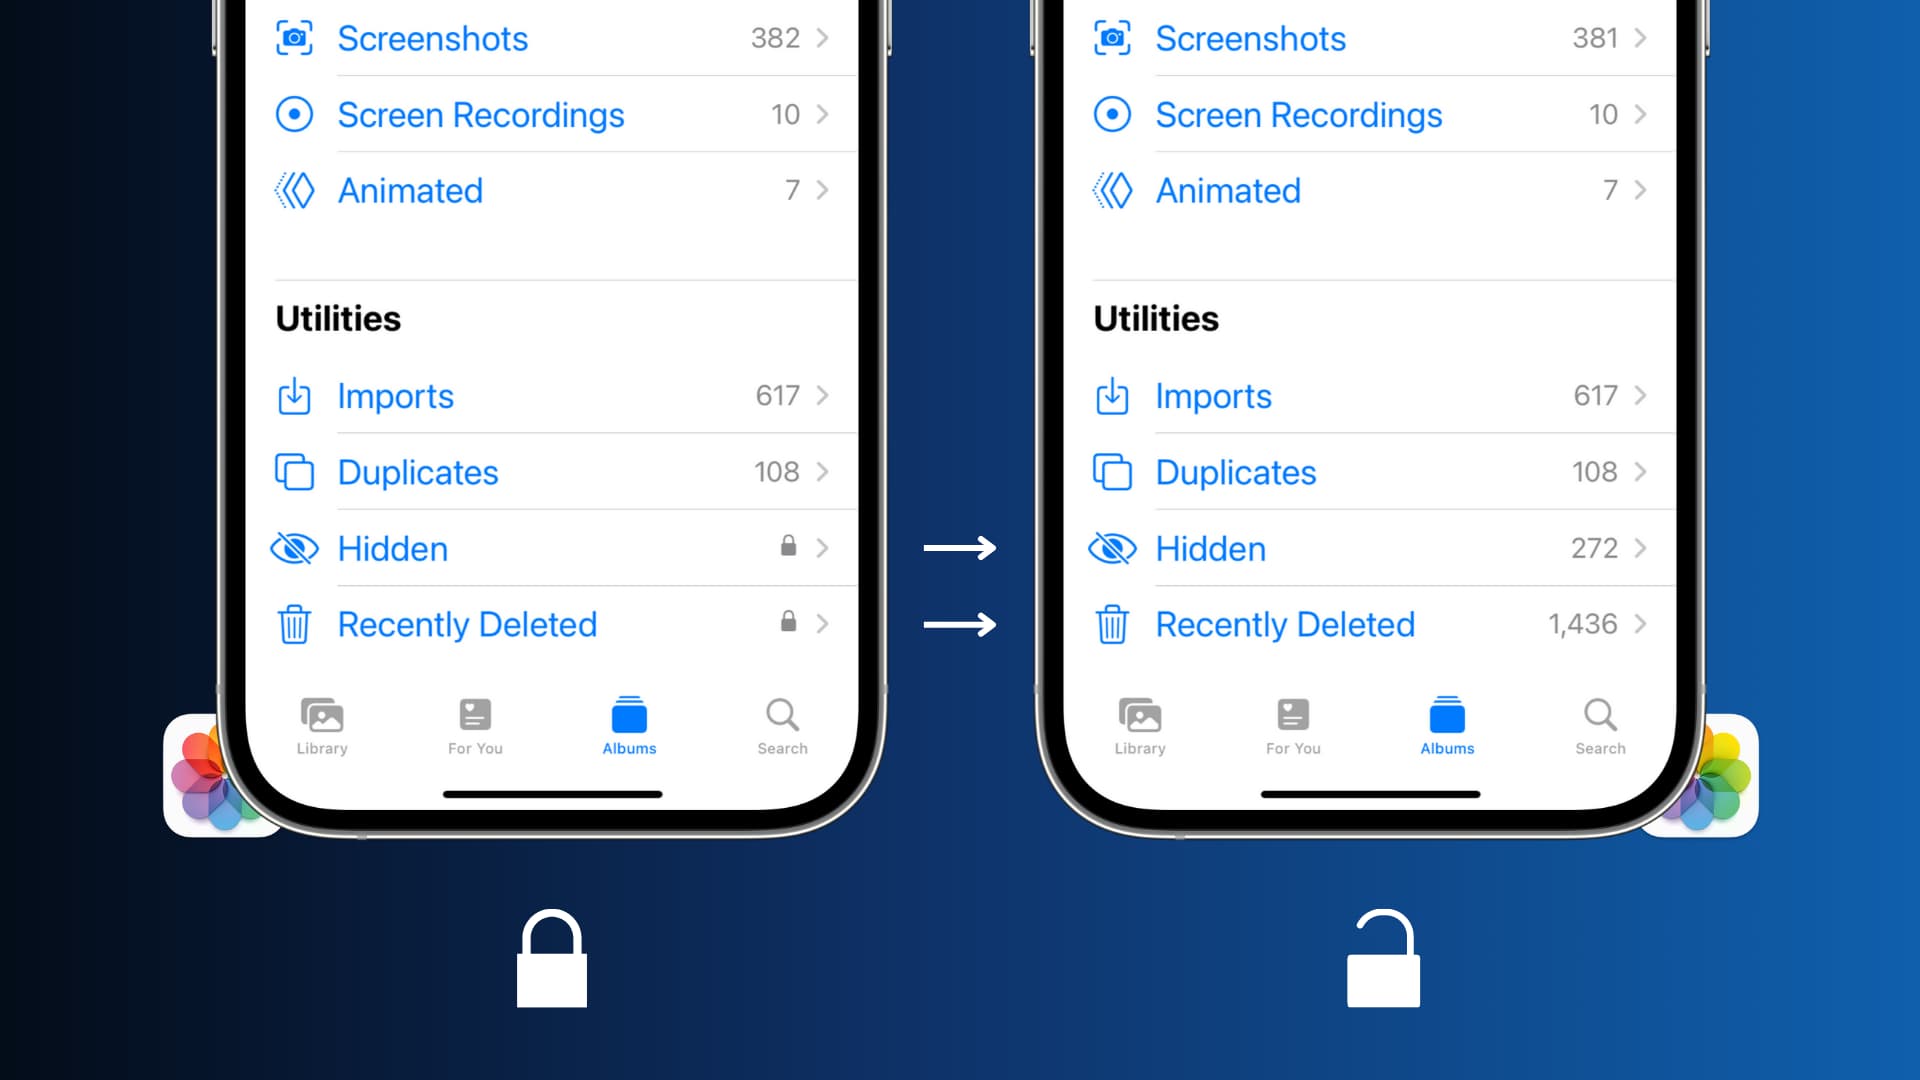
4. Find the “Recently Deleted” section: Scroll down the Face ID & Passcode settings page until you find the “ALLOW ACCESS WHEN LOCKED” section. Within this section, locate the “Recently Deleted” option.
5. Toggle off the “Recently Deleted” switch: By default, the switch next to the “Recently Deleted” option will be turned on. To disable Face ID for recently deleted photos, simply tap on the switch to toggle it off. The switch will turn gray when it is disabled.
6. Exit the Settings app: Once you have successfully disabled Face ID for recently deleted photos, you can exit the Settings app by pressing the Home button or using the gesture suitable for your device.
That’s it! You have now turned off Face ID for recently deleted photos on your iPhone or iPad. From this point forward, you will no longer be prompted for Face ID authentication when permanently deleting photos from the “Recently Deleted” album in the “Photos” app.
Remember that if you want to re-enable Face ID for recently deleted photos in the future, you can follow the same steps outlined above and toggle the “Recently Deleted” switch back on.
Disabling Face ID for recently deleted photos gives you greater control over your device’s photo management process, providing a more personalized and efficient experience. Enjoy the convenience of managing your photo library without the added authentication step whenever you want to permanently delete photos.
In the next section, we will summarize the key points discussed and conclude our guide to turning off Face ID for recently deleted photos on iOS devices.
Conclusion
Disabling Face ID for recently deleted photos on your iPhone or iPad can offer convenience and customization to your device’s photo management process. By following the simple steps outlined in this guide, you can easily turn off Face ID authentication when permanently deleting photos from the “Recently Deleted” album in the “Photos” app.
We discussed some of the reasons why you might choose to disable Face ID for recently deleted photos, including convenience, personal preference, faster workflow, enhanced privacy, and specific use cases. Keep in mind that disabling Face ID for this specific feature does not compromise the overall security of your device.
In the step-by-step guide, we walked you through the process of turning off Face ID for recently deleted photos. By accessing the Face ID & Passcode settings in the Settings app and toggling off the “Recently Deleted” switch, you can customize the behavior of Face ID according to your preferences.
Whether you find it more convenient to delete photos without additional authentication, prefer a faster workflow, or have specific use cases where disabling Face ID is beneficial, this guide has provided you with the instructions to make the necessary changes on your iOS device.
Remember, if you ever want to re-enable Face ID for recently deleted photos, you can simply follow the same steps outlined in this guide and toggle the “Recently Deleted” switch back on.
Take control of your photo management process and enjoy the convenience of deleting photos from the “Recently Deleted” album without Face ID authentication. Customize your device’s functionality to suit your needs and preferences, making your iPhone or iPad even more personalized and efficient.
We hope this guide has been helpful in assisting you with turning off Face ID for recently deleted photos. Feel free to explore other settings and features on your iOS device to further enhance your user experience. Should you have any questions or encounter any difficulties, consult the official Apple support documentation or seek assistance from Apple Customer Support.